A new trend in construction is the use of cellular concrete blocks for the construction of low-rise buildings. These include aerated concrete and foam concrete. Particularly lively discussions are taking place around aerated concrete, its characteristics, advantages and disadvantages.
Despite conflicting opinions (any building material has pros and cons), aerated concrete has proven itself well in private construction.
Cottages and houses built from aerated concrete blocks have been standing for several decades and will confidently stand for at least a hundred more. Despite the fact that building a house from aerated concrete is cheaper than from brick. Inexpensive does not mean bad, by the way, sometimes quite the opposite. Of course, such a service life indicator is only possible if standards and regulations are observed. And the recommended technology for building an aerated concrete house has been taken as an axiom.
But, if professionals are guided by many years of experience, then beginners who want to do the work themselves need step-by-step instructions from A to Z, from the foundation to the roof.
Regulations for the construction of a house made of aerated concrete - GOST, SNiP
Regulations for the construction of a house made of aerated concrete - GOST, SNiP All processes of construction of a private house are regulated by such standards as:
GOST 31359-2007 “Autoclaved cellular concrete”;
GOST 10884-94 “Thermomechanically strengthened reinforcing steel for reinforced concrete structures”;
GOST 9561-91 “Reinforced concrete hollow-core floor slabs for buildings and structures”;
SP 22.13330.2011 “Foundations of buildings and structures”;
These standards contain recommendations for the design of any of the structural or engineering components of the house.
Construction of a house from aerated concrete blocks
To achieve a good result, even without construction experience, you need to do the work in stages; below are step-by-step instructions, which were compiled based on practical experience and feedback from owners.
Construction time for a house made of aerated concrete
The construction period consists of the duration of its individual stages:
- foundation installation - can take from 2 weeks to a year (when pouring a strip foundation, it is recommended to wait a year for the concrete to gain strength);
- box – construction of load-bearing walls and partitions – 2-5 weeks;
- roofing work – rafter system + laying of roofing material – 2-6 weeks;
- formation of a warm contour - 3-4 weeks will be spent on installing all windows, doors, flooring and insulation;
- exterior finishing – 3-6 weeks;
- wiring of communications – at least a month, including approval at all levels;
- interior decoration - ad infinitum.
On average, according to user reviews, the construction of a house made of aerated concrete takes 5-6 months. Craftsmen will complete this work faster, from 2 months, depending on the complexity of the project.
The duration of the work is significantly influenced by the complexity of the house design, the degree of mechanization of the work, the experience and number of performers involved in the construction.
Aerated concrete dacha: history of construction
When it comes to what material to build a summer house from, the first thing that comes to mind is to use wood, for example, timber, or build a house using frame technology. Both options are time-tested and available to self-builders. Our portal has already talked about how to reconstruct an old dacha using the “frame builders” technique, and what is better to build a house from: regular or profiled timber.
In this regard, the experience of FORUMHOUSE user with the nickname Assi73 is interesting, who decided to build a house intended for seasonal living (spring-autumn and occasionally winter) from aerated concrete.
Assi73FORUMHOUSE Member
Aerated concrete attracted me because it is easy to process, saw, groove, fireproof, and easy to work with. The house is growing literally before our eyes.
According to many users of the portal, it is easier to warm up a frame house to a comfortable temperature during seasonal living than a stone one, for example, when arriving on a Friday evening. But the user firmly decided to build from gas silicate, eventually equipping the dacha with a cast-iron fireplace stove with a brick heating panel to increase the heat capacity of the structure. As a result, the concept fully justified itself - now in a couple of hours it is possible to properly warm up the first floor.
According to Assi73, it took him a whole year to think about and design the house, during which he read our portal, calculated and made drawings.
Note: The heating panel is highlighted in brown, next to it is a cast-iron stove-fireplace.
Initial data for construction and main dimensions of the dacha:
- The area of the plot is 4 acres.
- The soil is 30 cm fertile, then there is loam and clay, the area is marshy.
- The dimensions of the house are 5x8 m.
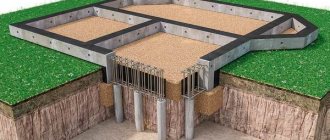
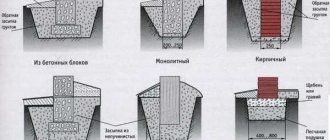
- The foundation is monolithic strip, with a cross-section of 1100x300 mm.
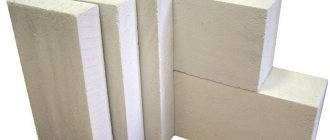
- Wall material - aerated concrete D500 600x250x300 mm.
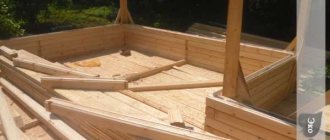
- Floors – timber 100x150 mm.
- The second floor is a frame insulated attic.
- The roof is gable.
- The roof is metal tile.
- Estimated estimate – 600 thousand rubles.
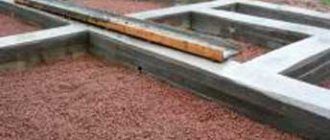
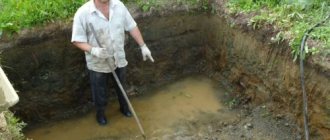
First, the user marked out a place for the foundation and dug a trench 0.8 m deep. A sand cushion and drainage of the site were not made in this option.
From our article you can find out whether a sand cushion is needed for the foundation.
Assi73
The workers I found through an advertisement were digging the trench. I can’t say that they did it very well; in one place the trench turned out to be crooked, in another the walls collapsed, but they managed. I also didn’t immediately tell them where to dump the soil. They ended up throwing it in the center of the foundation.
A trench for the foundation 5x8 + 3 holes for pillars for an extension - a summer veranda, 1 m deep, was dug by 4 people. At a price of 1000 rubles per 1 cubic meter. In total, we dug 10 cubes in about 8 hours.
Note: prices are for 2014.
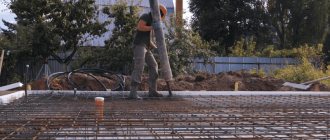
Having said goodbye to this team, the user hired another one to tie the reinforcement and make the formwork. We took the “ten” reinforcement, placing 3 rods on top and bottom of the tape. Of the 110 cm, 80 cm ended up in the ground, and 30 cm above the ground. Having finished this, we began pouring the foundation, for which we ordered two mixers. One is 5 cc and the other is 9 cc.
Assi73
Concrete was ordered M200. I calculated the volume, and it turned out that 12.5 cubic meters needed to be poured, but the builders said that concrete had to be ordered in excess. So I did. I ordered 14 cubes and was right.
On our portal there are articles that tell in detail how to calculate the formwork for the foundation so that it does not burst when pouring concrete, and how to make self-mixed concrete.
The first mixer was unloaded in 30 minutes. The second one in 1.5 hours, and Assi73 specifically took that day off work to personally supervise the pouring. The “extra” cube of concrete was used to pour the columnar foundation for the veranda. According to the user, the foundation turned out to be smooth and strong, and he paid the builders 18 thousand rubles for the work for 2.5 days of work.
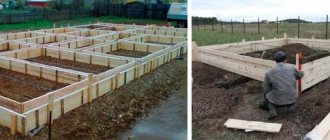
Having completed the “zero” cycle, we move on to laying the walls. Having refused the services of the 1st brigade (they asked for too much for the work), the user hired guests from the south at a price of 1,200 rubles. for laying 1 cube of aerated concrete. After shaking hands, we ordered the first 14.5 cubic meters of aerated concrete.
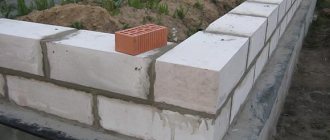
At this stage, the user made a mistake - he did not control the start of work. As a result, upon arriving at the site, he saw that the guys had already laid 4 cubes of blocks, and the first row was placed on the foundation, directly on the glue, citing the fact that it was level.
According to the rules: the first row of aerated concrete is laid on a cement-sand mortar. Only after laying the base and bringing everything to “0”, further work is carried out using glue to ensure fine joints of the masonry.
Because the builders neglected this rule, then in one place of the masonry there was a wave, and in some places there were steps.
Having made a suggestion, Assi73 forced the would-be builders to smooth out all the differences with graters and bring the masonry to one level. Also, every 4th row of masonry was reinforced with two reinforcement bars, 10 mm in diameter, placed in grooves.
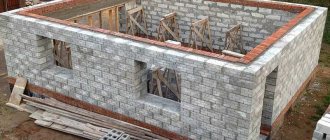
In just 1.5 days, 11 cubic meters of aerated concrete were laid.
Assi73
The photo above shows the state of the construction for 5 days, if you count from the moment the trench was dug. The laying speed is impressive. After thinking about it, I decided to refuse the services of defectors and continue to work on my own, especially since the process itself is simple. It’s also time to make armored belts and window lintels, but I don’t want to trust this brigade with important work.
What finally infuriated the user was that the construction foreman, when asked how they would make the armored belt, asked why it was needed at all, adding the catchphrase of all “specialists” - we always build like this, and nothing has fallen apart yet!
Allowing the guys to put the remaining 3.5 cubes on the walls, Assi73 settled with them and, rolling up his sleeves, together with his volunteer helpers - his father and uncle, began to work. Having purchased almost 2 more cubes of “warmer” blocks: D400 625x250x300, the team began work.
It took the whole day to lay the 1st row. It took the most time to make the window lintels. To do this, a U block was cut out of an aerated concrete block with an ordinary two-handed saw.
The 200th block was sawed in half and from two halves 100x250x625, placed on glue, the outer part of the row was laid out under the armored belt. The block was also sawn to 50x250x625 for the inner part of the row, and to 125x150x625 for the middle. Those. As a result, we get permanent formwork - an analogue of the factory U block.
The inner wall was made from a block 20 cm thick. The upper part was immediately cut out in the shape of the letter P, with walls 4 cm thick. The recess turned out to be 12x12 cm in size. Next, a reinforcement frame was laid - 4 “tens” bars.
Now it's time to fill the armored belt. This took about 0.7 cubic meters of concrete. The glued blocks did not break, and the aerated concrete formwork successfully withstood the pouring.
Let us add that before the armored belt was poured, the construction was frozen for 7 months. During this time, nothing cracked or popped out anywhere, and the unfinished house, covered with film, withstood the cold perfectly.
Assi73
Having laid out 3 more rows of blocks with my father and installed a timber floor, we moved on to the next stage - laying the Mauerlat, installing a rafter system and installing metal tiles.
Initial data:
- Rafters – 5000x150x50 mm.
- The distance between the rafters is 1000 mm.
- Mauerlat – timber 150x150 mm.
The Mauerlat was fastened like this: a hole with a diameter of 2.5 cm was drilled in the block to a depth of 15 cm. Concrete was poured, an M12 pin was inserted, then the beam was mounted and the nut was tightened. The ends of the beam were additionally tightened with staples.
We also left space for laying 2 more rows of 100 mm thick aerated concrete. A crew was hired to install the roof. At this stage, the general appearance of the house began to emerge.
Assi73
The roof pie is as follows: rafters - wind and moisture protective film - a block along the rafters to create a ventilated gap, counter-lattice, metal tiles.
The user also pre-painted the end rafters, assembled on the ground in the form of a triangle, which were placed on top in this form, so that later he would not have to climb at a height with a brush and a can of paint.
The roof installation process is clearly presented in the following photographs.
It took the team 2 days to install the rafters and lay the entire pie under the metal tiles. Then the guys laid down the roofing and at the same time made a penetration under a sandwich chimney 3 m long.
Having completed the roof installation stage, Assi73 and his father laid a row of aerated concrete in front of the Mauerlat beam. To do this, we used a block 20 cm wide, sawn into two parts.
The gables were covered with OSB for further painting and production of imitation half-timbering made from boards with a section of 2x10 cm.
Assi73
I simply climbed out of the window and installed the boards, without using ladders.
Next, the user installed windows and moved on to solving the issue of heating the house.
We already wrote above that for this we use a metal stove + a heating panel, which took 400 pieces. solid brick and 225 kg of clay mixture.
I also needed to buy 2 valves and 3 doors. The shield stands on the foundation of the house, inside the opening in the wall; the stove-fireplace weighing 150 kg was placed on the floor covered with plasterboard and tiles.
We are reaching the finish line. At this stage, we insulated the attic with mineral wool insulation, 15 cm thick, not forgetting about the vapor barrier.
We also covered the walls with plasterboard, painted it and installed a partition dividing the attic into two parts. Next we moved on to plastering work inside and out.
Assi73
My father and I plastered and painted the walls of the rooms ourselves. Looks great.
A crew was hired to do the exterior work. The workers plastered without beacons and without using a grid, although this was not according to the rules. The user paid 35 thousand rubles for facade work.
After this, they built an extension - a veranda made of 10x10 cm timber, and also painted the upper part of the plastered walls with 2 layers of paint.
What happened in the end can be clearly seen in the following photos.
And although there is still a lot of work ahead, we can say with confidence that the aerated concrete dacha was a success!
In the topic on FORUMHOUSE you can find out all the details of building an aerated concrete dacha and get acquainted with the advantages of permanent polystyrene foam formwork. We also recommend reading the article that tells you how to lay aerated concrete on polyurethane foam. The video shows the nuances of self-building a house from aerated concrete.