Preparatory work
If your base is uneven, this will significantly complicate the process of facing the steps. You can try to smooth out the unevenness with a thick layer of adhesive, but this approach may cause cracks in the tiles.
If you glue porcelain tiles onto an uneven layer of adhesive, it will take longer to harden and shrink unevenly. As a result, one edge may harden before the other, and when the second hardens, the tile will constantly lie in a tense state. A small blow - and that's it, a crack or split is guaranteed.
But besides, it is not enough for a staircase to have a regular, level base. It must be poured at an angle to ensure rainwater drainage. And if you can still make such a slope on the steps using glue, then on the porch landing it will be almost impossible to make it level without beacons.
Making a screed to create a slope
Our porch did not have a slope, so we first had to make it ourselves. To do this, we fixed 2 beacons made of tile adhesive with the addition of sand on the site. Ceresit CT 29 repair mixture is also suitable for this. We did not use a standard beacon profile, because after the screed hardens, they will protrude above the surface, and then it will be difficult to build an even plane.
The beacons are installed with a height difference of 1 cm to create a slope
Gradually level the entire surface along the beacons
Ceresit glue M 11 and cement-sand mortar M150
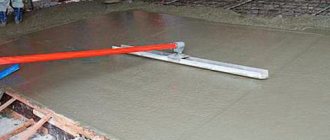
Screed after leveling with the rule
We check for irregularities the next morning
Preparing the steps
Before facing the steps, you need to prepare their ends. Here you also need to create a solid foundation.
To do this, you can use a simple device made from several welded profile pipes, popularly called a “stencil”. You apply this corner to the edge of the platform and run it along the end, removing excess glue applied. After this, the edge of the top tile should protrude 10-12 mm above the end. If you cover the ends with mosaic, it will be enough to leave a recess of 5 mm at the end (depending on its thickness).
Removing excess glue from the end of the stairs
The porcelain tile lies completely on the glue, with the exception of 1 cm of overhang for laying the riser
Glue Ceresit SM 117
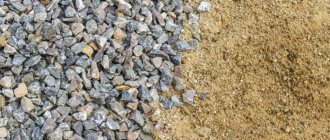
We made the solution according to this recipe: 1 part cement, 2.5-3 parts river sand and 1 part any tile adhesive . Glue is added to make the solution plastic, so that it is convenient to spread on the end and does not slip.
If the ends of the steps fall under the tiles by more than 3 cm, additional mortar for building must be secured with reinforcement. To do this, use a hammer drill to make 10 mm holes in the end and hammer in the appropriate reinforcement.
We hammer 10 mm reinforcement into the holes in the end of the porch
Stages after filling
Finishing the concrete porch
One of the most advanced cases of finishing porches recently is press concrete. It is also called decorative or top concrete. This pleasure is quite expensive, but only if you order it from a specialized company. With the help of our recommendations, you will be able to perform simple types of it yourself.
With this option for finishing the porch, we simply do not add concrete to the top level of 2–3 cm, but prepare a slightly reinforced composition and lay it directly on fresh concrete. Thus, only the surfaces that we will form will have a different concrete composition. The composition of our press concrete is as follows:
- 1 part cement M500;
- 1 part white river sand;
- 3% (by weight of cement) plasticizer C-3 or similar in properties, which, however, can be replaced with a similar amount (by weight) of liquid soap;
- polypropylene or basalt fiber, at the rate of 600 g per 1 cubic meter. concrete.
I think you noticed that there is no crushed stone in this composition. And it is right.
Carefully work the upper part of the concrete with spatulas and trowels, lightly reinforce it with cement and wait until it begins to set (your finger leaves an even, clear dent). Mold with simple-textured polyurethane or silicone stamps - there are a lot of offers and prices on the Internet. You can also make them yourself.
Before starting molding, sprinkle the surface of the concrete with a separating layer, which can be the same talc or iron oxide if you want to slightly tint your porch, but honestly, it’s better to do this later, tinting it entirely.
A little more difficult with risers and side wings of the porch, if any. In this case, it is better to provide for the possibility of applying an additional layer of such plaster and mold it under the same conditions with the same stamps, treating their surface with liquid soap for better separation.
You can paint all this with simple compositions, which are not difficult to make yourself by adding dyes to a deep penetration primer, or you can buy expensive, fashionable ones and get almost the same effect.
Tip: make a piece of surface somewhere off to the side with press concrete before pouring the porch. You will experience everything, and you will experiment with colors and mixing them. Get a unique pattern with a marble effect.
Read about other ways to decorate a porch in the article on our website.
We recommend other articles on the topic
Selecting the composition of the solution for paving slabs
Methods of painting paving slabs, choice of dye
Attaching a canopy to a house with your own hands - stages of construction
Natural stone for paths - overview of types, installation process
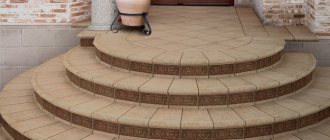
Laying tiles
The cladding of stairs begins with whole tiles from the end of the landing. It is advisable not to allow narrow cuts less than half the width of the tile. If you cannot do without them, move the layout to remove them. Small pieces will be noticeable and will come off easily.
The porch area is lined
- Using a regular spatula, apply the adhesive to the back of the tile. Use a comb with large teeth (12 mm) to remove excess so that even grooves remain.
- Press the tile down, tapping it with a rubber hammer if necessary.
- Lay the second tile and check its evenness relative to the adjacent one using a small bubble level. We insert plastic crosses between the tiles to maintain an even gap.
- When we lay out a whole row, we check it with a long level for overall evenness.
- If necessary, we cut the tiles with a grinder; a manual tile cutter may not be able to cut them.
Why do tiles fall off on the porch and how to deal with it?
Many people are familiar with the situation when, after the first winter, a tiled porch begins to crumble before our eyes. This is an unpleasant story, and the easiest way out of it is to reposition the fallen tiles - many do this. But a year passes and after the next winter everything repeats again, and so on ad infinitum. As a rule, there is only one reason for such a series of events - the tiles for the porch, or rather its installation, did not pass the test of weather conditions.
Why do tiles fall off?
The answer to this question is simple to the point of banality - the technology for laying outdoor tiles was not followed. It may fail on several fronts at once, but as a rule, one mistake is enough for all the work to go down the drain. This is due to water and the constant change in its state of aggregation.
When moisture penetrates under the tile, it expands when freezing and first slightly undermines the tile from the base, then melts, and more water penetrates into the enlarged crack, which, upon the next freezing, further enlarges the crack. This is how the street tiles for the porch gradually fly off. To combat this natural phenomenon, there is only one way - you must fully adhere to the technology of laying tiles on the street and use special adhesives and grouts.
Proper laying of tiles outdoors
We will not delve into the intricacies of installation work and focus on how to lay tiles correctly, but will consider only the necessary steps that will prevent the tiles from falling off at the end of winter.
Proper laying of tiles on the street must be carried out in compliance with the following rules:
- Firstly, it is necessary to perform reinforcement. A plaster mesh pre-stuffed onto the porch will connect all the laid tiles into a single solid array and prevent individual tiles from falling off. It turns out that a poorly laid tile will be held by the neighboring ones, and they, in turn, will be held by the rest of the tiles of the resulting array.
- Secondly, tiling the porch should be done using special building mixtures. Ordinary tile adhesive such as CeresitCM11 will not work here; the use of such compounds is a direct path to relaying the entire tile. There are specially developed mixtures for street work. If we are talking about Ceresit brand glue, then this is glue labeled CM17 or CM117. This glue costs three to four times more than ordinary glue, but it is distinguished by increased strength and ability to withstand moisture. But you don’t have to limit yourself to this - the best results in this regard were shown not by tile adhesive, but by a special waterproofing mixture made on a cement base. It not only adheres the tiles efficiently, but also repels water, preventing the latter from penetrating into the adhesive structure. If we are talking about Ceresit again, then these mixtures are labeled CR65 or CR66 - the cost of the first is approximately the same as that of CM17, and the cost of the second is three times more. But this price is worth the end result - you will forget the expression “the tile has fallen off” forever.
- Thirdly, it is necessary to lay the tiles with high quality. Qualitatively, not in the sense of smooth, but without voids. Although the tile laying technology approvals state that two-thirds of the space behind the tiles is filled with glue is normal, this approach is not suitable for the street. In principle, there should be no voids here - the tiles must be laid so that excess glue comes out evenly from all seams. You can't do this without a rubber hammer.
- Fourthly, proper grouting. In principle, if the tiles were laid on the porch as described in the paragraph above, then there is simply no need for grouting the joints. The waterproofing compound or special glue that has come out will perfectly protect the tiles from moisture penetration - all you have to do is remove the excess and return the seam to normal condition. I want to warn you right away - adhesives such as CM17, CM117 or waterproofing in a dried state practically do not come off the front surface. Therefore, you need to clean the tiles immediately and thoroughly. Do not try to use any other grouting compounds - even acrylic-based grout or sealant will not save you in this situation.
Only by observing these four simple principles can tiling the porch be done for many years. Ignoring at least one of them will lead to the inevitable process of tiles falling off.
And finally, some advice for those who have already directly encountered the process of re-laying a porch and do not want to redo it completely.
In this situation, it will not be possible to carry out full reinforcement, and laying the mesh in small parts does not make any sense. The only thing that will help in this situation is the use of the necessary glue for laying the fallen tiles and regrouting the seams using cement waterproofing - the seams will have to be completely cleaned of the old glue. Well, the best option to correct the current situation would be to completely relay the tiles in compliance with all the technology from “A” to “Z”. READ ALSO: Laying tiles on the floor with your own hands video
Second option:
We are attaching a porch to the house separately. We dig a hole in the place where the porch will stand:
It is best to dig a hole to the depth of the foundation of the house. In this case, they dug a hole 800 mm deep, since groundwater is far away.
During the construction of the basement, in the place where the porch will be, five reinforcement pins were released.
We knit a mesh from reinforcement. In this case, ribbed reinforcement with a diameter of 12 mm was used:
Fill the mesh with concrete. The composition of the concrete is one bucket of grade 400 cement, two buckets of sand and 4 – 5 buckets of crushed stone.
We lay backfill bricks on top of the concrete using mortar:
The second very important point is the waterproofing of the porch; unfortunately, it is done very rarely. Waterproofing is necessary to cut off moisture. Waterproofing is done very simply.
We level the backing masonry with a solution:
We do horizontal and vertical waterproofing. Roll out regular aquaizol (thin, without mesh inside) into one layer. You can replace it with two layers of roofing material:
Vertical waterproofing in this case is necessary, since the base to which the porch adjoins does not have waterproofing. Therefore, we cut off the porch from the base with aquaizol (or roofing felt).
We assemble the first step from face brick. In this case, a bassoon was used (not the best option). You can also use higher quality facing bricks. Or completely assemble the steps from backfill bricks and cover them with tiles.
Then we lay the backing brick inside the steps. Next, we assemble the next step from face brick and again lay the backing brick inside the step. Ceramic granite tiles will be laid on top of these steps.
The waterproofing must be laid slightly below the front covering (so that the aquaizol does not stick out).
In this case, the blind area near the porch will be covered with FEM. And the waterproofing will be slightly below the front surface of the FEM.
Some developers think that if they make a porch entirely of concrete and line it with tiles, then such a porch will not be afraid of moisture and destruction from frost, but this is not so. As you already understand, without waterproofing, a porch made of any materials will not last long (without visible damage).
Often a porch is built from used red backfill bricks. Some developers believe that any used red brick is a good brand. But it is not always the case.
When they dismantle a house for bricks, they break the outer walls, partitions, and basement and put the bricks in one pile (mix the bricks). According to the standards, red bricks of different grades are used for the plinth and internal partitions.
For example, for internal partitions you can use red brick of the lowest grade (to save money), but in no case should it be laid in the ground or in a more aggressive environment (it will fall apart). Therefore, red brick differs in its quality characteristics.
For the porch it is better to use red backfill brick grade 150.
There are a huge number of good building materials for building a porch. Therefore, choose local materials for exterior work so that waterproofing can be done conveniently.
The best option is:
– Step length – 300 mm.
– Step height (tread) – 150 mm (two rows of bricks).
General rules for waterproofing under tiles
Waterproofing a bathroom floor under tiles is a fairly simple procedure. However, for its high-quality implementation, certain rules must be observed:
- When performing waterproofing work, you should cover not only the floor, but also the walls to a height of about 20 cm with protective material. This will ensure the maximum level of waterproofing, creating a kind of trough in the room through which moisture cannot pass.
- In addition to the floor and wall, it is necessary to carry out high-quality waterproofing of other important areas. These include the shower stall in the bathroom, areas around the sink, and areas where pipes pass. This applies to laying tiles in the bathroom. If you need waterproofing of a balcony, on the street or in a bathhouse, then the areas that need the highest quality treatment are different. In this case, it is recommended to use special sealants and a hydraulic cord.
- It is recommended to waterproof under tiles using one material, but in some cases several types of sealant can be used.
After installing the waterproofing, it is necessary to make a concrete screed. And only after this can the floor be finished with waterproofing. If you choose adhesive waterproofing, a screed is required, but in other cases it is desirable.
When choosing what is best to use as waterproofing under tiles, you should consider all material options. This will help you make an informed decision depending on the type of room and surface features.
Example 1:
In the photo below, the flower bed near the porch was not built correctly, without waterproofing. The flowerbed does not have a canopy and precipitation falls into it.
From the flowerbed, moisture is absorbed into the brickwork (from which the flowerbed and porch are built). Part of the excess water from the flowerbed leaves through special tubes so that the roots of the plants do not rot.
In winter, this damp porch with a flowerbed succumbs to frost heaving and collapses. The porch with a flower bed (photo above) only stood for four years. The owner of this store with a porch completely tore off all the tiles and re-tiled it (with the same tiles and the same color), but did not eliminate the cause of the destruction!
It's only been one year and already a couple of tiles have fallen off the porch steps (photo above).
How to pour concrete for a porch with steps
You can make a concrete porch in different ways:
- pour a monolithic porch;
- pour the strip foundation and install ready-made slabs (blocks).
A monolithic porch turns out to be more durable and gives more freedom in choosing the configuration of the product, so we will consider this option.
The work on making a concrete porch can be divided into several main stages.
Excavation
After the dimensions and shape of the porch are determined, it is necessary to dig a foundation pit for its foundation.
Usually 20 cm are added to the length and width of the porch and this is how the length and width of the pit are determined; its depth is usually about 50 cm. To mark the corners of the future pit, pegs are placed and connected with a cord.
Next, the bottom of the pit is compacted, and sand and crushed stone (gravel) or ASG are laid on it in layers of 10 cm. This “pillow” also needs to be watered and compacted very carefully.
For waterproofing, a dense film in several layers or roofing material is spread on top.
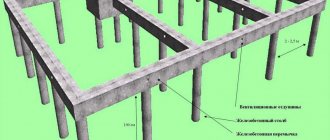
Formwork
To make a concrete porch, formwork of complex shape is required. If the porch is rectangular, the formwork can be made from boards or thick (from 10 mm) plywood. The round porch is poured into formwork made of metal or plastic.
Assembling the formwork begins from the top step. Each step is sequentially reinforced if reinforcement with steel reinforcement is provided.
Before starting concrete work, the inner surface of the formwork is lubricated with sand.
Mixing concrete mixture
Concrete mixture for a porch can be ordered ready-made, but preparing it yourself allows you to save money and control the composition of the concrete for your porch. For example, you can enrich the mixture with special Cemmix additives and get flawless concrete.
You can mix the concrete mixture in a concrete mixer or using a construction mixer or a shovel.
Concrete laying
The porch must be filled in one step. Adding plasticizers Cemmix CemPlast or Plastix allows you to extend the life of the solution by a couple of hours, which will not be superfluous.
If you do not use CemPlast or Plastix plasticizers, after laying the concrete you must compact it thoroughly; It is best to use vibration treatment. The lucky ones who added the CemPlast or Plastix plasticizer to the concrete mixture simply pour the concrete mixture into the formwork and level the surface.
What to do next
In the first few days, you need to water the porch with water 2-3 times a day and cover it with film. It is advisable that the air temperature be in the range from 18°C to 22°C for at least a week after laying the concrete.
After a week, you can remove the formwork, but you can load the structure no earlier than after a month.
How to make a beautiful porch
A neatly executed concrete porch looks stylish and laconic. You can add gloss and additional water-repellent properties to it using Cemmix impregnations, which can have, for example, the effect of wet stone or enhance color.
Another popular finishing method is tiling with porcelain stoneware, natural or artificial stone. At this stage, you can show your imagination, use different colors, textures, and patterns to make your porch unique.
Important nuances when choosing tiles:
- rough surface;
- selection of frost-resistant tile options.
You can make a beautiful concrete porch with your own hands. Modern Cemmix additives: polypropylene and basalt fiber, plasticizers CemPlast and Plastix, water-repellent additive CemAqua allow you to save cement, simplify work and at the same time achieve a professional result. You can buy concrete fiber and other additives wholesale from the manufacturer and in Leroy Merlin stores, as well as in other construction retail chains.
You can buy CemAqua, CemPlast, CemBase CEMMIX without leaving your home, with discounts from 5 to 33%!!!!
Buy on Ozon
Buy on VseInstrumenty.ru
Buy on Wildberries
Buy at Leroy Merlin
Or you can find the nearest official dealer in your region on our map
← How to pour a concrete pad for a car
Choosing the composition of a repair mixture for repairing cracks in concrete →
Return to list
Comments
Example 2:
The photo below shows the same thing, a porch with a flowerbed without waterproofing. It didn't last long either.
No amount of super glue or mesh will hold the tiles so that they do not come off the base!
How to make a flower bed correctly? Nothing complicated. It is necessary to remove the access of moisture to the “body” of the porch. In other words, it is necessary not only to cut off the porch and flower bed from the moisture of groundwater from below.
It is imperative to make the flowerbed bowl airtight. That is, so that moisture from the flowerbed cannot get (absorb) into the walls and bottom of the flowerbed.
Waterproofing in a flower bed can be done using paintable waterproofing (coat with primer) and glue aquaizol on top using a gas torch.
If you waterproof a flowerbed using only paint (primer) or solid waterproofing (special mixtures), then moisture will enter the walls and bottom of the flowerbed through the natural deformation of the flowerbed or micro cracks.
Ideally, waterproofing in a flower bed should be elastic and airtight.
Optimal waterproofing under tiles
When preparing the base for tiles for the bathroom, on the balcony, in the kitchen or other rooms with high humidity, you can use various waterproofing materials, but which one is better to choose:
- For a bathroom or kitchen where the humidity level is not very high, you can use adhesive waterproofing.
- If the house is built of concrete blocks, it is better to use penetrating insulation in the premises. It not only guarantees a high level of protection against moisture, but also creates a stronger and more reliable foundation.
- For a “warm floor” system, a bitumen-polymer or coating cement-polymer waterproofing should be used.
Regardless of the subfloor - wood, concrete or cement, a layer of waterproofing material should be laid before laying the tiles. This will provide reliable protection against moisture penetration.
Example 3:
For the normal existence of plants in a flowerbed, it is also necessary to drain excess water from the flowerbed, like a hole in the bottom of a pot, so that the roots of the plants do not rot and so that it does not break in the winter. See photo below: