Combined designs
This option is even more popular than products made from only one building material. The most common:
- capital base (blocks, brick, monolith) with a light metal top;
- solid foundation with wooden frame;
- cantilever canopy over a permanent base.
The models presented above in the photo can rather be called canopies, although when organizing fences (except for the last photo) and constructing the foundation of the site separately from the foundation of the house, such structures can also be considered verandas.
Important: verandas with a solid foundation and a light frame can be glazed with no less success than completely brick or block structures.
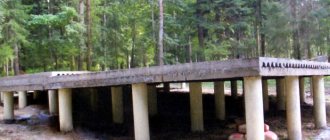
Pile foundation construction technology
The first step is to choose a veranda project and draw its plan, deciding on the exact dimensions. After drawing up the drawing, you can already calculate the amount and weight of materials needed to mount the piles. You should also take into account the quality of the soil and the depth of water, the level of soil freezing. After this, you need to select the correct parameters and number of pile pipes, taking into account that their distance from each other can be 1.5–3 m.
The easiest way is to build an open veranda from wooden beams with your own hands. Snow loads by region can be found in the Building Code under Loads and Impacts. For example, in St. Petersburg, for every 1 m² of roof there is up to 180 kg of snow mass.
Required materials and tools
When constructing a summer veranda on a pile-screw foundation, you need to purchase the following materials:
- sand;
- crushed stone;
- cement;
- screw piles;
- wooden beams for joists and roof (100×50 mm);
- beams for grillage (metal, concrete or wood);
- boards;
- nails, screws;
- varnish or paint for wood;
- roofing material (selected in accordance with the roof of the main building).
For a light wooden veranda, it is better to use a profiled crown beam with a cross-section of at least 150×150 mm as a grillage. In addition to the above materials, it is necessary to treat the piles with anti-corrosion agents, for example, bitumen.
You should stock up on the following tools:
- shovel;
- collar for twisting;
- welding machine;
- deep compactor for concrete mixture;
- an angle grinder with cutting wheels (grinder);
- hammer;
- saw;
- screwdriver;
- tape measure;
- plumb line;
- level (regular and hydraulic);
- pegs and rope.
Gates for manual screwing are sold already with rods.
Preparatory work
First you need to clear the area where the extension is planned. Then you need to dismantle the porch and blind area. The soil under the screw foundation can simply be leveled with a shovel. After this, using pegs and rope, mark the perimeter of the veranda. Next, the installation sites for the piles are marked and small holes are dug in them for ease of screwing.
How to screw in screw piles
The procedure for installing screw piles is as follows:
- The rod tube is inserted into the hole with a blade and screwed in with a collar. It is best when this procedure is performed by two people. At the beginning of screwing in, it is necessary to constantly check the vertical position of the piles with a plumb line and correct it if necessary. If there is a slight deviation, the piles are cut, making the ends level. Usually 20–30 cm of pipe is left on the surface (depending on the height of the base).
- When all the piles are installed at the required depth, marks for the grillage are made using a hydraulic level at the above-ground ends.
- The rods are cut with an angle grinder at the marked level.
- Concrete is poured into the pile cavities and immediately compacted with a compactor.
- A steel rod is inserted into the middle of the cement mixture (this is necessary for a veranda with a wooden grillage). Then the lower crown beam is attached to it.
- The pipe is covered with a head and welded.
- Waterproofing is attached to the top.
When determining the parameters of the veranda adjacent to the wall of the house, a line is drawn. When applying it, take into account the thickness of the lumber that is laid on top.
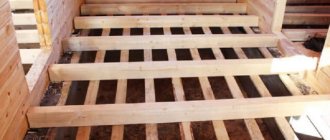
Installation of grillage and floor
Along the boundaries of the extension, a crown beam is laid on the piles. If the veranda is of significant size, then the beams are hammered inside the perimeter and then tied. There, using a corner and screws, the logs are attached at intervals of 50–60 cm around the perimeter of the structure. At the bottom you can make a base from siding or slabs. Then vertical posts are installed in the corners, to which the canopy or roof will be attached. A flooring is made from boards across the joists. It is recommended to fill the voids between them with gravel.
Lastly, install the veranda fencing
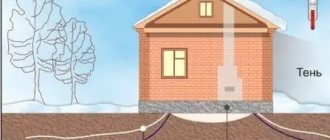
Its foundation may settle slightly, so the structure must be independent. A gap of 2-3 cm is made between the veranda and the wall, which is filled with insulation (for example, mineral wool). A foundation made of screw piles for the veranda of a private house can be installed independently, without carrying out excavation work and waiting for the concrete to harden. This significantly reduces the time and finances for constructing an extension.
Extension on screw piles to a house on a strip
Question:
Hello! We are remodeling an extension to an old house made of timber. The house was built a long time ago on a strip foundation. The old extension “moved away” from the house, because... the concrete pillars on which it was made were askew (heaving soil). We are making a new frame extension on screw piles.
Is it permissible to rest the frame beam of the extension, which will be on piles, also on the old strip foundation? Is it possible that in winter the strip foundation will rise and the new extension will be damaged? Maybe it’s better to lay the strapping beam end-to-end against the timber of the house? Please also explain the technology of expansion joints in walls. Thank you very much for your answer!
Zinaida Petrovna, Leningrad region.
Answer:
Hello, Zinaida Petrovna from the Leningrad region!
As a rule, the strip foundations of old houses are already established and are rarely subject to seasonal movements (mainly in the vertical direction). Although there are examples of the construction of shallow-depth strip foundations on heaving soils, which have continued to oscillate up and down to about 5 centimeters for a decade and a half.
Therefore, in my opinion, with your heaving soils, it is more advisable to do not a single connection of a new extension on screw piles with the old foundation, but an autonomous one. Because with the correct technology for installing a pile-screw foundation, its “oscillations” will be unlikely. That is, as a result, there may be displacements of the old house in relation to the new extension and precisely because of the movements of the old strip foundation. I say this with a degree of probability, since it is difficult to create a mathematical model of the behavior of foundations depending on the characteristics of the soil; not every construction research institute can calculate this.
I have seen more than once or twice when their calculations turned out to be “false letters” in practice after several years of operation of buildings. However, all this is from the theoretical field.
If you make the extension beam end-to-end to the house beam, then this will most likely be preferable.
Accordingly, the so-called expansion joint between the old house and the new building at the junction of the walls may be subject to deformation over time. Therefore, it is not worth fastening it tightly. To prevent a cold bridge, the seam is filled with insulation, preferably the mineral wool type. It should be decoratively covered on both sides. Which is most often done using vertically installed boards that are attached to only one side (either to the old house or to the new extension). The external cover is supplemented with waterproofing made of some material to prevent the ingress of atmospheric moisture. What is done locally and individually each time.
A more complex issue is the junction of the roof of the old house and the roof of the extension. I have described this issue many times in the materials on my website; if you wish, you can find this detailed description. And so, in general, with a common roof for both the house and the outbuilding, this is somewhat more difficult to do. With separate roofs, when the roof of the extension is slightly lower than the roof of the old house, it is easier to do this by using an apron that is attached rigidly to the wall of the old house, but may not be attached to the roof of the extension; it is placed on top of the upper surface of the roofing material of the extension, and then only foamed with macroflex foam to fill the voids between the roof and the apron. So that neither water nor snow gets here.
All. Although there is still a lot that could be added to the topic raised.
Good luck!
Construction in Moscow and Moscow region
We work with a guarantee! Wide range of construction services.
Foundation, walls, ceilings, roofing, turnkey! +7 (916) 318-60-60
domstroykolomna.ru
Other questions on the topic of extensions to premises:
- Extension to an adobe house for a bathroom and toilet
- Frame extension and attic for the bathhouse
- How to fill the space between the house and the extension
- Second floor extension on pillars
- Common diagonal for house and outbuilding
- Cantilever terrace
- Increase the ceilings in the extension to the house from sleepers
- Extension of attached garage
- Attach a garage with an attic to the house
- Extension of a garage made of blocks to a house made of timber
- Frame extension to a timber house
- House floor made of timber, second floor made of frame
- Extension from blocks to a panel house
- Porch with a canopy made of wood
- Extension of a veranda with a gable roof
- Shrinkage of the log veranda and vertical supports
- Extension to a one-story panel house
- Foam block extension to the log house
- Extension to an old brick house
- Connecting a house with a new extension (log-log)
- Timber extension to a block house
- Add a veranda to a house made of timber in a swamp
- The junction between the house and the extension
- Block or brick extension to a log house
- Extension of a terrace to an old house
- Attaching a timber veranda to a timber house
- Extension to the slag-fill house
- Attic on pillars or extension
- Extension to a brick house on stilts
- Block extension to a wooden house
- Attic extension to an adobe house
- Extension made of timber to a house made of logs
- Protecting a wooden terrace from sun and rain
- Construction of a foundation for a bathhouse from slabs fl 6-12
- Distance between canopy supports to shed
- Attach a second floor to a brick house
- Attic extension for permanent residence
- What to use to make an addition to an old log house
- Log house and frame under one ceiling
- Extension between log houses
- Extension to a house made of rounded logs
- Brick or timber for an extension
- Add a second floor to a cinder block house
- Frame extension to a concrete wall
- Extension of a veranda to a house made of timber
- Extension made of wood or brick
- Frame extension to a log house
- Extension to a log house on a strip foundation
- How to fill the gap between slag and timber walls
- Extension on screw piles to a house on a strip
- Extension to a wooden house
- How to attach an ice cellar to your house
- Three-walled house - how to add a second floor
- Construction of a veranda for the bathhouse
- Frame extension to a brick house
- Extension from a block to a house made of timber
- Extension project for a panel house
- Timber extension to a timber house
- Wooden extension to log steam room
- Second floor made of logs on gas silicate
- Add an attic from blocks to a brick house
- Attach an attic to an old log house
- Joining the foundations of a house and an extension
- Extension between two houses
- Build an extension to a house with an attic
- Expansion joint between the house and the extension
- Enlarging the house - an extension or a second floor?
- Insulation of an extension to an adobe house
- Extension made of foam blocks to a frame house on stilts
- Timber extension on a house made of foam blocks
- Extension from foam blocks to a timber house
- Extension to the house for rooms
- How to properly re-roof an extension
- Foundation for a frame extension
- Estimate for an extension made of blocks
- Which foundation to choose for an extension?
- How to attach a veranda and attic to a bathhouse
- Sealing the junction of the wall of the house and the extension
- Support pillars for the second floor
- Attach a second floor to a block house
- Material for the construction of an attachment
- Extension to a dump house
- Extension to a house on a screw pile foundation
- How to attach a bathhouse to a house on screw piles
- Brick extension to a log house
- Extension to a log house made of timber
- Calculation of the price of an extension to a house
- Calculation of the roof for an extension made of aerated concrete
- U-shaped extension made of blocks to an old log house
- Timber veranda for a round timber house
- Designing a foundation for a frame extension
- Step foundation for an extension
- External vernade cladding and polycarbonate instead of windows
- Size of beam for extension
- Common roof or separate for an extension to the house
- Attaching the canopy to the wall of the house
- Attach a second floor to a log house
- Connecting the roof of the timber building and the house
- Skid foundation for frame extension
- Extension to a sloping roof
- What to make an extension to a cinder concrete house from
- Attaching a porch to a log house
- Foam block extensions to a brick house
- How to make a roof and cornice for an extension
- Foundation for an extension to a cinder block house
- An extension to the main house - how to fill the holes?
- How to attach a timber bathhouse to a brick house
- Foundation for an extension
- Extension from dead wood to a house made of timber
- Insulation of a room attached to the house
- Common roof for a new log house and its extension
- When and how to pour the foundation for an extension
- Extension made of foam blocks to a house made of timber
- One roof per house and new extension
- Insulation of an extension to a slag-filled house
- Extension to a log house
- Extension and sewerage
- Renovation of an old log house, lining and extension
- Joining the roof of the house and the extension
- How to attach a room attached to a house
- How to add an attic floor
- Extension to an adobe house
- How to fill the gaps between the log house and the outbuilding
- How to build a roof on an extension and insulate it
- The extension to the house is lopsided
- How to add a room to a log house
- How to insulate a frame extension
- How to make a roof on an extension to a house
- How to choose a foundation for a brick extension
- How to attach a timber extension to a log house
- Extension to the store
- Extension to an adobe house
- Frame extension to a timber house
- Extension to a house made of timber
- How to attach a canopy to a wall
- How to add a room to your house
- Extension to the house on supports made of asbestos cement pipes
- Timber extension to a log house
- Attach a veranda to the house using old windows on an aluminum profile.
Extensions
All questions to Semenych about construction
Semenych (author of materials)
Our site is regularly updated with interesting and unique materials and articles on the topics of lumber, building materials and works, the author's opinion and knowledge of a real coven with more than 15 years of experience are provided. There is a section - funny stories of shabashniks. If you would like to receive information about this, subscribe to our website's newsletter. We guarantee that your address will not be shared with third parties.
Apartment renovation in Moscow and Moscow region
We work with a guarantee! Wide range of repair work.
Professional craftsmen. +7 (905) 797-20-34
luxurycomfort.ru
| Country house | Bath |
| For the dacha | Tool |
| Materials | Tales |
| Foundation | Log houses |
| Roofs | Insulation |
| Walls | Siding |
| Floors | Cellars |
| Attics | Doors windows |
| Stairs | Extensions |
| Wells | Toilets |
| Balconies | Loggias |
| Condensate | Flooding |
| Fences | Kennels |
| Sidewalk | Birdhouse |
| Adobe | Carts |
| Garages | Barn |
| Greenhouses | Bath |
| Swing | Brazier |
| Shower |
| Horizontal bar |
Foundation
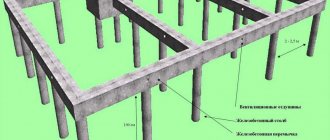
Due to the fact that the frame extension is not a bulky and heavy structure, there is no point in erecting a monolithic foundation. For the reliability of the building being erected, it is necessary that the foundation of the house and the extension be either one whole or independent of each other. The best option would be a strip or column foundation.
Tape
You can make a strip foundation with your own hands.
- Markings are applied on the ground around the perimeter of the proposed extension, which outlines the boundaries. Along the marking lines, a trench is dug under the foundation, with a depth similar to that at the base of the house itself, and a width of approximately 15 cm wider than the future walls of the extension.
- Next, you need to protect the foundation from groundwater: to do this, sand and crushed stone are poured into trenches 15-25 cm deep, followed by a small amount of water, then covered with roofing felt.
- The next stage is the arrangement of formwork, the height of which is equal to the height of its future foundation. Reinforcement is installed in the trench to provide reliability.
- And at the end everything is poured with concrete. You can make concrete yourself by mixing sand, crushed stone and cement. At high temperatures, the foundation must be moistened with water to avoid cracking.
Popular articles Gladioli in pots for the home
Columnar
An inexpensive and durable type of foundation that is suitable for lightweight structures: bathhouses, frame extensions and others.
After careful calculations, small holes (20 cm) are drilled in the ground - the basis for the lower parts of the pillars, which are reinforced with a fine mesh and filled with a mixture of sand and concrete. Pipes with a diameter of 10 cm are installed in the pits, reinforcing bars are inserted inside them, and then everything is filled with sand concrete.
After 3-5 days, when the concrete has completely hardened, new openings are drilled, into which the pillars obtained from the pipes are subsequently inserted.
You need to insert it very carefully so that the pole does not crumble.
The grillage for a columnar foundation is made of metal or concrete.
The main advantage of this type of foundation is its versatility: it is suitable for all types of structures with low weight, and lasts a long time, even if the house is located in a swamp.
When choosing the type of foundation, take into account winter heaving of the soil, topography and soil properties.
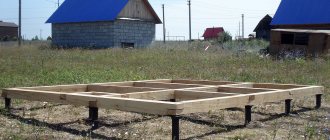
Pile-screw
The main advantage of using screw piles to build a foundation is the ability to carry out work at any time of the year. Moreover, the entire installation will be completed in 1-3 days. After its completion, you can immediately begin building the extension. A pile-screw foundation is the simplest and cheapest option for light buildings, which you can also do yourself. The only drawback is susceptibility to corrosion, but this can be completely avoided when treated with anti-corrosion agents.
If the extension is being built as a separate room, then the foundation must be constructed as a separate element and have an expansion joint.
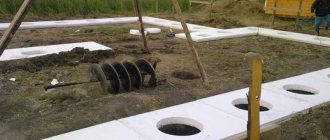
A pile-screw foundation consists of metal pipes, the cavities of which are designed to be filled with concrete.
To begin with, the required space is calculated and markings are made. Pegs are driven into the corners of the markings of the future foundation, then a construction cord is stretched around the perimeter.
Next, holes are dug by hand or with a drill in the places where the piles will be installed. After which the piles are screwed in, doing this yourself is quite problematic. When screwing is completed, the supports are cut at the same level, and the cavities of the piles are filled with concrete or soil.
Building an extension on a pile-screw foundation with your own hands
The junctions between the main building and the extension are equipped with a separating material.
When starting work on laying a pile foundation, it is necessary to check on what foundation the main structure stands, since different types of foundations sag differently during operation. If the main building is not built on a pile foundation, an expansion joint must be provided in the places where an extension on a pile-screw foundation adjoins it.
An expansion joint is a gap between the foundation of the main building and the grillage of the pile foundation. It is covered with strips from the inside and outside of the newly formed structure.
If the house and the extension are installed on pile foundations, the grillages of both foundations are connected to each other into a single whole. When constructing light frame extensions, the role of a grillage may well be played by a wooden profiled beam.
Preparatory work
If space permits, piles for an extension can be screwed in using construction equipment.
Before you begin independently constructing a pile-foundation foundation for an extension, you need to carry out a number of preparatory measures:
- thoroughly clean the work area;
- remove the blind area arranged along the wall to which the extension will adjoin;
- mark the construction site by driving pegs where the corners of the extension will be located;
- string a construction cord (string) along the perimeter of the future structure;
- calculate the required number of screw piles, taking into account that the maximum distance between two adjacent supports should not exceed three meters;
- in places where it is planned to install screw piles, drill or manually dig shallow pits.
Preliminary preparation of the site will allow you to imagine the actual dimensions of the extension and evaluate the correctness of the calculations.
Installation of screw piles
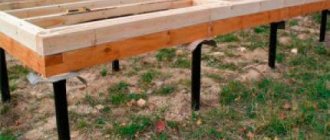
Aligning piles horizontally using a wooden beam
Installation of screw piles begins from the walls of the main building. In this case, the distance from the wall to the first row of supports should be 0.5 m. Initially, all piles are installed in prepared pits and covered with earth. Only after this they begin to screw them into the ground.
To facilitate the work, it is necessary to prepare a lever with which to screw the piles into the ground. As a rule, a long metal pipe is sufficient for this. Screwing in the support may require the participation of two, and sometimes 4 people. In this case, one of them must, using a building level, control the correct installation of the piles.
After all the supports are screwed into solid ground, they are cut at the same level. The height of their protruding parts must be at least 150 mm.
The correct installation of screw piles is determined by:
- the depth of immersion of the tip below the soil freezing level - this is especially important when constructing a pile foundation on unreliable soils;
- coincidence of the cut ends of the piles horizontally;
- vertical evenness of piles.
After making sure that the piles are installed correctly, their internal space is filled with concrete, and the ends are covered with steel caps, with the help of which the grillage is attached to the supports. Depending on the weight of the extension being built, the grillage (frame) can be made of profiled timber, metal profile or monolithic concrete.
Features of connecting the foundations of the house and the extension to each other
The grillages of the building and the extension are not rigidly connected, as uneven shrinkage is possible.
If the house, like the extension, stands on a pile foundation, their grillages are rigidly connected to each other, provided that the buildings stand on solid ground. Otherwise, the foundations may become skewed due to their uneven settlement.
If the types of foundations are different, they are connected through an expansion joint. To do this, the pile foundation of the extension is placed as close as possible to the foundation of the main building, and the distance between them is filled with hydro- and heat-insulating materials. The seam created in this way will allow the new base to “play” during settlement without damaging the foundation.
The decision to rigidly attach a new foundation to the old one is best made after consultation with experienced specialists. After all, if any distortion occurs in the screed, the entire work will be ruined.
Building a terrace for a house with your own hands: how to make a foundation
There are two main rules for building a terrace for a house with your own hands: the floor should not sag or spring underfoot, and the railings should be strong, stable and safe. Since such structures generally represent a continuation of the building, they are most often attached to it. Let's look at the construction of such a terrace using a specific example.
When building a deck foundation, keep in mind that it supports the entire deck structure and prevents it from moving or sinking into the ground. Typically these are concrete blocks measuring 30 x 30 cm, buried 15 cm in undisturbed compact soil.
How to make a foundation for a terrace yourself? Each concrete block should be placed on a sand bed, protruding 15 cm above the ground surface, so that the posts or beams of the terrace frame are not subject to rotting under the influence of the soil.
Instead of ready-made concrete blocks, you can use homemade ones cast in plank formwork. However, this solution is suitable only for regions of a warm climate zone, in conditions of non-freezing or slightly freezing soil. In the conditions of the middle zone, when erecting buildings on heaving soils, constructing a foundation for a terrace with your own hands can be different. The main thing is that this base ensures the stability and rigidity of the entire structure. The design of the foundation of the main building should also be taken into account so that the mutual displacement of the main building and the extension does not lead to noticeable deformation of the structures.
These photos show the foundations of the terrace for the house, made by yourself:
Before you implement the task called “building a terrace with your own hands,” familiarize yourself with the main stages of the work.
Application in suburban construction of a screw foundation
One of the most promising ways to build a foundation for an extension is a foundation based on screw piles. This method is now very popular in suburban construction. This is due to a number of factors that make it most attractive:
- can be installed in one day;
- costs significantly less than concrete work;
- not subject to seasonal soil heaving;
- You can start construction immediately after installing the piles.
Here it is worth understanding that it is important to individually select piles for each building. They differ in wall thickness, petal shape and diameter. Each type of pile has its own purpose and is adapted, for example, for a specific soil. Load-bearing capacity may also vary. Pile tips can be:
- cast;
- welded
Of course, there are now a great many manufacturers of such products. Their quality can vary significantly - some were manufactured at a factory using special equipment. Others are hand-welded in the garage. Here you should be careful and purchase only reliable and high-quality products. It is also important to pay attention to the thickness of the products used during construction.
Open area around the pool
A terrace in a private house is often located next to or around the pool. This is especially useful for pools made from large, prefabricated fiberglass tanks. In this case, the terrace performs two functions at once - it provides a comfortable place to relax near the water and hides unaesthetic details (the side of the container, pipes for supplying and draining water, aeration, cleaning devices, and so on).
The principles of arranging the structure are the same as in previous cases: screw piles as a foundation, a cellular frame as a support for the flooring. In this case, the frame is made of metal; wooden elements near water require too serious and expensive protection from moisture
The installation process is discussed in more detail in the video below, but there are some nuances that are worth paying attention to:
- such large containers must be concreted, and the first row of piles (located closest to the side of the pool) may not be screw, but ordinary - installed in concrete;
- the metal frame is necessarily protected from corrosion, galvanized screw piles and stainless steel fasteners are used;
- the frame is positioned so that the flooring hangs over the water and at the same time it is possible to line the vertical fragments of the platform;
- For flooring, a special material is used - the so-called deck board (decking). It can be natural wood with special processing (usually larch), a composite material or pure polymer. A special feature of the board is its increased resistance to moisture and textured surface;
- Built-in lighting fixtures can be mounted flush with the sheathing in the decking.
Popular articles Russian style in landscape design
It is also possible to install a deck below the edge of the pool, if this edge is properly designed.
For bowls of complex shape, the flooring is also usually made with a curved contour.
If the pool bowl is not completely buried in the ground, the terrace flooring is elevated, creating a kind of podium.
What type of foundation is better to choose?
The basic rule is that the foundation for the extension must have the same design as the main one. Tape to tape. Columnar to columnar. Pile to pile.
Of course, there are exceptions. But they must always be justified. The house is on a reinforced concrete slab, but you want to use screw piles? Call us and consult with our specialist.
screw foundation
The nuances of building a terrace
Any dacha construction project has its own construction features. The construction of a terrace is no exception, especially if we are not talking about a stationary structure, but about an extension to an existing house. To begin with, I propose to understand the intricacies of building a terrace adjacent to the house.
- An extension to a house must necessarily include laying a separate foundation. The foundation of the extension performs several functions; it evenly distributes the weight of the terrace; in addition, if the terrace is left without a foundation, then, sooner or later, the house and the terrace will begin to move relative to each other, which will lead to premature wear and destruction of the walls of the building.
- In order for the extension to be a full-fledged part of the house, the foundation of the terrace does not stand apart from the house, but has attachment points to the foundation of the main building. Below I will write in more detail how this happens.
- Depending on the type of terrace chosen, it is possible to reduce the negative processes of “grinding in” between two buildings. Thus, a terrace installed on the side of the house will be a less stable option than a terrace surrounding the facade.
Before starting construction of a terrace, it is necessary to conduct an analysis and answer several essential questions, including:
- decision on the materials from which the terrace will be made, as well as calculation of their quantity;
- planning the entrance to the terrace: a door will also be installed from the house or outside;
- appearance of the terrace.
By default, it is considered correct from a design point of view to build a terrace from the same materials that were used to build the house. However, present the project visually, and do not be afraid to experiment: a terrace for a brick house does not have to be built of brick, such a structure will lose its airiness and ease of perception.
This is interesting: How to clean and equip a well with your own hands: let’s look at all the nuances
Walling
Walls, unlike the floor, are an optional attribute of attached verandas. Instead, it is quite possible to build a regular fence in the form of a railing. The veranda may not have any fencing at all - some projects for adding a veranda to the house involve the use of plants and hedges as a fence. If you plan to make full-fledged railings, walls and roofing, the next stage after the formation of the floor will be the construction of the frame.
A lightweight wooden frame is made like this.
- Along the perimeter of the floor, beams are laid, connected to each other with a direct lock. Grooves should be made on them for attaching the racks in increments of about 50 cm.
- The racks are fixed in the grooves using metal brackets.
- The top of the racks is tied with timber.
- We make rafters for the roof.
A lightweight metal frame is erected in a similar way. If the foundation allows, the frame can be made of concrete or brick. The thickness of the load-bearing structural elements may differ from the characteristics of the walls of the main house. Roof supports must be at least 1.5 bricks thick, fence posts must be 125 mm thick.
Terrace walls can be finished using a variety of materials:
- wooden or plastic lining;
- metal siding;
- beam;
- decorative brick and much more.
The main thing is that the design of the terrace decoration matches the appearance of the house.
The walls of the veranda must be connected to the wall of the house in the same way as the foundations of the structures. For this purpose, steel embedded elements are used. They are fixed in the main wall using deep holes, and in the wall structures of the terrace they are laid at the construction stage and secured with cement-sand mortar.
If the veranda is made open, railings are erected instead of walls. They can also be made from wood, metal, WPC, brick or concrete. This type of fence consists of posts, balusters and railings.
Where the veranda roof joins the house
As a rule, when covering the veranda roof, the same roofing materials are used as when building a house, so as not to disturb the overall design of the building as a whole. The connection of the roof of the extension to the house can be done in various ways, depending on which wall the veranda is attached to. If the roof of the veranda is ultimately a continuation of the roof of the house, then the task is greatly simplified, since it is enough to splice two rafter systems. It turns out that the roof of the veranda is adjacent to the roof of the house.
In this case, proceed as follows:
- The upper trim of the veranda is formed with the fastening of the posts.
- Ceiling beams are attached to the frame, to which the veranda ceiling will subsequently be attached.
- The rafter legs of the house are shortened so that they do not extend beyond the wall.
- The elements of the extension truss system are attached to the house truss system as shown in the image below. The mounting method is selected depending on the complexity of the structure. For greater reliability, metal linings are used.
- To ensure that the structure is reliable and can withstand loads, special reinforcing struts are attached, the purpose of which is described in the image below.
Popular articles Using iris versicolor in homeopathy: beneficial and medicinal properties of the plant
If the width of the veranda is more than 2 meters, and also if heavy roofing material is used, additional spacers are installed. As a rule, they are not attached to the sides of the rafters, but are inserted between the upper and lower beams, after which it is better to secure them.
In order to prevent the roof from sagging, spacers are installed between the ceiling beams and rafters
Sometimes it turns out that the roof of the veranda is adjacent to the wall of the house. To solve this problem, you need to make a groove in the wall and lay a special profile in it, carefully sealing all the cracks. The second side of the profile extends onto the surface of the roofing material, which prevents precipitation from entering the space that is caused by the adjoining of the structure to the wall.
How to attach a veranda roof to the wall of a houseYou can make such a profile yourself by bending a piece of galvanized steel accordingly. The design differs in that it is necessary to strengthen a special beam, which moves this apron away from the wall to the required distance. The apron is also attached not to the wall itself, but to a beam embedded in the groove. In fact, if the design of the extension is simple and primitive, then such an apron can also be attached to the wall by bending the edge accordingly. After this, it is better to seal the groove with sealant.
The second option for connecting the roof of the extension to the wall of the house
The rafters are attached to the outer top frame using metal corners, as shown in the photo below, since the dimensions of the elements do not allow special cuttings to be made, as with a Mauerlat.
Method of attaching veranda rafters to the top frame
The solution is simple and reliable, although it does not look very good, but in fact no one will see it after the roofing material is laid on the roof and the ceiling is lined with any finishing materials.
How to make a foundation for an extension to a house - step-by-step diagram
Step 1: Selecting a Base
The new foundation must fully correspond to the type of the previous foundation. In addition, the load and soil type are taken into account. For example, if we are talking about a massive extension to a brick house, then it is necessary to lay a strip or make a pile foundation. But if the additional room is adjacent to a wooden dwelling, then it is possible to get by with a cheaper columnar option.
Step 2: Calculations
Regardless of whether you choose a rigid connection type or a separate foundation, the depth and width, as well as the dimensions of the foundation pillars, if any, should be the same as those of the foundation of the house. Determining these parameters is quite simple. It is necessary to dig a hole next to the wall of the house and measure the dimensions of the base.
If there should be no questions about how to measure the depth of the structure, then to measure the width, you should take a rod, bend one of its edges 90° and insert it in a horizontal position under the foundation. Then we turn the rod until its bent part rests on the reverse side. After this, you need to make a mark on the rod and pull it out. By measuring the distance from the hook to the mark, we know the width.
Step 3: Preparatory work
Before pouring the foundation for the extension, it is necessary to carry out preparatory work. If you decide to give preference to a rigid connection, then we dig a trench of the given dimensions and drill holes in the existing base. Moreover, their diameter must exceed the thickness of the reinforcement.
Metal rods should also be prepared. It is necessary to make a longitudinal slot at their end and insert a special wedging insert into it.
Step 4: Frame Formation
We drive the reinforcement with wedges into the prepared holes. The number of rods is taken at the rate of 20 pieces per square. In this way, the frame of the future foundation is formed. To ensure a reliable connection of the following parts, it is necessary to leave the edges of the reinforcement about 300 mm long, which will subsequently need to be welded.
Step 5: Installation of formwork
Now you will need wide wooden boards. We form the formwork of the given dimensions. We securely fix its walls with supports, earth, cinder blocks, etc. You can cover the inside of the formwork with polyethylene. The latter is especially true if you are pouring only part of the foundation and you will have to reuse these boards.
Step 6: Pouring the Mortar
We prepare a mixture of cement, sand, crushed stone and water
It is very important to keep the proportions correctly. For example, for M300 you can take 10 kg of cement, 30 kg of sand, 40 kg of crushed stone, mix everything well and fill with 40 liters of water
If the concrete is too dense, you should dilute it with liquid, but only add it in small parts so as not to spoil the solution. We pour concrete into the formwork and wait several days until it completely hardens. We moisten it periodically, otherwise cracks may appear.
Step 7: Formation of a columnar foundation
Making such a foundation is important when a lightweight extension is adjacent to a wooden house. We drill holes so that they are below the freezing level of the soil. We form a sand cushion and install fiberglass reinforcement.
This material has excellent properties and does not require additional treatment with waterproofing compounds. Formwork of specified dimensions is also formed and filled with concrete. This foundation for an extension is the easiest to implement, and everyone can create it with their own hands.
Step 8: Construction of a separate foundation
But when the number of storeys of the main and adjacent housing is different, then a separate foundation should be made in close proximity to the previous one. The distance between the two bases is from 2 to 5 cm, depending on the number of floors of the new room. The higher it is, the wider the seam is selected.
We fill this gap with heat-insulating materials or tow. Then a special decorative overlay is attached to the wall of the home
It is very important to correctly mark the base. To do this, we pull the cord onto the pegs around the perimeter of the future site and check whether the diagonals are equal
If a heaving type of soil predominates on the site, then the floor of the extension must be made so that it is not lower than the flooring of the main housing by the amount of possible deformations.
What are screw piles
A screw pile is a support that is driven into the ground by screwing and pressing at the same time. Consists of a cylindrical pipe (trunk) and blades. Manufactured by welding or casting.
The first screw piles served as supports for piers. Then the technology was used in the construction of lighthouses, stabilization of unstable soil along the coast, and strengthening of piers. In the mid-twentieth century, scientists and engineers of the USSR theoretically substantiated its use. Helical fence posts are the basis of modern fencing construction. They are also widely used in the construction of military facilities, especially on heaving, deeply frozen soils. It was then that the advantages of the technology were appreciated.
There are several types of screw piles. Each group is intended for specific conditions. The characteristics are calculated for a specific load on the foundation and for a certain type of soil.
Advantages of a foundation on screw piles
The construction of a pile foundation has a number of undeniable advantages:
- high speed of work;
- low cost;
- small amount of land work;
- no need for special equipment when deepening supports up to 2-3 meters;
- possibility of construction at any temperature;
- unsteady, heaving, water-logged soils do not reduce the reliability of the foundation;
- convenient to use for areas with complex landscapes, where there is not enough space or where slopes and elevation changes prevail.