How to build a terrace at your dacha with your own hands: posts and beams (with photo)
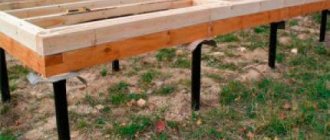
Before you make a terrace with your own hands, you need to install racks. Posts are beams (pillars) that evenly distribute the weight of the terrace onto the foundation. They usually have a cross-section of 100 x 100 mm, but they can also be larger, depending on the size and design of the terrace. The terrace posts should be secured to the foundation using brackets and not poured with concrete. In the latter case, the lower end of the rack will quickly rot.
When building a terrace to the house with your own hands, the posts can support the beams or pass upward through the flooring, forming fence posts or, for example, benches.
The beams rest on posts or are attached to them with screws or bolts. They should first be set strictly horizontally in the frontal plane. To do this, if necessary, place pads under the beams on separate racks. In addition, before building a terrace with your own hands, if you plan to use not a boardwalk, but a continuous covering of the terrace, you should ensure that its surface slopes slightly away from the house. A slope of 1:100 will be quite enough.
The larger the cross-section of the beam, the larger the span can be between the posts - this allows you to use fewer blocks of the terrace foundation for the house, built with your own hands. It should also be noted that if you plan to use beams with a cross section of 100 x 150 mm, then they can be assembled by bolting two 50 x 150 mm boards.
Joists, usually made from boards with a cross-section of 50x150 mm, connect the beam and the support beam, which is attached directly to the building, which gives the entire terrace structure a certain rigidity and stability. To build a terrace for a house with your own hands, the logs are laid perpendicular to the beams in increments of 400,600,800 and even 1200 mm, depending on the thickness of the flooring boards. When the thickness of the flooring boards is 50 mm, the distance between the joists should not exceed 800 mm; when using boards 25 mm thick, the distance between the joists should be no more than 400 mm.
The boardwalk is the uppermost, visible part of the manufactured terrace. The logs are not visible, but they must be spaced at the same pitch and parallel to each other. This will make the subsequent installation of the railing easier. In addition, the location of the joists determines how the screws securing the boards will be visible on the deck. Placed in one straight line, they will look much neater.
As you can see in the photo, on terraces in the country, built with your own hands, the support beam usually has the same width as the logs:
It is attached with screws (bolts) to the wall of the building, and one end of each joist rests on it. The support beam must be placed in such a way that there is a gap of 30 mm between the top of the deck and the bottom of the doorway. This will prevent rainwater from entering the room through the threshold.
The video “Do it yourself terrace” shows how the posts and beams are attached:
The following describes how to build a terrace with your own hands in stages.
How to choose a foundation for a terrace
Some inexperienced builders mistakenly believe that building a foundation for a terrace is not such a necessary undertaking.
The performance properties and “life” of the entire structure will depend on the nature and quality of the base. To build a strong and durable foundation, it is necessary to carefully plan all stages of work, from the materials used to the type of foundation. Therefore, before starting to build a foundation, you need to choose one of the foundation options.
The choice of foundation for construction is determined depending on the size, purpose, weight of the frame of the house or building being erected, as well as based on the amount you are going to spend on construction work. A foundation with a solid structure is suitable for the construction of a solid terrace with a large area. Lighter foundations are perfect for small open terraces.
If you plan to fill the terrace with concrete or use frame technology for construction, then it would not hurt to think through options for a better quality foundation that can withstand heavy loads.
Which foundation to choose
To determine the type of foundation, it is important to do a competent analysis of the soil on the land plot, determine the degree of groundwater, and the level of soil freezing. For high waters, a columnar and screw or pile foundation for a veranda is suitable
For stable and non-heaving soil, choose a strip base. Which foundation to choose for a country house, see here. We will look at the types of foundations for the veranda.
A columnar foundation for a terrace or veranda is the most common option due to its cost-effectiveness and accessibility, speed and ease of construction. You can easily install the poles with your own hands on lands with high humidity and frozen soil. In addition, such a base is characterized by reliability, strength and durability.
A screw or pile foundation consists of piles that are screwed into the ground. This is a universal design that is suitable for every type of soil. A suitable option for installation on uneven terrain, which is characterized by accessibility and low cost, easy and quick installation.
A strip foundation will allow you to build a veranda or terrace of any scale, size and design. Such a foundation will support a heavy structure made of brick, concrete or natural stone. It easily tolerates ground movements and various soil loads, does not deform and is highly stable, durable and strong. In addition, it will allow you to insulate the walls and floor.
Types of foundations for verandas
There are, in fact, very few types of foundations. They all have a certain depth and lie on a bed of draining crushed stone, pebbles or sand. There is always waterproofing between the foundation and the structure erected on it. There are exceptions: pile foundations are made without a cushion (although sometimes a buried pile foundation grillage rests on the cushion). There are also foundations that are not buried, simply lying on a drainage bedding, and are used for the lightest buildings.
Since the main house has already been built, you already have in your hands a professional opinion on soils made before designing it. Moreover, you already know how buildings behave: what are the soil movements, the subsidence of the house, the flooding of the earth's surface in front of the house.
The choice of the type of foundation for the veranda will be based on the opinion of professionals and existing personal experience. In other words, the choice is strictly tied to several indicators specific to your site.
Soil characteristics
Textbook “Soils. Foundations. Choosing the optimal foundation" classifies soils as follows:
- Rocky soils are a homogeneous crystalline rock (in other words, a rock mass) and sedimentary (layered). These are dolomites, compressed sandstones, shales, shell rocks, and limestones. For rocky soils, any foundation is suitable except a screw foundation (it is difficult to screw piles into the rock).
- Conglomerates - contain more than half of the rock fragments. They do not erode or change volume when freezing, so any foundation is suitable here.
- Non-rocky soils:
- bound - clayey and loamy soils: they freeze deeply, sometimes up to two meters, they can “float” and shift; it is precisely such soils that are characterized by the presence of underground lenses of water. Concrete strip and heavy slab foundations are suitable for such soils;
- unbound - sandy and sandy loam soils: when wet they become mobile, freeze to about half a meter, screw pile and concrete foundations of any type are suitable for them.
Groundwater
The groundwater level is also the most important indicator on which the foundation model depends.
The structure of groundwater in your area has a huge impact on the choice of foundation type
If the groundwater level is low, then a shallow strip foundation will be sufficient. But if groundwater is close and the soil is prone to heaving, then a pile foundation with a grillage will be more reliable. The grillage can be made from a variety of materials. When the groundwater level is high, sometimes even a radical solution is necessary - a monolithic, durable concrete slab foundation.
Different foundations are suitable for areas with different ground levels.
Freezing depth
The freezing depth for our middle zone is on average from 0.8 to 1 meter, but deviations are also possible. If you are making a buried foundation of any type, then its lowest point should be below the freezing point of the soil.
The next most important factor is directly related to the level of soil water and soil type.
Water "lenses"
This phenomenon is observed where the soil is combined: permeable sand or sandy loam lies on a layer of clay. Rain and melt water penetrates through the upper soil and remains under it in the form of so-called “lenses” lying on a clayey, waterproof base. Such lenses can greatly damage any foundation, so you need to know for sure that they are not present at the construction site.
Diagram of soil permeable from above, in which internal “lenses” of water are formed
Types of foundations
Foundations are divided into buried, shallow and non-buried. Usually, a shallow and shallow foundation is sufficient for a veranda.
Based on their engineering design, they are divided into four main types.
Slab
It is used in the presence of quicksand, close-lying water, or subsiding soil. If the veranda is winter and heavy, it is better to build just such a foundation. Its main advantages are thoroughness and reliability. Disadvantages: it requires a lot of labor and a large amount of materials, eliminates the existence of an underground floor, and is expensive.
A slab foundation for a veranda is most often redundant
Tape
It is a shallow strip foundation that in most cases will be the best option for a veranda. There are many ways to build: buy ready-made concrete mortar, mix your own, lay a foundation of concrete, expanded clay or foam blocks. Advantages: reliability and relative ease of implementation. Disadvantages: not suitable for unstable soil and soil with high water content. Although these problems are often solved by strengthening the structure: the foundation on problematic soils is made deeper, wider and with a more powerful reinforcement frame.
Strip foundations are most often used in individual construction. On soft soils it is made deeper and more powerful
Columnar
The easiest foundation to implement. It can be recessed, shallowly recessed and not recessed. But the latter option is suitable only as a basis for very light or temporary structures - wooden, plywood, frame. The blocks are placed on a crushed stone or gravel bed, either directly on a cleared area or in pits. Advantages: extreme ease of execution, low cost, suitability for any soil. Disadvantages: not suitable for large and heavy houses, does not allow you to create an underground floor and completely insulate the space under the veranda.
A simple columnar foundation made of blocks with a wooden grillage
Pile
These are supports of small cross-section, deeply buried in the soil and well fixed in it - asbestos-cement or metal pipes. Rarely, but still sometimes, a pile foundation is made of wooden beams, but this requires special processing of the wood. Recently, factory-made metal screw piles have become widespread, which can be used on the weakest soils and with a large natural slope at the construction site. Advantages: a simple pile foundation does not depend on the type of soil, prevents deformation of the structure during soil subsidence, is inexpensive, especially when using piles from asbestos-cement pipes. Cons: requires labor and great care. And a foundation made of screw piles with a metal grillage is also very expensive and difficult to implement.
Screw pile foundation with concrete grillage
Photo gallery: types of verandas on various foundations
Veranda and frame house on a single monolithic foundation
The veranda on a columnar stone foundation looks very beautiful
A small wooden veranda can be placed on concrete pillars
Piles help to build a foundation for a veranda on soft soil
A single foundation for a house and a veranda requires a technological gap
Monolithic foundation without a plinth in the Mediterranean style
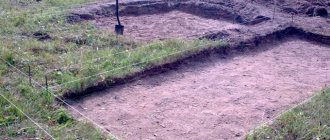
Step-by-step construction of a strip concrete foundation for a veranda
- We make markings for digging trenches under the tape. The pegs are driven not into the supposed corners of the foundation, but so that these corners are formed by the intersection of the cord. The height of the pegs should correspond to the height of the future base.
The corners of the tape are at the intersection of parallel cords
- We dig trenches according to the width and depth planned according to the plan.
The dimensions of the trenches are determined according to a pre-drawn plan
- We fill the bottom of the trenches with sand for a drainage cushion to a height of approximately 0.3 meters.
Sand is poured into the bottom of the trench and compacted until a flat bottom surface is formed.
- Lightly fill the sand with water and tamp it down - manually or using a mechanism called a “vibrating tamper”.
Then add gravel and repeat the procedure. A layer of gravel is poured onto the compacted sand and compacted with a vibrating plate. - For formwork, we cut the boards with a circular saw into elements of the required length according to preliminary calculations.
- We put together the formwork. It must correspond in height to the future base; its horizontalness is checked using a hydraulic level.
The height of the formwork is set using a cord that determines the height of the future plinth
- We lay the reinforcement in several layers with the calculated frequency of installation of vertical columns.
The reinforcing frame consists of several horizontal rows mounted on vertical posts, which are installed at a calculated frequency
- We mix the concrete solution from cement, sand and crushed stone. If you have a construction mixer, the process becomes much easier.
Large volumes of concrete are much easier to produce using a mixer
- Pour the solution into the formwork. To ensure that there are no voids or bubbles in the hardened concrete, you need to stir it in the formwork with a stick. The pouring must be done in one day, otherwise the foundation will be divided into layers that are poorly bonded to each other due to the difference in the “setting” time.
- Using a trowel, smooth out the filling flush with the formwork.
The pouring surface is leveled with a trowel
- We cover the foundation with film. We must not forget about the need to constantly moisten its surface under the film.
- We dismantle the formwork in five to seven days. But the cement will gain the calculated hardness only after 28–30 days.
The cement will reach its maximum strength only in a month
- After the specified period, we strengthen the roofing material for waterproofing. You can get by with roofing felt alone, or you can also coat the surface of the foundation with hot bitumen by placing roofing felt on it. The joints are overlapped. We trim the edges.
After a month, you can make waterproofing from bitumen and roofing felt
Video: construction of a strip concrete foundation
You have completed a difficult task - you have built the foundation for the future veranda. Now we need to continue to improve in home construction and try to build the veranda itself.
Features of the use of asbestos pipes for columnar foundations
The base in the form of free-standing supports for a summer veranda can be built not only from brick. For this purpose, metal or asbestos-cement pipes are often used. When choosing the latter option, you should understand some of the subtleties of using this material. In particular, we are talking about the following:
- If it is necessary to cut asbestos-cement pipes, you should use a grinder with special cement discs.
- Waterproofing of pipes is carried out using sheets of roofing felt or other rolled waterproofing material, which is used to wrap the supports.
- The installation of poles made of asbestos-cement pipes is accompanied by constant checking of verticality using a building level.
- The internal cavity of the pipes is filled with concrete mass. For greater stability, the support is raised slightly, allowing the solution to fill the bottom of the well and flow directly under the post.
- Additional stability of the support is achieved with the help of reinforcing bars, which are driven into the center of the pipe. In addition, such actions allow you to remove excess air from the concrete.
- The free space between the asbestos-cement pipe and the walls of the well is filled with crushed stone and poured with concrete.
If you decide to build such a foundation, we recommend reading detailed step-by-step instructions on how to make a foundation from asbestos-cement pipes.
Wood
Although this type of foundation is used extremely rarely, it is sometimes used when building a wooden house. This is the most environmentally friendly option of all those presented above. The work can be done in the following way:
- We dig holes.
- We pour 10–15 cm of concrete onto the bottom and, without waiting for it to harden, install wooden piles.
- To install corner posts, you need to use wood at least 30 cm in diameter.
- For installation of auxiliary ones – 15–20 cm in diameter.
- The installation of piles must be carried out below the freezing point.
- The top should rise 30 cm above the ground.
- For greater strength, you can make a tenon connection between the pile and a horizontal log.
- After installation, the piles can be filled with concrete or covered with sand.
On screw piles
This type of foundation is considered the youngest of all of the above. Its essence is that pile elements with special screw blades are “screwed” into the ground manually or mechanically, and then a house frame or terrace is installed on them. Such piles must be screwed in gradually, otherwise the soil around them will not be compacted well enough and the pile will not sit tightly.
The power of the structure directly depends on the diameter and material from which the piles are made. For light wooden terraces, any piles, even the simplest and cheapest, are suitable. But for massive buildings it is better to thoroughly calculate the power and degree of load.
The advantages of screw piles are that they can be used on absolutely any type of soil. This is the best option for the construction of overhanging extensions or terraces on moving or freezing soils. This type of foundation is ideal for building a terrace on a slope.
The service life of screw piles can be easily calculated in hundreds of years. Such a foundation will easily last 100 or even 150 years.
An integral part of any country building is the terrace. It is very important for the entire building because it is convenient for excellent leisure activities. As in any other construction, arranging a terrace is a fairly important process and it begins with laying the foundation.
The foundation for the terrace can be done with your own hands in order to spend as little money as possible. These works are paramount, since the overall service life of the load-bearing structures of the future building depends on them. Therefore, if the question arises - is a foundation needed for a terrace, then the answer will be clear - Yes. And in order for it to be durable and strong, you need to be very careful when laying it. You should not save too much, as you may end up with a poor-quality foundation later.
Columnar foundation for the veranda
This type of foundation is most suitable for lightweight structures. It's easy to do, no skills required. To build such a foundation, you can use some blocks or bricks. To build a light veranda we will need to make 3 to 5 supports. These supports are not connected to each other in any way. A columnar foundation involves free-standing supports that do not depend on one another. It is worth remembering that such a foundation must be made to the depth of the foundation of the house or building near which the construction of the veranda was started.
STEP 1: materials. What materials and tools will be needed when building a columnar foundation? Everything is banally simple. Reinforcement with a cross-section of 0.7 - 1.0 cm, concrete mortar, roofing felt, rope for marking.
STEP 2: territory. First, you need to clear the entire area of debris and foreign objects, then we make markings and hammer in pegs. The distance between supports should not exceed 1.5 meters. It is at this distance that we hammer in the pegs. These will be the supports of our columnar foundation.
STEP 3: indentations. In place of each peg, you need to make holes 70 - 100 cm deep (depending on the depth of the foundation of the house). To do this, you can use a garden drill, or any other device that can easily cope with the task. We fill the bottom of each hole with an even layer of 15 - 20 cm of sand and tamp it down.
STEP 4: support frame. At this stage of the instructions on how to make a columnar foundation for a veranda, you need to install the frame of the future support. To do this, according to the size of the future pillar, you need to make a frame from reinforcement and place it in the center of the finished pit. You cannot weld rods together. A special knitting wire is used to connect the rods.
STEP 5: formwork. In order not to make formwork from wooden boards inside the hole, you can use roofing felt as a form for the future columnar foundation. This roofing material will be an excellent waterproofing for the base of the foundation.
STEP 6: supports. Next, you need to make supports from blocks or bricks, the required height and the required area. First you need to make a small pillow of sand and compact it well. Basically, an ordinary cinder block is used, which is laid using a special technique. Only then can you cover it with facing bricks or decorative tiles. Don't forget about the building level.
Such a columnar foundation will help you save time and money by performing the same function as, for example, a strip foundation. You will only need to spend 1 – 2 weeks on its construction. And the columnar one can be made in 2 – 4 days. Such a foundation is used for the construction of light verandas and extensions (wood, profile pipe).
Do you need a veranda foundation?
Of course, the veranda needs a foundation. A veranda is a very light building compared to a house. But it still has a certain weight and is subject to the effects of groundwater freezing, soil heaving and movement, and moisture penetration into the structure itself. Therefore, it needs at least the simplest foundation. It will protect your veranda from most of the listed troubles.
Foundation (from Latin fundamentum - base) is an underground or underwater part of a building (structure), which receives loads and transfers them to the base. There are strip foundations (including those made from cross strips), columnar, solid, and pile foundations. There are monolithic and prefabricated ones. Material: concrete, reinforced concrete, stone (rubble), wood.
Big Encyclopedic Dictionary (BED)
https://slovari.299.ru/enc.php
Veranda design
The veranda can be summer or winter. But it always has a floor, a full roof and a fence. And in the winter version, windows are added. Windows can be up to the floor - they are called “French”.
What kind of foundation does a veranda need?
The foundation is the fundamental part of any building. Any foundation is bad and does not perform its functions if it is built incorrectly. You can use any known types of foundations, the most reliable of which are monolithic and strip. But there is one small subtlety here. We need to combine the two foundations, while avoiding differences in height and cracks in the walls.
We have:
- difference in the weight of buildings (house and veranda);
- the difference in their height (not always, but in the thickness of the floor coverings is necessary).
There are several key points in combining foundations.
Technological junction
There is a law: the heavier the structure, the greater the load on the foundation. Even if you have fulfilled all the requirements for the construction of drainage systems, it still remains the greater the load on the foundation, the greater the load - no matter the soil! — it will sink, crushing this soil.
Therefore, even if the foundations of the house and the veranda are the same in design, in any case a gap of 20–40 centimeters should be left between them, which is called a technological joint. The ends of the reinforcement of the connected buildings are brought out into it.
The ends of the fittings of adjacent parts of the house are brought into the technological joint
In the first months after the construction of the veranda, especially in the spring on wet soil, the new foundation will sag much more than the old one. Therefore, the ends of the reinforcement are connected and the gap is closed with mortar and stone after at least a year.
Deepening
It is believed that no matter how different the foundation designs are, they should be buried in the same way. But practice shows that next to the deep capital foundation of the main house, a shallow or shallow veranda foundation can also exist perfectly well. And it’s even better if the design of the veranda foundation is chosen so that it better resists soil deformation.
From my own experience. The veranda rests on one side on the foundation of the house. The other, in the corners, on blocks in 2 rows in height. The lower block is recessed. It has been standing for many years. The foundation is in place. The soil is clayey. At the same time, a basement wall was built between the blocks on a cushion, and after 5 years it cracked - heaving in action. Replaced with siding.
Levonty
https://www.forumhouse.ru/threads/1465/
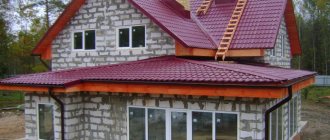
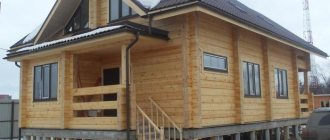
Brick veranda attached to the house
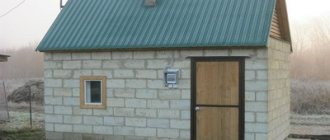
If a metal or wooden structure is considered universal and can be used for almost any type of private house (frame, log house, permanent), then a brick veranda with plastic windows is suitable only for permanent construction.
Here, unfortunately, it is not possible to provide a diagram or sketch with a layout of materials - construction from brick or block is too individual. However, we can highlight the main stages and nuances:
- For such a structure, columnar and pile foundations are not suitable; a serious strip foundation with good waterproofing is required. It can be made monolithic or block, the depth is calculated depending on the depth of soil freezing in a given region. Read more about the design and waterproofing of foundations in the article;
- the structure can be solid - with full walls that take the load from the roof - or with column-shaped supports. The second option is more economical in terms of materials and time. Columns with 4 bricks or more in a row of masonry must be placed in the corners of the veranda and, if its area is large, additionally in the gaps. The photo above shows just such an option, with columns, the space between which is filled partly with metal-plastic windows, partly with single-row brickwork;
- the covering of a brick veranda can be arranged on wooden beams or on metal trusses, depending on the weight of the roofing material;
- The installation of metal-plastic windows in this case is carried out after the initial finishing of the walls and installation of the roof. Otherwise, there is a high risk of damage to frames and sashes under the influence of a suddenly increased load or during construction work;
- The best finishing option for a brick veranda is considered to be facing bricks and tiles, including those imitating wild stone, plaster, and painting.
To build a veranda that is combined with the house as successfully as possible, you will have to use mortgages - metal parts that will connect the main wall of the house with the new extension.
The main connection is at the foundation level; the reinforcement of the strip base for the veranda is connected to the foundation of the house.
Similarly, the connection is made between the walls/columns of the veranda and the wall of the building.
If possible, roof trusses/rafters are also driven into the main wall of the house. This will allow for better waterproofing of the seam between the wall and the canopy, and will increase the stability and strength of the structure as a whole.
Features of the approach to arranging the foundation for a terrace
The correct approach to making a foundation for an additional extension involves taking into account the following features of its formation:
- Firstly, it is not recommended to build such a foundation as one whole with the load-bearing foundation of the entire residential building (that is, it must be separate from it). This requirement is explained by the fact that possible soil movements have a unequal effect on foundation structures of different designs, which for this reason are most often made independent.
- Secondly, in the process of constructing a foundation foundation with your own hands, you need to pay attention to the depth of its laying, which should not differ significantly from the corresponding parameter of the foundation of the main structure.
Preparation for construction
First, the landowner needs to think about the size and shape of the future terrace:
- You can independently transfer all the numbers to paper - draw a diagram of the future construction. In the future, this drawing can be loaded into a computer drawing program.
- A ready-made, and most importantly, correct drawing in all calculations can be ordered from specialists. True, this will require additional costs.
- Ready-made drawings of verandas can also be found on the Internet.
Calculations and drawing
The structure on supports is classified according to the depth of the pillars and depends on a number of conditions - the type of future construction and soil characteristics. Requirements for construction, depending on the type of soil, are specified in SNiP 2.02.01-83.
For lightweight free-standing verandas, non-recessed and shallow-recessed bases are more often used. For extensions to a house, the foundation must be more solid, especially if the building stands on heaving soils.
Based on the weight, including the snow load on the roof, and the dimensions of the building, the number of supports, the distance between them, and the total amount of materials are calculated. If the veranda is built on a turnkey basis, its cost will be calculated free of charge by specialists.
When constructing it yourself, you can use online calculators on construction sites. You will need to enter the initial data of the desired structure and soil type.
Tools for work
To build this base you will need:
- laser level or hydraulic level;
- shovels;
- rubber hammer;
- tamping;
- trolley on wheels;
- measuring tape;
- construction mixer and/or concrete mixer for self-mixing;
- screwdriver
You also need to purchase:
- reinforcement, ready-made concrete (or its components for self-mixing);
- sand;
- crushed stone;
- wire;
- waterproofing material;
- plywood or boards;
- screws and other fastening materials.
Installation of a shallow structure
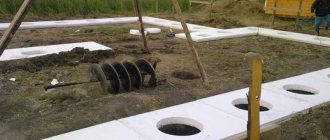
This type of foundation is installed 0.4 - 0.7 meters deeper than the soil surface. It is used quite often when constructing a veranda. The formwork is made of brown concrete, plastic and metal pipes.
For a brick veranda, a pipe diameter of up to 0.2 meters is suitable; for lighter variations, a diameter of up to 0.1 meters is sufficient.
The construction of a shallow foundation consists of the following stages:
At the preparatory stage, we clear the area of rubbish and carry out markings. Places for installing poles are marked with stakes and rope. Holes are dug in designated locations to a certain depth.
It is important to add 0.15 meters for the arrangement of the sand cushion (the sand is watered and compacted). The bottom is covered with roofing material. Then, using a building level, the pipes are leveled
If the water is shallow in the soil, they are treated with a waterproofing base. Next, the pipes are filled with a concrete-gravel mixture to a depth of 0.3 meters. After which the support will rise by 0.15 meters, which will further protect the pillars from deformation when the ground moves. After the concrete has set, the pipes are lined with roofing felt and the holes are compacted with sand. At the end of the process, reinforcement is carried out and concrete is poured to the surface of the supports.
Installation of a non-buried base
Located at ground level. The difference between the installation of pillars varies from 1.5 to 2.5 meters. The sole, provided it is easy to construct, can be erected on non-heaving soils.
During construction, blocks with dimensions of 0.2x0.2x0.4 meters are usually used. Finding out the price of such a foundation is easy. The total amount of material required is multiplied by the cost of one block. Concrete and rubble stone are also used in construction.
The sole can also be made from brick, but we must not forget that ceramic and silicate bricks can be deformed at low air temperatures.
The construction of this type of foundation takes place in several stages:
- First, we clear the construction site and make markings.
- Then, by calculating the load on each support, we determine the number of pillars and the area on which they will be located.
- We carry out excavation work - remove 15 mm of the top part of the soil.
- We create a sand cushion under each support and install pillars. We apply plaster to their upper part.
- Finally, we protect the pillars from moisture with bitumen resin or roofing material.
Description of foundations that are suitable for building a terrace
The first type of sole implies the presence of structures that are not interconnected. Afterwards a wall will be installed on them. These foundations are constructed from strong pillars that can withstand quite heavy loads.
This method is most suitable when building a wooden terrace. In this case, pillar elements are installed at the corners of the building.
Terrace on pillars
If the structure is quite large, then you need to think about how to add additional columns and supports.
You can make a columnar foundation for a terrace using brick, rubble concrete or concrete mortar. A bed of sand or gravel is usually placed at the bottom of the trench. Do not forget about waterproofing; it is equipped with molten bitumen.
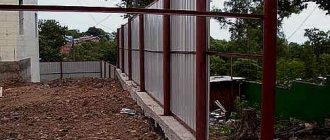
The strip base is more suitable for a terrace to the house.
It is flawless and suitable for cast and brick wall structures. The structure itself looks like a solid wall located underground. If the ground is unstable and not dense, the sole can be made a little wider.
Laying is done with natural stone and brick by connecting them together with cement mortar. Don't forget to provide openings for the communication system. The strip foundation for the terrace is the most commonly used for placing verandas.
A pile foundation is a structure that is easy to install and economical. This technological process provides for the use of long column lengths. Initially, before installing a pile foundation under the terrace, you need to level the pits and pits intended for supporting elements.
The pit is dug approximately half a meter deep. And after that, wells are drilled with a construction drill.
Ruberoid sleeves will then be inserted into them. The bottom is lined with a cushion of gravel or crushed stone mixture. All this is poured with a not very thick concrete solution, and when it hardens, a load-bearing column is installed.
In order to compact the soil to a greater degree, it is customary to weld blades onto ordinary piles. Thus, the resulting unit is screwed into the soil. The overall strength of the load-bearing structure will depend on the diameter of the pipes and what material they are made from.
Large open terrace
Any type of soil is suitable for creating this kind of foundation. It is quite easy to install and is ideal for a terrace on a sloped area. In addition, such a foundation can serve you for more than a hundred years, since the operational period of helical piles is very long.
Tape base - can withstand any weight
A similar foundation is erected for verandas and terraces with a large mass, built of stone or brick. It is not difficult to equip it with your own hands, but you will have to focus yourself on labor-intensive work. The technology for constructing a strip base is as follows:
Mark the foundation (take into account its internal and external parameters)
Important! You need to retreat 2 cm from the base of the house. These centimeters are required to make a special expansion joint
It will smooth out the difference in loads on the main and foundations under construction, protecting them from the appearance of cracks. Dig a trench, cover its bottom with 20 cm of sand, which you must compact. You make a formwork structure and place a frame of reinforcement in it. It is installed 5 cm below the planned concrete pouring line. Fill the structure with a solution of crushed stone, sand and cement M300–M500 (proportions – 3:5:1).
Strip foundation for terrace
If you make a concrete composition with your own hands, consider these recommendations. First you need to mix 10 liters of water and cement in a large container, and then add sand and crushed stone to it. It is advisable to carry out mixing not by hand, but using an attachment on an electric drill.
When using a concrete mixer, the mixing sequence is different. The first step is mixing all the dry ingredients, the second is adding water. The liquid is added as needed in small portions. You should get a composition similar in consistency to thick sour cream.
A small nuance. Do you want to make a truly high-quality concrete solution with your own hands? Add 70 grams of a special plasticizer to the concrete (sold in any construction store). This ingredient will give the foundation maximum strength by removing excess moisture from the base. Concrete with a plasticizer allows the masonry to easily withstand even very severe frosts.
The strip base is made without constructing a formwork structure. The technology is like this:
- lay out (without using mortar) a row of red bricks at the bottom of the trench;
- The second and subsequent lines of brickwork are installed with a solution of cement, water and sand (no need to add crushed stone).
Brick can be replaced with natural stones. In this case, they are filled with a mixture of sand (3 parts), cement (1) and water (1.5).
Tape
Strip foundations are most often used for the construction of terraces. It is convenient to build cast structures made of concrete or brick boxes on it. Naturally, the load of a brick terrace is much greater than that of a wooden one, but the strip foundation is designed for this.
Strip foundations are cast walls buried underground over the entire area of the above-ground structure. In cross-section, it is a quadrangle with a slightly widened lower part, which makes it more stable.
In case of strong humidity or mobility of the soil, the lower part (“sole”) of the foundation can be further increased using masonry made of natural stone, brick or concrete mixture. However, the strip foundation has one controversial quality - it cannot be corrected or redone, so it is necessary to carefully consider all the nuances from the very beginning. Don't forget to leave openings for communications and ventilation.
How to connect the foundations of a house and a veranda
Adding a veranda with a foundation, regardless of the size of the future structure, is only at first glance a simple matter. First of all, it should be remembered that when carrying out work it is important to adhere to legislative and construction standards, including obtaining permits for a new building.
Laying the foundation of a future building is one of the important tasks that must be dealt with at the very beginning. The best solution in this case is considered to be combining the foundations of buildings, rather than building a separate pedestal.
Before constructing a future veranda, it is necessary to study in detail what the foundation of the house consists of, how it was built and its overall dimensions. In order to avoid subsidence of the floor and cracks in the walls in the future, it is recommended to build a foundation under the veranda of the same type as that of the house. First of all, this is due to the intensity of shrinkage, because different types of foundations interact with the soil differently. The depth of the two structures must also match to avoid distortions in the future.
Another important point when building the foundation of a veranda is the time of year. In spring, soil moisture increases, and this will entail additional shrinkage of the structure. Also, a significant nuance may be the difference in the weight of the two buildings, which will also lead to uneven subsidence.
Considering these factors, it is recommended to wait one season before carrying out major construction work and provide for a technical gap. To connect the foundations, it is recommended to use concrete mortar or reinforced concrete, having previously strengthened the foundations with a reinforcement cage or drilled reinforcing bars into the old foundation.
Depending on the severity of the new structure, foundations can be connected using several methods:
- Separate construction of the foundation of a new building in close proximity to the old foundation . In this case, a full-fledged reinforced concrete grillage is constructed, and the distance between the two bases is filled with roofing felt. When using this method, you need to take into account all the factors affecting shrinkage and create a layer that will allow the new foundation to play without damaging the old structure.
Rigid connection between the foundation of the house and the building . This method is considered difficult to predict and is used if the soil on the site allows you to calculate shrinkage, and the future building will have several floors. When using this method, a new foundation should be built of the same type as the old one, and the weight of the future building should not differ significantly from the old one. Buildings of too different dimensions will have different shrinkage rates, and this will lead to distortions and cracks.
If during the initial construction of a house you are already planning to expand its territory, it is recommended to lay a foundation for future construction. This will allow you to create a single structure, which during downtime will finally take up the required space and become stronger.
Strip foundation - is it economically profitable?
For soils that are not heaving and not prone to flooding, a strip foundation can be poured under the veranda. The optimal depth is up to 50 cm. It is very unprofitable to make a deeper foundation for a simple extension. But at the same time, if all the properties of the soil are not taken into account, after winter the shallow foundation may crack. Therefore, when choosing this type of foundation, you need to proceed from the budget and its need in a particular situation.
The installation of a strip foundation is also carried out in stages:
- The place for the foundation is marked using pegs with stretched twine. The outer contour corresponds to the dimensions of the veranda, and the inner contour is responsible for the width of the foundation. The angles must be exactly 90⁰.