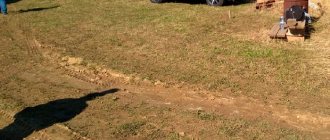
What should be the slope in the shower?
When arranging a shower room, it is important to take into account all the important points - the correct installation of all parts, partitions, strong fastening, installation of a tray without distortions, installation of plumbing and other elements.
But don’t forget about the slope of the floor in the shower. Comfortable use of the cabin and complete drainage of water depend on this indicator; if it is not done correctly, the liquid will stagnate, which will lead to the formation of dampness and mold. Along the way, I’ll focus on the diameter of the sewer pipes. It's simple here. If you are making a shower with a mixer and/or a walk-through, then the diameter of the sewer pipe should be made d=50mm. If the shower is the last one in the row of appliances and/or there is only a shower in it, then pipes d=40mm are sufficient.
We figured out the slope of the shower drain pipes. But that's not all. Is there a need for a floor slope in the shower pan itself?
According to SNiP 2.04.01-85, in paragraph 16.9 we read that the slope of the floor in the shower should be 0.01-0.02 towards the tray or drain. That is, if the pallet is 1 meter wide, and the ladder is located in the corner of the pallet, you need to tilt the floor of the pallet by 1-2 cm. This is in theory. In practice: if you do not want water to accumulate at the bottom of the shower tray, you need to make the floor slope in the shower room at least 1 cm.
To better understand the technology of floor slope in the shower, let’s look at the “helper” from Western companies.
As you can see, these are plastic beacons with a wedge profile that ensure the level of the finishing screed in the shower at an angle to the drain (tray).
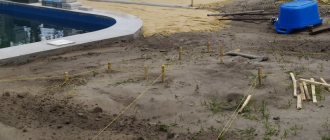
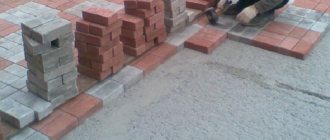
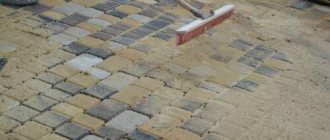
We do without such helpers and make beacons for inclined screeds from wooden planks (photo 2) or from simple plaster beacons (photo 1).
Pouring technology for inexperienced builders
You should not be afraid of carrying out work on arranging a screed if you do not have experience and skills in how to pour floors in a bathhouse under the drain. In reality, this process cannot be called complicated.
Segments of aluminum profiles can serve as guide beacons. It is not mounted strictly horizontally, but with a slight slope towards the place where moisture is collected. A distance of about 100 centimeters is left between the beacons. To fix the landmarks, you can use small piles of cement mortar, which must dry.
Then they start pouring the screed. Work begins to be done from the farthest corner. The prepared solution is laid out on a rough base and distributed between the guides using a trowel. To make the process move faster, it is advisable to fill the floor with an assistant who will ensure a continuous supply of the mixture.
For the final leveling of the floor surface, a long rule is used. They guide it along the guides and smooth out the solution. If necessary, the mixture is added and spread with a trowel.
After a few days, the concrete layer will acquire the necessary strength, but the screed will be completely ready in no less than 2 weeks. The concrete surface should be moistened at least 2 times a day. The presence of light spots on the surface of the screed means that moisture is not enough and after wetting with water it needs to be covered with a film. To speed up the process, plasticizers must be added to the solution.
Installation recommendations
Laying tiles on a floor with a slope: 1 – frieze rows; 2 – cutting lines; 3 – partial tiles; 4 – lighthouse rows; 5 – mortar layer; 6 – waterproofing; 7 – ladder grating; I–IV – sequence of laying tiles in triangles
- Before laying the tiles, it is necessary to lay a layer of waterproofing so that the liquid does not erode the base and moisture does not accumulate under the tile covering.
- Laying tiles starts from the walls. First of all, the horizontal frieze is lined with 3-4 rows of tiles. The number of horizontal rows of tiles depends on its width and the size of the room. After these rows, the laying of tiles on inclined runoff collection areas begins.
- Before starting to line the drains, the reliability of the drain fastening, the angle of inclination and the quality of the waterproofing layer are checked.
- The layout that is used for tiling floors with a slope is called an envelope. The essence of this layout option is that laying tiles on inclined surfaces begins from the base of an isosceles triangle. First of all, solid tiles are laid out.
- You must start strictly from the middle of the base. If an even number of whole tiles are placed in the first row of the base, then the laying is done on both sides of the perpendicular, which will divide the isosceles triangle into two rectangular ones.
- If there is an odd number of whole tiles in the first row, then the first tile is placed perpendicular to its center line.
- The next row is laid in a bandage, like brickwork. In the process of facing inclined sectors, it is necessary to regularly check the parallelism of the rows to the base of the frieze and the thickness of the seams between the rows. In the event of even a slight shift, the seams of adjacent drains will not coincide at the cut.
- For ease of laying and monitoring the center of the masonry, beacons are installed and cords are pulled. They are also called moorings. Beacons are installed in pairs, the first beacon of the pair is placed strictly in the middle of the wall of the horizontal frieze, and the second - near the ladder. The tiles are installed along the cord, the so-called lighthouse row, or in the jargon of tilers - hanging.
- This can be considered a vertical row, laid only with whole ceramic tiles, and it starts from the base of the drain triangle to the drain. If there is a space left near the ladder after laying the last intact tile of the lighthouse row, into which it is necessary to insert a tile insert, then it is left until the moment when the cuts are laid.
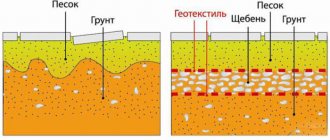
- Filling the earthen surface. The compacted sand layer should be 10-12 cm, the crushed stone layer should be 10-15 cm. You can lay expanded clay on top of the sand, which retains heat.
- Reinforcing layer. A construction mesh with 8 cm squares is stapled around the perimeter and at several points along the field.
Finish coating
It is allowed to use a special stable varnish as a finishing coat. Before application, the surfaces should be sanded and the dust thoroughly vacuumed. For grinding, it is better to use an electric machine; it not only makes the work easier, but also significantly improves the quality. You can never make such a smooth surface with your hands.
Floor sanding
Alternatively, you can sand the floor by hand.
Acrylic wear-resistant varnishes have proven their good performance in practice. If the manufacturers are responsible, then the floor will be used for a long time; no periodic repair work will have to be done due to wear and tear of the finishing coating.
You can cover it with an ordinary paint brush, the number of layers is at least two. Moreover, when covering with the second layer, the brush should move in a perpendicular direction to the first. For steam rooms, it is recommended to apply three or four layers of varnish, which increases the service life. Each subsequent one is applied only after the previous one has completely dried; there is no need to try to reduce the number of layers by increasing the thickness of each. Such a gross violation of coating technology has extremely negative consequences.
The floor is covered with wear-resistant acrylic varnish
After completing the work, it is recommended to ventilate the steam room for several days, during which time unpleasant odors and harmful chemical compounds will be completely removed. After the first warm-up, ventilation also needs to be repeated, and only then is it allowed to enter the steam room.
Drainage arrangement
Layout of the drain for draining water in the floor
There are recommendations from some builders to make the floor in the bathhouse heated. Of course, you can listen to them, but we do not recommend doing so. Why? Firstly, the floor in the bathhouse is already warm; in principle, it cannot be cold. Secondly, electrically heated floors require special wiring; the total installation power exceeds 5–7 kW.
We invite you to familiarize yourself with Waterproofing a concrete pool bowl
For rooms with high humidity, there are very strict safety requirements of the PUE; it is difficult and expensive to comply with them in full. Thirdly, if you are afraid that your feet will freeze, then it is much easier to make wooden grates. Place them not only in the bathhouse, but also in the dressing room and other rooms. It will be very cheap and will make washing comfortable.
Wooden grate on the floor
Drawing of a wooden grate for a bath
Keep in mind that the larger the tiles, the more difficult it is to lay them on a slope. All corners are located in different planes; it will not be possible to make the joints smooth. The best option is to use mosaic tiles. This material makes it possible to make any turns and tilts; a large number of small plates correct minor errors.
Step 1. Take four tiles, place them with corners on the drain and mark the diameter of the hole on them. Using a grinder with a diamond blade, carefully cut out the holes.
Step 2. All tiles near the drain should have a slope in two directions. We have already mentioned that there is no need to make a large angle, a few millimeters are enough. Small slopes can be made with glue; for larger ones, you will first have to screed or use cement-sand mortar for gluing.
Step 3. Throw the material under the surface of the first tile, put it in place and gradually push it in with your hands so that the drainage point is the lowest. Immediately control the amount of tilt. Place the remaining tiles near the drain in the same way, making sure that they all slope towards the hole.
Checking the levelness of the floor
Application of the solution
Leveling the solution
Step 4. Finish the first row, while controlling only one plane between adjacent tiles. This is much easier than setting two planes at the same time.
Applying mortar to tiles
Tile laying process
Step 5. The position of the tiles of the second row must be controlled according to two parameters. The edges must be located in the same plane as the first row and be parallel to each other.
First, it is recommended to lay four tiles around the perimeter of the drain and allow time for the glue to harden. The fact is that these tiles will be used as a template in the future; any displacements are strictly not allowed. The position of the others is constantly monitored using the first tiles; the load on them during the work is the greatest.
Trimming tiles
Slope check
Step 6. It is recommended to continue further work in parallel rows. If you have concerns about your qualifications, you can increase the area of the square plot by alternately laying tiles on each side of the square. This algorithm requires much more time, but allows you to correct mistakes in a timely manner. For beginners, it is advisable to first lay out the tiles dry and use supports of varying thicknesses instead of glue.
Tile marking
The process of laying tiles near the ladder
Tiles laid near the ladder
Laying is controlled by level
Drain in the corner, tiling completed
The larger the floor area, the longer the level should be. The tool must simultaneously control the position of at least three tiles; this is the only way to avoid kinks. The seams are sealed after the glue has completely hardened; with their help, you can slightly smooth out the sharp joints of the tiles.
Tile grout
At this point, the work on pouring the concrete floor in the bathhouse is completed, and you can begin finishing the interior surfaces of the room.
What to do when there is a need to break the surface?
We figured out how to lay tiles in a bathhouse or shower with slopes under the drain. But imagine a situation where, for reasons beyond your control, a situation has arisen that requires you to “bend” one of the tiles being laid.
If there is no way not to “lift up” any of the corners, this is quite normal. Unfortunately, the entire aesthetics of the appearance will be greatly spoiled. There is only one solution - to saw the tile material (the required number of elements) diagonally. The cut is carried out carefully, the cut is polished with an abrasive stone, and the chamfer is removed.
Bath sewer theory
So, you decided to build a bathhouse. Where to begin? Of course, with planning. Because without planning, the end result is not at all what you wanted at the very beginning.
In order for your bathhouse to please you with its characteristics, you need to write down all the important points before you start building it:
- How many people should the steam room and washing area be designed for?
- How quickly should the steam room warm up and how long should the temperature be maintained?
- In what seasons should the bathhouse be used or should it be ready for year-round use?
These are just a few questions from a large list that you must answer before starting bath construction.
So, what should a bath sewer be like, how should it be equipped - here is a small list of questions that you should answer before you start installation:
- Will you make a bathroom in a bathhouse or will you only have a washing area?
- Will the bathhouse be heated year-round, will there be above-zero temperatures in the bathhouse rooms?
- What materials will be used in the construction of the bathhouse, what will the walls, rough and finished floors be made of, what waterproofing materials will be used?
- How far is the house from the future building site, how far is the septic tank, at what distance from the future bathhouse is the drainage ditch?
- How far is a well, borehole, or any other source of drinking water located from the future bath complex?
- Is there an open body of water near the construction site - a river, lake or pond?
- Will there be a plunge pool installed next to the bathhouse or a swimming pool?
We invite you to familiarize yourself with the Sauna stove with a water tank
Having answered the above questions, you can fill the floor with a drain yourself or make a pouring structure, as well as install a water drain in the bathhouse with your own hands.
How is a bath sewer installed, and what theoretical aspects are important here?
Firstly, at the time of the start of the implementation of the bath water drainage system, you must have completed all foundation work. In strip and slab foundations, holes for future sewer pipes are prepared in advance. Columnar foundations do not require such preparation.
Secondly, a place must be selected for a pit with a crushed stone filter for bath water. Many owners build a pit right under the bathhouse, but this is the wrong decision. In this case, the lower crowns of the bath house and the subfloor will constantly be affected by wastewater, even if the base is made high and the waterproofing preparation is not forgotten.
Thirdly, before starting the project, it is necessary to choose what type of floor will be used - solid or poured. This determines how the power structure of the lower floor of the bathhouse will be implemented, how the subfloor will be implemented and, most importantly, how wastewater will be collected from the washing compartment.
In order for your bath furniture to last for many years, you need to study some recommendations for caring for it. The basic rule to remember: after each session in the steam room, the room must be ventilated. This procedure will allow you to quickly remove excess moisture from the room. Sometimes a sauna stove is used for drying, which is turned on for some time after the sauna procedures.
A bathhouse is a room in which sanitary and hygienic procedures are carried out. Therefore, cleanliness in the steam room should be monitored as carefully as in the bathroom. Regular cleaning helps prevent the accumulation of dirt and the development of bacteria on the shelves in the steam room.
The most important rule is the mandatory drying and ventilation of the room after each session in the steam room
https://www.youtube.com/watch?v=LpF7xkrmHSU
After each procedure, it is recommended to wipe all surfaces using a dry towel. This measure will significantly speed up the drying process of wooden boards. It is worth remembering that natural materials cannot be treated with cleaning products containing active chemical compounds. The best option in this case is to use laundry soap.
Self-assembly of bath furniture requires careful preparation. Before starting work, you will need to complete a drawing that includes all the necessary dimensions and data about the room and the structure of the shelf itself. If you are not confident in your own abilities, you can always use the services of specialists.
Tools and materials for installing a shower
To make a shower without a tray with a floor drain as safe and competent as possible, according to step-by-step installation instructions, you should use a certain set of tools and special materials.
- In installation work you cannot do without a level. It is more convenient to use laser. A marker for marking and a tape measure will also come in handy. To install the drain, you need plastic pipes 5 cm in diameter and the structure of the drain itself.
- To install the podium you will need bricks or metal guides and drywall.
- The materials will need waterproofing. Bitumen-polymer mastic can play this role. It is applied to the floor and walls on the sides of the shower after screeding with a regular trowel or brush. It is better to apply in 2 layers and leave for 1-2 days to dry.
- You can lay a layer of roofing felt or any bitumen-polymer roll material on the floor.
- For the screed, you need to prepare in advance a special solution based on cement with the addition of sand, expanded clay or other porous material.
- For the top layer you will need decorative tiles and special glue.
Point or linear drain - installation features
A linear ladder is a structure consisting of several components, they are listed from bottom to top:
- set of legs;
- ultra low S – base (rotating);
- quarry, reducer;
- frame;
- lattice.
Outside, a rectangular grille will be visible in the floor after installation. Initially, you need to determine the size and shape of the shower and draw a drawing.
Next you need to do this:
- On the concrete floor of the room, install shower stops according to the size of the shower (you can use a board).
- Fill the floor from the outside with screed, leaving the level of the shower itself below. Minimum installation height 52 mm. It is necessary that the structure fits in depth. Importantly, here you can reduce the reduction to the desired size by simply sawing it off. In this case, it is necessary that a drain pipe has already been laid.
- Mark and screw the ladder structure to the concrete base. Adjust the level to zero.
- Place the drain pipe to the drain.
- Fill with screed with a slope of 2° towards the drain.
- Apply waterproofing in 1 or 2 layers. Allow sufficient drying time between coats.
Now you can lay tiles over the entire area of the bathroom at the same time as the shower. You should first apply tile adhesive around the perimeter of the drain, lay the tiles, install the outer frame for the grate and secure with sealant. Then completely assemble the outer gangway grille.
Why is concrete flooring preferable?
Installation of beacons and creation of screed with a slope towards the drain
How to pour concrete floors correctly? It is worth considering that non-leaking floors must have a slope. Otherwise, the water will not go down the drain without “help.” What should be the structure of the concrete base in the bathhouse? To properly pour the cement mortar and make the desired slope in the floor, you should adhere to the following recommendations:
- In the case of arranging the foundation on a strip or pile foundation, first of all, floor joists are laid;
- The subfloor is subsequently attached to the joists. Skull blocks are nailed to the bottom of the joists, onto which boards are thrown;
- Heat-insulating materials (foam plastic, polystyrene, mineral wool) are placed in the sections between the joists;
- Then a sewage system with a siphon is installed in the washing department;
- After installing the hydraulic component of the floor, the wooden sheathing is sheathed with DSP sheets;
- The slope of the base for normal water drainage should be approximately 30 mm per m2;
- Cement mortar is poured onto the prepared subfloor;
- After the screed has hardened, a drain ladder is installed and a finishing coating (wood, tile) is laid.
Many experts consider installing a concrete floor in a bathhouse to be an economically correct and profitable solution. This method of flooring is supported by the long service life of concrete. A high-quality screed can last more than 30 years. Among the advantages of this floor it is worth noting:
- Resistant to temperature changes and high humidity.
- Doesn't rot.
- Harmful microorganisms and fungi do not develop on concrete.
To care for a concrete floor, you do not need to buy expensive household chemicals. In addition, you have the opportunity to decorate the floor, for example, with tiles.
Drainage arrangement
A lot of water is used in the bath. This suggests the need for drainage facilities. Before concreting the floor, a drainage system should be designed and implemented. To do this, you need to determine the point that will allow you to most easily equip the sewer system. At this point, an intermediate tank should be placed, which can be made in the form of a small pit with a size of 40x40x30 cm. The simplest method of treating a pit is concreting, with a layer of at least 5 cm.
Then a drainage system should be made from this reservoir into a sewer hatch/septic tank. For these purposes, you can use a fan pipe with a diameter of 200 mm.
The soil should be leveled and then compacted. Then fill the floor with coarse gravel 15 cm thick. The gravel can be replaced with broken bricks. The next layer is crushed stone 10 cm thick.
Insulation
To significantly reduce heat loss in a bathhouse, the concrete floor should be insulated. This is done after the first layer of concrete has hardened. Expanded clay can be used as insulation. It needs to be covered with a layer of 5–8 cm.
This is not the only insulation that is suitable for arranging a concrete floor. Often construction felt or mineral wool is used for these purposes. But, it is worth considering the fact that when installing mineral wool as insulation, you will have to additionally waterproof it. Roofing felt can be used as a waterproofing layer.
Another option for floor insulation is pouring cement mortar with perlite (a rock of volcanic origin). It began to be used in this direction relatively recently. The advantages of this component are high water absorption and thermal insulation characteristics.
Mixing is done in a concrete mixer
A second concrete layer should be poured over the insulation or waterproofing (this depends on the insulation material you installed). In this case, it is necessary to lay a reinforcing mesh (this can be wire or reinforced mesh) before pouring concrete. In order for the resulting concrete to be strong, it must be compacted, leveled, and tension concrete poured on top.
The screed needs to be poured in one go, so you need to act quickly. Start pouring from the far corner, leveling the solution with a trowel. You need to tighten it with a rule in a circular motion, which would be directed towards the exit from the room. After the screed must harden, this process takes several days.
With the addition of plasticizers, the hardening process of concrete is accelerated. They, among other things, increase the strength of concrete, reliably connect the components of the mortar together and prevent the possibility of cracks.
The quality of the surface is determined after the concrete has completely dried. If the screed has a uniform gray tint, this indicates its uniformity. In addition, durable and high-quality concrete will not show noticeable marks from a hammer blow.
Finishing
Ceramic tiles are most often used to finish concrete floors in bathhouses. The tiles will also look impressive. A significant drawback of tiles is that when wet, they become slippery, which increases the risk of injury. Therefore, from a practical point of view, it is better to lay Metlakh tiles on the concrete floor.
today are considered the most appropriate option.
We invite you to familiarize yourself with Wooden floors in a private house using joists
For a bathhouse, one of three floor options is usually chosen: adobe, wood and concrete. To understand why the latter option is preferable, it is worth taking a closer look at the features of all materials.
What kind of floors can be made in a bathhouse:
- Clay - the oldest option, made in the format of a compacted dense layer of clay and acting as a water seal, where a drain was created outside the building. A layer of wood was laid on top of the clay, which had to be dried and ventilated after each visit to the bathhouse. Today, clay is no longer relevant, as it is not very comfortable to use.
- Wooden floors are made from species that are resistant to water. They are easy to install, warm, and make it easy to install a water drainage system. But in any case, wood and water interact poorly - wood is susceptible to the spread of insects, rodents, and microorganisms. It would be possible to protect the material from these influences with special impregnations, but they can be dangerous to human health.
- A concrete floor on the ground in a bathhouse is the most relevant option today: it demonstrates excellent strength, resistance to moisture, lasts a very long time, provided that a layer of thermal insulation is installed or a floor heating system is installed, it is comfortable to use. You can lay any coverings on concrete or leave the surface in its original form by installing wooden flooring.
Prepare materials, tools and equipment. For pouring you will need gravel, sand, cement, a concrete mixer, usually a container for mortar, a trowel and a level. The amount of materials depends on the size of the bathhouse and the thickness of the concrete. The minimum pouring height cannot be less than 10 cm. To increase the stability of the structure, it is recommended to use building reinforcement of a periodic profile with a diameter of 6–8 cm or metal mesh.
Step 1. Remove fertile soil and large construction debris from the site. If possible, treat the soil with special products to prevent weed growth.
It is necessary to remove grass and large stones
Prepared base
Step 2. Using a laser or water level, make a zero floor mark along the perimeter of the foundation. It is from this mark that the depth of concrete placement and the thickness of all layers will be controlled. Calculate the parameters and, if necessary, deepen the pit. The soil can be removed manually, but you should constantly check the horizontal surface of the bottom.
Step 3. Begin filling the pit with gravel.
Beginning of backfilling, first layer
The thickness of the material is within 15–20 cm. It should be filled in layers of approximately 10 cm, then the gravel is leveled and compacted. Leveling is much easier with an ordinary metal rake.
Backfilling in layers of 10 cm
It is recommended to use screenings with fine crushed stone for the first layer; it compacts better and holds loads. If the floors are poured in several rooms of the bathhouse, then work should begin with the most distant one; the material can be transported along wooden ladders. Due to this sequence, the need to re-level the bedding is eliminated.
Step 4. Each layer of bedding must be compacted separately. This can be done manually or using a special unit. Working manually is long and difficult, and the quality may be unsatisfactory; professionals recommend using vibrating plates.
Tamping with a vibrating plate
You should go over one place at least three times, fill large depressions immediately, and remove the mounds. The smoother the bedding, the less expensive concrete will be needed to fill the floor.
Step 5. After tamping, you need to pour a layer of crushed stone of fraction No. 10–20 with a thickness of 10–15 cm. After leveling, tamping follows, the algorithm for performing the work is the same as for fine crushed stone with screenings.
Loading crushed stone
Another layer is filled
The thickness of each layer should be controlled according to the marks previously made on the foundation tape.
Leveling the crushed stone layer
Step 6. Prepare the last layer; you can use sand or fine screenings for it. Choose the material that is cheaper in your region; from a practical point of view, there is no difference. After leveling, tamp down thoroughly. It is advisable to moisten the last layer with water and let it stand for at least one day, during which time the bedding will shrink and gaps and other problem areas will be revealed. They must be removed immediately and compacted again.
Sand filling
Elimination, backfilling
Step 7. Install the beacons according to the selected thickness of the screed. Beacons are much easier to install using a laser level. Drive wooden pegs or pieces of metal rod into the bedding along the beam line. If there is no laser level, then the outer beacons can be set at the water level, then stretch a rope between them and adjust the height of all the remaining ones. The distance between the beacons is 40–50 cm. The width of the lines should be 15–20 cm less than the dimensions of the plaster.
Step 8. To increase the strength of the concrete floor, use reinforcing mesh. Raise it above the bedding; the mesh should be located approximately 1/3 of the height of the concrete. Building codes prohibit placing it in the middle of concrete; in this position it does not strengthen the structure. To raise the mesh, you can use various supports or pour a little concrete under it with a shovel and lift it off the ground with your hands.
Welded mesh laid
Do-it-yourself shower drain installation
A home craftsman who does not have sufficient experience in carrying out such work will find the following tips useful:
- Choose a place for the ladder so that a whole number of tiles fit between it and the walls, taking into account the seams between them (2 mm).
- It will be easier to form the required slope of the floor with a significant area using polystyrene foam: we lay sheets 30 mm thick near the ladder, a little further - 40 mm, and along the walls - 50 mm.
- So that a sewer pipe filled with screed can expand freely when heated by hot wastewater, it must be “dressed” in a sleeve made of foamed polyethylene.
It is better to seal the drain grate with tape from the moment of installation until the end of the installation of the tiles to avoid accidental clogging.
There are kits on sale for installing a shower drain, containing, among other things, beacon slats.