Laying heated floors
Laying the screed begins after carefully securing the heating elements. Due to the strong loads acting on the mixture, their shift cannot be ruled out, and this may affect the efficiency of the entire system. Once the mixture is ready, the next step is to take care of the optimal level of concrete mix. A protective layer is required if the heated floor is water-based. The thickness of the screed in this case is determined by the diameter of the pipes.
The standard height of the concrete layer above the highway surface is 25–50 mm. This thickness ensures fast and uniform heating with sufficient strength. There is another important point related to the thickness of the protective layer - its uniform drying. The appearance of cracks does not bode well. It takes about four weeks to gain strength, and during this time it is not recommended to carry out any work until the concrete has completely dried.
Device nuances
The screed for heated floors is poured from a solution that has relatively high densities. Beacons are made from it, resembling small cones in shape, which are laid in straight lines. Steel guide profiles are laid along them, along which the floor will be poured. To set the required level of concrete, use a tape measure and a profile. Subsequently, concrete is poured exactly to the surface level at the bottom of the profile.
Compensation damper tapes made of foamed polyethylene are installed around the perimeter of the room. Concrete is subject to thermal deformation, that is, under the influence of temperature changes it expands, and the elastic tape allows you to maintain the area of the protective layer at the desired level. After pouring the solution, you must wait for it to completely harden.
If the resulting floor surface is not smooth enough for laying a soft covering such as linoleum or carpet, it is additionally filled with a leveling solution.
Mixtures for self-leveling floors
How to make a warm floor from heating Warm water floor.
Installation of a heated floor Let's consider what can be used to fill the heating elements and the floor underneath them.
Cement-sand mortar. Due to the presence of sand, the mixture has good plasticity and is easy to work with. The most suitable brand is M200. For heavy loads, stronger solutions are used: M250, M300. If the room is damp, then M400 cement is suitable. To strengthen the cement mixture, fiber can be added to the composition.
Proportions of mortar for screed (by weight):
- M200 - water/cement/sand - 0.48/1/2.8;
- M300 - water/cement/sand - 0.4/1/2.4.
Concrete from ASG. Cement mortar on a sand-gravel mixture is classic concrete. When installing heated floors, it can be used to fill the rough screed. The result is a strong and inexpensive base.
The consumption of materials for concrete grade M300 will be: 1/5.6 - for one kg of M400 cement take 5.6 kg of ASG (group 4 with a gravel content of 60-65%).
Concrete from screenings. Screening is fine-grained crushed stone that has been passed through a sieve (particle size up to 10 mm). It is added to the mixture instead of sand. Irregularities characteristic of screening particles help strengthen the screed. However, this also makes placing and grouting the concrete more difficult.
Foam concrete. A distinctive feature of foam concrete is the presence of a foaming agent in its composition. This makes the material cellular (it has a large number of closed pores). It has increased sound and heat insulation properties, weighs less than conventional concrete and demonstrates greater strength. If necessary, it can be easily drilled.
Expanded clay concrete. Expanded clay concrete is similar to a regular cement mixture, but instead of heavy crushed stone, expanded clay granules are added to it. Thanks to this, the material is warmer and lighter. But expanded clay concrete is fragile, and it cannot be used for pouring surfaces that will be actively used. Those. Expanded clay concrete is used for screeding under heated floors.
Self-leveling mixtures (self-levelers). Self-leveling allows you to get a flat surface with less labor. Can be used both for pouring the base under heated floors and for the top screed on which the flooring will lie. This material costs a little more than others. You can use, for example, Ceresit CN 176, cement leveler Unis Horizon.
Gypsum solution. Not suitable for pouring floors!
Mixture composition
Cement screeds for pouring are wet and semi-dry:
- the wet type is a conventional cement-sand or concrete composition;
- The semi-dry type of mixture contains, in addition to sand and cement, plasticizers and other property modifiers.
Wet type
Wet type cement screed is prepared by adding clean river sand to the cement. This method is considered the simplest for closing a warm water floor and its heating pipes; it does not require special skills or special equipment.
To mix the solution, you just need a large container and a hammer drill, so you can do without a concrete mixer.
If finances allow, you can use a ready-to-use dry mortar, developed in compliance with the proportions of additives, sand and cement: you just need to mix the mixture with water according to the instructions.
Wet-type mixtures have a classic composition: cement mortar consists of cement and quarry sand in a ratio of 1:3 or 1 to 4.
By adding water, you get a liquid plastic consistency, which can then be easily leveled after pouring and get a smooth surface. If the base is uneven, fine expanded clay is added to the concrete solution.
To improve the strength of the screed, during the preparation of the cement mortar, plasticizers are added, which can be liquid or dry. The standard amount of such additives is 0.8 liters per 1 sq.m. screeds.
Cement should be used grade 300-400 for pouring floors in residential premises. Low grade cement will not provide a strong and durable foundation.
We recommend: How to turn on underfloor heating?
The advantage of wet screeds is the simplicity and ease of preparation and the availability of components.
The advantage of such a screed is the fact that it is quite thin on a flat surface, therefore, the volume of the room does not decrease with it.
Screed for water-type underfloor heating is performed for several purposes. Most importantly, it protects the pipes from external mechanical loads, protects them, prevents wear, and helps maintain the tightness of the pipes.
On the other hand, the wet screed correctly distributes the heat exchanger, which operates according to the following principle: the air in the rooms is heated according to the following scheme:
- water pipes emit heat;
- then heat is transferred to the concrete layer;
- in turn, the concrete screed transfers thermal energy to the floor covering, and the air in the room gradually becomes warm and comfortable for residents.
Another advantage of concrete screed: due to its heat-retaining properties, such a layer takes a long time to cool down, which provides significant fuel savings.
Despite its popularity in construction work, wet screed has its drawbacks.
It is not recommended to lay insulated linoleum or laminate underlay on top of concrete floors, which are considered heat-insulating materials and can reduce the efficiency and effect of heated floors. The best options for finishing flooring over a concrete layer are porcelain stoneware, tiles and clinker.
The solution of such a screed takes a long time to dry; the process can take from 15 to 30 days. Until all the liquid has evaporated from the concrete, the surface has reached the desired state of dryness, so that you can start finishing it, you have to wait a long time.
Semi-dry type
The semi-dry type of screed has a short hardening time for the solution, since less water is used in the preparation process of this type. The addition of special additives leads to improved performance of the screed.
In addition to plasticizers, when laying a heated floor, fiber is added, which comes in the form of thin organic or mineral fibers. They increase the strength of mortar from semi-dry mixtures and reduce the formation of cracks in the cement screed.
We recommend: How to install heated flooring under laminate?
Semi-dry screed dries quickly, it almost does not crack.
Semi-dry mixtures are prepared in two stages.
Take cement and mix it with sand in a ratio of two to three. For example, 20 kg of cement and 10 kg of sand, then add 30 g of fiber fiber to the mixture for every kilogram of cement.
Fiber fiber must be added in small portions, as it is difficult to mix.
After thoroughly mixing the components, water is added to the mixture in portions (up to 8 liters for the specified components). The resulting solution is left to settle for 20–30 minutes.
The preparation of the second portion is carried out without cement with the inclusion of the following components:
- sand 20 kg;
- fiber fiber 25;
- 4 liters of water. 1:5:6.
Mix everything until a homogeneous mass is obtained.
Pouring a semi-dry screed is considered a rather complex process, in which it is necessary to use a concrete mixer.
Stirring by hand is very difficult; you need a vibrating plate. If you lack the skills, you can ruin the whole job. Semi-dry screed is suitable for film or cable heating.
It is better to avoid doing the semi-dry type of screed with your own hands.
You can do the installation of floors with water or electric heating yourself - the process is not complicated, but only for those who have experience working with cement or other solutions for heated floors, and are also well versed in electricity.
If you don’t have the skills, then you need to turn to specialists. Installing a heated floor requires responsibility; violation of installation technology can quickly lead to undesirable consequences. Before installation begins, you must purchase high-quality materials; it is not recommended to skimp on them.
In Moscow and the Moscow region you can order any type of mortar for underfloor heating screed.
- Related Posts
- Do you need warm floors in your home?
- Should I use penoplex for heated floors?
- How to fill a heated floor?
- How is Lavita underfloor heating installed?
- How much does underfloor heating cost?
- How are pipes for heated floors installed?
Water heated floor screed device and sequence of work
Water heated floor
To make it easier to understand how a screed for a heated floor works, let’s look at it as it is being poured - let’s imagine it in the form of a certain sequence of work, from which it will not be possible to deviate without disrupting the technological process. I don’t think anyone should be told what the consequences of such violations are. Therefore, we will not save money and reinvent the wheel, but will approach the technology of manufacturing screeds for warm water floors with all seriousness and understanding.
- First, we lay the waterproofing layer on the floor slabs that have been cleared of the old screed. After all, you need to think about the lower floors and prevent the leakage of liquid, which is contained in abundance in the cement mortar! As such a waterproofing layer, as a rule, dense polyethylene is used - its strips are spread on the floors, overlapping each other and on the walls. You can even stick it with tape to the walls so that the constantly falling ends of the film do not interfere with your work.
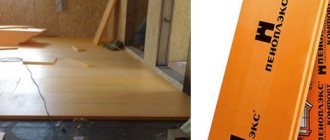
- We lay polystyrene foam. There are no subtleties here, so we just take it and arrange it as you like or as conveniently as possible.
- Installation of reflective thermal insulation. Everything here is also quite simple. This type of thermal insulation is produced in rolls - we roll it out, join the individual strips together end to end, after which we glue the joints with aluminum tape.
- Reflective thermal insulation, let's just say, is not friendly with cement mortar - the substances contained in it, after a year, will leave practically nothing left of the foil, which is responsible for reflecting thermal radiation. It is for this reason that, in order to prevent the screen from being destroyed, the next step is to cover it with cellophane film (this time you can use a thinner material). If finances allow, you can immediately purchase reflective thermal insulation with a polyethylene coating.
- Now it's a matter of reinforcement. No problems are expected here either - in most cases, a ready-made metal mesh is laid on top of the heat-reflecting screen, assembled from 3mm thick wire and having a cell of 100x100mm. In principle, other options are possible. The mesh must be laid carefully so as not to damage the heat-insulating layer.
- Next comes the damper. In principle, you can purchase a special tape made of polyethylene foam, or you can, as mentioned above, use thin polystyrene foam. In my opinion, you shouldn’t save money - it’s better to buy tape. It is laid along the walls around the entire perimeter of the room. Again, so that it stands in place and does not interfere with work, it can be glued in places with tape.
- If we are talking about a water heating field, then we install the heating system pipes; if you plan to install electric heating, then this step is ignored.
- Installation of beacons. Everything is standard here - ud drywall profiles are used as beacons, which are installed in the horizon plane using a hydraulic or laser level. Beacons are mounted in increments of 1-1.8 m - it is selected based on the length of the rule that will stretch the tie.
- And then we work hard, preparing the cement mortar, pouring it and stretching it between the beacons. This process is not complicated, but labor-intensive - here you need to be very careful and stretch the solution clearly in accordance with the installed beacons.
After 1-2 days, when the floor screed has dried out a little and you can walk on it without worrying about it breaking, you will need to remove the beacons and fill the remaining grooves with a rare solution. Also, at this stage of work, it will not be superfluous to clean the screed from unnecessary build-up of mortar - this is done with the sharp edge of the rule.
The screed for an electric heated floor is poured almost exactly the same way, with the exception of one nuance - the electric heating cables are laid on top of the finished screed. Subsequently, they are either immediately tiled, or, if we are talking about installing other floor coverings, they are filled with a special leveling compound.
In conclusion, I will add only one thing - before turning on the heated floors and checking its operation, the screed for the heated floor must be completely dry. As a rule, depending on the temperature in the room, this occurs within 2-4 weeks.
Dry screed for heated floors
Not always and not everyone has the opportunity to mix components, select and add plasticizers. In this case, a ready-made mixture for heated floors, which is designed specifically for this case, comes to the rescue. In this composition, all components are measured in a certain proportion and mixed to the desired consistency. You just need to pour in water, mix and achieve homogeneity of the solution.
The advantage of dry mixtures for warm water floors is the ability to choose the composition for a specific floor covering. Their disadvantage is their rather high cost compared to similar home-made materials. Therefore, if you have a sufficient budget, you can purchase a dry mixture; if you want to save money, you can knead the solution yourself. However, in any case, it is recommended to use a dry screed as the final leveling layer.
The “warm floor” system requires the presence of a cement screed. What solution is needed for a heated floor - this issue can be resolved at your own discretion and depending on your financial capabilities.
Water heating elements hidden under the floor displace other systems. It is important that the screed under the heated floor is of optimal thickness. Considering that warm air is lighter than cold air and it always rises, heating the floor is effective and economical, as well as reliable and practical. The most labor-intensive process is laying a layer of concrete. But it is quite possible to not only hide all the heating elements, but also do it yourself.
Warm floor on the ground
Water heated floor under laminate
At the initial stage of work on the ground, it is necessary to properly arrange the subfloor, i.e. the base on which the finishing coating will be laid.
The most common base for heated floors is concrete.
But before we begin to describe the technological process of arranging a concrete floor base on the ground, it should be noted that not all soils are suitable for pouring it. The following conditions for working on soil must be met:
Scheme of a warm floor with corrugated sheets.
First: the level of groundwater should not exceed 4 meters, so that the floor does not flood and there is no moisture suction. Second: the soil should under no circumstances be mobile. On moving soils, a concrete base is a pie, and the entire floor can collapse quite quickly and at the same time damage the foundation of the house. Third: the soil must be dry before starting work.
Work on the ground begins with marking the level of the finished floor. Let’s take the lower part of the doorway as a guide, from which we place a mark on the wall at a height of 1 m. Then, from this mark, which must be present, a horizontal line is drawn along all the walls of the room. The horizontal direction of the line being drawn must be controlled using a level. After this, marks should be placed along the entire perimeter of the room 1 m down from the drawn line. By connecting the applied marks with a horizontal line, we get the level of the final floor covering. For the convenience of further work, you can hammer nails in the corners of the room and tighten the cord.
After all construction debris has been removed from the room, it is necessary to form a cushion (pie) for the concrete base of the floor from several layers of a certain thickness. A layer of gravel (5-10 cm) is laid, followed by watering and compaction. The next layer is sand (10 cm), watering and compaction. The third layer is filled with crushed stone (10 cm), which after careful leveling must be compacted. When forming a bedding, it is necessary to control the horizontal level using a level.
The top layer of the required thickness of the crushed stone cushion is compacted on the ground until there are no sharp corners that could damage the next waterproofing layer. For waterproofing, you can use rolled materials, several layers of roofing material or polyethylene film (at least 200 microns thick) or a mixture of them. The material should be spread correctly over the entire area of the room. The edges of the waterproofing are overlapped onto the walls to the “zero” level, where they are secured with tape. If several strips of fabric are laid in a room, the joints are overlapped up to 20 cm and secured with adhesive tape.
A separating layer is attached to the walls around the perimeter of the room - strips of insulation 20-30 mm thick. The width of the stripes should reach the “zero” level.
Then, on the ground, a monolithic concrete floor preparation with self-leveling properties is formed. To fill it, lean concrete (class B7.5 -B10), crushed stone fraction 5-20 mm is used. The thickness of the concrete layer should be 50-80 mm. Concrete preparation should be reinforced with fiberglass or metal mesh. The reinforcing frame cannot be installed directly on the waterproofing layer, because in this case it will be not only useless, but also superfluous. The frame is raised by 1/3 of the thickness of the intended concrete layer, for which special stands 2-3 cm high are used.
The procedure for preparing cement mortar for pouring screed
Taking into account the different floor area in each specific room, as an example, a recipe for preparing a solution for pouring 1 square meter of floor with a screed thickness of 30 millimeters is given.
- One bag of sand weighing 50 kg is poured into a trough, onto a sheet of iron or into a concrete mixer (the most preferred option);
- Next, 1/3 of a fifty-kilogram bag of cement is poured on top of the sand and everything is thoroughly mixed;
- Polypropylene fiber is added in small portions to the resulting dry cement-sand mixture in an amount of 0.027 kg. After adding each portion, the mixture is thoroughly mixed;
- Measure the amount of plasticizer. The average consumption of this material is 200 grams per fifty-kilogram bag of cement. In our case: 200/3=65 grams. Round up to 70 grams;
- Measure out the amount of mixer (water). The average water consumption is defined as 30% of the weight of cement or 16.67 x 0.3 = 5 liters. Due to the fact that a plasticizer is used, 15% should be subtracted from 5 liters: 5x0.85 = 4.25 liters;
- Mixing the sealer and plasticizer;
- The resulting material is added in small portions to the dry cement-sand-fiber mixture and thoroughly mixed until a homogeneous plastic mass is obtained. Important! Under no circumstances should you add “excessive” water to the solution. This leads to a significant decrease in the strength of the structure and the appearance of shrinkage cracks.
Brands
When choosing a dry ready-mix, you should give preference only to high-quality products. There are well-known brands that have proven themselves on the positive side. These include the following companies.
Knauf
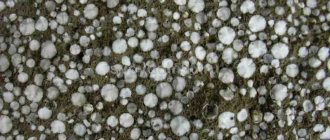
The UBO Knauf cement-based mixture using granulated polystyrene foam has good thermal insulation and soundproofing. It is used as a universal solution that does not require additional coatings.
Boden Knauf's gypsum-based mixture using polymers allows you to create very thin surfaces from 2-15 mm. Thanks to these mixtures, it is possible to level out unevenness reaching 35 mm in height (even 80 mm).
- For roughing, Boden 30 mixture is suitable.
- Boden 15 is used as a self-leveling product based on gypsum with the addition of plasticizers.
- For universal processing, use Boden 25 on a gypsum basis with the addition of mineral components.
Ceresit
The CN 80 mixture is used for rough processing. The universal building mixture marked CN 175, CN 76, CN 88, Tomsit DG does not require additional coatings and dries very quickly. CN 68, Thomsit D, Thomsit DD is used as self-leveling. Levels substrates up to 60 mm thick.
"Osnovit" "Staroline T-41", "Mixline T-44" are universal mixtures. Level surfaces up to 150 mm thick.
Grupa Altas
The mixture “Typhoon Master No. 44, No. 45” is suitable for initial surface treatment.
- The mixture “Typhoon Master No. 41, No. 48” is used as a self-leveling mixture.
- "Typhoon Master No. 40, No. 47" is used as a universal mixture.
"Sarmat"
Mixtures “Optimal”, “Sarmat NV-42”, “Sarmat NV-40” are suitable for primary treatment of bases with large uneven areas.
- The Sarmat NV-45 mixture can be used as a self-leveling mixture.
- "Sarmat NV-43" is used as a universal solution.
Unis
The “Horizon” mixture is suitable for the initial treatment of bases with large uneven surfaces, and “Horizon-2” is used as a self-leveling mixture. “Horizon Eco-Pol” is used for universal floor treatment.
Bergauf
Base and Easy Boden mixtures are suitable for the initial treatment of bases with large uneven surfaces. Boden Inter Gross is used for universal surface treatment.
Ilmax
The ilmax X-plan mixture is used as a self-leveling mixture, and Ilmax 6600, Ilmax 6650, Ilmax 6705 gypsplan, Ilmax 6715 rapidplan are used as universal floor coverings.
Compositions based on well-known brands have similar components, but differ only in the type of sand. Small grains contribute to the formation of a more liquid consistency. The type of initial surface determines the use of a particular brand.
Universal products are convenient because they do not require additional coatings. However, their use requires special qualifications and knowledge. It is better to purchase the mixture in large stores.
Please pay attention to the release date. The earlier it was released, the worse the quality
How to prepare a solution and pour a screed
Fillers for cement mortar.
Today, the solution can be prepared in two ways. The first involves diluting the dry mixture with water to the required consistency in accordance with the instructions. The basis of such mixtures, as a rule, is gypsum. It is thanks to him that the floor dries quite quickly, within a week.
The main thing when making a mixture is to adhere to certain proportions, but that’s not all. It is necessary to prevent an increase in the fill layer, that is, the thickness established by the standards. This size must be specified by the manufacturer. As soon as the work is completed, it is necessary to treat the floor adjacent to the wall with waterproofing.
Quite often, this method is used not only when pouring heated floors, but also in water-type systems. In this case, the pipe screed coverage should be more than 30 mm. To avoid damage to heating system elements, you must wear soft shoes.
As for the second method, it is suitable for independently preparing a mixture of cement, the grade of which cannot be lower than M300. This solution has high thermal conductivity properties and is also not susceptible to the aggressive effects of a humid environment. It can be used with screeds thicker than 80 mm. In addition, it must be more than 5 cm above the pipes.
Scheme of a heated floor screed with a system of fastening brackets.
The solution is made from 1 part cement and 4 parts sand with a fraction of 0.8 mm. As for water, it must be added until the consistency resembles elastic dough. The solution should be such that it can be molded into a ball without it falling apart.
To make it easier to work with cement mortar for screed, a plasticizer is used, which increases the ability of the mass to be leveled. In addition, the screed over the pipes is reduced. However, it should be taken into account that the temperature also becomes lower, which helps to avoid overheating.
Before pouring the floor screed with concrete, it is necessary to carry out preparatory work. First you need to clean the work surface of various debris. This will ensure high-quality grip.
Next, insulation with waterproofing is laid; you can use a simple film. After this there is a mesh with pipes, then the solution prepared in advance is poured.
On the upper floors (2, 3, etc.), there is no need for waterproofing, as well as for reinforcing mesh.
Scheme of pouring concrete screed.
It is first necessary to calculate the volumes. The area of the room (premises) where the water floor is installed is multiplied by the thickness that is required. According to modern standards, pouring a heated floor screed is possible with a thickness of 65-70 mm. As for the thickness of the screed itself, it should be 45 mm. If self-leveling mixtures are used during the work, then these indicators are reduced by 25 and 20 mm, respectively.
If you plan to use large furniture, it is best to resort to additional reinforcement using a mesh made of high-strength steel.
In this case, the screed is reinforced with fiber or polypropylene shavings.
After leveling the poured solution, you should stop working for a while. Depending on the thickness of the layer, it takes up to a month to dry. It is worth noting that for further work a prerequisite is its complete drying.
How to prepare the mixture
To prepare high-quality concrete mortar, it is better to use coarse sand. Small grains of sand contribute to the formation of cracks in the screed under the influence of constantly changing temperatures. Such a defect is practically irreparable, while the heat transfer of the system decreases and the temperature in the room drops.
In order for the screed to be done efficiently, it is necessary to properly prepare the solution. To do this, you need to combine dry sand and cement, mix them thoroughly, and then add water. The liquid is added to the dry mixture for screeding a heated floor in small portions, mixing the composition well after each addition. The amount of water depends on the consistency of the solution required. It is very important that it does not spread over the floor surface, but has sufficient plasticity. You can start pouring the screed only after achieving the required plasticity and homogeneity of the solution.
Wet screed is popular among private and professional builders. During operation, not only the advantages of such a solution for screeding a heated floor began to emerge, but also its disadvantages. In particular, the following became known:
- The screed takes a very long time to dry, complete drying is achieved in 28 days. This is because the solution contains a large amount of water.
- During the process of pouring the screed, it is possible that voids may form, which are practically impossible to remove, since compaction can damage the heating elements of the heated floor.
- Drying of the screed is always accompanied by the formation of cracks. Reinforcement using a metal or polymer mesh helps to partially solve the problem. However, small cracks are always present on the surface.
- Leveling the screed is a labor-intensive process; for this it is necessary to install beacons and use a rule. After the mortar for screeding a warm water floor has dried a little, be sure to rub in the indentations and cut off the excess mortar.
Concrete screed
To make a heated floor with your own hands, you can use the classic method - concreting. After preparation, a screed made from a cement-sand mixture is applied to the base and forms a durable top layer of coating. But do not forget that it will be subject to strong temperature changes. This will affect the strength of the product and quickly crumble the surface. To avoid this problem, it is better to use screenings instead of sand in the screed to be poured. This will make the resulting material stronger and more durable.
Concrete screed
Compound
In order for a heated floor to be poured of high quality, the composition of the solution must comply with the standard and include:
- screening fraction up to 5 mm;
- cement composition grade M300 or higher;
- plasticizers.
The correct selection of components is extremely important. Using cheap materials will result in you having to do the job all over again soon. Therefore, use quality ingredients.
Screening has high adhesion rates and is an order of magnitude superior to sand in this indicator. A good brand of cement mixture will provide reliable strength and protect the base from cracks when heated. The plasticizer will make it possible to reduce the layer thickness from 5 cm to 3 cm. And most importantly, it will not allow the screed to crumble due to temperature changes.
Proportions
Now that you know what to fill a warm water floor with, it is important to find out in what proportions to do it. To properly prepare the mixture for pouring, it is mixed in this way: . 1 part cement; 6 parts dropouts; 350 ml of plasticizer per bag of cement mixture; water is added until a homogeneous solution is formed.
- 1 part cement;
- 6 parts dropouts;
- 350 ml of plasticizer per bag of cement mixture;
- water is added until a homogeneous solution is formed.
If a warm water floor is poured in a room whose area exceeds 40 m2 or the floor has a complex configuration, it is better to add fiberglass. It will allow you to do your work without a reinforcing mesh and help distribute the solution evenly.
When thinking about how to properly pour a heated floor, and whether it is worth using a cement screed for this, you need to take into account a number of features. Its undoubted advantages are strength, durability and uniform heating of the floor. The disadvantages are the severity and duration of hardening - 3 weeks. Therefore, if installation needs to be carried out as quickly as possible, this method will not suit you.
Screed composition
Screed for heated floors can have a different composition; usually a mixture of sand and cement is used. Often crushed stone or expanded clay is added to the solution to save cement, as well as a plasticizer to improve properties. In this case, a concrete screed is obtained. The cement content in the mixture may vary, depending on the chosen floor covering.
If laminate, parquet, tiles or other heavy materials will be laid on the screed, then take 5 parts sand and 0.7 parts water to 1 part cement. When planning to lay light flooring, for example, linoleum, carpet, the ratio of cement, sand and water will be 1:4:0.7. When adding crushed stone to the mixture, adhere to the following proportion: 1 part cement, 3 parts sand and 5 parts crushed stone. The amount of water can reach half the mass of cement. Regardless of the composition of the mixture, it is recommended to add a plasticizer to the heated floor screed. It can be PVA glue. For 1 bag of cement you will need 1 kilogram of glue.
Screeding can be done easier and faster by using ready-made mixtures. How to use them is indicated in the instructions supplied with them.
So what solution for pouring heated floors do you recommend?
Absolutely all solutions are good in their own way and are suitable for pouring heated floors, the main thing here is to read the technical specifications indicated on the packaging and mix, apply in the quantity recommended by the manufacturer. But if you are making a solution for pouring a warm floor from cement and sand, there is a minimum layer, and in fact it should be 3-4 centimeters. And if you take into account that in front of the heated floor there will be foil insulation*, and even on a soft substrate, then whatever you say, you will need to pour 4, or even 5 centimeters over the top of it. This is necessary so that the solution presses the substrate onto the concrete to the maximum. So it’s better not to put foil insulation under a warm floor; one heat reflector will be enough!
From my practice I will say that to fill a water heated floor
, purchased starting screeds in combination with leveling masses have proven themselves to be excellent. That is, the pipes of the water heated floor are filled to the very top with a starting screed, this is 2-3 cm, and then covered with a leveling mass. It is not a shame to put any finishing finishing material on such a heated floor covering: linoleum, carpet, laminate, etc., it is precisely this type of heated floor that will bring you quick heating of the floor, and evenly. Read more about the composition of the solution for a warm water floor here*. We do not exclude the use of a homemade screed to fill a warm water floor. Here you can get by with cement and sand, where the proportions will be 1:4, taking into account the fact that grade 300 cement will be used, 1:3 if grade M 200 cement is added to the fill, etc. You can add granular slag, which will only strengthen our screed and you will get a thin concrete base, which will also need to be covered with a leveling mass to obtain a perfect, flat floor. For reinsurance and reinforcement, you can add fiber*. If you are laying tiles on top of a heated floor, then you don’t need to do any preliminary pouring, unless you are going to save on tile adhesives*.
This is how we do it with tiles! Before laying a warm floor, we prime the base, then level it as much as possible using a starting screed, lay a heat barrier, and install a warm water floor on top of it. Well, on top, already obviously, we are laying the tiles. A warm water floor, with this installation, acts as a level and is located directly under the tiles, thereby heating it in the shortest possible time. Thanks to this method, you use less electricity or gas for heating.
We do not pour electric heated floors under laminate or parquet at all.
, but only level the base underneath it, using the same starting and, if possible, leveling mass. This is due to the fact that wooden cladding already fits perfectly on an electric carpet, and it itself is designed for such loads. In the case of installing it under tiles, the steps are the same and the screen itself simply lies under a thin layer of tiles. But there is some disadvantage to this method of arrangement. The electric heated floor will have to be set to more powerful heating!
It is important to know how to fill a warm water floor
Water heated floors have recently become quite common. This is an excellent addition to your existing main heating system. Typically, heated floors are installed in the bathroom and kitchen, but they are also found in living rooms - for example, in a nursery, because children prefer to play on the floor, and in winter this surface is cold. The warm water floor system can be turned on and off at will.
After its arrangement, the need arises to fill the floor. In this regard, many consumers are interested in how to fill a warm water floor. This work is not difficult, so you can save on the services of specialists.
How to fill a heated floor
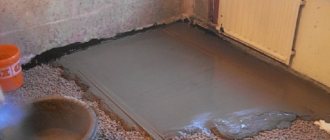
The screed for water heated floors is made after laying the pipes, as in the photo. When performing screeding, you must strictly follow the recommendations of specialists.
As for what solution can be used, there are two options:
- special dry mixtures (semi-dry screed)
- cement composition (concrete screed).
Each method has its own advantages and disadvantages. Before you finally decide how to fill a warm water floor, you need to get acquainted with the features of both types of screed.
The most popular and common material for this is concrete. But ordinary concrete is not suitable for pouring a warm water floor. In this case, it is recommended to use a solution with a cement grade of at least M-300 and a fraction of 3-5 millimeters. It is also worth remembering that dropouts have better traction than sand.
To prevent the screed from crumbling after some time, a plasticizer must be added to the solution. Its consumption is 0.6-1 liter per “square”. The use of a plasticizer allows you to reduce the thickness of the screed to approximately 30 millimeters. If it is not used, then the concrete layer should be about 50 millimeters.
Before pouring, it is necessary to determine the places where expansion joints will be located - they will compensate for the thermal expansion of concrete (for more details: How to pour a heated floor: installation details). If a thin screed will be made in a room of complex shape and an area of more than 40 square meters, then instead of additional reinforcing mesh it is better to use fiber, which is well mixed and evenly distributed.
Features of semi-dry screed
Semi-dry screed has many advantages:
- the cost of dry mix is less than concrete mortar
- no floor leveling required
- after drying there is almost never any shrinkage, cracks or other defects
- During operation, a small amount of water is used, so the likelihood of it leaking to the lower floor is practically excluded
- hardening and complete drying occurs faster than concrete
- the porous structure increases sound and heat insulation.
Performing a semi-dry screed
With this type of filling, unlike the classic one, less water is required to prepare the solution. For this reason, it takes less time for the screed to harden and dry completely. If a warm water floor is poured in this way, the result is more durable. An indispensable condition is the addition of polymer modifiers and the arrangement of a reinforcing layer.
A semi-dry screed using fiberglass is performed as follows. First comes the preparatory work.
They are performed in the following sequence:
- surface cleaning
- laying a waterproofing layer
- wall preparation
- display of beacons.
Dust and debris are completely removed. This is easy to do with a powerful vacuum cleaner. Surface unevenness is smoothed out, and cracks and cracks are sealed with mortar. Waterproofing is needed to protect the base from moisture penetration, and it is also a sound and heat insulation layer. The waterproofing layer is laid on the floor as a continuous sheet.
The walls around the perimeter of the entire room are insulated from the screed with damper tape. As for lighthouses, they are made of cement mortar or special T-shaped slats are used.
Then a solution is prepared. When using ready-made dry mixtures, you must strictly follow the manufacturer's instructions. To check the quality of the mixture, you need to take a small amount of it in your hand and squeeze it in your fist. If moisture appears, then there is a lot of water in the solution, and if the lump remains intact, then the quality is good.
Pouring and sanding
Pouring a warm water floor begins after placing the beacons and preparing the solution. The surface is divided into separate zones and filled with the mixture. The floor is leveled using the rule, movements to the right and left and towards yourself. The layer thickness should be no less than 30 and no more than 40 millimeters.
Screed with a semi-dry mixture is better
This type of pouring differs from the classic liquid one primarily in the smaller amount of water used to prepare a solution from a cement-sand mixture. That is why such a heated floor screed hardens quite quickly and has higher strength.
The addition of polymer modifiers with this method is mandatory, as is the laying of the reinforcing layer.
Let’s take a closer look at this version of a semi-dry screed using fiberglass. First, you need to do the preparatory work. All actions taken can be divided into the following stages:
- Cleaning the base
- Laying waterproofing
- Preparing the walls
- Display of beacons
Garbage and dust must be removed completely and done better using a powerful vacuum cleaner. Floor unevenness is smoothed out, cracks and crevices are sealed with mortar. Waterproofing is necessary to protect the base from moisture, and it also serves as a heat and sound insulation layer.
It is laid as a continuous sheet directly on the floor surface. The walls are insulated from the screed with damper tape along the entire perimeter of the room. Lighthouses are usually made of cement mortar or use special T-shaped slats.
The next stage of work is preparing the solution. And in this case, if you yourself are not an expert, then it is better to use ready-made dry mixtures and follow everything according to the attached instructions. The quality of the solution is checked as follows: take a small amount of it in your hand and squeeze it in your fist. If moisture is released, then there is a lot of water in it; if the lump has not disintegrated, then everything was done correctly.
Heated floor structure
It is determined by two indicators:
- underground space;
- type of heating elements.
Underground space
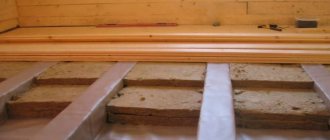
- Before pouring the screed, two types of insulation are installed on the first floors or in basements: thermal and water. Thermal insulation consists of insulation. For flooring in residential premises, basalt mineral wool or extruded polystyrene foam is used. Layer thickness – 50-100 mm. It depends on the climatic region. Mineral wool must be waterproofed on both sides. For this purpose, use ordinary polyethylene film or membrane vapor barrier. Extruded foam does not absorb moisture. Therefore, the waterproofing is laid directly on the rough base under the insulation.
- In rooms with a warm underground space, it is not necessary to install insulation. If a decision is made on additional insulation, then the thickness of the material is only 20-30 mm.
Regardless of the type of room, the heated floor is laid in a screed on a layer of heat-reflecting material. It has one side covered with foil and prevents heat from escaping downwards.
Type of heating elements
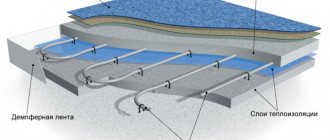
Water or cable - provides the maximum number of layers:
- The first is the foundation. This could be a floor slab that needs to be leveled, or an earthen substrate on which a reinforced monolithic concrete slab needs to be mounted.
- The second is waterproofing. In the case of a floor slab, it is laid over it. When constructing a monolithic reinforced concrete slab, the film is placed directly on the ground.
- The third is insulation. These are sheets of basalt mineral wool or polystyrene foam. They are laid end to end. The cracks are sealed with polyurethane foam.
- The fourth is steam or waterproofing. It is used only to protect mineral wool. It is not needed for polystyrene foam.
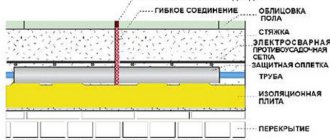
- The fifth is a heat-reflecting surface. It consists of foil material and foamed polystyrene.
- Sixth – heating elements. Use polypropylene pipes or electrical cables. They are attached to the base with staples.
- The seventh is reinforcing mesh. It is installed when the thickness of the heated floor screed is more than 50 mm.
- The eighth is a leveling screed made of sand and cement. It is poured over the entire surface of the heated floor.
- Ninth – finishing coat. For water and cable heated floors, this can be ceramic tiles, laminate, parquet boards and other finishing materials.
For cable or infrared heating mats, the number of layers is reduced:
- The first is the foundation. The mats can be installed on flat floor slabs without prior preparation. It is enough to sweep away all construction debris.
- The second is cable or infrared electric mats. They are sold in rolls, which are rolled out on the floor and connected to the electrical network.
- The third is the finishing coat. Most often these are tiles laid on glue.
When installing film heating elements, it is strictly forbidden to install a “wet” screed.
They use “dry”, consisting of several layers:
- The first is the foundation. The technology of its device is no different from the previous two.
- The second is film heating elements. They are mounted directly on the base. Then they are connected into a single electrical circuit.
- The third is waterproofing. Polyethylene is laid on the film floor.
- The fourth is flooring. For rigidity, GVL, fiberboard, OSB sheets are mounted.
- Fifth – finishing coat. This could be laminate, cork flooring, linoleum, etc.
A floor screed made from gypsum fiber sheets or chipboard is the simplest option. It does not require large financial and labor costs.