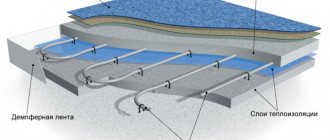
Temperature gaps
The reason why cracks most often appear on the surface of a concrete base is incorrectly located expansion gaps. The rules for installing heated floors do not provide for the installation of a monolithic slab in rooms with complex layouts or in large rooms.
In this case, the proposed heated area is divided into several zones, delimiting them with a damper tape having a width of 5-10 millimeters.
The arrangement of temperature gaps is carried out taking into account the following nuances:
- The size of each zone should not exceed 30 “squares”, and the length of the sides should be less than 8 meters. The ratio between the parameters of the walls of the room cannot but correspond to the proportion of 1:2.
- When a room has a complex layout, it is divided into zones in the shape of a square or rectangle.
- In some cases, dividing lines are drawn with a trowel to approximately a third of the depth of the solution.
- After the concrete has hardened, the seams are sealed.
According to the standards SP 41-102-98:
- When pouring a heated floor, solid pipes should be used when installing the heating circuit.
- When laying a pipeline crossing an expansion joint, it is necessary to protect the heat source with a corrugated shell more than one meter long.
- The pipes must be fixed to the floor using special V-shaped brackets or soft-lined wire.
Step-by-step instruction
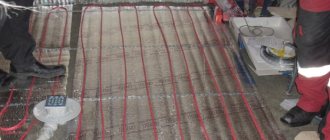
When the underfloor heating system is prepared and the solution is mixed, you can start pouring it with concrete. Do-it-yourself pouring takes place at temperatures of 5 °C and above, otherwise the grade of concrete will not correspond to reality, and it may begin to crumble at any time. The thermal element in the pipes must be under operating pressure. This is necessary so that the concrete does not deform the pipes, and the pipes, in turn, do not destroy the screed when heated.
Related article: DIY lampshade
After pouring the heated floor with the solution, it is left for 21-28 days. During this time, the concrete will gain its basic strength indicators. When the concrete solution becomes solid, a control start-up of the heating system is performed. Moreover, the temperature is increased gradually over some time until operating characteristics are achieved. If the heating system equipped with the working floor has drying, it should be turned on 10 days after pouring. The underfloor heating program increases the temperature every day by a couple of degrees, and it can also be adjusted manually.
First, you need to consider pouring a water-heated floor, since the electrical system is laid out almost according to the same scheme, but with some differences. For example, a reinforcing mesh is placed under heating electrodes. Foil roll sheets are placed under the cables that supply voltage to the heater.
When installing a heated floor, you need to choose pipes, because this is one of the most important elements in laying the floor. The operation of the entire heating system depends on the quality of the pipes. The ideal material for pipes is copper, as it has high thermal conductivity, and the material itself does not rust or age. However, copper is an expensive metal, and you will need a lot of pipes to make a warm floor. Installation of copper pipes will also require special welding.
In this regard, it is best to use metal-plastic pipes. Metal-plastic is cheap and easy to install, and also unpretentious in operation. It is ductile, meaning it can be bent, has high temperature characteristics and does not age over time. Metal-plastic does not require welding, as it is easy to install by hand.
When laying a layer of floor insulation, it is important to arrange the pipes so as to ensure uniform heating of the entire surface area, that is, it is necessary to create the same thermal conductivity in all places. When installing pipes, it is important that the pitch is observed and that the diameter of the pipe itself matches it. Calculations show that with a pitch of 300 mm, the diameter of the tube should be 20 mm. This is another advantage of metal-plastic pipes: they can withstand standard pitch.
Related article: Interior of a bathroom combined with a toilet
Preparatory work before pouring
Before pouring a heated floor, you need to perform a number of preparatory measures, including:
- arrangement of the base for the solution;
- installation of all heating circuits.
When a warm floor is created, the screed is poured after laying the so-called “pie”. The main thing is to correctly lay the heated floor in the screed, following all the recommendations.
It is done in a certain sequence:
- To ensure waterproofing, a polyethylene film with a thickness of 200-250 microns is laid on the rough base.
- Then, to create thermal insulation, a thin layer of polyethylene foam is used, one side of which is covered with heat-reflecting foil. You can use extruded polystyrene foam with a thickness of 5-10 millimeters.
- At this stage, a base for fixing the pipes and metal mesh with cells of 10.15 centimeters are installed to perform reinforcement.
- After this, they begin to fix the heating circuits , for which they use metal-plastic or polypropylene pipes with a cross-section of 20 millimeters (for more details: “How to make a warm floor from polypropylene pipes with your own hands”).
- In order to increase the strength of the screed, additional reinforcement is sometimes added. To do this, another row of mesh is laid on top of the pipes.
- To obtain a level base, beacon profiles should be secured - this is one of the requirements for how to properly fill a heated floor. It is necessary that the gap between the guidelines be less than the length of the rule. Mount the beacons using mortar or self-tapping screws and focusing on the level. They begin to be installed from the zero (also the highest) point of the floor.
- The final layer
is laying the mortar under the heated floor structure. Before this, you need to determine what to fill the warm water floor with. The screed should rise 3-7 centimeters above the level of the heating circuit. This thickness allows the thermal energy to be distributed evenly and ensure the same surface temperature.
Wet pouring method
In order to form the basis for laying the highway, it is necessary to level the surface. Most often, a wet concrete screed is used. It has high strength, resistance to moisture and temperature changes.
To improve the characteristics of concrete, it is recommended to pour it onto a reinforced mesh. To prepare the solution use the following ingredients:
- 1h – M500 cement for rough foundation; M300 for finishing surface;
- 6 hours – sand for pouring heated floor screed; to form a coating for heating elements, screenings or fine gravel are used instead of sand;
- water – 0.7 tsp.
The finishing screed should conduct heat well. It is an additional heating element. Plasticizers or fiber fiber are added to concrete; it can be made of polypropylene, wood, metal.
Additives are administered according to the rate indicated in the instructions on the product packaging. On average, 1 liter of liquid product is used to prepare 1 m3 of concrete.
The surface, made of concrete mortar, is resistant to high loads and durable. Along with numerous advantages, a screed poured wet takes 28 days to dry and hardens in 48 hours. It is necessary to wait a long time to begin facing work.
However, pouring heated floors using the wet method is most often used. How to make rough concrete coating?
- The base is cleared of debris and leveled with sand and expanded clay.
- Bitumen-based waterproofing is laid on the surface.
- The floor is insulated with mineral wool 10 cm thick.
- Cover the insulation with plastic film or a moisture-repellent membrane.
- A reinforced mesh is laid on it.
- Install beacons; height 10 cm.
- Prepare a solution.
- It is necessary to quickly fill the warm floor with concrete; The solution is applied to small areas to prevent it from setting.
- They level it out with a rule.
- After 48 hours, the beacons are removed from the screed; Cover the floor holes with concrete.
- The surface is moistened and covered with plastic film. These measures help ensure uniform drying of the coating.
- After 4 weeks, a heating line is laid on the base.
We recommend: How to calculate the power of a heated floor?
The finishing coating for heated floors is done in a similar way, but a damper tape is installed along the lower perimeter of the walls. It serves as a compensator for the expansion of the screed during heating. The depth of the layer will depend on the characteristics of the heating elements.
If a warm water floor is used as heating, then the thickness of the finishing surface should exceed the diameter of the pipe by 2 times. Add 30% for reserve. The pouring of a warm water floor is 5-8 cm. For the cable and carbon rods, a coating of 3-5 cm is performed. A layer of tile adhesive is 2-4 cm. How to fill the floor line?
- Strengthen the damper tape.
- Install beacons. They are prepared from concrete mortar in the form of small mounds. They are installed in steps of 1.8 m. The height of all beacons should be the same; use a laser level.
- Prepare a solution with a plasticizer.
- Filling is carried out in small areas. I level the surface using the rule.
If 2 or more “warm floor” circuits are installed in a room, then the screed is performed for each circuit separately. Expansion seams are provided between them. They install a damper tape in the shape of an inverted “T”.
Tools and building materials for pouring
To create a screed under a heated floor, you need to prepare or purchase:
- sand, cement, polyethylene film;
- damper tape;
- plasticizer and fiber;
- mounting grids;
- thermal insulation material;
- profiles for beacons;
- level;
- solution container;
- 20 mm pipes;
- nylon ties for fixing to the mesh;
- hammer drill and screwdriver;
- construction mixer (you can use a hammer drill attachment);
- rule;
- vacuum cleaner, broom;
- protective clothing (rubber boots and knee pads).
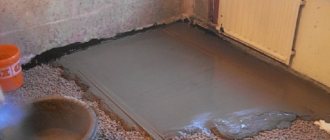
How to pour a concrete screed
Choosing the type of screed to fill is not enough; you also need to know how to fill it correctly. Any mistake in the manufacture of such a coating reduces the effectiveness of heated floors and leads to the destruction of the screed. Before the pouring stage, work must be done to prepare the base, lay waterproofing and reinforcing layer, and install the heating system. The damper tape is also attached around the perimeter of the room before laying the heated floor. And only after this you can start making the screed.
How to make a heated floor screed. Scheme
Schematic diagram of the screed
To work you will need:
- metal profile for guides;
- dry gypsum;
- container for mixing the solution;
- level;
- trowel;
- rule.
Heated floor screed options
Step 1 . Using a level gauge, a line for pouring the screed is marked on the wall. Please note that the thickness of the mortar above the pipes should not be less than 3 cm.
Features of pouring heated floors
Before pouring, hydraulic tests are carried out. Inside the pipes, during the installation of the screed, a pressure of 0.3 MPa must be maintained.
In order for the concrete base to turn out to be of high quality, you should know which solution is best to fill the heated floor. It is recommended to use M400 cement and plasticizer for mixing.
Only one month after pouring is it permissible to begin thermal testing of the pipeline. At first, the heating of the coolant cannot exceed 25 degrees. Then the temperature is increased daily by 5 degrees until this parameter is the desired value.
Performing a screed
Concrete floor screed for heated floors is performed in the following several stages:
- Installation of beacons;
- Preparation of the solution;
- Filling.
Each of them has its own characteristics.
Beacon installation diagram
Installation of beacons
So, the heating system is installed, you can begin installing the concrete floor. You need to start work by installing beacons, for which you can use a special metal profile. The only thing is that you must first lay the reinforcing mesh.
When installing beacons, it should be taken into account that the concrete screed for heated floors must have a thickness of at least 50 mm from the highest point of the floor. If the floor is installed in an industrial premises, then its thickness should be at least 10 cm.
Installation of beacons is carried out in the following order:
- Along the room, at a distance of about 150 cm from the wall, lumps of cement mortar, slightly exceeding 50 mm in height, are laid.
- Then the first slats are laid on the lumps, which should be positioned strictly horizontally. Therefore, its location must be checked using a building level.
- Next, a second beacon is mounted at a distance less than the length of the rule, and both slats must be in the same horizontal plane, which is also checked with a level.
- Using the same scheme, the remaining beacons are installed with your own hands up to the opposite wall.
In the photo - preparing the solution with a mixer
Preparation of the solution
After the beacons are installed, you can begin preparing the solution. It should be said right away that ordinary concrete is not suitable for pouring heated floors. To make it, you will need concrete of a grade not lower than M300 and filler with a fraction of 3-5 mm.
Advice! Experts recommend using screenings rather than sand as a filler, as it has better adhesion and heat transfer.
In addition, special plasticizers for concrete for heated floors must be added to the composition. They make the material more durable, as well as improve the properties of the heated floor, in particular, speed up its heating.
Another important point when making screeds are expansion joints. They are especially necessary when filling a large area. Below we will take a closer look at how they are performed.
The composition of the concrete mixture for water heated floors is as follows:
| Cement | One part |
| Dropout | Six parts |
| Plasticizer | 0.6 – 1 liter per square meter of screed |
| Water | Add until the mixture reaches the desired consistency |
It must be said that the same composition can be used for electric heated floors, the only thing is that the thickness of the screed must be at least 45 cm from the cable.
Dry mixture for heated floors
Another option for preparing the solution is to use ready-made dry mixtures specifically designed for heated floor screeds. They contain all the necessary components, including plasticizers. Therefore, to prepare the solution, you just need to dilute the mixture with water and stir with a mixer.
True, from an economic point of view, using such mixtures is not very profitable, since their price is higher than that of self-made solutions.
Note! Before pouring the screed, it is necessary to check the heating system for functionality.
Performing a screed
Fill
Filling begins from the wall opposite the entrance to the room.
The instructions look like this:
- First of all, damper tape is glued to the wall.
- Next is the filling . The solution must be evenly distributed between the guide rails of one span.
- When the concrete reaches the level of the slats, the surface is leveled using a rule that stretches along the beacons from the wall towards itself.
- Next, the remaining spans are filled in the same way. As a result, the concrete should fill the entire space well . If holes have formed in some places, concrete mixture should be poured over them and leveled using the rule.
- When the concrete has set, the beacons should be dismantled and the marks should be sealed with mortar..
Grouting screed
- After the concrete screed on the heated floor is poured, it is grouted with a float . This makes the floor smoother.
- Then, during the first 10 days, the screed must be periodically moistened so that the solution hardens evenly . If the work was carried out at high ambient temperatures, the floor should be covered with damp burlap.
- Complete hardening of concrete occurs 28 days after pouring . After this period of time, you can begin finishing the floor. If the area is large, then expansion joints are made that prevent concrete from cracking as a result of expansion when heated.
To make expansion joints, a 3-4 cm deep slot should be made for every 30 square meters. Reinforced concrete is cut with diamond wheels.
- At the end of the work, the seams need to be filled with foamed polyethylene (penofol).
Cutting expansion joints
Advice! Before pouring, it is necessary to provide openings for communications. If this is not done, then diamond drilling of holes in the concrete will subsequently be required, but this operation can damage the heating system.
At this point, pouring the floor with concrete is completed.