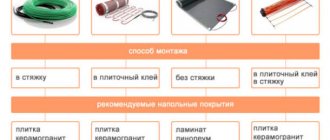
Operating principle and main advantages of the device
The temperature regulator is connected to a temperature sensor, which is located near the heating cable. Its operating principle is to determine deviations from specified values. If they are, then the thermostat transmits a signal to increase or decrease the temperature. After a certain temperature value has been set on the thermostat, the required amount of coolant is supplied to the cable.
| Do you dream of purchasing a good knife? Then you should definitely visit the bestblades.ru knife store. Kitchen, folding, travel, multi-item, exclusive knives from famous brands - you will find all this in this store. You can also purchase accessories for knives, everything for sharpening them and much more. The widest range and fast delivery, as well as many gifts with purchase, will certainly delight you. |
The main function of the device is to maintain a set temperature by turning the heating elements on or off. The device significantly saves on electricity costs, since the system starts working only when the temperature drops below the set temperature.
When operating a heated floor system, you should remember that it is inert: for the temperature in the coating to change, some time must pass.
Temperature regulators are considered an indispensable item for heated floors due to their many advantages. Among them:
- low price, depending on the type of thermostat;
- control is carried out using several keys;
- significant savings in electrical energy;
- the device is small in size;
- high degree of reliability of the device.
Types and possible functions of thermostats
There are many types of such devices. It is customary to classify them according to several characteristics, but the most understandable is the classification according to the principle of action. According to it, the following types of devices can be distinguished:
Mechanical thermostats for heated floors
They are considered the easiest to manage and affordable. All settings are set and changed manually. The main disadvantage of this type of device is the inaccuracy of temperature indicators, which may differ from real ones by 3-5°C.
Electronic thermostats for heated floors
The cost of such devices is higher, but they have greater functionality. In such devices, you can set the floor temperature to decrease or increase at a certain time of the day. If the temperature outside the window has changed, then there is no need to adjust the indicators. Control can be carried out using a remote control.
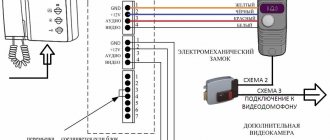
Connecting the thermostat to the mains
Connection can be made in two ways:
- Connect through an outlet using a plug.
- Pass a three-core wire in a pre-prepared groove from the thermostat to the outlet.
In order to connect the regulator in the second way, you need to install it under the socket. To do this, a hole is made for a regular socket box. Using a crown, a hole is drilled into which the box is installed. There are also special boxes in plasterboard; thermostats can also be installed in these boxes.
When connecting the temperature controller, you should pay attention to the contacts located on the back of the device; they are marked with three letters that indicate different wire colors:
- L – phase, brown or red wire;
- N – zero, blue or blue wire;
- PE – grounding, yellow-green or yellow wire.
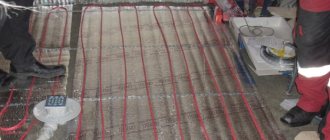
Usually the cable comes complete with a thermostat, the wire length is up to 3 meters. It is connected to a temperature controller and a temperature sensor.
For the entire circuit to work, you must connect a thermostat with a temperature sensor and a heated floor. Before connecting, make a groove from the temperature regulator to the floor and lay the wires using the diagram that is in the instructions. We talked about how to perform wall gating in a separate article.
So, you can connect the thermostat to the heated floor as follows:
- Connect the temperature sensor to terminal numbers 1 and 2 of the thermostat.
- The wire from the network must be connected to terminal numbers 5 and 6. The phase is placed on the fifth, and zero on the sixth.
- The heating cable is connected to terminals 3 and 4.
Please note that the markings on the thermostat may be different and, accordingly, the connection diagram will be different (for example, the power cable will be connected to terminals 1 and 2).
It is also important to understand that not all houses have the opportunity to connect the regulator to a three-wire network, because many old houses do not have grounding. There are also single-core or double-core underfloor heating, this also affects the installation method
Connection diagram for a heated floor thermostat with grounding and without a grounding wire:
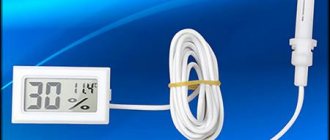
The temperature sensor is installed under tiles or other floor coverings, so it should be installed in such a way that in the event of a malfunction it can be removed without damaging the floor covering. Despite the simple connection diagram for the thermostat, it is important to carefully read the instructions, because if the connection is incorrect, the heated floor will not work. The video below clearly shows how to install a temperature controller and connect it to the network with your own hands:
The video below clearly shows how to install a temperature controller and connect it to the network with your own hands:
This is the technology used to install a heated floor thermostat in the bathroom and other rooms. Now you know at what height to install and how to correctly connect the wires from the heating system and temperature sensor to the regulator.
It will be useful to read:
- Errors when installing heated floors
- Installing a fan in the bathroom
- Connecting a thermostat to an infrared heater
How to connect a heated floor to a thermostat?
Installing a thermostat, with a clear understanding of each stage, is not a complicated process, but you need to be aware of some nuances. The device should be installed at a height of approximately 80-90 cm from the floor, but if the thermostat must diagnose the temperature of the air and the floor, then it is better to place it in another place.
The installation process consists of several stages:
Preparing for work
Before you start connecting, you need to familiarize yourself with the specifics of the device. All necessary requirements are contained in the instructions. Particular attention should be paid to the section that describes the installation of the thermostat, since the process of installing the device for different systems may have some differences. Before starting the installation, be sure to turn off the electricity supply to the distribution panel.
To perform the work, prepare the following equipment:
- indicator screwdriver;
- tester;
- screws for fastening;
- level.
Connecting wires
To connect the temperature controller to the floor, you first need to run the power wires. Using an indicator screwdriver, identify the phase wire, which may be black or brown. The wire with the working zero is painted blue, the ground wire is yellow-green.
Using a tester, measure the voltage between phase and zero. The device should indicate a voltage of 220 V. There is a connection diagram on the back of the device or in the instructions. The diagram is different for different thermostats, so be sure to check this point before connecting the wires.
Next, connect the temperature sensor, which is located in a corrugated tube, to the sensor terminals. If the sensor is not inserted into it, you will need to do it yourself.
Installing the thermostat front panel
Using the screws provided, secure the front panel. Using a level, make sure the thermostat is level. After this, close the lid of the device and restore the electrical power supply. If everything is done correctly, its screen should light up. The installation of the heated floor thermostat can be considered complete, after which you can begin setting it up.
Checking correct operation
After installing the thermostat, you need to check that it is working correctly. To do this, you need to perform the following steps: first you need to set the on and off time, the temperature parameters of the device. After this, you need to run a trial daily cycle of its operation.
Notes
Since the thermostat is a complex electronic device, its installation can only be performed if you have experience in electrical installation work. Errors during installation of the temperature controller can lead to damage to the heated floor.
If you decide to install the thermostat yourself, then before carrying out work, consult an electrician who has practical experience.
Connection diagram of the thermostat to the heated floor
How to install a thermostat for a heated floor
Before installing the device, be sure to read the attached operating instructions. It indicates the procedure for removing the front panel, that is, the control panel. This procedure must be carried out correctly, otherwise the device will become unusable. For built-in models, a recess is prepared into which the mounting box is inserted. It is recommended to place the thermostat close to outlets at a height of 0.6-1.0 m from the floor. Before starting work, the home network must be de-energized.
Setting the floor heating thermostat
Depending on the settings, there are two types of thermostats: non-programmable and programmable.
The first type is simpler and cheaper, great for small spaces. After turning on the device, you only need to set the required floor temperature using the buttons. The main disadvantage of non-programmable temperature controllers is the long time it takes to heat the floor. Depending on its type, heating the floor can take from 10 minutes to an hour.
Programmable thermostats are much more convenient because you can set the time for the floor to heat up. Simply put, once configured, the floor will be heated in the morning when you wake up and in the evening when you come home from work. The rest of the time it will be disabled. The main advantage of programmable controls is energy savings: every time you leave, you won’t have to think about turning off the floor heating. The cost of such thermostats, in comparison with conventional ones, is significantly higher.
To correctly set the floor heating thermostat, you need to follow the sequence of actions. Only the general diagram is described below; for some device models the sequence may be different. To configure you need:
- set the current time and date;
- It is recommended to enable the floor sensor in the settings, as this will allow you to more accurately adjust the temperature;
- in the time period settings, set the time for turning on and off the floor heating, and then set the required temperature;
- If your device has this option, then set the parameters for weekends.
Watch the video on setting up the device:
How to choose a thermostat for a heated floor
Normal operation of a heated floor is impossible without a thermostat, which allows you to save a significant amount of energy and money. When performing the assigned tasks, this device only turns the heating on and off at a set period of time or in accordance with the readings of the thermometer. When choosing a thermostat, it is necessary to take into account its power, which must correspond to the power of the heated floor.
The creation of the most comfortable conditions in the room, as well as the safety of the floor covering, largely depends on the operation of the thermostat. If the temperature is too high, the floor covering may become deformed, crack and lose its quality. Therefore, which thermostat is best to choose for a heated floor is an important issue when installing heating systems.
Among the huge number of models and designs of thermostats, experts distinguish several main groups:
- Devices that provide an economical mode of operation, allowing to reduce energy consumption in the absence of owners. At this time, the heating power decreases by several degrees.
- Models with a programmable timer that allows you to set any time intervals during which the room will be heated at a given intensity. All commands from the timer are transmitted to the thermostat, which, in turn, maintains the required temperature level.
- There are highly intelligent designs where entire operating modes can be programmed and set, in which periods of heating and saving alternate. The command from the device goes directly to the heating element at a set time, depending on external factors and specified settings.
- Thermostats using a built-in limiter, which is a special sensor that protects the floor covering and the heating element itself from overheating. Such devices are most effective for laminate, which should not heat above 260C. Otherwise, the release of harmful toxic substances will begin.
The choice of thermostat for a particular room depends on its area. For a small room, a regular device without programming or installation will be sufficient. The use of more complex programmable devices is best suited for larger spaces. Most often in such cases, electronic thermostats with temperature sensors installed inside the floor are used.
Is it possible to connect a heated floor without a temperature controller?
Theoretically, it is possible to use a heated floor without a thermostat. Moreover, every experienced craftsman who deals with such devices will say that using a thermostat is simply necessary. There are many reasons why you need to install this device. The most important are the following:
- A warm floor that was installed without a temperature controller simply will not provide comfort during operation. For example, if the temperature of the heated floor is too high, then with the help of a thermostat it will be possible to adjust the heating and set comfortable levels. If the temperature is too high for a long time, this will lead to failure of the heating element.
- With constant operation of the heated floor, electricity consumption increases significantly. Installing a temperature controller will save significant material resources, therefore, it will pay for itself in a short period of time. A programmable thermostat will help you save even more energy.
- The presence of a thermostat will significantly extend the life of the heated floor. This also applies to the floor covering, which, if constantly heated, will quickly become unusable.
How to choose a thermostat for a heated floor?
Today there are a large number of temperature controllers in different price categories on the market. The choice of this device must be taken with responsibility, since a correctly selected thermostat can significantly save money.
When choosing, special attention should be paid to the type of installation of the temperature sensor, which can be:
- Remote. Such a sensor is mounted in the floor of the room between the heating elements. It is placed in a tube embedded in the floor. The floor temperature can be adjusted more accurately because the sensor will be close to the floor surface. Such thermostats are worth buying in cases where the heated floor is not planned to be used as the main source of heat.
- Built-in. This sensor measures the air temperature in the room. If a warm floor will be the main source of heat, then it is worth purchasing devices with a built-in temperature sensor.
In order to avoid denial of warranty repairs in the event of a heated floor failure, it is recommended to purchase a thermostat from the same manufacturer as the heating elements.
On average, the warranty period for a temperature controller for a heated floor system is 2 years.
Mechanical thermostat for heated floors
The simplest devices include room mechanical thermostats equipped with a manual control panel. This panel in most models is made in the form of a rotary regulator, around which there is a temperature scale. The device is turned on and off using a special key.
When deciding which thermostat to choose for a heated floor, it is necessary to take into account the absence of any electronics in mechanical devices. These devices do not require electrical energy to operate, although many models have indicator lights on the panels that indicate the status of the heating process. Some designs are equipped with a mechanical timer that sets the operating time of heated floors at a certain time.
The air temperature in the room is measured by a special built-in temperature sensor for a heated floor thermostat, the operation of which is based on the properties of gases or bimetallic elements. Under the influence of the environment, they are able to change volume or shape. That is, when the desired temperature is reached, the electrical circuit begins to close or open. In this case, the temperature of the heating elements themselves is not controlled.
Thus, the mechanical control device is able to maintain the desired temperature until it is turned off. If necessary, just turn on the thermostat again and wait for the heated floor elements to heat up.
TOP 5 best thermostats
If you are still in doubt about the model of thermostat for heated floors, then we have prepared a list of the 5 best devices:
Devireg 530
The device is the best option in cases where an additional heating system is planned. The device is highly reliable because it is equipped with control in case of a break in the wire that goes to the sensor.
Priotherm PR-119
To set the desired settings, you can choose one of 6 modes. The specified parameters are saved in the settings memory. The thermostat housing is made of high quality plastic.
Danfoss ECtemp Next Plus
Thanks to the possibility of programming, energy savings are ensured. Modern design will allow Danfoss ECtemp Next Plus to fit into any interior.
SET 09
The thermostat has a large graphic display. Thanks to the daily and weekly cycle, a comfortable temperature is constantly maintained.
Electrolux Thermotronic Touch
High-quality temperature sensors allow you to adjust the temperature with an accuracy of 0.5 degrees Celsius. You can set up to 6 time modes for each day.
The thermostat cannot be considered separately from the underfloor heating system, since it ensures an optimal level of comfort and reduces material costs for electricity. A variety of types of thermostats provide many options for implementing such control. It is recommended to install the thermostat only if you have experience in electrical installation work, since its incorrect connection can damage the entire underfloor heating system.
Electronic thermostat for heated floors
The most widely used are non-programmable electronic thermostats, which allow you to control the temperature level with an accuracy of 0.5 degrees.
The liquid crystal display of the device displays the current and set floor temperature, as well as the room temperature. In addition, a special symbol appears on the screen when the heating system is on. Various types of technical messages and symbols indicating malfunctions in the underfloor heating system are periodically displayed. This function allows you to perform diagnostics in electronic thermostats. Direct control of the device is carried out by three small keys located on the external panel.
Power is supplied to the heating elements in the same way as with mechanical thermostats. It should be borne in mind that an electronic device can constantly change on and off cycles, which allows saving about 30%. Its work will continue until the warm floors are forcibly turned off by the owners.