Attaching the cable to the wall
When installing cables, various fastening methods are used. It all depends on the specific conditions, financial capabilities and tastes of the owners of the premises. When performing this work, everything must be securely fixed, the insulation must not be damaged, and the appearance must be consistent with the surrounding environment and be favorable.
Types of fastening cables and wires to the wall
The materials from which walls and ceilings are made can have different densities and structures. The cable, depending on the task at hand, can be completely or partially “hidden” in grooves (groove recesses), plastic pipes, corrugations or special trays. And if this is not really necessary, you should secure it more carefully.
All this can be done using a wide variety of devices. Let's try to take a closer look at the most common types of fastening.
Advantages of professional installation of power cables on the wall
The first guaranteed advantage that a person who orders electrical installation services from a professional electrical installation company receives is the prices for laying power cables along the wall, as well as an integrated approach to completing the assigned tasks. The fact is that when providing complex services (design, installation, commissioning, etc.), prices for certain types of services can be significantly reduced, which will undoubtedly bring certain financial benefits to the customer. Additional benefits of professional wall installation of power cables include:
- in the prompt and high-quality performance of services that are provided using modern technical means and equipment;
- in full compliance of the power system with the requirements of electrical standards, which guarantees the absence of claims from regulatory agencies;
- in the formalization of the contract for the provision of relevant services, which gives the customer important and necessary rights.
Having successfully provided the services provided for many years, we guarantee the customer a high level of service and a guarantee of the reliability of the future energy system.
Wooden wall
Due to the high degree of flammability of wood, the standards for laying on a wooden wall are much stricter than for brick or concrete. In this case, the following conditions must be strictly met:
- The cable line must be laid in a non-flammable sheath.
- The entrance to the building through the wall must be equipped with a metal sleeve made from a thick-walled pipe.
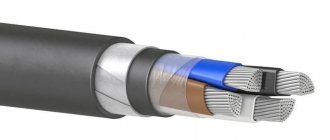
As a rule, a branch from the power supply network is made with a self-supporting insulated SIP wire with aluminum conductors. The use of aluminum wiring with a flammable sheath for laying on a wooden facade is prohibited, therefore, before attaching the line to a wooden wall, you must connect to a cable with copper conductors using special sealed clamps. When laying a SIP cable, it is prohibited to place it close to the siding; it must be located at a distance of at least 6 cm from the wall, even if the wire is inserted into a corrugated pipe or metal hose.
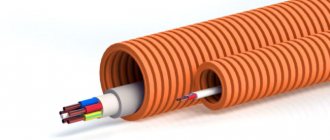
The wiring can be laid in a metal or plastic cable channel. If there is no threat of mechanical damage, the use of corrugated PVC pipe or metal hose is allowed. When using corrugation, it is very important that the purchased product is equipped with a fire safety certificate. In accordance with the standards, the corrugated pipe fastening step must correspond to the table:
| Corrugated pipe diameter mm | Mounting pitch mm | Corrugated pipe diameter mm | Mounting pitch mm |
| 20 | 1000 | 50 | 1700 |
| 25 | 1100 | 63 | 2000 |
| 32 | 1400 | 75 | 2300 |
| 40 | 1600 | 90 | 2500 |
It is allowed to use a thick-walled pipe as an input bushing, the thickness of the walls of which must correspond to the cross-section of the conductors:
Cable laying along the building facade
, operating in the industrial mountaineering market since 1999, offers its clients various high-altitude installation works. Our employees carry out facade finishing, lifting loads, cleaning work, laying cables along the building facade, roof repairs, etc. Order services by phone..
According to the Electrical Installation Rules, clause 2.3.15., the laying of cable lines must be such as to avoid the occurrence of dangerous mechanical stresses and damage in the future.
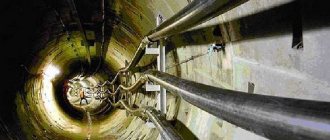
Laying cables using the industrial climbing method Hidden installation of cables in a metal box The method of installing cable lines depends on the design of buildings
Typically, the cable is installed externally (using staples) or hidden (in grooves or metal boxes). The best protection for the cable is to lay it along the facade of the building in boxes. If protection of the cable from mechanical damage is not needed, then it can be laid in a corrugated PVC pipe and secured with staples to a wall or cable. The method of cable installation depends on the design and architectural features of the building facade. For example, laying a cable behind a ventilated facade involves hidden installation in a steel pipe and subsequent fastening to the structure.
The laying of the subscriber communication cable along the facade of the building must be carried out in accordance with the requirements of the Instructions for the design of communication systems RM-2798. It is recommended to install the cable in a hidden way, in grooves and recesses.
Prices for services for laying cables along the facade
| Type of work | Unit change | price, rub. |
| Laying the electrical cable in an open wayThe cable is attached to the facade with clips | p.m. | from 100 |
| Laying the electrical cable in a closed way The cable is laid in a corrugation or box, then attached to the facade | p.m. | from 120 |
Notes to the customer
- We successfully carry out insulation of facades, laying cables, sealing windows, finishing facades, as well as other high-rise works in Moscow and the Moscow region.
- We carry out work for cash and non-cash payments.
- We accept orders from individuals and organizations.
- We have all the necessary documents to carry out the work.
- We have modern technology and equipment.
- We are ready to visit the site free of charge for detailed consultation and clarification of order details.
- An employee’s visit can be ordered by phone. or by email
- We provide guarantees for safe work
Stages of laying cable along the facade of a building
Work on installing cable lines has a certain sequence and is carried out in several stages.
- At the initial stage, a laying project is developed taking into account existing standards. After its approval, materials for installation are purchased: cables, corrugated pipes, metal boxes, fasteners, tips, etc. The use of special equipment, for example, an aerial platform, is agreed upon. Horizontal laying of the cable along the facade of the building implies its rigid fastening at the end seals, on both sides of the bends and at the connecting and locking couplings.
- At this stage, suitable holes are marked and drilled on the facade of the building, into which steel sleeves are installed. A metal box is mounted along the facade, into which the wire is laid and secured. Vertical installation of the cable along the facade of the building provides for its fastening in such a way as to avoid deformation of the shells and not to disrupt the connections of the cores in the couplings under the influence of the cable’s own weight.
- After finishing the external work, the cable is laid in the electrical room and connected to the switch.
High-altitude installation work
High-altitude installation work is performed by industrial climbers. The scope of services of these specialists includes: painting and repair, washing and cleaning of facades, windows or shop windows in high-rise buildings, sandblasting, painting and anti-corrosion coating of metal structures, etc.
High-altitude electrical work
Electrical installation work at height, which is carried out by climbers, requires certain qualifications of installers and they have approvals.
Installation rules
Fixing the wiring is necessary not only to make the room look aesthetically attractive, but also to comply with safety standards. Even if a hidden fastening method is used, the cable is first securely fixed, and then only the holes are sealed.
Regardless of the mounting method, there are a few rules that are easy to remember and simple to follow.
- the distance between the fasteners should be 40–50 centimeters;
- at the corners, the fasteners are installed 7–10 cm from the bend;
- Do not leave the caps of hardware sticking out, they can damage the insulation;
- the cable (wire) should not sag;
- if there is exposure to ultraviolet radiation and an aggressive environment, you need to use a hidden installation method;
- where damage to the wiring is possible, it is hidden in cable channels or grooves;
- work cannot be carried out if the cable is live.
The main task of fasteners is to ensure reliable fixation and prevent damage to the insulation. In principle, some types of fasteners can be used with both open and hidden methods of fastening electrical wiring. Everyone chooses for themselves what is more convenient, cheaper and what they like best.
The most practical cable holder
As I already said, depending on the method of installing the electrical wiring, the attachment of the cable to a particular base also depends.
If the installation of electrical wiring is carried out hidden, then it is important to securely fix the wires in the groove so that they do not interfere with future finishing and plastering of the walls.
For open wiring, they try to choose methods and accessories that are less noticeable to the eye and do not attract attention.
Also, the cable fastening depends on the finishing methods in the room. For example, if the ceilings in the apartment are suspended or suspended, and the cable routes run along the ceiling, then there is no need to make grooves on it and cover the wires in them (they will already be hidden under the decorative finish).
What tools are needed to securely attach the cable to the wall? The surfaces you will have to work with can be made of concrete, brick, wood, so the minimum set of tools is a hammer drill, drill or screwdriver.
Dowel clamp for cable fastening
These mounts are designed to secure a single cable. It is very simple to secure the cable dowel with a clamp. To do this, we just need a hammer drill and a concrete drill with a diameter of 6 mm. First, a hole is drilled in the concrete to the required depth (depending on the length of the dowel itself), then the clamp is opened and the cable is inserted into it, after which the clamp is pushed into the hole.
There are notches on the sides of the clamp at an angle, which prevents it from falling out of the wall. If the size of the drill and clamp are chosen correctly, the dowel will never fall out of the hole.
The dowel clamp for fastening the cable can be in two versions: for flat and round cable.
The positive aspects are low cost, quick installation method, reliable fixation (you can be sure that the cable will not break under its own weight).
Using a dowel clamp, the cable can be fastened to concrete, brick, foam block, and decorative stone. Suitable for both open and hidden fixation of wires.
Mounting area for cable fastening
This cable fastener is made in the form of a square platform. They can be square or more oblong. I prefer to use the second option as they are more durable. There is a mounting hole inside for fastening. Sometimes in stores you can find the abbreviation PMO (platform with mounting hole).
Installation is also not difficult. To begin, drill a hole in concrete with a diameter of 6 mm, insert a regular dowel into it, and attach the platform to the base (wall or ceiling) with a self-tapping screw.
Then we take a regular nylon tie and use it to secure the cable to the site. This method allows you to attach several wires and cables to one platform. This means that fewer holes need to be drilled, which accordingly speeds up the installation process.
The positive aspect is ease of use, quick installation, and the ability to attach several cables to the site at the same time.
Dowel for bandage
In appearance it has something in common between a dowel and a self-tapping screw. Made from plastic. The mounting head is equipped with a hole through which you can insert a tie and secure the cable.
The installation principle is similar to the previous methods. We drill a hole with a diameter of 6 mm and hammer the bandage into it. Then we pass a tie through the hole and tie a cable or group of cables.
To be honest, I haven’t tried to secure the cable to the wall with such a bandage, so I can’t say anything about them.
Dowel tie for cable fastening
A dowel tie, or as it is also called a clamp with a dowel, is a convenient and versatile device. The device consists of two elements assembled into one whole: a dowel and a clamp (tie). This simplifies the installation process.
Facade fasteners
Next, the SIP must be driven directly along the wall.
According to the rules of the PUE, SIP wires must be located at a distance of at least 60 mm from the surface of the walls.
This distance is ensured by special façade fastenings.
Here are their varieties:
Ensto IEK KW Sicam Niled
Universal clamp SO125 and multi-clamp SO90.1
Remote clamps SO71 and SO76
Facade fasteners IEK KFK
Facade fasteners KVT KF
Facade bracket Sicam SC 93-6 PC
SIP facade fastening Niled SF 50
Everything is installed very simply:
- a 70cm route is marked between the brackets
- holes are drilled
- Dowels are inserted into these holes
- after which a nail is driven in with a hammer or a screw is tightened
- if the wall is wooden, the plastic dowel needs to be cut to the limiting ring and just hammer in a nail
- the cap is covered with an insulating cap
Keep in mind that where there are turns, descents or ascents, that is, efforts aimed at pulling out of the wall, it is better to use facade fasteners not with simple nails, but with a screw dowel.
If other communications, such as water or gas pipes, run along the same wall, then a certain indentation must be made from them.
- from SIP to water pipelines must be at least 100mm
- to gas pipes at least 400m
We start dancing from the façade wall
First of all, you need to select a point on the wall from which the branch will begin. The rules for electrical installations do not regulate the choice of wall: it can be front or side. But in practice, in our latitudes it is the façade that is chosen. Roof slopes usually extend onto the side walls of buildings, from which ice (icicles) or snow can fall off.
The starting point for laying on the wall is considered to be the point where the cable exits the anchor clamp. The main design elements are shown in the illustration:
- Anchor bracket.
- An anchor clamp, after which the wire is not held on the overhead line route.
- Facade fastening is the first element of the wall installation system.
The bracket is installed at a height of at least 2.75 meters. The distance to the nearest corner of the load-bearing wall (excluding the thickness of the insulating material) is at least 10 cm.
Tip: If the cross-section of the power cable allows you to choose between different anchors, you should choose a hanger with a lower load. In this case, if there is a mechanical impact on the SIP (for example, caught by a truck on the road, or a pole falls), the wall will not be destroyed, the anchor will simply be torn off.
Nail staples
Typically, nail brackets are used for fastening Internet, antenna, and telephone cables. They are used on substrates into which a nail can be driven: wood, clay and cement plaster, plasterboard, aerated concrete. They are very cheap. Installation is as simple as possible. The staple is placed on the wire and a nail is driven in. Clips are available for both round and flat cables.
At what distance should the cable be attached to the wall?
7.4.1 When choosing a method for fastening cables, it is necessary to take into account the structure of the material from which the wall base is made (concrete, slag concrete, plaster, brick, wood, etc.), as well as the structural forms of the building’s building elements.
In this case, preference should be given to the most progressive and industrial methods, which eliminate labor-intensive punching work, provide speed and ease of fastening and allow the installed fastening structures to be loaded in the shortest possible time after their installation.
In this regard, it is recommended to shoot fasteners using a construction gun or hang cables on a steel rope using the technology given in 7.2.12.
7.4.2 Before starting work, the electrical parameters of the cables must be checked, the necessary tools must be prepared, and the serviceability of power tools, as well as ladders and stepladders, must be checked.
7.4.3 When laying cables, work must be performed in the following technological sequence:
a) marking the cable route;
b) preparation (preparation) of the cable laying route;
c) laying and securing the cable;
d) installation and fastening of protective gutters;
e) sealing grooves, holes and plastering the damaged wall surface.
Requirements for electrical wiring installation
Sooner or later, every owner of a house or apartment has to deal with the repair or installation of the power supply system for their fireplace. Everyone knows that careless handling of electrical devices can lead to fire and death.
In order for all people to be able to freely operate electrical appliances, certain conditions must be created, taking into account rules and regulations, the observance of which guarantees a reliable and uninterrupted power supply in your premises.
There are certain sources that describe in detail the rules and regulations for electrical installation work. Such literature includes the “Rule for Electrical Installations” (RUE) and the “Rules for the Safe Operation of Consumer Electrical Installations” (RBEEP).
What should every home owner know?
A detailed study of the above postulates will require a lot of time, so there are certain highlighted points that every owner of the premises should know when dealing with electrical wiring.
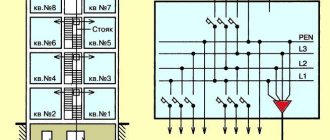
Wiring diagram for the apartment
These requirements include:
- Any installation work involving laying cables in the wall or on its surface must be carried out with the power supply turned off. To de-energize a private house or apartment, you should turn off the input circuit breaker or unscrew the plugs in the electrical distribution panel.
- All distribution boxes in which external and internal electrical cables are connected must be accessible (covered with special insulating covers).
Isolate all contacts - All contact connections must be insulated.
- To perform external installation work, it is recommended to use a cable with special non-flammable insulation.
- It is strictly prohibited to lay electrical cables on flammable substrates, wood or timber products. For such installation, the wiring must be placed in a special metal pipe.
- All electrical wiring passages through the wall must be made in special insulating pipes.
- According to generally accepted European standards, the switch should be at a height of 90 cm from the floor, and the socket - 30 cm.
- All cable routes must be located no lower than 15 cm from the ceiling.
- When routing the electrical cable yourself, it is necessary to create a conditional route diagram so as not to damage the electrical wiring in the future.
- To prevent possible mechanical damage to the cable, it is recommended to place it in special boxes.
- The cable should be fastened to the wall every 40-65 cm.
Many electricians strongly recommend using a three-wire system with an additional grounding conductor (usually a yellow or green wire) to which all electrical appliances in the room should be grounded (connected).
Briefly about other fastening methods
These methods are more relevant to open wiring:
Securing the cable using dowel ties
They can be used to fasten cables of any cross-section: round or flat. It is convenient to fasten cables of different diameters; you can fasten several cables at once.
Fastening with clips
For fastening the wire in a corrugated pipe to the surface, clips are ideal, which are attached to the wall using “quick installation” or self-tapping screws - if the wall is made of plasterboard. The size of the clips is selected in accordance with the diameter of the corrugation.
Securing the cable using nail clips
Low-current cables (telephone, antenna, fiber optic cable and Internet cable) can be secured to the wall using nail brackets. Cable clamps can be used for both round and flat cables.
Installation of electrical cables on brick and concrete walls
Depending on the quality of the wall sections, cable laying along the building facade is carried out with varying degrees of protection. Installation is carried out in a corrugated pipe for laying cables or steel shells. It is important that the electrical wire laid in the pipe is not a source of spread of moisture, fire, or smoke from one part of the room to another.
Wire insulation is of great importance. Read here about which insulation is better.
The joint installation of power and low-current lines implies compliance with the following rules:
- In dangerous areas of the wall, additional protection should be provided. Laying armored cable is necessary in places where fire may occur;
- sealing of all openings, pipes, additional and backup boxes. The entire space between the electrical wiring at the wall entrance is carefully sealed;
- Laying cables through walls is carried out with a sleeve. The space between the sleeve and the cable is also sealed;
- the hole in the wall is made in accordance with the clauses of the regulatory documents.
For additional protection of the electrical network, corrugation should be used.
So, first you need to determine the point where you plan to drill a hole in the wall. Depending on the diameter of the electrical wire and corrugation, the required hole is drilled. The sleeve is selected with a small margin so that the electrical wire can easily pass through the pipe along with the protective sheath.
Electrical wires between boxes and connection points pass through grooves in the wall. They can be made in brick and concrete walls in several ways - with a wall chaser, a grinder and a hammer drill. Each of these tools has its own advantages and helps prepare the wall surface for laying electrical wiring.
How to determine where the phase, zero and ground are. The wire colors will help you.
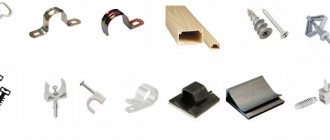
Types of fastenings
The following fasteners are used for laying conductors:
- Nylon ties . Budget-friendly and fragile, afraid of frost, bright sun and heaviness, disposable. Used for fastening single cables and lightweight structures.
- Metal ties . Made of stainless steel, unpretentious, can withstand loads of up to 30 kg, therefore they are often used by installers.
- Platforms for clamps . They are attached to screws that are screwed to the trays. A tie is threaded onto the platform and a wire is attached to it.
Influence of base material
Another factor influencing the choice of methods for attaching the cable to the wall will be its design and materials of manufacture.
Load-bearing and internal walls of the building are erected in the following options:
- reinforced concrete panels;
- brickwork (solid, hollow, multilayer, combined);
- wooden (logs/beams);
- poured monolithic concrete;
- sip panels;
- frame-panel construction.
In each specific case, it is necessary to decide which fastener to use for the selected type of wiring.
Brickwork
The diagram and method of how to secure the cable to a brick wall are chosen based on the available tools and materials. As a rule, masonry is not left without a protective coating of plaster, so the wiring will be of a closed type.
If the volume of work is large, you will need a hammer drill and a grinder to align the groove channel. Short sections can be completed by hand with a chisel and hammer.
Cables on brick
An example of wiring on a brick wall is visible in the photo:
You can reliably fix the connection of wires to the wall using simple methods that do not require the expense of special fasteners: quick-drying mortar (alabaster, plaster, glue), wire to driven nails/screws, strips of tin + nails. The main condition is reliable fastening without the possibility of displacement or sagging.
After the cables are laid, the channels will be covered with a layer of plaster. To prevent them from affecting the monolithic structure of the applied mortar, the recesses are covered with a reinforcing mesh.
Monolithic solid surfaces
The wires are attached to the concrete wall with dowels using a mounting gun or manually drilling holes for installing a plastic sleeve, to which a fixing bracket or clamp is screwed.
Plastic clamp
A version of what the plastic fastener looks like is shown in the photo:
Depending on the diameter of the cable (bundle of wires), staples, perforated metal tape of industrial production and home-made are also used as fasteners.
The use of a mounting gun on various types of cable and corrugated concrete fastenings is demonstrated in the video:
Laying in pipes
Monolithic concrete surfaces are not grooved; wires are fastened on trays, in pipes or using corrugations. The wiring can remain open, be mounted inside the wall during its construction, or be hidden under the finishing trim. Sometimes, to simplify the work, channels are cut into the slabs of permanent formwork, but this solution leads to disruption of the uniformity of the thermal insulation protection of the house in the places where the polystyrene foam board material is removed.
The feed-through Ø of various standardized products allows you to select the material in which the appropriate number of supply wires can be laid. The characteristics of corrugated PVC pipes for laying power networks are presented in the table:
Before installing the corrugation according to the design diagram in the self-leveling wall, you need to thread a soft wire into it, so that later you can easily insert the wires. If you need to lay several cables in one tube, diverging in different directions in intermediate fittings (tees, elbows, crosses), then thread the required number of wires in directions, and the corresponding ends are marked in different colors (paint, colored electrical tape).
If such preparation for pulling the soft core is not made in advance, then you will have to use a cable (approximately Ø 3 mm), which confidently passes into the pipe at a distance of 3 - 4 m. The end of the cable must be closed with soldering or a round nozzle so that it does not fluff up in the narrow corrugation , did not get stuck, did not damage it when feeding forward with scrolling.
In conditions that do not require a strict aesthetic approach, in technical rooms, to reliably protect external wiring, a more rigid metal hose is used connecting distribution boxes (also metal). The principle of attaching it to the wall is no different from the plastic corrugation and is shown in the diagram:
In all cases (pipe, corrugation, metal hose), it is important to firmly fix the cable exit into the connectors of the attached box at an angle of 90°, so the first fastening is placed at a distance of no more than 10 cm.