What brands of electrical cables can be used for laying underground
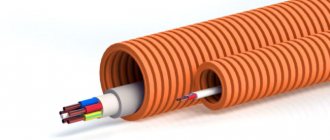
GOST requires that electrical cables be laid in the ground with additional protection from mechanical damage and high humidity. That is, to enter the house from the pole, it is advisable to take an armored electrical cable of the following brands:
- AVBbShv stands for ( A - Aluminum conductor, B - Insulation of conductors made of polyvinyl chloride plastic, B - Armor made of two steel strips, b - Without a cushion, which is the inner part of the protective cover, placed under the armor in order to protect the element underneath from corrosion and mechanical damage from armor tapes or wires, Shv - Protective cover in the form of an extruded hose made of polyvinyl chloride plastic;
Cable AVBBShv
- VBBShV stands for (* - the absence of the letter A means that the conductor is copper, B is insulation made of PVC plastic, B is armor made of galvanized steel strips, b is without a cushion under the armor, Shv is a pressed-out PVC protective hose;
Cable VBBShv
- PvBShv stands for ( Pv - Insulation - cross-linked PE, B - Armor cover - galvanized steel tapes, Shv - Protective hose - PVC plastic compound.
PvBShv
cable Also suitable for soils with normal acidity are AAShp , AAShv , AAB2l , AAP2lShv , ASShl and other similar products.
Laying electric cables in chemically active soils (swampy areas, salt marshes, slagged and littered soils) is possible with lead armor or an aluminum sheath. Here it is advisable to use the following types of cable products: AAPl, ASB, AAB2l, AVBbShp, AVBbShv, APvBbShv ASPl, AAShv, AABl, AAShp, AAP2l, and others.
For domestic needs, a regular PVC-sheathed cable is suitable, as it is durable and sealed. It is quite enough to power a facility with a small number of electrical appliances (bathhouse, utility unit, animal room, shower). To connect street lighting on a site, NYM, SIP, VVG are usually used, which last for several years. But all these cables are not intended for underground installation and quickly become unusable. More powerful cables cost more, but also last much longer. Taking into account the complexity of installation work, it is better to give preference to special cables: AAP2l, ASB, APvVG, ASpl, APVG, APsVG, AABl, AAShp, AAPl, AVVG, AAShv, etc. In permafrost areas, special frost-resistant types are used for laying underground cables - PvKShp.
Price list
| № | Service list | Unit change | Price according to price |
| 1 | Installation of cables with a cross-section of up to 6mm2 on walls and structures | m.p. | 80 |
| 2 | Installation of cables with a cross-section > 6mm2 on walls and structures | m.p. | 150 |
| 3 | Installation of cable up to 6mm2 in PVC corrugation | m.p. | 100 |
| 4 | Metal installation Pipes on walls and structures for wires | m.p. | 160 |
| 5 | Installation of cable with a cross-section up to 6mm2 in a cable channel | m.p. | 20 |
| 6 | Installation of cable duct up to 4x40mm | m.p. | 80 |
| 7 | Installation of cable duct up to 80x40 | m.p. | 100 |
| 8 | Installation of cable channel up to 110x60 | m.p. | 140 |
| 9 | Pulling cables into corrugated cable pipes up to 6 mm sq. | m.p. | 40 |
| 10 | Pulling the cable into a corrugated cable pipe up to 16 mm sq. | m.p. | 50 |
| 11 | Pulling the cable into a corrugated cable pipe up to 35 mm sq. | m.p. | 60 |
| 12 | Installation of wires (television, telephone, twisted pair) on walls and structures | m.p. | 50 |
| 13 | Installation of cables on metal trays with a cross-section of up to 95 mm | m.p. | 400 |
| 14 | Installation of cables on metal trays with a cross-section of up to 150 mm2 | m.p. | 500 |
| 15 | Installation of cables on metal trays with a cross-section of up to 240 mm.ka | m.p. | 600 |
| Scoring and drilling | |||
| 1 | Grooving grooves in brick | m.p. | 250 |
| 2 | Grooving grooves in foam blocks, plaster, section up to 6 cm2 | m.p. | 80 |
| 3 | Grooving grooves in concrete up to 6 cm2 | m.p. | 300 |
| 4 | Scoring on the ceiling | m.p. | 350 |
| 5 | Drilling a hole for a socket, distributor. box (concrete) | PC. | 310 |
| 6 | Drilling a hole for a socket, distributor. box (brick) | PC. | 250 |
| 7 | Drilling a hole for a socket, distributor. box (plaster) | PC. | 150 |
| 8 | Drilling holes up to 80mm in concrete | PC. | 400 |
| 9 | Drilling holes in a brick wall up to 80mm. | PC. | 340 |
| 10 | Punching holes in a brick (foam block) wall d up to 20mm | PC. | 100 |
| 11 | Punching holes in a concrete wall d up to 20mm | PC. | 190 |
| 12 | Drilling through holes in a wooden base d up to 20mm | PC. | 180 |
| 13 | Making through holes in drywall | PC. | 80 |
| 14 | Making a niche for an electrical panel in concrete | PC. | 3000 |
| 15 | Making a niche for an electrical panel in brick | PC. | 1800 |
| 16 | Making a niche for an electrical panel in plasterboard | PC. | 600 |
| Electric points | |||
| 1 | Installation of a switch (dimmer) socket openly | PC. | 250 |
| 2 | Installation of sockets, switches (dimmer) in socket boxes | PC. | 120 |
| 3 | Installing a power outlet | PC. | 380 |
| 4 | Installation of a socket box | PC. | 50 |
| 5 | Disconnection of the distribution box | PC. | 180 |
| 6 | Installation of external distribution boxes | PC. | 85 |
| 7 | Installation and connection of a TV splitter | PC. | 250 |
| 8 | Installation and connection of the fan | PC. | 450 |
| Installation and connection of lamps | |||
| 1 | Installation and connection of a lamp with socket E14, E27 | PC. | 250 |
| 2 | Installation and connection of the lamp in the Armstrong ceiling | PC. | 300 |
| 3 | Installation and connection of a spotlight | PC. | 200 |
| 4 | Making a niche for a spotlight in plasterboard | PC. | 80 |
| 5 | Installation (Gluing) of LED strip | m.p. | 150 |
| 6 | Installation and connection of luminaire type RKU, RSP | PC. | 550 |
| 7 | Installation and connection of the frequency converter | PC. | 3000 |
| 8 | Spotlight installation | PC. | 750 |
| 9 | Installation and connection of lamp type LPO 2x36 | PC. | 300 |
| 10 | Installation and connection of the chandelier | PC. | from 500 |
| 11 | Installation and connection of chandeliers from 15 kg | PC. | from 1400 |
| 12 | Chandelier assembly | PC. | 350 |
| 13 | Chuck installation | PC. | 90 |
| 14 | Replacing electronic ballasts | PC. | 500 |
| Installation and connection of protection devices | |||
| 1 | Installation and connection of the machine on a DIN rail (single-pole) | PC. | 150 |
| 2 | Installation and connection of the machine on a DIN rail (two-pole) | PC. | 300 |
| 3 | Installation and connection of the machine on a DIN rail (three-pole) | PC. | 350 |
| 4 | Installation and connection of a power type machine (in a molded case) | PC. | 450 |
| 5 | Installation and connection of RCD 220V | PC. | 300 |
| 6 | Installation and connection of RCD 380V | PC. | 450 |
| 7 | Installation and connection of starter, contactor | PC. | 500 |
| 8 | Installation and connection of a switch type YaBPVU | PC. | 1400 |
| 9 | Installation of surge protection (SPD) | PC. | 400 |
| 10 | Installation of cable channels pefr. for assembling panels | m. | 100 |
| 11 | Installation of time relay | PC. | 380 |
| 12 | Installation of voltage monitoring relay | PC. | 500 |
| 13 | Installation of a grounding bus | m. | 120 |
| 14 | DIN rail installation | PC. | 100 |
| 15 | Corrugated cable pulling. Pipe up to D-32mm | m. | up to 80 |
| 16 | Assembling the circuit in the installation box, soldering, welding. | PC. | 250 |
| Meter installation | |||
| 1 | Installation of a single-phase electric meter | PC. | 800 |
| 2 | Installation of a three-phase electric meter | PC. | 1250 |
| 3 | Installation of measuring current transformers | PC. | 600 |
| Shields | |||
| 1 | Installation of lighting board | PC. | from 380 |
| 2 | Installation of distribution cabinet | PC. | from 800 |
| 3 | Installation of the ASU cabinet | PC. | 3000 |
| 4 | Installation of a box with a step-down transformer | PC. | 350 |
| Equipment | |||
| 1 | Installation and connections of the UPS (depending on complexity) | PC. | From 300 |
| 2 | Installation and connections of batteries for UPS | PC. | 750 |
| 3 | Installation and connection of a stabilizer up to 12 kW | PC. | 1400 |
| 4 | Installation and connection of a stabilizer up to 30 kW | PC. | 2500 |
| Warm floor | |||
| 1 | Installation of heated floor with heating cable | m2 | 350 |
| 2 | Installation of infrared heated floors | m2 | 280 |
| 3 | Installation of a thermostat with sensor | PC. | 500 |
| Cable ends | |||
| 1 | Cutting and connecting the ends of cross-section cables. Up to 16mm2 | PC. | 26 |
| 2 | Cutting and connecting cable ends with cross-section > 16mm2 | PC. | 160 |
| 3 | Cable cutting, crimping 25-35mm.kv | PC. | 255 |
| 4 | Cable cutting, crimping of lugs 35-70 mm.kv | PC. | 360 |
| 5 | Cable cutting, crimping of lugs 70-120 mm.kv | PC. | 900 |
| 6 | Cable cutting, crimping of lugs 120-185mm.sq. | PC. | 1170 |
| 7 | Cable cutting, crimping of lugs from 185-240 mm.kv | PC. | 1280 |
| Dismantling works: | |||
| 1 | Dismantling a socket, switch, circuit breaker | PC. | 40 |
| 2 | Dismantling the lamp | PC. | 30 |
| 3 | Dismantling the chandelier | PC. | from 100 |
| 4 | Fan removal | PC. | 80 |
| 5 | Dismantling old wiring (cable) | m.p. | 40 |
| 6 | Dismantling the electric meter | PC. | 250 |
| 7 | Dismantling the distribution box | PC. | 80 |
| 8 | Dismantling the lighting board | PC. | from 400 |
| 9 | Dismantling the distribution cabinet | PC. | from 800 |
| 10 | Dismantling the ASU cabinet | PC. | from 1100 |
| 11 | Dismantling the control panel | PC. | from 1300 |
| 12 | Dismantling the starter | PC. | 100 |
| 13 | Dismantling the transmission current | PC. | 80 |
| 14 | Installation of a ground loop busbar indoors | m. linear | 240 |
| 15 | Installation of a ground loop outdoors | m. linear | 380 |
| 16 | Installation of the main ground loop - in-line | PC. | 40400 |
| 17 | Measurements of ground loop resistance from issuing a protocol | PC. | 7000 |
| Commissioning works 5% of electrical installation work | |||
| Cable support systems | |||
| 1 | Tray gasket up to 400 mm wide | m. linear | 190 |
| 2 | Tray gasket up to 200 mm wide | m. linear | 120 |
| 3 | Installation of bracket for tray up to 400 mm | m. linear | 100 |
| 4 | Installation of bracket for tray up to 200 mm | m. linear | 80 |
| 5 | Installing a cover for a tray up to 400 mm | m. linear | 40 |
| 6 | Installing a cover for a tray up to 200 mm | m. linear | 30 |
| 7 | Tray gasket up to 300 mm wide | m. linear | 240 |
| 8 | Installation of bracket for tray up to 300mm | PC. | 80 |
| 9 | Installing a cover for a tray up to 300mm | PC. | 30 |
| 10 | Installation of bracket for tray up to 300 mm | PC. | 80 |
| 11 | Installing a cover for a tray up to 300 mm | m. linear | 30 |
| 12 | Tray gasket up to 500mm wide | m. linear | 300 |
| 13 | Installation of bracket for tray up to 500mm | PC. | 110 |
| 14 | Installing a cover for a 500mm tray | m. linear | 40 |
| Additionally | |||
| 1 | Coefficient for work after 22.00 (night rate) | Ph.D. | 1,20 |
| 2 | Coefficient for working in cramped conditions | Ph.D. | 1,4 |
| 3 | Coefficient for working with expensive materials, cramped work, as well as work in cold rooms | Ph.D. | 1,8 |
| 4 | The coefficient of work at height (work that is performed at a height of 1.3 m or more from the surface of the ground, ceiling or working floor, including from the working platforms of lifts and mechanisms, as well as at a distance of less than 2 m from unfenced edges at a height of 1 ,3 m and more) | Ph.D. | 1,5 |
| 5 | Coefficient for work at sub-zero temperatures | Ph.D. | 1,8 |
In the ground, as a rule, armored wires are used, that is, with a metal sheath: such a cover provides protection from chemical exposure. If the electrical installation of wires is carried out with non-armored cables, then PVC or asbestos-cement pipes are used. They protect against accidental mechanical damage.
We carry out electrical installation of wires in the city of Moscow on the basis of engineering calculations in strict accordance with the customer’s wishes, offering the most effective solution at the most favorable price.
Laying underground occurs in several stages:
- Routes are selected and agreed upon, marked and laid out.
- A trench is dug out.
- The pillow is being arranged.
- Protective pipes are laid if provided for in the project.
- The material is being prepared for the upcoming installation.
- Install couplings.
- The wires are buried and protected with brick or asbestos-cement slabs.
Specialists lay signal and warning tape if this item is provided for by the project. Next, a hidden work report is drawn up and the line is tested, after which it is covered with soil. The price of the service depends on the type, length of the section, complexity of the sections and method (trenches, pipes). The cost of electrical installation work performed by our company is indicated in the price list.
Rules for developing cable routes
Work begins with the development of the cable laying route. There is no doubt that laying the cable in a straight line is the most profitable option, but this is not always possible. The design of the electrical cable laying route is carried out taking into account the following points.
- The distance from the track to large trees should be more than a meter. If a tree grows in the path of laying the cable, it should be bypassed along an arcuate path at a distance of 1.5 m from the trunk. If it is not possible to go around the tree, a metal tube is driven into the ground and a cable is pulled into it.
- It is advisable to design the route bypassing areas with increased traffic: parking lots, access points for sewage disposal vehicles, sidewalks, pedestrian paths, etc. These areas are bypassed along the perimeter. If it is not possible to bypass areas of high load, the cable is laid in cases to increase protection. It is mandatory to use cable channels at the intersection of the electrical cable route with drains, water supply, sewerage and other underground utilities. Also, channels for electrical cables are laid in sections less than 50 cm deep and where it was not possible to bypass solid objects, such as the remains of an old foundation or large stones.
- If the underground route runs parallel to the foundation, the distance between them should not be less than 60 cm. Laying the cable at a shorter distance is prohibited, since ground movements or shrinkage of the building can harm the power line.
- If possible, the route should not intersect with other cables. If this is not possible, both electrical cables must be placed in cases that protrude beyond the crossing by at least 1 m in both directions, and the cables in the ground should be at a distance of at least 15 cm above each other.
- As a rule, it is almost impossible to completely avoid difficult areas, and there is no need for this. In problem areas, it is enough to use corrugated pipe, metal tube or HDPE as cases. Sections of metal pipes are connected to each other by welding so that the joints do not damage the sheath of the electrical cable.
Basic methods of installing 10 kV cable lines
Laying cables in trenches
This is the most common and simplest method. It consists of excavating holes in the ground along the entire length of the route and placing the main wire there. It is laid directly into the ground without the use of additional structures. Sometimes, when laying lines, the conductor is additionally covered with red brick or reinforced concrete slabs.
Trench parameters
- Depth: not less than 700 mm. In some cases, it is possible to reduce this indicator to 500 mm: if we are talking about the area at the entrance to the building with a length of less than 50 cm and where the route intersects with underground structures. In this case, protection with asbestos cement pipes will be required.
- Width: calculated in such a way that between parallel laid lines with a voltage of 10 kV there is an interval of at least 100 mm, and the distance from the side walls of the recess is at least 50 mm.
Connection points
Where branches from the main highway will appear in the future, the trenches will be expanded. Wells or pits appear in which couplings will be placed.
There should be no more than 6 couplings per section of a 10 kV line 1 km long. Each unit is subject to requirements for tightness, resistance to moisture, mechanical strength, and absence of corrosion.
Laying cable lines in blocks
In this case, the protective structure is an underground structure made of asbestos-cement or ceramic pipes, as well as reinforced concrete panels. Among the features of this installation method are:
- The reliability and safety of lines is significantly increased;
- The installation process becomes more complicated;
- Financial and time costs increase;
- The current loads on the cable are lower (in comparison with the trench or open method of laying 10 kV lines).
Reinforced concrete channels, tunnels, blocks of pipes, etc. are erected as protective structures. This method of installing cable lines is used quite rarely.
Laying wires on support structures
This technique is found when installing an electrical network in production workshops, when it is necessary to run a line along the wall of a building or in a tunnel. The supports themselves are made of steel sheets. They can take the form of racks with shelves, brackets, or wall shelves.
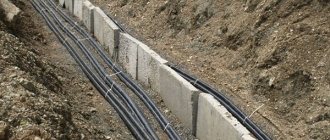
Method of laying cables in the ground
Laying the cable in the ground
After the electrical cable laying project has been developed, excavation work begins. The depth of the trench should be 70-80 cm, and the width depends on how many cores will be laid in the trench. The distance between them should be at least 10 cm. If the trench is ready, the following operations must be performed.
- Remove and remove anything that could damage the cable insulation and cause power outages: stones, splinters, roots and other sharp objects.
- Level the soil at the bottom and compact it a little.
- Cover the bottom of the trench with sand 10 cm thick and slightly level it. Regular quarry sand can be used, but it must be sifted to remove stones, glass, etc.
- Compact the sand cushion, removing depressions and hills.
- Check the condition of the cable insulation; if a violation of integrity is detected, insulate it additionally.
- Place covers on the cable.
- Lay the cable in a trench with a sandy bottom, without tension. The cable should lie with slight bends. The waves protect the line from breaking when heaving from frost or when soil moves.
- Cases are placed in places of increased pressure.
- Before digging a trench, the installed electrical cable should be checked for damage. You can test the conductors with a multimeter or a regular tester and check the grounding. If the insulation is damaged, you will have to look for the damage and repair it.
- If the parameters are within normal limits, draw a plan for the route on a scale with reference to surrounding objects. Be sure to indicate the distance from a reliable object to the cable. For example, from the corner of a house or the edge of a plot. If it becomes necessary to repair or replace the cable, a dimensional plan will make it easier to access the damaged area.
- Cover the laid cable with sifted sand. The layer is at least 10 cm. There is no need to compact it strongly, you can simply compact it with your feet.
- Next, pour a layer of 15-20 cm of previously removed soil. As you backfill, you also need to remove stones and foreign objects. The soil layer is also leveled and compacted.
- A signal tape with the inscription “Caution, cable!” is buried shallowly in the ground. During excavation work, it will protect underground electrical wiring from accidental damage.
Underground cable installation technology
Laying an electrical cable in the ground at a summer cottage, the territory of a private household or other facility begins with excavation work. Before this, you need to decide on the depth and width of the trench. The depth must be at least 80 cm, and the width 30 cm for each cable, if there are several of them. In accordance with the developed plan and route markings, soil sampling is carried out. The trench is cleared of foreign hard and sharp objects, and its walls should have a slight slope. After excavation work is completed, the cable is laid according to the following algorithm:
- the bottom of the trench is leveled, covered with sand in a layer of 15 cm and compacted;
- Protective cases are placed on the prepared pillow, if necessary;
- the cable is pulled through the cases, maintaining the required slack;
- the protection pipes are connected into one whole in one of several ways;
- a layer of sand 25 cm thick is poured on top of the laid cable in protection;
- the top filling is slightly compacted, preferably with your own feet;
- plastic warning tape must be laid with the lettering facing up;
- the trench is filled with soil, layer by layer, with mandatory compaction.
Attention! Don't rush to bury the cable! Be sure to invite a representative of the energy company that gives permission to connect to public electrical networks. You can carry out underground laying and installation of the necessary equipment yourself, but authorized power engineers must check for compliance with GOSTs and PUE (electrical installation rules)!
It is advisable to lay the cable in one single piece, without any connections. If this option cannot be implemented, then the individual pieces must be connected in mounting boxes specially designed for outdoor use. The device is installed on a post above the soil surface, at the junction of the cable, where its ends are brought to the surface. Do not bury the box, as this will quickly damage the line.
At this point, the laying of cable lines in the ground ends and the stage of connecting underground electrical communications to the general power supply networks and input into buildings located on the site begins. Each stage of work, both when laying the cable and connecting it, has its own nuances, which will be highlighted below. We will begin this description with the choice of cable for underground routes.
Features of laying cables underground
Running an electrical cable underground is a labor-intensive process. It is not easy to dig a trench, place cases, and prepare the sown sand. Moreover, you will have to carry the cable. Burying is easier than digging a trench, but this process also requires effort and time. And if after some time the insulation becomes unusable, you will have to start all over again: dig a trench, look for the cable, determine the location of the damage and only then fix it. Therefore, everyone understands that it is better to do it well the first time, so as not to waste time and energy on repairs later.
GOST allows for electrical cables to be laid in a trench without a protective casing. This does not contradict the regulations. And if you install a high-quality armored cable, it will last quite a long time.
If you decide to use a VVG or NYM cable, it is better to lay it using a double-walled corrugated hose DKS, and in areas of increased load additionally use cases made of rigid pipes or DKS, only with a larger diameter. Asbestos-cement pipes or thick-walled plastic pipes are often used.
This method of laying cables underground reduces the risk of damage to electrical wiring, because significant loads fall on the walls of the pipes, and not on the protective casings and wires themselves.
Another advantage of laying cables underground in plastic and asbestos-cement pipes is the possibility of quick replacement. The new pipe is tied to the old one, and then the old one is simply pulled out. In this case, the new piece simply “crawls” into the place of the old one as the pipe or corrugated hose is pulled out. But this method does not always work, since over time both the pipe and the corrugated hose are destroyed under the influence of ice and increased loads.
Based on the above, we can conclude that although the regulations allow cables to be laid in paper insulation, it is better to play it safe and use plastic or cross-linked polyethylene. Any paper, despite special impregnations, deteriorates faster than polymers, therefore, it is short-lived. And since laying and subsequently replacing a cable in the ground requires significant effort and labor, it is more advisable to use more reliable materials during installation.
Methods for laying cables in the air
Cable installation over the air is carried out in one of the following ways:
1. Using a special crossbow or gas weapon (a cable to which the cable is attached is fired). 2. By pulling cables along the ground and then lifting them onto both buildings or supports at once. The cable is first rolled out, and then lifted and tensioned. 3. On overpasses. This method is used when laying cables at metallurgical, chemical, petrochemical and other enterprises, as well as in areas that are overloaded with various underground communications.
For aerial installation, we recommend copper cable of the brands PvVG, VRG, NRG, SB2lG, VSVG, etc. It is important that the copper cable for aerial installation has reliable protection from external influences (ultraviolet, rain, snow, hail, etc.).
Cable connection method
If possible, it is better to lay the cable in the ground as a whole section without joints. If a cable of the required length cannot be found, then the ends will have to be connected manually. To do this, both sections need to be brought to the surface, then a special mounting box must be installed and the ends of the cable connected in it. If you don’t have enough experience and don’t have special equipment, you shouldn’t try to connect the cable, it won’t lead to anything good. An incorrect connection will quickly destroy the entire line, and you will have to dig up again, look for damage and redo everything. And a connection made professionally is convenient, because there is always the possibility of re-docking it.
Laying options
It is advisable to consider options for how to route the cable along the fence if the height of the fence reaches 2 meters or higher, or the fence is less than 2 meters high and is made of corrugated board, wood or brick. Let's consider the rules for laying the line in each case.
The height of the fence is from 2 meters. The simplest option, in this case there is no need to arrange cable protection from mechanical damage. It will be enough to stretch a steel cable with a diameter of 1-2 mm between the fence posts, to which the conductor is secured with nylon clamps, approximately as in the photo below. This installation method is the simplest to implement, requires relatively low material costs, and meets fire safety requirements if the fence is made of wood.
Methods for introducing cables into the house
It is unacceptable to lay the input under the foundation, even if we are talking about a shallow-depth strip version. To avoid problems, at the foundation stage you need to think about cable anchors. These are sections of pipes into which the cable is subsequently inserted. The cross-section of the pipe for the cable channel must exceed the cross-section of the cable itself by at least 4 times. And so that various living creatures do not penetrate into the hole, upon completion of installation the channel is hermetically sealed. For these purposes, the old-fashioned method is suitable: plug the hole with a rag moistened with cement milk. You can also froth it.
Another way is to raise the cable in a metal tube along the outer wall to the level at which the incoming cabinet hangs. Then, at the same level, the embedded wall is installed according to the rules described above, and the cable is led inside along it. This is a suitable method for a monolithic foundation or when you do not want to violate the integrity of the foundation.
Methods for introducing underground cables into a house
In the case of armored cables, the armor will have to be grounded. To do this, you need to weld or solder an additional wire and connect it to zero in the panel room. If you neglect this rule, when a phase breaks down, the armor will be energized. If a person touches the armor at this moment, he or she may receive a fatal electrical injury. If the armor is protected, in an emergency the machine will work and the power supply will be turned off until the reasons are clarified.
Laying wires inside buildings
Among the general requirements, it is inadmissible to lay nearby circuits with voltages up to/above 42 volts, with rare exceptions (see clause 2.1.16). Relevant to today's reality, when I wanted to illuminate the bathroom without restrictions with a constant 12 volts. Fortunately, the DIN rail adapter sells for 800 rubles. It turns out that it is forbidden to merge into one branch. Wire your home from 12 volts. Safe, allows the use of a minimum wiring cross-section.
PUE 6 gives the answer here: use fireproof partitions between the wires. Much more interesting would be the requirement for the phase and neutral (return) wires to be connected together (it is prohibited to use adjacent pipes). Village residents should know: cables are not laid in combustible cavities or niches in wooden walls. Ceramic insulating rollers are used (distance to the plane is more than 10 mm, or by placing fireproof material).
When laid open, the distance from the floor is at least 2.5 meters. We believe that in private houses the villagers do not comply with the requirement. Only for high-risk areas. There is no obligation to reduce the voltage, placing the upper limit at 42 volts, placing the electrical cable for internal installation at a height of two meters. But it can be done. Remember the 12 volt adapter, placed in the distribution board. It will definitely be enough to provide lighting for a village house. As for sockets, protected installation (cable ducts) should be used. When the protection level of the box is IP20 and higher, the height is not standardized. Connections are allowed in the form:
- crimping;
- terminal blocks;
- welding;
- rations.
Cable management in the house
By the way, bare twists are prohibited even for grounding circuits. The insulation of joints is no worse than linear sections. Next come the obvious requirements: absence of tension, accessibility of components and connections (to service specialists). A combustion-protected cable must be laid under the cladding: many installers have forgotten. YouTube will give you any number of stories: the cladding of PVC panels hides traditional PVC for several cores. The mentioned part of the PUE is inactive, the installation process itself does not become less dangerous. The conclusions are clear: we do it for ourselves (so that we are guaranteed nothing will happen).
Thus, laying an electrical cable in a wooden house is a delicate art. Aluminum corrugation is useful. It is clear that plastic is not always suitable for reasons of lack of fire resistance. Take comfort: aluminum corrugation is easy to ground, certainly improves the electromagnetic environment of the house, simplifies the replacement of wiring, and protects against fire. Like other metal parts of the building, hoses, pipes, cable channels are zeroed. Can serve as a screen. Read more about the standards for laying electrical cables in the table. 2.1.3 PUE 6, regarding the peculiarities of installation in various climatic conditions (heat, dampness), many rules are prescribed in section 2.1.
Increased attention is paid to places where they intersect with pipelines. The electrical cable is laid leaving a gap of at least 5 cm. If there is hot water or something flammable (read gas) in the pipeline, the distance doubles. Moreover, 25 cm of protection against mechanical damage should be provided on each side of the intersection. On a parallel pipeline or cable, the distance is taken to be 10 or 40 cm minimum, depending on the contents (gas, kerosene, hot water, steam).
External building wiring
How to thread an electrical cable into a pipe or corrugation
There are two types of corrugations sold on store shelves: with and without a probe inside. It is more convenient to work with a probe. A thin wire runs along the entire length of the corrugation. A cable is tied to it and pulled inside. The procedure is very simple. But if there is no wire inside, problems may arise. While it is still possible to tuck a hard cable inside, in the case of a soft cable everything is much more complicated. The procedure will require time and ingenuity. First, you will have to stretch a thin rope into the tube, tie a wire to it, and only then pull it inside. A regular vacuum cleaner will help you thread the string into the pipe. To do this, one edge of the rope is securely fixed, and the rest is inserted into the pipe without lumps or loops. A vacuum cleaner is connected to the other end and the opposite hole is closed. Due to the rarefaction of the air inside the tube, the end of the rope flies out from the other end.
Laying electrical cables under the road
If, when developing a route, it is not possible to avoid the intersection of the cable with the road, you will have to obtain permission from the owner of this road. This point cannot be neglected, since there may be other communications in the ground that can be easily damaged during excavation work. As for dacha plots, in this case you need to obtain permission from the administration of the dacha village.
The rules for laying cables under the road are the same as for normal situations. Separately, it is worth mentioning the laying of cables under asphalt. If the track surface is destroyed, you will have to restore everything at your own expense, and this is an expensive proposition. In this case, it is advisable to use special equipment with which you can make a puncture under the route. This will cost less than restoring asphalt after excavation.
Installation of cables from Tandem-Electro
Electrical installation and laying wires in the ground are the most economical way to arrange a line. In addition, unlike the air method, in this case they are not exposed to precipitation and phenomena, which increases their service life.
We guarantee high-quality and timely performance of cable laying services in Moscow of any complexity. Such lines have a number of advantages:
- They are not exposed to atmospheric surges.
- Ensure maximum uninterrupted operation of the network.
- They are distinguished by high quality and reliable functioning of communication devices and alarms.
- They have a long service life, including a maintenance-free period.