How to install light on a balcony or loggia with your own hands
The balcony is a room in which electricity is not provided according to the project. However, light is not superfluous here. Lighting is important not only for solving functional problems, but also for zoning space. In this article we will tell you how to independently install light on the balcony and organize the whole process, taking into account the structural features of the room.
Precautions when installing electrics on the balcony
A loggia, if it is glazed and especially insulated, is a fire hazard. The risk is even greater if the wall paneling and frames are made of wood. Please take this into account before starting work on electrifying the loggia.
If you have already arranged this part of the room, then it is preferable to install hidden wiring on the balcony. An open type of wiring is possible, but then it is necessary to adhere to fire safety requirements.
If the wire is insulated and located in a recess in the wall, and is also covered by sheathing, this is less dangerous, and such a situation is unlikely to cause a short circuit.
If you have worked with electricity before, you know how important it is to follow safety regulations. Do not work with exposed wires or power on. Provide protection systems. Be very careful.
The electrical line must be de-energized until the very end of the work. The wire phases should be determined using an electrician's indicator or a special tester. Exposing and twisting wires together, ignoring solder connections or cable lug design, is strictly prohibited. Homemade twisting will become hot under tension - this can lead to a sudden fire.
Important preparation points
Remember that lighting on the balcony must be carried out in compliance with safety. It is necessary to correctly calculate the cross-section of the wire depending on the number of sockets and other electricity consumers.
- to protect against fire, the wire should be routed in a corrugated hose;
- it would be correct to use wiring of the same cross-section as at the entrance to the apartment;
- when connecting switches, sockets and other network elements, you need to do a full check of the contacts;
- It would be ideal to use a distribution box - if there is none, you should route the wiring from the outlet closest to the loggia.
Before you install an outlet on the balcony, you need to determine the tools and materials for the work. You need the socket itself included. You can choose different options, external or internal, depending on the features of the balcony. For additional protection against accidents, we recommend stocking up on corrugated pipe to properly insulate the wiring. To output electricity, reliable and safe insulated cables, preferably double ones, are suitable.
If you also decide to install light, then stock up on switches. For hidden installation, it would be correct to use a cable channel. Basic tools:
- screwdriver;
- sharp knife;
- wire cutters;
- hammer drill or drill;
- insulating tape;
- indicator screwdriver.
Selecting wires
The first and most important thing is to determine the type of wires to use in your work. You have to choose from two types - aluminum and copper wire. They both have the same cross section. However, aluminum wires do not have the same capabilities as copper wires.
Copper ones can withstand significant electrical loads and are very flexible. This is very important, since the wire will bend many times on the balcony. The disadvantage of copper is that it is more expensive than aluminum.
Choose a cable with good, preferably double insulation, brands NYM, VVG, PVS.
All future wiring must consist of insulated cables and must be of the same type. The wiring will be pulled from the nearest outlet from the hole drilled in the wall through the wire into the hole in the conduit.
Important preparation points
Remember that lighting on the balcony must be carried out in compliance with safety. It is necessary to correctly calculate the cross-section of the wire depending on the number of sockets and other electricity consumers.
- to protect against fire, the wire should be routed in a corrugated hose;
- it would be correct to use wiring of the same cross-section as at the entrance to the apartment;
- when connecting switches, sockets and other network elements, you need to do a full check of the contacts;
- It would be ideal to use a distribution box - if there is none, you should route the wiring from the outlet closest to the loggia.
Before you install an outlet on the balcony, you need to determine the tools and materials for the work. You need the socket itself included. You can choose different options, external or internal, depending on the features of the balcony. For additional protection against accidents, we recommend stocking up on corrugated pipe to properly insulate the wiring. To output electricity, reliable and safe insulated cables, preferably double ones, are suitable.
If you also decide to install light, then stock up on switches. For hidden installation, it would be correct to use a cable channel. Basic tools:
- screwdriver;
- sharp knife;
- wire cutters;
- hammer drill or drill;
- insulating tape;
- indicator screwdriver.
We lay the wiring
The choice of hidden or open wiring is directly proportional to the presence or absence of cladding on the balcony. Open wiring can be on “bare” balconies, and closed wiring can be on sheathed ones. Let's look at two options as an example of how best to conduct electricity to the balcony.
Hidden wiring
This type of wiring is the preferred option, regardless of whether the loggia is insulated or glazed. It should be laid before the insulation and finishing stages. And this is also a prerequisite when combining a balcony with a living room.
The wiring is installed in the following order:
- special grooves are cut into the wall using a perforator;
- Wires are laid along the grooves;
- The holes are covered with putty or other finishing mixture on top.
It turns out neat, aesthetically pleasing and safe. A cable hidden in the wall poses much less of a threat. Before covering the ceiling, the wire is laid in a metal hose.
Open wiring
Open wiring, or external wiring, does not contradict building standards and safety regulations. Therefore, it can also be laid on glazed loggias, but after the finishing stage. Open wiring is easier to do than closed wiring.
To install light on the balcony with your own hands using open wiring, stock up on the following tools:
- cable channel made of non-flammable plastic;
- plastic corrugation;
- metal hose to prevent fire and moisture penetration;
- mounting boxes that are needed to connect cables and wires;
- cable with the cross-section necessary to maintain power;
- switches, lamps.
Junction box and cable management.
Attention. All associated mechanisms (such as a junction box, switches in housings, moisture-proof lamps, sockets with a protective overlap) involved in the installation of electrical systems on the balcony must have an appropriate level of protection (IP) from dust and moisture, because in the room that is closer all bordered by the street, a lot of dust and condensation.
Instructions for conducting open wiring consist of the following steps:
- first, the location of all visible elements involved in lighting is marked;
- lines are drawn along which the wires will pass;
- cables passing through metal hoses are secured inside along the entire laying path, or a cable is laid on the wall and immediately secured.
There are two options for powering the cable:
- if electricity needs to be supplied for two or three lamps, it is connected to the outlet from the apartment that is closest to the balcony;
- if not only lighting, but also household appliances are installed on the loggia: a microwave oven, a computer, and there is more than one socket on the balcony, it is connected to the electrical panel.
Installing an electrical outlet on the balcony
To install an outlet on the balcony, you can use overhead and built-in plugs.
The first option is used when the wiring is open and the external socket is mounted on top of the wall. The process is simple, but operation may be inconvenient.
Installation of an internal outlet is used for hidden wiring. It almost does not protrude from the wall, so it is more comfortable during use. But the installation is more complicated because the contacts with the junction box are placed in the wall. At the site of the future socket, make the necessary recess using a hammer drill with a round nozzle. The connector can be positioned according to European/Russian standards. This is 30/80 cm above the floor.
It is recommended to replace the single plug connector with a block. The installation process is not very complicated, and this may be useful in the future.
Connecting the internal plug
In the vast majority of cases, the light to the balcony is supplied from the nearest plug. It is in the adjacent room. Therefore, we will analyze this common option for generating electricity on the balcony.
They mark the route and create a technological groove in the wall. To obtain a neat channel, use a grinder to make two parallel cuts. Then, using a hammer and chisel, knock out a groove between the cuts. Because electricity to the balcony space is conducted through the adjacent wall, a hole is drilled on it, based on the diameter of the corrugated pipe. A recess is created in the right place to suit the size of the socket, switch and/or distribution box. You can use a drill with a round diamond bit or a hammer drill. We select the drilling mode and do not use combined with chiselling.
The mounting box, when placed in the hole, must be hidden in it.
The cable should be laid in a channel in a corrugated/metal fireproof pipe and fixed to brackets/alabaster mortar in 20 cm increments. To connect to the contacts, it is necessary to provide a 5-centimeter wire outlet on the side of the power plug.
On the other hand, the wire runs through a hole in the wall, leads out onto the balcony space and is trimmed. The free cable end protruding from the box must be 5 cm long. The socket box is mounted in a hole prepared for the box. The hole is moistened with water, then filled with a solution of an alabaster/gypsum mixture, then the box is driven into it until it is flush with the wall surface.
We recommend making the socket box deeper so that it does not stick out into the wall. Then the mounted socket will adhere as tightly as possible to the wall surface. The mounting locations of the plug for the self-tapping screws must be located on the same horizontal or vertical line.
Installing the switch
You have figured out how to install light on the loggia, but to control electrical appliances on the balcony you need a switch. This “participant” of the electrical system can consist of one, two or three keys - depending on how many lighting sources you plan to install.
One type of switch - a dimmer - can not only work on the “on-off” principle, but also regulates the brightness of the lighting. There is an indicator light on the body of this device that glows in the dark and makes it easier to find the switch.
Note: Please study the dimmer packaging before purchasing. It usually indicates the total power of possible light sources. For example, if 300 W is specified, the dimmer can be used for three light bulbs, the power load for each of which will not exceed 100 W.
Step-by-step instructions for installing the switch are as follows:
- the switch is connected to the break of one cable core;
- the other core runs directly to lighting fixtures and sockets;
- the wire is mounted in series with three or more lamps;
- the lampshades are finally fixed in place;
- fastenings are checked for reliability of connections and connections;
- connection to the power point is made and the operation of the entire system is checked;
- Once the functionality is confirmed, the room continues to be refined.
Choosing lamps
The market for lighting fixtures for balconies is replete with a variety of lamps. Before installing light on your balcony with your own hands, visit a lamp store and choose what you need. Your purchase may affect installation details.
You should consider the size of the lighting fixtures, the purpose of the room and the level of lighting in it. Light sources should also match the overall interior design.
Pro tip: choose outdoor, waterproof lamps, especially if the balcony will remain open from the street. And it is better to exclude sockets with this option.
Lighting equipment is classified by type of light and installation.
By type of light
Lighting devices differ in the specificity and direction of the light flux. Hence their classification:
- directed downwards - consistently and evenly illuminate the room, relevant for lighting balconies with low ceilings, as well as for local zoning;
- reflected (reflecting from the ceiling, the luminous flux is directed to illuminate the entire space) - provide diffused light that is evenly reflected from all surfaces, suitable for general lighting. If the light requires adjustment, purchase a dimmer.
By installation type
If you correctly place lighting equipment in a room, you can win in design. Proper lighting can “raise” the ceiling and “spread” the walls - giving the visual effect of a spacious room. Any designer will tell you this.
For the electrification of balconies, the following types of localization of lamps are especially popular:
- ceiling - a classic of the genre and the most common choice among buyers;
- floor ones are, of course, mobile lighting devices, but they are too bulky for a balcony;
- wall-mounted (as an option - sconces) - create intimate lighting and a cozy atmosphere, suitable for classic interiors;
- spotlights (recessed) are an excellent solution; they are practical, aesthetically pleasing, and, moreover, the service life of these light sources is quite long. You can install them yourself if you have some skills. And another disadvantage is related to the light emitted, which can tire the eyes due to the narrow focus.
Depending on the purpose and functionality, lighting on the loggia can be of the following types:
- general (one or two chandeliers);
- local (lamp with a closed shade);
- decorative (designer lamps, can be located in different places);
- combined (as an example - a combination of wall sconces and a ceiling chandelier);
- two-level (with suspended ceilings or plasterboard structures).
The space on the balcony can be advantageously zoned - highlighting both a workplace and a relaxation area, softly illuminated by a small sconce.
To organize electric lighting on the balcony, you do not have to be an electrician. The main thing is to adhere to the proposed instructions and follow safety rules. And you will succeed.
How to lay wiring under the casing
This is a compromise method of wiring that can be implemented for lighting on a balcony. In this case, electricity is laid under the casing. This method of electrical wiring is applicable if you are using cladding with a frame. It has no significant disadvantages; rather, on the contrary, it combines the advantages of hidden and open wiring.
To install wiring in this way, you do not have to make grooves. The wires will not spoil the interior design. But you will have to lay the wiring in a protective corrugated sleeve made of plastic. This is necessary for additional insulation of wires and safety during operation.
As a result of the work carried out, you will receive an additional room with a suitable type of lighting.
Do-it-yourself spot lighting on the loggia
Lighting in the arch between the room and the balcony
Spot lighting on the balcony
Balcony lighting option
Installing lighting on the balcony with your own hands
Original balcony lighting
Sconces on the balcony as lamps
Balcony lighting option
Installing LED lighting on the balcony with your own hands
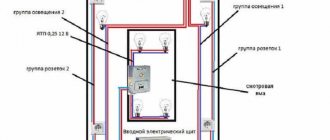
Wiring installation diagram
Do-it-yourself electrical wiring for the loggia
After glazing a loggia or balcony, the owner of the home receives additional space. How to properly install electrical wiring will be discussed in the article. It is quite natural that having glazed the balcony, the owner has a desire to make it completely habitable, that is, to install electricity. It should be noted that if the glazing is made without insulation, and the heating has not yet been supplied, electrical installation is carried out in strict accordance with existing safety standards.
Of course, it is possible to install light on an unglazed balcony or loggia, but then all electrical installation work will have to be carried out in accordance with external wiring standards. Moreover, the lamp itself must have a degree of climate protection of at least IP44, and the switch must be installed indoors. It is not recommended to install sockets on an unglazed balcony at all.
When engaged in independent electrification of a glazed loggia, it is necessary to take into account that all electrics, even with very good quality glazing, will be constantly exposed to low temperatures and moisture. Taking these factors into account, it is necessary to install products with a degree of climate protection of IP21 and higher.
In a situation where there are elements of decorative finishing on the balcony, or their presence is expected in the future, it is recommended to lay the wire in a corrugated pipe. If there is no decorative finishing on the balcony, then it would be more advisable to lay the wire in a cable channel with double insulation (for example, ShVVP-2 x 0.5). It is not recommended to do open wiring on clamps or brackets.
If there is a grounded wire in the room, that is, the electrical installation is made according to a 3-wire circuit, then it is more advisable to connect a similar power line to the balcony. In this case, the socket is mounted with a grounding contact, and in a light bulb or lamp the grounding wire must be connected to the housing.
As for the installation location of the switch and socket, the choice here is based on personal needs and layout nuances. You just need to remember that the installation height of the switch should be at least one and a half meters from the floor, and the socket should be at least 80 cm.
Next, a distribution box is installed into which all the wires are laid. There are usually eight of them: two from the outlet, two from the switch, two from the lamp and a double network cable. It is best to mount it under the ceiling (approximately 15 centimeters away).
The connection is made via a wire in a cable channel, which can be connected directly to the socket terminals. Naturally, the power line must be equipped with a residual current device. Having completed the above procedures, it is necessary to restore the power supply and immediately, without delay, check whether the system is working. If everything is in order: the switch works, the lamp is on, and there is voltage in the socket, then the loggia is completely ready for use.
Conducting electricity to the balcony from an outlet
Connecting to an electrical source may seem like the most difficult part. If there is a distribution box nearby, the connection must be made to it. If you don't have one, use a power outlet. In fact, all manipulations turn out to be simple even for novice electricians.
https://youtube.com/watch?v=1J2DLrEOUiw
It is important to know exactly the location of the phase and zero, which can be easily checked with an indicator screwdriver. After turning off the power to the apartment, you should connect the phase and neutral on the balcony to the corresponding wires that were pulled from the outlet. After installing electrical sockets, the room can be called residential, and the renovation will be completely completed
After installing the electrical outlets, the room can be called residential, and the renovation can be completely completed.
Electrical wiring installation
The result of the work carried out on balcony lighting is largely determined by the preparatory stage of work. Already at the planning stage, the type of electrical wiring, types of lamps and other similar devices should be determined.
Light on the balcony photo
Further work on lighting the balcony is carried out according to the drawn up plan.
Wiring types
There are two types of wiring: open and closed.
Hidden - they are installed during the cladding of the balcony or they lay wires in grooves, curtains made in brick, concrete or other wall material, and then seal them with plaster.
Photo of lamps on the balcony with hidden wiring
Thus, closed wiring is safe to use and does not disturb the interior of the balcony. However, with this type of installation, access to the wires is limited, and sometimes it is simply impossible.
If the aesthetic appearance of a loggia or balcony is not so critical, you can lay open electrical wiring along the wall or ceiling. It is mounted on special support insulators attached to the walls or ceiling.
Exposed wiring in retro style
This installation has an undoubted advantage - ease of installation and the possibility of quick local repairs or complete replacement of wires. In addition, connecting external sockets and switches does not present any difficulties.
Important: To avoid fire, it is recommended to insulate the wires by placing them in special corrugated hoses, trays or boxes.
Mounting box and corrugation with electrical cable
Wires in the balcony lighting device
The following wires are mainly used for lighting wiring:
- aluminum - they are more popular due to their flexibility and greater aesthetics;
- copper is a more durable option that can withstand heavy loads, however, over time it is susceptible to oxidation, and due to heating if contact is poor, it can burn out.
Obviously, only wires of the same type can be connected to each other, otherwise differences in the physical characteristics of the materials will cause a short circuit.
Installation of open wiring from a room outlet
The installation procedure is similar to the hidden wiring option. True, there are differences in the way the cable is laid.
Initially, twisted wires on insulators were used for open wiring. Today there are other more convenient and reliable methods.
- Securing cables with brackets. The method is simple and cheap, but the design of the room is disrupted.
- Laying in pipes. Corrugated pipes are used, which fit well into the design of the balcony.
- Packing in boxes. The most popular installation method for balconies. The connecting cable is laid in a plinth or rigid boxes made of non-flammable plastic. These devices have snap-on covers that facilitate the process of laying and replacing networks. In addition, sockets are mounted on the boxes or sockets and switches built into the baseboard are used.
In general, in order to install electricity on a balcony, you do not need to obtain an electrician’s diploma. It is enough to have skills in working with electricity, follow safety rules, and not violate installation technology.
Subscribe
Choosing lighting elements for the balcony
Balcony lamps such as sconces, table lamps or even floor lamps can act as lighting elements. Lighting of a large balcony and loggia can be organized using several lighting sources, say, a chandelier and sconces or spotlights.
Photo of lighting on the loggia
The choice of the type of lamp is also based on the functional purpose of the room.
Depending on the mounting method, there are wall, recessed, ceiling and floor lamps.
Floor lamp on the loggia
Lamps are divided according to purpose:
- to general
- decorative,
- local,
- combined,
- indicative,
- expositional.
Decorative lamps for the loggia photo
Of particular importance when choosing lamps for a balcony and loggia is the direction of the light flow. According to this principle, they are divided into the following types:
Direct light
The lighting of these devices is directed downwards. This is the best option for balconies with low ceilings. Devices of this type are also used to create local illumination zones for certain interior items, when reading and working in a balcony office.
Lighting stylized to match the design of the balcony
Reflected light
Lighting from the lamp directed upward creates smooth and measured illumination. The absence of a glare effect ensures special comfort in the room. To increase efficiency and illumination, materials with a maximum reflective coefficient are used for finishing the ceiling in balconies and loggias.