Which OSB to choose for the floor
Oriented strand board comes in different thicknesses depending on the number of layers of wood chips and coarse shavings. During the production process, these layers are stacked on top of each other in a mutually perpendicular direction: in one along the length of the sheet, in the other across. This technology makes it possible to increase the strength of the finished slab, increase its fracture resistance, and ensure dimensional stability. The thinnest slabs consist of three layers.
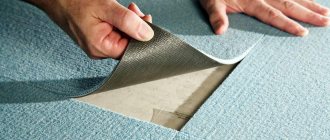
OSB holds fasteners much better and has higher moisture resistance compared to a similar material - chipboard. Therefore, it is possible to lay such panels on the floor, but you should choose slabs of a certain class for this.
According to the main characteristics, OSB occupies an intermediate place between chipboard and plywood Source i.ytimg.com
Moisture resistance class
The moisture resistance of the boards depends on their density, the size of the chips, and the type of resins used as a binder. OSB is divided into 4 classes according to this parameter:
- Class 1 includes slabs that are unable to withstand the penetration of moisture into the structure of the material. They are the cheapest and are used for the manufacture of packaging containers and interior decoration of dry rooms.
- Class 2 OSB boards have slightly higher moisture resistance, but are not sufficient for laying flooring. They are used in furniture production.
- Moisture-resistant slabs of class 3 can be laid on the floor, used for both internal and external use.
- The most moisture-resistant material is class 4. It can be used as a floor covering, but it is more expensive than others, so it is used mainly when a finished floor is created from it.
OSB is increasingly used in interior design as a facing covering Source yandex.net
On a note! It is more correct to call such panels by the abbreviation OSB - oriented strand board. The name OSB is an incorrect interpretation of the English abbreviation OSB (oriented strand board), but this spelling has already taken root among builders, sellers and buyers of the material, and therefore is not considered erroneous.
Thickness
The slabs are available in thicknesses from 6 mm to 26 mm. The larger this parameter, the higher the bending strength. Since the floor takes on significant horizontal loads, strength is critical when choosing a material. It must match its design.
When laid on a flat, solid base - a concrete slab, screed or solid wooden flooring - the thickness of the OSB for the floor should be at least 10 mm, provided that too heavy equipment or furniture will not stand on it. Otherwise, it is better to increase it to 16 mm.
If the flooring is mounted on logs, its thickness is selected in accordance with the step between them:
| Distance between lags, mm | OSB thickness, mm |
| 350-420 | 16-18 |
| 450-500 | 18-20 |
| 500-600 | 20-22 |
| 800-1000 | 25-26 |
Dependence of sheet thickness on the pitch between logs Source chudopol.ru
If you decide to make a floor from OSB on logs, it is recommended to calculate the cost of several options with different distances between the support bars, since the cost of the material increases with its thickness and number of layers. In one case, it will be more profitable to make a thicker frame, in another - to buy thicker slabs.
Manufacturer
Until recently, it was possible to buy OSB in our market only from Chinese and European manufacturers. But for several years now, factories producing oriented strand boards have been operating in Russia. The most famous of them are Kalevala and the enterprises of the Austrian company Kronospan.
Domestic Kalevala products have been on the market since 2013 Source centro-snab.ru
The possibility of using them for finishing residential premises depends on where and by what technology the slabs are produced. The fact is that Chinese products are made on the basis of phenol-formaldehyde resins, which provide moisture resistance and glue the layers together. This substance is very toxic, so materials containing it are not recommended for use in finishing residential buildings. They can be used to make a floor in a garage, utility room and other auxiliary buildings.
OSB floor boards must be made using other binders that are safe for health. For example, polyurethane resins, which are used by our and European manufacturers. But a European brand is not a guarantee of quality, so studying product certificates is mandatory when choosing such material.
Advice! To ensure a good fit of the panels to each other and prevent their displacement, it is recommended to choose tongue-and-groove slabs with a tongue-and-groove connection for the flooring.
Slabs with a tongue-and-groove lock Source st48.stblizko.ru
So, let’s summarize the results of our analysis: a material of at least 3 moisture resistance class, produced using a harmless binder and a thickness that corresponds to the expected loads, is suitable for flooring.
Why OSB is the best choice
Oriented strand board is known to consumers by the abbreviations OSB, OSB and OSB. All this is the same material, consisting of several layers of compressed wood. The shavings are impregnated with a polymer resin-based composition that protects them from rotting. In each layer, the shredded wood has a different orientation, which provides the canvas with the maximum possible strength.
Osb has a lot of advantages over materials of a similar profile:
- durability;
- moisture resistance;
- resistance to deformation;
- environmental Safety;
- low ignition threshold;
- hypoallergenic.
Classification of OSB boards
Manufacturers offer OSB of different thicknesses: 8, 9, 10, 12, 15, 18, 22 mm. Standard canvas sizes are 2500x1250 mm and 2440x1220 mm. There are three types of OSB boards:
- OSB-1 - used for making furniture and as packaging material.
- OSB-2 - intended for use in rooms with low levels of air humidity. Can be used for covering any load-bearing structures.
- OSB-3 - capable of withstanding the most severe operating conditions and being an integral part of load-bearing structures.
- Varnished osb is a canvas coated on one side with high-quality waterproof varnish.
- Laminated osb - on one side of the canvas there is a laminated coating.
- Tongue-and-groove osb - the canvas has a tongue-and-groove end on 2 or 4 sides, which allows for high-quality horizontal and vertical laying of slabs.
There are three ways to lay oriented strand boards:
- directly onto concrete;
- on the logs;
- on top of the old floor.
READ MORE: Thickness of porcelain tiles on the floor
Contraindications for installation
Since the basis of OSB boards is wood, no matter how good moisture resistance they have, they should not be installed in rooms with high humidity or laid directly on the ground without high-quality waterproofing.
You will also have to abandon such a coating if you plan to install a heated floor underneath it. There are several reasons for this:
- when heated, the synthetic resins contained in the material will evaporate toxic substances and poison the air in the room;
- heated glue loses hardness and becomes plastic, thereby reducing the strength of the floor slab;
- the efficiency of the heated floor will be poor due to the low thermal conductivity of OSB, which creates a serious obstacle to the escape of heat from the source to the outside;
- to get the desired temperature, you will have to spend a lot of electricity and overpay for heating the stove itself, and not the floor surface.
At the same time, OSB can be used as a base for laying a heated floor on top of it, including for pouring screed Source www.gk-gss.ru
Characteristics of OSB boards
OSB is a construction analogue of plywood and chipboard. These slabs are more durable and are perfectly adapted for finishing. The material appeared on the market relatively recently. OSB is made from wood chips, which are laid in 3 layers. They are glued together with special resin-based compounds. In this case, the layer in the middle is laid perpendicular to the other 2. Due to this, the resistance of the material to loads is formed.
When marked, this parameter is indicated by a number. The lower the value, the lower the resistance to loads and damaging factors such as humidity. For example, index 2 means that the OSB board is not moisture resistant and cannot withstand intense long-term loads. And the number 4 indicates that the product can be used as a ceiling that will not collapse even when exposed to moisture.
USEFUL INFORMATION: Kitchen renovation: where to start, main stages
The material for laying on the floor is selected based on the mentioned designations in order to form a smooth rough surface. You should not skimp on the quality of the OSB board. This may result in the need to lay an additional layer, which is expensive and inconvenient. The best option is OSB 3 board.
The question often arises: “Do I need a substrate for OSB?” From a practical point of view, no. Wood itself is an excellent thermal insulation material, and if you consider that it is laid on wooden boards, then no backing is needed. But sometimes it is still used to achieve the maximum possible soundproofing effect.
Installation methods
OSB can be laid on joists, laid directly on a concrete screed or a well-leveled old wooden covering. The installation technology will be different in each case. In addition, such slabs can serve as a basis for finishing decorative flooring or themselves serve as a facing covering. This point is also taken into account during installation.
See also: Catalog of companies that specialize in finishing materials, including those for flooring.
On a concrete base
The minimum recommended thickness of an OSB board for a floor in a house mounted on a concrete screed is 16 mm. If parquet boards, laminate or other hard material will be laid on it, you can reduce the thickness to 10-12 mm. And in the case of using slabs as an independent finishing coating, it is advisable to choose a material more than 20 mm thick.
How it behaves during operation depends on the installation location and environmental conditions. As you know, concrete absorbs moisture. Therefore, if you are not sure that the screed is made according to the rules with high-quality waterproofing (for example, in a basement or ground floor), then it is better to choose the installation option using joists.
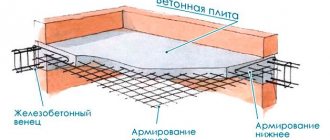
Waterproofing should extend onto the walls Source sam-sebe-dizainer.com
In other cases, the only condition for installing a floor made of oriented strand boards is a perfectly flat surface of the screed and its maturity - at least four weeks must pass after pouring.
OSB is glued to a concrete floor with universal assembly adhesive, after priming and drying the surface.
Another method of mounting on a screed is fastening with dowels. In any case, the sheets are laid with offset seams. Along the perimeter it is necessary to leave a small gap between the slabs and the wall in case of thermal expansion of the material. For the same reason, floor panels are not laid close to each other, but at a distance of 2-3 mm. This temperature gap is filled with elastic silicone sealant upon completion of installation.
Dry screed
- First of all, the concrete screed needs to be thoroughly cleaned from dirt and dust. This step is dictated by the fact that the subsequent installation of OSB is done with glue, which should adhere well to the concrete.
- Priming the screed with a primer is also performed to improve the adhesion of the glue to the surface, which becomes dense after such treatment.
- Next, proceed to cutting the OSB sheets. When laying, leave gaps of 3-5 mm around the perimeter of the room and between the sheets. In this case, the sheets are laid staggered so that the four corners do not converge in one place.
- Now you can fix the sheets on the floor. The bottom layer is covered with rubber parquet adhesive, after which the OSB is additionally fixed to the floor using driven dowels.
The dry backfill on the exposed beacons must be carefully leveled, after which you can begin laying OSB boards. The first and second layers are placed with the seams offset relative to each other by a distance of at least 20 cm. The oriented strand boards are fixed with wood screws 25 mm long, screwing them along the seams of the top layer every 15-20 cm.
Traditionally, drywall is laid on a dry screed, which is subsequently covered with laminate or parquet boards. At the same time, the cost of drywall is significantly lower than OSB. It is advisable to use particle boards if they are planned to be covered with linoleum in the future.
In order for the self-tapping screws to fit flush with the slab, first narrow holes with a diameter of 3 mm are drilled under them, and then they are expanded at the top with a 10 mm drill. Thus, the cap will be completely hidden in the thickness of the slab.
If you need to level a concrete floor. then it is advisable to opt for a material whose thickness is 1-1.5 cm. Before you begin laying the slabs, you need to prepare a concrete base. It is cleaned of all kinds of debris and dust. Then, the surface is treated with a primer. To increase adhesion, concrete contact is added to the primer. Subsequent work begins after the soil has dried.
The next step is cutting the sheet material. It is most convenient to perform trimming with a circular saw or jigsaw. If such a tool is not at hand, then an alternative option is a sharp hacksaw. Then, the slabs need to be laid on the floor, using a rubber-based adhesive for fixation.
To distribute the glue evenly over the entire surface of the sheet material, use a notched trowel. Then, the sheet is applied to the floor and pressed for a few seconds.
Additionally, the slabs are fixed with dowels. In order for the fixation to be reliable, the dowels must be located from each other at a distance not exceeding 30 cm. If a high-quality adhesive was used when laying the slabs, then the dowels are driven only at the corners of the slabs.
READ MORE: How to level a laminate floor with your own hands
Since wood material was used in the manufacture, the slabs should not fit flush against the walls. During operation, they can expand and contract. It will be enough to place the plates at a distance of 1 cm from the walls. You should also make expansion joints between the plates themselves.
All that remains is to clean the surface from construction dirt and fill the seams with polyurethane foam. After 4 hours, you need to remove excess foam and you can begin laying the decorative flooring.
The most important stage is preparing the rough foundation. It is necessary to assess the condition of the boards and joists. If there are rotten or deformed elements, they must be replaced. It is advisable to treat all wooden structural elements with special compounds that protect against moisture and fungus.
Then, armed with a building level, you need to examine the surface for the presence of bumps and depressions. If there are any, you will have to remove the boards and level them according to the level of the logs. Next, using a sander, you need to clean the boards from any remaining paint and varnish, and finally level the surface. After this, you can begin laying the sheet material.
Since OSB will be laid not on logs, but on boards. You can opt for slabs 1 cm thick. The material is laid in such a way that the seams are offset. When laying on plank flooring, the presence of cross-shaped joints is unacceptable.
The material is fixed using dowels. To increase the strength of the floor, you can lay another layer of oriented strand boards. But do not forget about the expansion gaps between the slabs and the walls.
Video description
How to lay OSB on a concrete floor and secure it with dowels is shown in this video:
On wooden flooring
Wooden floorboards only look and perform well in the first few years. then they begin to dry out, creak, dirt gets stuck in the cracks - and the coating requires repair. And in old houses, in which the wooden floor has been painted with oil paint or enamel for decades, even if it is well preserved, it looks out of date.
Laying linoleum on such a base is problematic: over time, the relief of the floorboards will show through the elastic material. It is not recommended to lay ceramic tiles directly on wood. Laying OSB on a wooden floor will help you get out of this difficult situation.
Installation is carried out in the same way as on a cement screed, but much easier and faster, since instead of dowels you can use ordinary wood screws, for which there is no need to drill holes.
But the old floor first needs to be repaired: remove the baseboards, replace rotten boards, remove loose nails and screw screws into the floorboards, pulling them to the joists. It is most difficult to level the surface if the difference in level is quite large.
Laying OSB on a wooden floor
Over time, a wooden floor can succumb to deformation, dry out and become brittle. In such cases, installation is done as follows:
- All protruding nails must be sunk into the board. This can be done with an iron bolt, the diameter of which matches the size of the nail head, and a hammer.
- All nicks and irregularities must be removed with a plane - manual or electric.
- OSB boards cut according to the markings should be placed on the floor so that the seams of adjacent rows are staggered.
- The OSB is fixed to the floor using 40 mm screws every 30 cm. In this case, the heads of the screws must be recessed into the thickness of the slab.
- The joints between the plates should be sanded at the final stage. It is most convenient to use a grinding machine, especially if you need to process a large area.
Oriented strand board and plywood can be easily processed with a sander with a mesh for drywall (read more: “Floor sander: the right choice from the options”). This mesh allows you to cover a much larger area than regular sandpaper.
Installation of OSB on logs is carried out as follows:
- First, the distance is calculated and the joists are laid evenly so that the joints of adjacent OSB slabs rest on the support.
- Next, you should adjust the position of the joists so that any three of them are at the same level. To do this, linings are used, and for checking, a long rule is used.
- Installed logs must be securely fixed using screws on anchors or dowels. Only those logs that are made of dried wood and laid in a dry room are not secured.
- Laying OSB sheets is done in the same way as on a wooden floor, after which they are fixed with self-tapping screws every 30 cm.
For ease of installation, you can pre-mark the location of the logs on OSB boards.
In conclusion, we note that additional information can be gleaned from the video materials attached to this article. We wish you a successful repair.
The owner of the premises does not always need to lay a new floor. Sometimes it is much easier for the owner to strengthen and strengthen the existing one. Basically, wooden floors require this approach. Before laying OSB boards, it is necessary to level the surface. There are two options for doing this job.
- Strengthen the boards as much as possible, eliminating gaps and deflections. Use a plane to smooth out the protrusions.
- If the surface is fairly flat, you can lay a substrate under the laminate and lay OSB boards on it.
READ MORE: Damper tape for floor screed
These are the least labor-intensive jobs that any owner can do. Laying OSB on a wooden floor can be done not only on a soft shock-absorbing substrate, but also on a pre-leveled layer of well-sifted river sand. In this case, all the cracks will be filled, which will give the floor additional strength.
Finish coating made of OSB boards
Having laid OSB on the floor, you do not have to cover it with a decorative floor covering, but finish it with paint or varnish. The first option makes it possible to obtain a flat and smooth surface of the desired color that matches the interior, the second option is to preserve the unusual texture of the slabs, which looks good in loft-style interiors.
The finishing sequence must be strictly followed:
- First, fill the gaps between the plates with a special sealant or putty and seal the mounting holes with screw heads. If varnishing is intended, then the product is chosen to match the tone of the wood.
- After the putty has dried, the areas treated with it must be sanded and the resulting dust removed from the surface.
- The next step is priming and completely filling the surface with a special acrylic putty.
- After sanding and removing dust again, you can begin painting or applying parquet varnish.
- The paint is applied in at least two layers, allowing the first to dry.
Installation of OSB floors
OSB is most widely used in the construction of floors - rough and single-layer. The subfloor is the basis for the finishing coating. It can be installed on a concrete or wood base floor.
Selection of slabs
OSB boards differ in types and technical characteristics. When choosing a material, you must follow several rules:
- The material must comply with the European environmental standard E1.
- It is better to install the subfloor from OSB-3 type boards, which are characterized by high density and sufficient moisture resistance.
- When laying on a concrete floor, you can choose a material whose thickness is 10 mm.
- The thickness of the material for the floor on the joists should be 15–18 mm with a step of less than 50 cm and 22–25 mm with a step of 60 cm.
Floor construction
OSB boards have dimensions of 1220x2440 mm. Laying is done in such a way as to minimize the amount of waste.
If it is necessary to cut material, it is not recommended to use a jigsaw, since this tool does not always allow you to obtain an even side cut.
The base for the floor depends on the type of foundation. In buildings with poured and columnar foundations, the flooring is made on wooden logs. For their arrangement, timber or multilayer boards are used. Both rough and finishing single-layer floors can be installed on the joists. Installation of OSB on joists is also possible if it is necessary to level the surface for the finishing coating.
The slabs for the subfloor are laid on the underside of the joists. The lower part of the slab is additionally treated with protective compounds. Most often, bitumen mastics are used for this purpose. A layer of insulation and another protective layer are laid between the joists and slabs.
Foam plastic can be used as insulation, and a protective layer can be laid from glassine.
Technology for leveling the floor on a wooden frame
The next step is to make the base for the finished floor. It is advisable to do it in two layers. The first one is installed in such a way that the joints are on the short side. To connect the layers, special spiral-shaped nails are used, and to ensure greater strength, the joints can be additionally glued. The material is attached to the joists using ordinary self-tapping screws. The slabs of the second layer are laid with a slight offset. A single-layer base can be made with a flat base surface.
During operation, OSB absorbs a certain amount of moisture, which leads to a change in the size of the material. This is compensated for by expansion gaps between the plates of about 3 mm. For two-layer bases with gaps, both layers are installed.
Surface treatment
OSB can be used not only as a base for floor coverings, but also as an independent material. If you do not plan to apply a topcoat, the surface must be further processed. This can be done using varnish applied in several layers.
Floor construction on joists
When using linoleum, carpet and other rolled materials as a finishing coating, it is necessary to ensure that the joints are as smooth as possible. In this case, the installation of the base is carried out from slabs with the minimum permissible thickness. The joints are treated with sealant. In small rooms where the OSB surface does not have seams, expansion gaps are made along the walls.
The base for the tiles must be stationary. To do this, you can place the logs more often. Another way to ensure the base remains stationary is to use a tongue-and-groove mount. The tiles are laid using adhesive for wooden surfaces.
When arranging the base for a laminate, no special requirements are imposed on OSB, since the coating itself has the necessary rigidity and reliability. The only requirement is that the base is even at the joints.
We recommend: Installing heated floors on a wooden floor
Video description
The technology for painting OSB is described in the video:
Advice ! For processing and decorative finishing of the floor, it is advisable to use all products from one manufacturer.
If varnish is used, the first layer can be applied with a brush or roller. When it dries, the surface is slightly moistened and “smoothed” with a wide spatula, removing small splashes, stripes and other irregularities.
When finishing, a small amount of varnish is poured onto the floor and spread with a spatula using wide movements to obtain an even and thin layer.
All work must be carried out at air temperatures above +5 degrees.
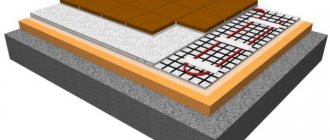
OSB on concrete floor
Concrete is a strong base, but very cold. And a regular screed is rarely perfectly level, so it needs to be leveled. Sometimes, over time, cracks appear in the screed. They also need to be sealed, since it is not worth putting a finishing coating on such a base. There are two ways. The first is to lay logs on the concrete, fill the gap with insulation, and lay OSB or other sheet material on top. This option is correct, and it is described above. But sometimes it is impossible to steal even those 5-8 centimeters from the height, since the ceilings in the rooms are low. Then you can do it wrong - lay OSB directly on concrete.
One of the options for properly leveling a concrete floor with OSB plywoodLaying OSB slabs on a concrete floor is not a completely correct definition. Rather, not lay it down, but glue it. Acrylic adhesive is used (not for tiles, but just universal mounting adhesive)
When choosing a composition, pay attention that it is compatible with concrete and wood, and brands may be different
Cracks in concrete can be closed with OSB boards laid with glue
How to glue OSB to concrete
The glue is applied to the base, passed with a notched trowel with a tooth of 4-6 mm (more is possible, but the glue consumption will be large). The height of the tooth depends on the size of the irregularities that exist. The height of the tooth should be 2 times greater than the amplitude of the irregularities. But such an alignment will only work if the difference is no more than 4 mm. For more significant unevenness, it is necessary to either fill in a leveling screed or grind the existing one, removing the most significant protrusions.
Before laying OSB, the concrete is primed. You can use the same glue diluted with water, or you can use another acrylic primer. If necessary, you can find soil with water-repellent properties.
Apply glue and spread it evenly with a notched spatula. In this process, the cracks are filled with glue.
The slabs are not placed close to the walls, but leaving a gap of 5-8 mm to compensate for thermal expansion. The same gap is left between the plates. To ensure that there is no empty space left around the perimeter, a damper tape or foam plastic cut into strips of suitable thickness is rolled out under the wall.
To make it easier to maintain gaps between the plates, you can use spacers of suitable thickness. As an option - crosses for laying tiles. After laying each sheet, be sure to check its horizontalness and check its level with adjacent sheets. They should all be at the same height.
We check that everything is at the same level and there are no differences
If there will be a soft floor covering in the future (linoleum, carpet, vinyl tiles), the seams must be sealed. They are filled with elastic sealant.
Briefly about the main thing
As you can see, OSB for flooring is an ideal material that allows you to quickly and without dirt level the base. But it should not contain phenol-formaldehydes and other toxic substances, so the choice should be taken seriously. Any flooring can be laid on such a base, including tiles and porcelain stoneware, but to do this it must be installed correctly. You can attach OSB to joists, plank floors or concrete surfaces, precisely following the installation technology. If everything is done well, the surface can be puttied and painted, leaving the slabs as a finished floor.
Ratings 0
Laying OSB on joists on a concrete base
If there is a concrete base (for example, a floor slab), installing joists and covering them with OSB sheets allows you to create a level floor without the use of wet leveling screeds. And also incorporate insulating, moisture- and noise-insulating materials into the structure.
Let's consider the technology of creating an OSB floor on logs on an existing concrete base. Logs (wooden blocks) are fixed to the concrete floor using dowels or anchors.
The wider the distance between the logs, the thicker the OSB boards used. If the pitch is 40 mm, then the minimum OSB thickness is 15-18 mm; if the pitch is 50 cm, the thickness is 18-22 mm; if 60 cm, the thickness is 22 mm or more.
We recommend: Izospan for flooring in a wooden house
Thanks to the logs, space is created between the OSB and the concrete floor. It can be put to good use by covering it with insulating material. For example, the floors of the first floors are often cold, so a thermal insulator can be laid between the joists: mineral wool, polystyrene foam, EPS, etc. If there is a wet basement under the ceiling, the floor structure is supplemented with vapor barrier films or membranes.
OSB boards are laid across the joists. The seams between adjacent slabs (widthwise) should run strictly in the middle of the log. During installation, it is recommended to leave expansion gaps (3 mm between the slabs, 12 mm between the OSB and the wall)
The sheets are fixed to the joists with self-tapping screws or nails (spiral, ring). Spacing of fasteners: along the perimeter of the sheets – 15 mm, on intermediate (additional) supports – 30 mm. Nails (or self-tapping screws) fixing the boards around the perimeter are placed at a distance of at least 1 cm from the edge (so that the OSB does not crack). Fastening elements are selected so that their length is 2.5 times greater than the thickness of the plates used.
How to fasten OSB boards to joists in an ordinary city apartment, watch the video:
Main nuances
The first question that requires an answer will be: is it possible to use OSB to assemble a subfloor? This is an important point, since for gluing shavings, which will be practically the only material used for the production of panels, a special binder is used that can release formaldehyde. The latter can cause serious harm to health. Many people are scared off by this point and they prefer other materials.
You can use OSB panels in the construction and decoration of the interior of a house. However, with some restrictions. Panels produced in Europe are required, since there is very strict control over the content of toxic substances in building materials and resin is used for gluing chips. Does not contain harmful impurities. Therefore, a subfloor assembled from OSB boards produced in European countries will be safe for health.
The second important point will be the type of parts themselves. There are four types, differing in moisture resistance and strength. When OSB is laid on a subfloor, the same type of parts is suitable as for finishing - OSB-3 panels. They are moisture resistant and quite durable. The thickness of the parts is determined by the distance between the lags on which they are laid. With a standard distance of 40 - 50 centimeters, the sheet thickness should be from 18 to 22 millimeters. If the subfloor is laid on a base made of concrete or stone, then the thickness of the parts can be reduced to ten millimeters.