Advantages and disadvantages of different options
The ceiling of the basement floor, as noted above, can be made of different materials, so the main advantages and disadvantages of each of them should be noted.
- Wooden floor. The advantages of wooden floors include, first of all, the low cost of work when compared with reinforced concrete. In addition, all the work can be done with your own hands, without the use of special tools. Among the disadvantages of wood, one can highlight a short service life, because the structure will be constantly exposed to adverse factors (including humid air). As a rule, to extend the service life of wooden basement floors, special antiseptic compounds are used.
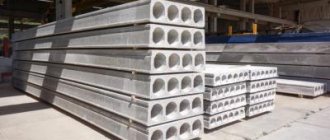
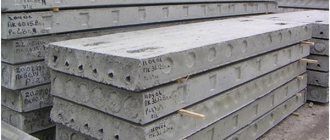
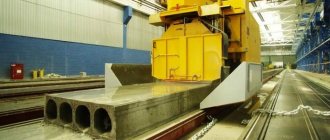
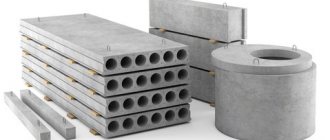
- Prefabricated hollow core slabs. You can cover the base with slabs very quickly. As the builders say: “They brought it and installed it.” This factor is of decisive importance in cases where construction work is strictly limited in time. But it should be noted that the installation of such slabs must be carried out using special equipment (a crane), which not every object can be approached (especially if construction is carried out in winter or late autumn).
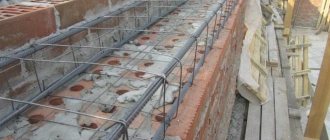
- Monolithic slabs. Such an overlap will have maximum spatial rigidity. The installation of the ceiling here can be carried out using a concrete pump, so it is not at all necessary to provide access for equipment to the construction site. The concrete truck itself can be located at a distance from the building.
The main disadvantage of this solution is the complexity of manufacturing and the significant weight of the monolithic slab. In addition, the measures to install such a floor are quite expensive: installing a pallet, installing reinforcing mesh, waiting for the concrete to harden, installing formwork, etc. It is worth noting that when installing monolithic floor slabs, a large amount of sand is required.
Schematic representation of a monolithic floor.
Despite this, many opt for a monolithic slab. In this case, the basement floor will be as strong and reliable as possible. A high level of thermal insulation and waterproofing will also be ensured (even without the use of special insulating materials).
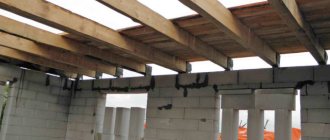
Ceiling of the basement floor using wooden beams
The basement is one of the main structural elements of the building.
It is designed to protect the walls and interior of the house from penetration and exposure to moisture.
The basement floor experiences significant loads, because it, among other things, plays the role of the floor of the first floor. Therefore, its design requires special attention.
As a rule, the height of the base does not exceed 80-100 cm. This is the most suitable indicator for the middle zone.
If the base is made too low or absent altogether, melt water will systematically wash away the structure of the house and penetrate into cracks in the walls and foundation.
During the winter months, this water will freeze and begin to tear the materials from the inside, which will lead to the impossibility of using the building in the future.
Installation of ceilings on wooden beams
When making a basement floor on a wooden beam, you need to take into account that the beam is mounted along a shorter wall. For example, for a room with a length and width of 4x5 m, respectively, four-meter wooden beams will be used.
If the building is brick, or the foundation is built from this material, then the beam is placed tightly in it. In the brickwork, it is necessary to provide openings in advance for the location of the floor beams. So that the depth of the support socket for the beam is at least 18 cm. This is necessary so that the beam rests on the foundation with a length of 15 cm and at the same time an air gap of 30 mm remains. This gap is needed to compensate for the expansion of the wood.
Installation of ceilings on wooden beams
Before laying the timber into the foundation, it must be cut at an angle of 60 from the end. The wooden beam must be positioned so that the cutting direction creates a distance from the beam to the bricks of at least 50 mm. That is, the lower part of the beam should fit closely to the brickwork.
Before installing the wooden floor beams, its ends must be wrapped in two layers of roofing felt and secured with nails. These actions prevent the timber from rotting in those parts where it rests on the foundation.
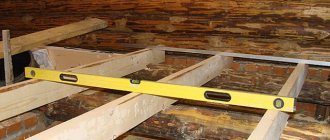
At the beginning of the work, two limiting beams are placed. At the same time, the timber level is maintained vertically and horizontally.
Boundary beams should be placed no more than 5 cm from the foundation; to level them, use scraps of wood coated with resin.
After the outer beams are aligned, a thread is pulled between them, along which the intermediate wooden beams will be aligned and aligned. Having completed the installation of the intermediate beam, its ends are insulated with mineral wool, then secured with a metal corner. To do this, one of the corner shelves is screwed to the beam with self-tapping screws, and the other is fixed to the foundation.
How to roll up correctly
After the beams are securely fastened, the cranial bars are screwed to them. They are bars with a cross section of 40x40 mm or 50x50 mm, which are screwed on both sides of the beam so that they can be rolled. Rolling is called flooring, which provides sound and heat insulation. Rolling boards are stuffed onto wooden blocks in such a way that they cover the entire space.
You cannot put boards or panels on the bottom of a block or beam, because they will only be held in place by nails. For these purposes, you need to use a tongue and groove board that has longitudinal grooves for connecting and a chamfer.
The finished flooring must be protected from destruction, so it is opened over the entire surface with an antiseptic. Then a vapor barrier is spread over it. The sheets of this layer must be placed overlapping each other by 10-15 cm. The next layer is the insulation, it can be any kind (roll, tile, bulk). If you need budget natural insulation, you can use dried sawdust. Watch the video on how to waterproof a floor.
The required height of insulation for the floor is 20 cm. If the cross-section of the beams does not make it possible to install insulation of such thickness, then you can lay logs on top of the timber, and insulation between them. In addition, beams with a large cross-section are often not very level for the floor. Often logs with a smaller cross-section are laid on top of them; they are more even. They are laid out perpendicular to the beam, with a smaller step. To level the logs, plastic wedges are placed under them.
How to increase the load-bearing capacity of a floor
By making a basement floor using wooden beams, you can save on roofing and insulation, without compromising the properties of this structure. With such a design solution, it makes sense to place a roofing material layer over the entire floor area. Backfilling will need to be done using compacted crushed stone or gravel.
The main advantage of a basement floor on wooden beams is that the load that this beam can withstand can be increased.
This is done by increasing the cross section of the beam, namely: boards of a certain thickness are nailed to the beams, they also rest on the foundation. Instead of boards, you can also use metal channels, which are attached to the beam with bolts. It is also possible to strengthen the ceiling using an easier method: laying additional beams between those that are already installed.
Thus, if over time, under the aggressive action of moisture, cold, and pests, wooden beams begin to collapse, then there is no need to completely redo the entire floor; it is enough to simply replace the damaged support beam with new beams.
There is a less budget option for increasing the load-bearing capacity of the floor - a cross arrangement of load-bearing beams. In this case, the floor is supported along the entire contour of the foundation. In places where the beams intersect, they are pulled together with clamps. Very often it is much easier to reduce the distance between load-bearing floor beams than to use a cross pattern.
Repair or replacement of attic floors
Payload on attic floor
usually taken to be 75 kg/m².
The approximate cross-section of beams
depending on the span width is given in Table 3.
Table 3: Sectional dimensions of wooden beams for attic floors.
| p/p | Floor span width, cm | Distance between beams, cm | Beam section, mm | |||||
| 50 mm wide | 60 mm wide | 70 mm wide | 80 mm wide | 90 mm wide | 100 mm wide | |||
| 1 | 2 | 3 | 4 | 5 | 6 | 7 | 8 | 9 |
| 1 | 200 | Depends on the section of the beam in the span | 50x70 | 60x60 | 70x60 | 80x50 | 90x50 | 100x50 |
| 2 | 250 | 50x80 | 60x70 | 70x70 | 80x60 | 90x60 | 100x60 | |
| 3 | 300 | 50x100 | 60x90 | 70x90 | 80x80 | 90x80 | 100x80 | |
| 4 | 350 | 50x120 | 60x110 | 70x110 | 80x100 | 90x90 | 100x90 | |
| 5 | 400 | 50x140 | 60x130 | 70x120 | 80x120 | 90x110 | 100x100 | |
| 6 | 450 | 50x150 | 60x140 | 70x130 | 80x130 | 90x120 | 100x110 | |
| 7 | 500 | 50x170 | 60x160 | 70x150 | 80x140 | 90x130 | 100x120 | |
| 8 | 550 | 50x190 | 60x180 | 70x170 | 80x160 | 90x140 | 100x130 | |
| 9 | 600 | 50x200 | 60x190 | 70x180 | 80x170 | 90x150 | 100x140 | |
READ ALSO: How to repair ceilings and floors with your own hands, general recommendations
When using sawdust or expanded clay as insulation
or other materials with a volumetric mass of
300-500 kg/m³, the cross-section of the load-bearing beams
should be taken the same as
for reinforced concrete crossbars
(Table 1) with a payload of
150 kg/m³
.
So that the interfloor beams
did not bend, they should be carefully calculated (see Tables 1-4) and laid at a distance
of no more than 1 m
from each other.
Attic insulation thickness
is given in Table 4.
Table 4: Thickness of attic insulation.
| p/p | Insulation | Unit change | Design winter temperature | ||||||
| -15°С | -20°С | -25°С | -30°С | -35°С | -40°С | -45°С | |||
| 1 | 2 | 3 | 4 | 5 | 6 | 7 | 8 | 9 | 10 |
| 1 | Mineral wool and felt with a volumetric mass of up to 200 kg/m³ | mm | 60 | 70 | 80 | 90 | 90 | 100 | 110 |
| 2 | Sawdust with lime with a volumetric mass of up to 300 kg/m³ | mm | 70 | 90 | 110 | 120 | 140 | 160 | 180 |
| 3 | Expanded clay or other bulk material with a volumetric mass of up to 500 kg/m³ | mm | 90 | 120 | 140 | 160 | 180 | 200 | 220 |
| 4 | Slag or other bulk material with a volumetric mass of up to 1000 kg/m³ | mm | 140 | 180 | 210 | 240 | 270 | — | — |
NOTE: Slag (fuel or metallurgical)
can be used for these purposes in extreme cases and only
for spans no more than 3...3.5 m wide
.To prevent beams from sagging
their cross-section should either be strengthened or the distance between them reduced. Both require additional consumption of lumber.
ATTENTION! Beams near stoves and chimneys
(for fire safety purposes) must be located
no closer than 40 cm
from the inner surface
of the nearest stove (chimney)
.
It happens that it is impossible to remove the beam from the stove (chimney)
.
In this case, the beam is cut into the crossbar, which in turn is cut into two beams, which slightly weakens them. To reduce weakening,
it is better to lay
beams with their thick ends towards the stove (chimney)
.
In such cases, if necessary, the beams are joined
with intermediate crossbars
(for fastening beams
around chimneys and stoves
).
Options for fastening the joining of beams
are shown in Fig. 6.
The joint of the beams
is fastened using
cranial bars
, by insertion method with fastening
with staples or using clamps
. All fastening methods are performed with stitching the ends with nails or staples.
Do not close the vents for the winter
In no case should you close the vents for the winter to protect against the cold, as was often done in the old days. The ceiling structures may become so damp that they will not dry out even by mid-summer - the house will feel damp and unpleasant odors will appear.
It is allowed to cut grooves in beams for laying communications, but the depth of such grooves should not exceed 1/4 of the thickness of the beam. Photo: IzbaDeLuxe
Calculation of beam diameter
In order to determine the cross-section of the beams, it is necessary to divide the space of the room step by step so that the value is within a meter. For example, with a room length of 7.3 meters, the calculated step will be 0.73. Using standard tables of sections, select the required indicator for the timber.
With a span length of 4 meters, step 0.6, the beam should be 10 cm thick and 20 cm high. Taking into account the support on both sides, we calculate that its length should be 4.3 meters.
When covering with wood, the span width cannot be more than 5 meters. It is important to carefully calculate the loads so that there is no sagging of the ceiling or destruction of the construction materials, which is dangerous for the life of the owner and leads to additional costs for repairs.
All calculations are automated and there are special programs for calculations, so you should double-check the obtained values on the computer.
Basement floor using wooden beams: how to make a beam floor from wood
The ceiling of the basement floor with wooden beams is a structure made of logs, which are located at a short distance from each other. The beam is a wooden beam, turned with a rectangular cross-section. All load-bearing logs, inter-beam filling, flooring and ceiling finishing - all this is carried to the wooden floor.
Loading …
Advantages and disadvantages of flooring on wooden beams
These floors are often used in private suburban construction. They are usually made between floors, or used to decorate a room or attic.
There are some special advantages that the basement flooring on wooden beams has:
- Installation does not require the use of special equipment;
- The ease of work is much higher than with other types of floors;
- The low weight of the structure does not place a large load on the foundation;
- Unlike concrete floors, wooden floors can be built up;
- The beams are easy to remove if required and are readily available and relatively inexpensive.
Among the disadvantages, it is worth noting the increased fire hazard, as well as sensitivity to changes in temperature and humidity. The disadvantages are not very significant, they can be eliminated if all the work is carried out correctly and the wood is treated with a special impregnation.
Requirements for wooden beams for floors
The floors involve not only timber, but also logs, which are trimmed on 3 sides; boards fastened together can also be used.
When choosing a flooring material, all structural elements are carefully inspected for damage, defects, and the presence of parasites, for example, shashel.
The quality of wooden blanks is affected by their drying, since the humidity level should not be more than 14%, otherwise the boards and logs will be less durable and deflections are possible in places of stress. The typical size of a beam assumes its thickness is 1/24 of the entire length.
That is, with a length of 5 meters, the width should be at least 20 centimeters. If it is not possible to select the required diameter, it is necessary to fasten several beams together.
Calculation of loads on the floor takes into account the weight of the heaviest one, as well as the average pressure indicators of the environment of the house, owners and other objects. The average pressure value is 400 kilograms per square meter. You need to add 30-40% to the obtained values for a good safety margin.
Each beam has a deflection, the minimum value of which is 1/300 of the length. In this regard, it is necessary to make structures such as lifts to reduce this figure. Deciduous wood does not bend well when used as a beam-and-timber floor, which is why they are not used for these purposes.
Calculation of beam diameter
In order to determine the cross-section of the beams, it is necessary to divide the space of the room step by step so that the value is within a meter. For example, with a room length of 7.3 meters, the calculated step will be 0.73. Using standard tables of sections, select the required indicator for the timber.
With a span length of 4 meters, step 0.6, the beam should be 10 cm thick and 20 cm high. Taking into account the support on both sides, we calculate that its length should be 4.3 meters.
When covering with wood, the span width cannot be more than 5 meters. It is important to carefully calculate the loads so that there is no sagging of the ceiling or destruction of the construction materials, which is dangerous for the life of the owner and leads to additional costs for repairs.
Rules for the construction of basement floors.
The need to make maximum use of all square meters of the house's area is dictated by several reasons, in this regard we will talk about basement floors :
- firstly, this is a small area of land (and the desire to place on it not only a residential cottage, but also a garden, vegetable garden, swimming pool and other pleasant “additions);
- secondly, the decision to combine various utility rooms (and a garage) with living rooms, thus avoiding access to the courtyard;
- thirdly, increasing the usable area of the house without constructing extra “above-ground” floors.
In all these cases, cottages are “equipped” with basement or ground floors that are in contact with the above-lying premises through a ceiling, the construction of which should be given special attention.
And first of all, when building a house, you should decide whether the ground floor (or basement) will be heated. In this case, it is recommended to place the insulation layer in the basement floor structure, separating it from the ground with a layer of waterproofing.
If the basement floor is not heated, the insulation will have to be “transferred” to the basement floor, blocking the access of cold air to the living spaces.
- The second issue that needs to be resolved at the stage of designing a house is the choice of material for the interfloor covering. For brick buildings, as well as for those houses whose walls are made of various small blocks, the best option is a floor assembled from round-hollow reinforced concrete slabs. They have a number of “advantages” (compared to a monolithic reinforced concrete floor poured directly at a construction site):
- less weight (due to round large longitudinal holes);
- guaranteed strength (as they are manufactured in a factory with mandatory calculation of the reinforcement cross-section);
- the ability to “assemble” them into a floor of any area and size (circular hollow-core slabs are available not only in different lengths, but also in widths);
- fairly good thermal insulation ability (again due to the voids in the “body” of the slab);
- quick assembly (no need to wait a month for the concrete of the monolithic floor to gain sufficient strength).
Of course, the reinforced concrete basement floor will need to be insulated. This can be done both from the basement side (by fixing insulating material, such as polystyrene foam boards, to its ceiling) and in the thickness of the first floor floor (using non-flammable mineral wool).
The most common option for insulating a basement floor in its upper part is to install the floor on joists - vertically installed wooden blocks that allow you to “raise” the main structure of the floor above the floor slab, and fill the free space with any available and effective thermal insulation material. You can lay thick plywood on top of the joists, and then lay any type of flooring (laminate, parquet, carpet, linoleum) over it.
In addition, water or electric “warm floors” can be used as additional insulation (in this case, they are installed directly along the leveling screed on the floor slab).
For wooden houses (as well as frame-panel houses), a lightweight version of the floor is required, which should be based on wooden beams. However, due to the fact that there is often high humidity in the basement and ground floors of the house, such basement floors will not last long. Therefore, if you plan to build a building with wooden load-bearing elements, it is better to make its lower part (basement and plinth) concrete. And only then install the wooden parts of the building.
Base insulation
Basement insulation. The process of building any house without exception begins directly from the foundation. The foundation walls themselves must be very strong and consist, as is customary, of brick or concrete...
Laying (device) of the foundation plinth
Construction of the foundation plinth, as well as its correct laying. The foundation plinth is the lower part of the wall located between the ground level and the floor level of the first floor.
Repair of old wooden foundation…
Replacement and repair of the foundation of an old wooden house. Sometimes it happens that an outwardly well-preserved wooden house is practically unsuitable for living. And the problem turns out to be not only “lying...
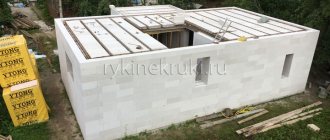
3.Installation of logs
After assembling the facade boards, we begin installing the logs themselves (50X200 boards), the pitch of which is calculated depending on the size of the spans and the load. If the piping is carried out over small spans (maximum 2 m), you can use logs of size 50X150. But in our case, the floor is insulated by 200 mm, so the boards must be appropriate.