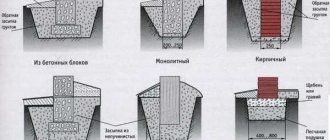
Classification of bases
The type of plinth depends on the type and material of the foundation.
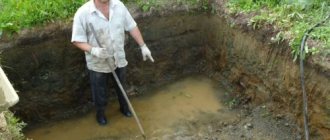
The plinth belt is assigned serious tasks to ensure trouble-free operation of the building and the comfort of its residents. Therefore, before building a basement around the house, the developer needs to become familiar with the existing structures and their main characteristics.
The following types of plinth are suitable for private housing construction:
- flush with the wall;
- sinking;
- speaker
The most effective is considered to be a sinking base, the recessed walls of which are less susceptible to mechanical damage and are not afraid of water flowing down the vertical walls of the building. This is the most cost-effective design (wall thickness is minimal) and does not require the installation of ebbs and the use of finishing materials.
A protruding base is erected when the building design includes an insulated basement or a recessed garage. At the same time, due to the thick external walls protruding beyond the general facade line, heat is well retained in the house. However, such a design will require reliable waterproofing and installation of drains along the entire perimeter of the building.
A basement, the outer surface of which is in the same plane as the outer walls of the building, is rarely erected. The reason is that the waterproofing is not protected from external atmospheric influences and is visible on the surface of the external walls. Without additional covering of these surfaces with finishing slabs, the appearance of the building leaves much to be desired.
Which plinth to choose when building on a columnar foundation?
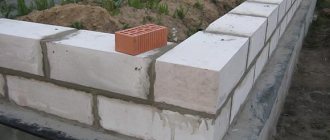
Scheme for finishing a plinth made of concrete blocks.
If the house is built on a columnar foundation, the base can be made in the form of a grillage (structure above the pillars) or a fence (structure between the pillars).
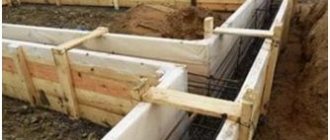
The grillage can be made in the form of a lintel, reinforced with 4-6 rods with a diameter of 10-12 mm. The reinforcement bars are laid on a concrete layer 7 cm thick. The height of a row lintel is ¼ span, but not less than four rows of masonry. In the case of wooden buildings, a wooden frame made of timber and logs can act as a grillage. In addition, the grillage can be made in the form of a prefabricated reinforced concrete or monolithic beam. When installing a monolithic structure, it is not necessary for the base to rest on the ground. In this case, free space (approximately 100-150 mm) must be left between it and the ground in the gap between the pillars.
Forming the texture of the plane of a reinforced concrete or concrete plinth must be done at the stage of pouring the mortar. Special attention must be paid to the construction of the grillage plinth: if it is done incorrectly, then in the future there is a high risk of deformation of not only the plinth, but also the entire structure of the house.
The pick-up plinth can be made of concrete, wood, brick, stone. Such a structure should go 30-50 cm into the ground. The height of the intake, as already mentioned, should be at least 4 rows. The finished structure is plastered with cement mortar. You need to try to ensure that the plane of the base of the house along the entire perimeter is uniform in shape and texture.
If construction is carried out on heaving soil, then a sand cushion must be made under the fence. Cushion width – 150-200 mm. It can be 20 cm wider than the fence. In such a basement structure, ventilation holes must be installed. Minimum permissible wall thickness of the cap-plinth:
- for reinforced concrete – 10-12 cm;
- for brickwork – 12 cm.
Diagram of load transfer through a sand cushion.
The material for the construction of the fence is selected taking into account the material from which the walls of the house will be made. In brick buildings, as a rule, the basement is also made of brick. In wooden houses - made of boards or logs. The wooden fence can be vertical or horizontal. The horizontal one is built from boards 4-6 cm wide. The side plane of the boards for the construction of the fence should include a bevel or ridge. The boards are inserted into pre-prepared grooves in the bars, arranged in the brickwork of the foundation. To create a horizontal fence, longer lumber is used - up to 300 cm, so it is somewhat more expensive.
To construct a vertical structure, a trench about 40-60 cm deep is dug. A layer of sand is poured into the trench, and a horizontal block is laid to a depth of about 30-50 cm from the surface. It must be laid with the longitudinal groove facing up. A similar block is installed on top, but with the groove down, and attached to the frame of the object. The ends should rest on the base. It is better not to make a groove in the harness, because... such simplification reduces its reliability and service life. The width of the groove depends on the size of the board being installed. In this type of construction, beams 10-15 cm thick are used. The beams and backboards that are laid in the ground must be tarred to prevent them from rotting.
To create a vertical structure, you can use small boards about a meter long, left over from building a house. So this technology is more profitable and economical. However, it has one significant drawback: if the lower ends of the boards rot, they will have to be completely replaced. In the case of a horizontal fence, only the lower boards can be replaced.
Design features and materials for the construction of the base
Brick plinth on a strip foundation
The structural design of the plinth belt is determined by the type of foundation base and depends on the materials used in its construction. On a strip foundation, the design of the plinth belt can be:
- monolithic, poured with concrete along with the foundation;
- from concrete foundation slabs laid on top of the base;
- in the form of a wall made of solid red brick, erected on the surface of the foundation.
Removing the pile foundation
If the building will be erected on a pile/column foundation, the base can be:
- hinged - for the construction you will first need to install a metal frame (frame), on which sheet insulation and cladding material will be attached;
- in the form of a shallow strip base with brickwork laid around the perimeter of the entire house;
- in the form of a wall (fence) between piles (pillars), which will cover the subfloor of the house.
The pick-up plinth is the simplest type of plinth belt installed between the foundation pillars. The height of the wall must be at least 0.5 m. As a rule, it is erected from the same material as the pillars (brick, wood, concrete, etc.), and then plastered with mortar. Making such a plinth with your own hands is not difficult even for an inexperienced developer.
As a rule, the excavation is buried approximately 25-50 cm into the ground. In this case, there will be no excess sand cushion with a depth of at least 15 cm. The wooden parts that will be buried in the ground must be tarred - this will prevent them from rotting.
The thickness of the pick-up is determined based on the material used. For reinforced concrete it is 10-12 cm, for rubble masonry - at least 10 cm. The brick wall must be at least half a brick thick.
When a house is built on heaving soils using a columnar foundation, the supporting surface for the base of the plinth is:
reinforced concrete grillage - for houses made of brick or small blocks;
wooden frame made of timber and logs - for wooden houses.
When installing a monolithic plinth, you cannot rest it directly on heaving soil. Between the soil and the base, 10-15 cm of free space is left, which is then filled with non-heaving soil or hidden behind decorative finishing.
How to build
We mark the guides for laying the first row of foam blocks in the same way as is done for bricks. In the photo above you can see a fishing line stretched 10 cm above the foundation. This is done so that the foundation wall is as level as possible. Armed with a cement-sand mortar, a trowel and a level, we lay out the first row. Be sure to check the level of the stacked blocks and, if necessary, correct them with a rubber hammer.
The first row of foam concrete blocks for the basement of our house.
We fill the interblock spaces with the same solution. We wait for the cement to harden and proceed to the next stage - the armored belt. In order for our base to be subject to deformation as little as possible due to various natural phenomena, it needs to be reinforced, that is, reinforcement must be laid around the perimeter.
To do this, we cut a furrow 4-5 cm wide and deep and lay reinforcement, pre-bent in the right places.
A cut groove with reinforcement inside. We used a hand-held circular saw for cutting.
A furrow around the perimeter of the main part of the house.
We fill our reinforcement with cement and wait for it to harden.
Furrow with reinforcement and cement.
Further – it’s easier. We lay out the second and third rows of foam blocks, not forgetting to move them to the side, at least 10-15 cm in relation to the previous row. We also do not forget about the evenness of the walls. The smoother the construction, the fewer problems with finishing later.
The second and the beginning of the third row.
Third row.
Insulation and waterproofing of the basement
Waterproofing and insulation of the basement
The basement belt is one of the most vulnerable elements of the building under construction. It is entrusted with the functions of protecting the house from moisture and cold, therefore special attention is paid to the issues of waterproofing and insulation.
Waterproofing
To waterproof the base, roll and coating materials are used. The main advantage of the rolls is their low price and quick installation. However, they are short-lived and easily susceptible to mechanical stress. These materials cannot be used at utility junctions.
There are two types of roll waterproofing:
- pasting - when laying on the surface of the foundation, it first requires the application of bitumen mastic to the monolith, and then it is pressed and smoothed;
- fused – is a canvas made of polyester or fiberglass with a layer of special mastic applied.
Before installing pasted and surfaced materials, the surfaces of the foundation and base must be thoroughly cleaned of dust and dirt.
The most commonly used coating materials are special mastics (bitumen, polymer and their combinations), cement coatings and astringent plasters. All these materials are applied to foundation and plinth surfaces with a brush or roller. They are given increased strength by fiberglass, which is used to reinforce the first layer of applied mastic. Coating coatings are also short-lived and require additional protection from mechanical damage.
To waterproof a base made of brick, bitumen lubricant and roofing felt are also traditionally used. When using bitumen lubricant, which must be applied in several layers, it is necessary to strictly maintain the temperature regime. If it overheats, the waterproofing coating will be of poor quality. It is necessary to cover the surface of the brick plinth with roofing felt in at least 4-5 layers.
Pasting with euroroofing felt
Impregnation
Treating the base with waterproofing paint
Injection and penetrating compounds, which have recently begun to be used in construction, are free from all of these disadvantages.
- A composition is applied to wet concrete, which, upon reacting with water, turns into crystals that penetrate into the pores of the base to a depth of 25 cm. In this case, the concrete becomes waterproof.
- Liquid for injection penetration is injected into all pores and cracks of the foundation and basement made of concrete, rubble stones and brick. This process is quite expensive and highly labor-intensive, requiring the involvement of experienced craftsmen.
When using solid red brick for laying the plinth belt, external waterproofing work is not required - a layer of waterproofing is applied to its surface during the manufacturing process.
Insulation
To insulate the basement belt, extruded polystyrene foam is most often used. It is characterized by high strength characteristics, moisture, frost and acid resistance. It is produced in the form of slabs, with a thickness of 3 to 10 cm. These slabs are glued to the surface of the base with an adhesive solution and then strengthened with the help of special dowels.
A significant disadvantage of this material is its flammability. After installation is completed, the surface of the base must be treated with non-flammable material.
Base installation
Purpose
Basement lined with torn stone
Many people wonder whether a base is needed for the foundation? The main function of the basement of a building is to protect the structure from moisture. It effectively resists such atmospheric phenomena as snow, slanting rain, splashes, etc.
Despite the fact that concrete tends to absorb water, it does not destroy or change the structure. If you bring the foundation “to zero” and immediately start laying, then over time the moisture will destroy the plaster and brick.
The plinth is necessary for installing wooden floors in the house, which are the most practical and traditional type of residential design today.
The logs for forming the floor are placed directly on the base, which makes it possible to create the necessary gap between the floor and the ground. The plinth also creates additional usable space for the basement.
The base and blind area of the foundation are used not only to protect the building from moisture, but also as a design element - it is quite difficult to imagine a house without a protruding lower part.
Plastic base for foundation - imitation of natural stone
Installation
The most rational is considered to be pouring a basement foundation, in which the base is formed together with the main part and, in fact, is an above-ground continuation of the concrete base.
However, this technology is not always appropriate due to various unforeseen circumstances that may arise during the construction of a building.
In some cases, additional expansion using concrete blocks may be necessary.
- Alignment. If for some reason the foundation was poured unevenly and there is a large gap along the plane, then it is worth thinking about how to level the foundation with a plinth? This is the only way to compensate for the lack of height without losing strength and moisture resistance;
- Extension. The lack of formwork of the required height or the design of a very elevated building leads to the fact that pouring the basement foundation may not be enough;
Leveling the foundation base using reinforced concrete blocks
As a material for forming a plinth, you can use either small concrete blocks filled with sand or slag, or reinforced concrete plinth blocks, for the installation of which it is necessary to use special equipment.
The use of one name or another depends on the dimensions of the foundation and the available funds, since their prices vary significantly.
In most cases, the installation of the base is carried out according to the diagram below.
- Before laying the plinth on the foundation, it is necessary to make markings for installing corner blocks. For this purpose, you can use both a laser level and an ordinary hydraulic level. Regardless of what material you use to form the base, the corner elements must be positioned at the same vertical level;
Base made of blocks
- After the measurements, either corner reinforced concrete elements are laid, or the corners are laid out in several rows of cinder blocks. To align the elements vertically, it is necessary to measure the required height of the base and compensate for the existing gap using concrete mortar;
Note! If we are talking about laying reinforced concrete blocks, then leveling the foundation must be done before laying. They must be mounted on a completely hardened and strengthened surface, since the blocks have a fairly large mass.
- After the blocks are aligned exactly vertically, it is necessary to maintain a single line for the layout of intermediate elements. To do this, a thread is stretched between the corner blocks, which will determine the location of the outer edge of the remaining elements. The remaining blocks are laid out according to this guideline;
Base made of reinforced concrete blocks
- Fixation of reinforced concrete blocks is carried out by pouring mortar into the grooves at the ends. Cinder blocks are laid out according to the principle of brickwork;
Decoration
The finishing of the foundation base is carried out using various decorative materials - plastic, natural or artificial stone, plaster, etc. In addition to a purely decorative function, the external decoration also partially protects the base from exposure to high humidity.
Base lined with natural stone
Protection of the foundation base is most often carried out mainly with plastic panels or by cladding with stone and ceramics. The use of ordinary plaster in this case is impractical, since it also absorbs moisture.
Note! If the base is wider than the foundation after finishing, this is a natural phenomenon. Since the finishing material does not rest on the ground, going beyond the main support is quite acceptable.
Exterior finishing
Upon completion of waterproofing and insulation of the base, exterior finishing work begins. The following are used as finishing materials:
- porcelain tiles;
- artificial or natural stones;
- basement siding;
- corrugated sheeting;
- decorative plaster, etc.
Acrylic resin stone
Clinker tiles
Decorative concrete stone
Polymer sand facade tiles
Flexible stone
In addition to the decorative effect, the cladding of the basement belt of a country house serves the function of protecting the entire building from the effects of various negative factors (atmospheric, mechanical, etc.). The choice of finishing materials must be approached responsibly, without shifting this responsibility to irresponsible hired workers.
Choosing the right type of base
To properly make the base of a house, it is important to take into account all available factors, including its color, material and shape.
The color of this part of the wall plays an important role, because it will be in direct contact with the ground, exposed to precipitation in all seasons of the year and solar heating. It is best to choose natural materials and not try to cover them additionally.
Installation of profiled sheet to the base.
In order for the base of the house to serve longer and reliably protect the foundation and walls of the building, you need to choose the right shape. It can be sunken, fused or protruding. Accordingly, the sinking along the perimeter will be narrower than the perimeter of the walls, and will be slightly pressed inward. This form is the most desirable, since it will maximally protect the material from the effects of negative environmental factors with walls hanging over it. The fused one will be aligned with the walls and will be able to stand out only by the type of material. All precipitation flowing down the walls will accumulate on it. A protruding plinth is most advantageous in architectural terms, since it will protrude in front of the walls. It can significantly transform the facade, but with this choice you should provide for a good slope of the cornice and choose the most durable material.