It is quite difficult to arrange the floor in the cellar yourself, since for this you need to know many different nuances. Professional craftsmen who have been involved in such buildings and their arrangement for a long time have relevant experience and, of course, their own secrets, acquired over years of practical work.
Cellar floor
Of course, any owner of a private property sooner or later comes to the conclusion that a cellar in the house is necessary, especially if there is a vegetable garden on the property. Stocking up for the winter will not hurt any family; there is no need to run to the store for pickles, jams and compotes. And you can set aside a corner in the basement for vegetables, as they say - everything is at hand. But in order for all these products to be safe throughout the long winter season, the cellar must be dry, ventilated and have a certain temperature.
So that the work is not in vain, and you do not have to dig a new cellar, you need to choose the right place for its construction, and it will depend primarily on how high the groundwater is located.
Selecting a location
Cellars are installed under a house, a garage, or separately from all buildings. On the one hand, a basement under the house is much more convenient than a separate option, for the reasons that it does not take up space on the site, and in the winter cold you do not need to leave the house to get groceries.
But, on the other hand, when you start digging a cellar under a building, you can get to the groundwater, and this can damage the foundation and walls of a house or garage, which can lead to their deformation, cracking, and even collapse of the structure.
You can, of course, as a last resort, make a backfill of sand and clay and work on waterproofing, but this also does not guarantee that after a certain time the water will not wash away such a “cushion” and begin to penetrate into the basement.
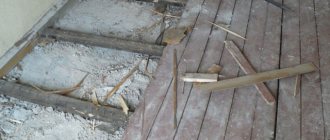
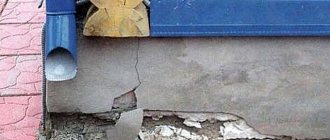
Consequences of neglecting drainage and reliable waterproofing
Therefore, if a decision is made to build an underground storage facility under any building, you need to find out exactly at what depth the waters lie in a given area.
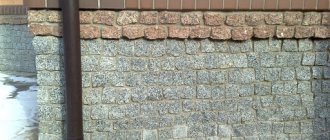
The ideal option is a cellar on a small hillock
If the cellar is built separately, then the location should be chosen, if possible, on a hill where groundwater runs deep and wastewater does not stagnate.
Housing and communal services issues
Have you ever watched horror films? Similar feelings arise when visiting many basements in our homes. But the walls of the basement are part of the foundation of the house, that is, what everything, in fact, rests on. Therefore, the management company or HOA is required to properly maintain the foundation
and
basement
.
What is included in the concept of “properly maintaining the foundation”
and
basement
"? This question is answered by the “Rules and Standards for the Technical Operation of the Housing Stock,” put into effect by Decree of the State Construction Committee of the Russian Federation dated September 27, 2003 No. 170.
First of all, the housing maintenance organization must ensure the correct temperature and humidity conditions in basements and technical subfloors. The air temperature there should be no lower than +5°C, and the relative humidity should not be higher than 60%.
The foundations and walls of the basement must be maintained in good condition, and any identified damage must be repaired immediately. In the basement there should be no dampness or soaking of the soil of the base of the house, foundation, basement structures and technical undergrounds. Internal and external drainage must work properly.
Engineering and technical workers of the management company or HOA must know the characteristics of the project and regulatory requirements for the foundations of buildings and structures, the strength characteristics and depth of the foundation, the bearing capacity of the soil of the foundation of the house, the groundwater level and the depth of soil freezing. When the first signs of uneven settlement of foundations appear, they must inspect the building, install beacons on cracks, take measures to identify the causes of deformation and eliminate them, order specialized organizations to study the structure of foundations, basement walls and soil conditions.
The basement must be dry, clean, have lighting and ventilation. To ventilate the basement, at least 2 vents for each section of the house are equipped on its opposite walls for through ventilation. Their area should be approximately 0.25% of the basement floor area. It is advisable to equip the vents with grilles. To protect the foundation and basement from the appearance of mold and condensation, as well as eliminate musty odors, regular through ventilation should be carried out by opening all vents, hatches and doors on dry and non-frosty days.
The walls of the pits must exceed the level of the blind area and sidewalk by at least 15 cm, and have no gaps where the pit elements adjoin the basement walls. The floor for removing water from pits must be concrete with a slope of at least 3% from the walls of the building; a drainage device (pipe) must be equipped in the far corner. To protect from rain, it is advisable to install folding canopies over the pits. Remember: when you walk along the house, you often see that the pits are filled with garbage almost to the very top. So, garbage from pits should be removed at least once a month.
Blind areas and sidewalks must also have a slope from the building walls of at least 3%. The surface of the blind area bordering the roadway should be 15 cm higher than it.
All holes, crevices, cracks and subsidence formed in blind areas and sidewalks must be sealed with materials similar to the covering of the blind area, with preliminary clearing of the damaged areas and backfilling with sand.
Anti-capillary waterproofing should be installed 15 cm above the blind area, and intersect the wall and internal plaster at the same level as the preparation for the 1st floor floor.
The premises of the water metering unit must have lighting, be protected from the penetration of melt, rain and groundwater, and be kept clean; Unauthorized persons are not allowed to enter the water metering unit premises.
There should be no gaps where all pipelines pass through walls and foundations. Places where utility lines enter basements through foundations and basement walls must be sealed and insulated. Bridges must be equipped across all communications and must be constantly maintained in good condition.
If the basement has earthen floors, then during the next major renovation they should be replaced with hard surface floors. The floor surface must be equipped with a slope towards a special concrete pit or ladder for collecting water. If water appears in the basement, it must be removed and the causes of the water must be eliminated. For this purpose, it is allowed to install intra-house drainages.
At places where sewer risers are cleaned in basements, it is necessary to install concrete trays to drain water into the sewer or pit.
The doors to the entrance to the basement and technical underground must be locked, the keys must be kept in the housing maintenance organization or in the joint dispatch service, as well as with residents of a nearby apartment, about which a corresponding inscription is made. Doors must be insulated, sealed and covered on both sides with roofing steel.
Prohibited:
flooding of basements with water due to malfunctions and leaks from engineering equipment;
litter, litter and pollute basements;
use of basements and technical undergrounds by residents for economic and other needs without appropriate permission;
install additional foundations for equipment in basements and technical underground areas, increase the height of premises by lowering the floor level without an approved project
dig ditches, trenches and carry out other earthworks at a distance of up to 10 m from the building without special permission;
add soil around the building 10-15 cm above the location of the blind area.
a basement should be kept
and
foundation
. Now you can compare the requirements for their content with what your management company or HOA actually does.
You can also read on this topic:
Payment of utilities - what do we pay for?
How do they calculate how much to pay for general household needs?
Will the common property of an apartment building be better maintained?
Send to friends
How to determine the depth of groundwater?
The groundwater level must be determined in the spring, when it rises to its maximum during massive snow melting. This can be done by looking into nearby wells or wells or by turning to traditional methods.
When choosing a place for a basement or digging a well, craftsmen paid attention to the plants that grow in a certain place.
- If moisture-loving plants such as horsetail, reeds or horse sorrel grow there, then it is better to dig a well in this place.
- If even plants that are unpretentious to the level of humidity wither in a not very hot summer, then this place is perfect for constructing a cellar.
There is another ancient method that experts use to determine the presence of water. To carry out this experiment you will need a piece of wool and a fresh chicken egg. A small plot of land where you plan to dig a cellar needs to be cleared of the turf layer and an egg and wool should be placed, then covered with a clay pot.
In the morning, when the sun rises, you need to check whether the objects are still dry or covered with dew:
- if they are wet, you cannot dig a cellar here - the water is close to the surface;
- if the egg is dry and the wool is wet, the water is deep enough;
- if the objects are dry, the water is very deep and you can safely start working.
Preparation before installing the floor
Carrying out preparatory work is an important stage in installing a floor in a cellar, regardless of its type and the presence of external or internal insulation. First of all, at this stage, the soil is studied, and the average groundwater level in the area is determined. It is because of the high level of groundwater that floors in cellars and basements begin to collapse, after which the problem spreads to the foundation and to the entire country house as a whole. If the soil around the building is saturated with moisture, a drainage support system should be made in advance.
In most cases, all survey work must be completed before construction of the building begins. If the house construction work was carried out not by you, but by the development company, you need to check with its representatives for all the data that will be useful in installing a basement or basement floor.
The basement, of course, is always built right away, but if you are building a basement and cellar several years after the construction of the house was completed, all survey work must be carried out again.
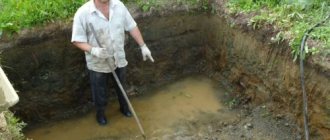
In order to independently check the groundwater level under the room, you need to make a hole about 60-70 cm deep at the base of the soil on which the future floor will be built. After that, all you have to do is wait. If after some time (from several hours to several days) water begins to appear in the dug hole, this will indicate that there is a high groundwater level in the area where your house is built. It is worth saying that it is better to check in the spring, when underground moisture rises as high as possible.
Even if there is a lot of water, you should not refuse to build a cellar. The simplest drainage system will help here, which should remove excess moisture outside the site from the foundation of a country house.
Compaction of the sand layer.
At the same time, a very important stage of preparation can be called the installation of a support cushion. To make such a pillow under the floor of a cellar or basement, you need:
- Deepen the base of the floor by 20-40 cm, then compact the resulting soil.
- Next, pour a layer of sand about 15 cm thick onto the resulting base (there is no point in doing more). After backfilling, the sand is filled with water and compacted thoroughly.
- Lay a layer of gravel (or crushed stone, preferably fine-grained) on the resulting sand cushion. The gravel layer should be no more than 10 cm thick (it also needs to be compacted well).
- A small layer of sand is again poured onto the gravel on top and compacted again.
Such a base is a traditional solution that can be used for a cellar, basement or ground floor of a country house.
Pit
Once a location has been chosen, you can begin digging a pit. Its depth must be calculated taking into account the fact that the floor will need to be raised by at least 50 cm, so you will have to go deeper by at least three meters.
Digging a pit for a cellar
The pit will have to be dug manually so as not to disturb the integrity and structure of the soil that will be around the pit. Earthmoving machines can dig a pit quickly, but not accurately. When opening, the verticality and integrity of the walls should be maintained as much as possible.
After the hole is dug, you should immediately start preparing the area for the floor.
Pouring the rough screed
If all these procedures were carried out in a pit dug for the future basement, and the walls will be erected only after the screed has been installed, then the following steps are carried out:
— an expanded clay layer is poured onto the laid geotextile, the thickness of which should be about 10 cm;
— a polyethylene film is laid on top of the expanded clay;
— a reinforcing mesh is laid on the film and beacons are installed to level the floor;
— the last stage is pouring and leveling the concrete using the rule. Calculate so that the surface of the screed is level with the foundation.
Construction of walls
After the concrete floor has hardened, walls are erected along the foundation. It would be best to first attach waterproofing material to the walls of the pit.
It would also be better to waterproof the walls from the outside
If a large gap has formed between the wall of the basement and the pit (and this most often happens), it must be filled with clay as the walls are built, moistening it and compacting it.
When the walls are raised, the joints between the wall and the floor must be waterproofed from the inside.
Waterproofing
For this process, there are several types of materials that act on the surface in different ways, but they are all used to achieve the same goal - to protect the floors and walls of the basement from moisture.
Coating waterproofing
To waterproof the basement from the inside (especially for the joints of walls and floor surfaces), different types of coating waterproofing are used.
1. One of them is a composition consisting of polymers and bitumen mastic, which makes this mixture plastic and therefore easy to apply. This composite composition is sometimes called liquid rubber. It is sold in stores under the name “Elastomix” or “Elastopaz”.
Liquid rubber
The convenience of these mastics lies in the fact that they do not require heating before application to the surface, and also do not emit harmful heavy fumes, therefore they are ideally suited for waterproofing enclosed spaces.
The waterproofing process takes place in three stages:
— The surface is cleaned of dust and debris.
— Then the floor surface and all joints are carefully primed with a special “Paz Primer” primer for liquid rubber. This solution must be mixed well before use and applied to the surface with a brush.
First, the corner joints and seams between the wall and the floor are coated with the composition, and then the entire surface of the floor and walls is coated. The primer should be well absorbed into the surface and dry - this will take 4-5 hours.
- After this, they proceed to applying liquid rubber using a spray bottle or brush. It is necessary that every corner is covered with the composition. The coating also begins with corners and joints, and then the entire primed surface is covered with the mixture.
— After the coating has dried, it is recommended to apply another control layer.
"Elastomix" has a thicker consistency, so it is applied with a spatula.
2. Another means for film waterproofing is liquid glass. This material is similar in the process of applying it to the surface with liquid rubber, but differs in that once it hardens, it does not allow not only moisture, but also air masses to pass through.
Liquid glass
liquid glass
It is quite possible to carry out waterproofing work yourself, and this can be considered a positive factor.
Another method of waterproofing that is available using this material is plastering work on the walls of the cellar with the addition of liquid glass to the cement mortar.
Waterproofing work using liquid glass is considered the fastest and most affordable method, which is why it is used quite often.
Penetrating surface protection
Penetrating compounds begin to work, falling on concrete and penetrating into the structure of the material. The composition crystallizes, closing all pores and creating additional bonds in the crystal structure. Such solutions protect the room from moisture penetration, but allow the structure to “breathe”. It is necessary to take into account one more positive property of this composition - if it is applied to the surface in several layers, it can saturate the material to a very significant depth.
Layers of such protective solutions are applied no earlier than 2 hours after applying the previous one. The stages of applying penetrating solutions do not differ from the film type of waterproofing.
Crystallisol is a popular type of penetrating waterproofing
One of the most popular penetrating waterproofing agents is Kristallizol.
Roll materials
Due to its affordability, roofing felt is most often used for waterproofing work. But, in comparison with modern coating or penetrating materials, today it is not so relevant, as it has a number of significant disadvantages. Working with this material requires a lot of time, since it must be glued to bitumen mastic, which takes a long time to dry, and at the same time does not always give the desired results.
The most common rolled material is roofing felt.
Work using roofing material is carried out as follows:
— the floor surface is well cleaned of debris;
- then bitumen mastic is applied to the surface. It must be taken into account that the entire surface of the floor and walls by 15-20 cm must be completely covered;
- Next comes the laying of roofing felt sheets. This is a rather complex process in which two people must participate - one heats up the mastic applied to the floor and the lower surface of the rolled material with a burner, and the second applies and levels the roofing material;
- the second sheet must be overlapped with the first by 12-15 cm, the joint distance must be additionally coated with mastic. This is repeated until the entire floor is covered with roofing felt. In the same way, that part of the roofing felt that extends 15-20 cm onto the lower part of the wall is glued.
roll waterproofing
Now that the waterproofing is completely ready, you can complete the arrangement of the floor by pouring a small leveling screed with appropriate reinforcement. If desired, it will be absolutely easy to lay tiles on it or make another covering, for example, from boards. However, some owners prefer to leave just a concrete floor or even cover it with a compacted layer of clay-sand mixture.
How to make a concrete floor in a basement
Tools and materials you will need:
If the area to be poured with concrete is large, then a concrete mixer is needed.
- Concrete mixer. If it is not possible to use this technique, concrete can be mixed manually and the floor can be cast in small sections. The work is labor-intensive and time-consuming, but it can be done in small areas.
- Shovels.
- Containers for carrying concrete.
- Tools for leveling cement-sand mortar: trowel and grater. The floor will need to be sanded if you plan to lay linoleum or other flooring on it. If wooden flooring is subsequently installed on joists, leveling will not be required.
- Grinder equipped with a disc for working on concrete and stone.
- The materials you will need are cement grade M 400, sand from a quarry, medium crushed stone, and water.
Stages of pouring a concrete floor in the basement
Diagram of the operating principle of the hydraulic level.
- The bottom of the pit intended for the construction of a basement is leveled using a hydraulic level. The soil will be compacted using a vibrating plate or manually.
- Prepare a base of sand 10-15 cm thick. It is thoroughly compacted, but before that, watered.
- Crushed stone or gravel is poured onto the sand. This pillow will also need to be well compacted.
- Next is the installation of the waterproofing layer. Most often, dense polyethylene or roofing felt is used for this purpose. The sheets of these materials must be laid with an overlap of 10-15 cm and must extend onto the basement walls by 20-30 cm. In the corners, polyethylene or roofing felt is carefully folded, forming a right angle, and fixed with a stapler.
- Then they begin laying thermal insulation materials. It is not recommended to use materials based on fiberglass, stone or other wool for flooring. These insulation materials absorb moisture very well, which will inevitably be in the basement even with the highest quality waterproofing. It will penetrate into the insulation from the air and settle in it in the form of condensation. Soon such material will become unusable, regardless of how it was made: in the form of slabs or rolls.
- To install a thermal insulation layer on a concrete floor, foam plastic with a density of at least C25 and a thickness of 5 cm is used. The sheets are laid as closely as possible to each other, the gaps between them are filled with polyurethane foam.
- Particular attention is paid to the gaps between the foam and the basement walls and its corners. In these places, polyurethane foam is not used, but a so-called technological gap or expansion joint is left. It is needed so that during soil heaving the insulation and floor covering do not deform. In most cases, it is enough to leave a gap 1.5-2 cm wide.
Concrete pouring process
Scheme of pouring concrete on the floor.
- If you plan to set up a gym or workshop in the basement, where heavy machines or sports equipment will be located, the floor should be reinforced with a thickness of at least 10 cm. If the room has a low traffic intensity and it will serve as a warehouse for agricultural products, a concrete thickness of 5 cm is sufficient. In this case, no reinforcement is required.
- In order to make an armored belt, meshes are made from smooth reinforcement with a thickness of 5-6 mm. Metal rods are tied together with binding wire or welded.
- The cement-sand mortar is prepared as follows: take 3 parts of sand sifted through a sieve with large cells and 1 part of cement grade M 400. The ingredients are mixed in a concrete mixer. You can add small stones, or better yet, sifting. Its amount should not exceed 15% of the total volume of the solution. Then water is added in small portions. When the composition reaches the required viscosity and plasticity, the concrete is placed in buckets or other containers and poured onto the reinforcing layer.
- Concrete is poured gradually, evenly leveling the solution over the entire floor area. In order to accurately maintain the height of the layer, beacons are installed. At the same time, do not forget about alignment.
- After the concrete has matured, grinding begins. But before this, it is recommended to perform expansion joints. Using a grinder and a disk, cut the floor through the stone so that the distance between the seams is from 4 to 6 m. These slots will prevent cracking of the concrete.