(No rating)
There are many ways to decorate various rooms of your home with your own hands. At the same time, the most ordinary and familiar building materials are transformed. One example of such an original design is that the pattern on the tile may be the same, or maybe different.
This finishing technique is especially attractive for those who like to do something with their own hands. Read more about what decoupage is and how to do it at home.
The pattern on the tile may be the same, or it may be different.
If you were involved in appliqué as a child, then you already have basic decoupage skills. After all, decoupage is nothing more than gluing cut-out figures, usually made of paper or fabric, onto various surfaces.
Almost any facing materials are finished in this way. Tile is no exception in this regard. Thanks to its smooth surface and precise geometry, it provides ample scope for imagination and ensures high quality of the final composition.
Decoupage is gaining increasing popularity as a decoration method due to several attractive properties:
- Achieving a uniquely finished surface from a standard material
- Availability and low cost of necessary accessories
- Absence of any requirements for the qualifications of the performer, except for accuracy
Features of the technique of transferring a pattern to tiles
The technique is similar to working with standard translations that everyone used in childhood. An interesting activity for lovers of appliques and crafts, people with an artistic streak.
A variety of materials are used: from napkins with patterns to thin fabric with an interesting print. The performer is required to be careful, precise and persevering. The result is the perfect kitchen decor.
Important! The napkin decoration technique requires special skills in transferring the image to the tile. It is important to make sure that the workpiece does not slip. Manipulations are performed using thin rubber gloves. The decorations are removed. The likelihood of damage to the thin napkin fabric is minimized.
The kitchen is the room where household members are constantly present. It is recommended to use only materials that are safe for human health during the work process. This applies to paints and varnishes. Water-based agents are preferred.
Where can I find pictures to print?
Nowadays on the huge Internet you can find a large number of different pictures for printing. The main thing is to correctly formulate the search query: for example, “pictures for decoupage”, “New Year’s pictures for decoupage”, “pictures for vintage decoupage”, etc.
However, it is important that the pixel size of the image is sufficient for high-quality printing. If we want to enlarge a small picture and print it for transfer to a large box, then the print quality may be unsatisfactory (the pixels, i.e., the squares that make up the image, will be visible).
It is best to choose the largest images that you can find, then you can use them to decorate not just a box, but even a chest!
Apply a stencil
To update the tile, you can apply a stencil to it (see the article “” about their types). First you need to thoroughly clean the surface. For this we will need a brush and any detergent.
Then the surface is wiped with alcohol and then wiped dry with silicone carbide paper. After this procedure, the surface of the tile will become rough. This is done to better fix the paint. And after this, the tiles are coated with a primer.
The patterns are applied using special paint for glass. Choosing a pattern is perhaps the most difficult thing in this matter. Go online and you will find many pattern options. After we have decided on the pattern, we make a stencil. Then, having attached the stencil of the design to the wall, we simply paint over its cut out areas.
Advice:
so that there are no smudges when decorating the tiles, and for better fixation of the stencil, it must be secured to the wall with aerosol glue. There will be no traces left after it, and it can be removed quite simply.
Drawings can be applied in different formats. For example, a repeating pattern is applied to each tile or a large composition is made. The second option is the most difficult. Only a person with certain abilities can complete such a task. If you don't have them, perhaps someone you know has a similar talent.
So, we have drawn the image. Now it should be varnished. After this, our decoration is ready. It can be applied to the walls of any room. Just remember that you cannot use abrasive materials to clean decorated tiles.
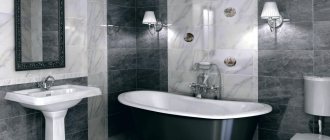
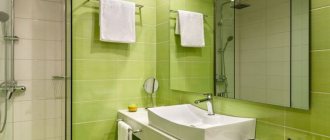
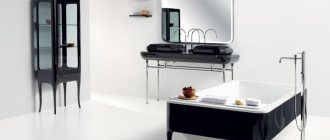
Japanese style bathroom decor
It has gained a strong leadership position in bathroom design recently. It is distinguished by oriental appeal combined with simplicity and harmony. There is some room for choice in the design of surfaces, depending on the tastes of the interior owners: these are either light natural shades of pastel colors, or bright, rich contrasting colors: gray - red, black - white, etc.
Lightness and subtlety of details are the distinctive features of Japanese-style decor
The furniture must be wooden, strict. There is one peculiarity in the use of plumbing: if there are no special requirements for the bathroom, then the sink must have a square shape. But the Japanese prefer to keep the toilet separately (if this is not possible, it must be hidden as much as possible). The lighting is dim.
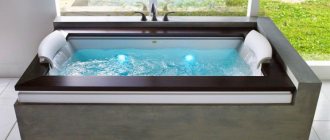
Classic Japanese style bathroom decor - paper partitions and pebbles around the bathtub
There are some features of Japanese bathrooms that are difficult to transfer to our apartments: for example, huge windows. Therefore, to best suit this style, purely Japanese jewelry and accessories are used: fans or reproductions of Japanese paintings.
Furniture made from light stained slats, wood trim, Japanese lanterns on the walls - elements of traditional Japanese decor
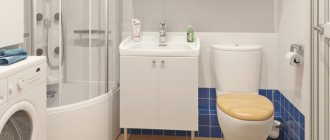
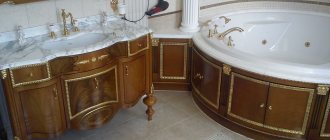
Repair
When choosing this method, it is possible to radically change the space and use technically complex methods and techniques. The downside is the high cost of materials and labor.
As a rule, ceramic tiles of various shapes, sizes, shades, patterns and designs are used to decorate walls and floors. There are models with stone, mirror, and metal inserts for laying out panels.
Possible combination with mosaic and natural ingredients. Coatings with decorative plaster, paint, self-adhesive film, plastic panels and completely innovative ones: with a 3D effect (tiles or self-leveling floor) are widely used.
In any case, all materials used must be resistant to temperature changes and high humidity, preferably environmentally friendly and easy to maintain.
Before starting work, you need to decide on the general composition, think through in detail the type, color, location of each accessory, and the presence of additional decorating elements.
Tile
There are several options for decorating tiles. Decorative elements can be arranged in different orders.
- The same image is repeated on the surface of the tiles.
- Alternation of different elements in an arbitrary or systematized form.
- Design it in the form of a strip, decorate only part of the wall.
- Make a panel.
The working process
You can decorate with decoupage both already laid tiles and those that are just about to be laid.
The obligatory condition in both cases is the same: the surface to be pasted must be cleaned of mechanical impurities and degreased.
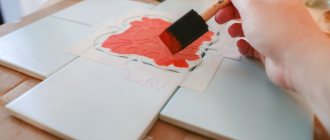
- Work begins with cutting the decor. If the images correspond in size to the dimensions of the tile, they are simply cut into appropriate pieces using scissors or another tool. If you plan to cover only part of the bathroom tiles, cut out the corresponding shapes
- The finished elements are placed in their designated places. In this case, thin and hygroscopic materials, such as napkins, tissue paper or fabric, are coated with glue on top. The work should be done very carefully so as not to crush the material. For thick paper and other materials, glue should be applied either to the tiles or to the decor itself.
The process of sticking a decorative element
- After the glue has dried, a layer of varnish is applied using a brush or roller. Drying can be speeded up using a hair dryer.
- If a durable coating is required, the varnish is applied in several layers. There should be at least two of them. Each layer is applied only after the previous one has dried.
- If necessary, an image is applied on top of the varnish as an outline. However, it can also be done under varnish - this way it will last longer.
Important information! If the images were applied to un-glued tiles, special care should be taken when laying them. Upon completion of installation, you should embroider the seams to match the image and cover them with the appropriate number of layers of varnish.
Obviously, decoupage of tiles is an absolutely simple procedure, and accessible even to a child. However, it allows you to create an original design for new bathroom tiles, or refresh old tiles. And all this - at the cost of very moderate means and efforts!
Preparing for work
It’s not enough just to have the desire to quickly and cheaply change the interior of your kitchen in the decoupage style; you need to properly prepare the tiled surface. The accuracy and aesthetics of the decoration result depends on this.
Preparatory manipulations:
- If three-layer napkins are used for decoupage, remove two main layers, leaving only the front one - with the pattern.
- If you use specialized paper, you must first soak it in water for 1 minute.
- Before work, the ceramic coating of the kitchen is cleaned of dirt and grease and dried. Treated with a degreaser - alcohol, acetone.
Preparatory work
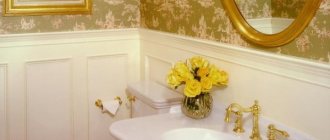
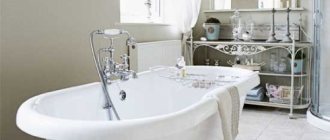
Provence
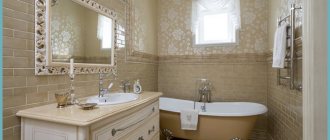
It is considered a traditional French style, so it will add a touch of romance to the interior. For walls, preference is given to natural colors: white, blue, yellow and green. It is not allowed to use items from different collections in plumbing fixtures. The furniture is preferably wooden (aged wood looks especially original), or from materials that imitate it.
Wooden elements and an old cast-iron bathtub will organically fit into the Provence style decor
Provence requires thoroughness. Such an interior must have a window with textile curtains. For lighting, the French prefer sconces and floor lamps with light forged bases. Accessories include paintings and fresh flowers in vases (the bathroom is no exception).
In the Provence style, antique furniture and textiles with floral patterns are actively used.
IMPORTANT! Despite the fact that Provence, as one of the favorites, is often used in small spaces, it looks much more advantageous in spacious bathrooms
Provence style decor in a spacious bathroom
Execution technologies
When the conversation turns to decoupage of ceramic tiles laid on the wall of the kitchen, the same type of drawings comes to mind. All this is already a thing of the past, because imagination knows no bounds, which means that there are many more opportunities to transform the kitchen space in simple ways. So, here are just some ways to decorate tiles.
- Selective decoration, that is, single.
- Combination of different patterns.
- Color combination.
- When one patterned motif is used over the entire surface.
- Panel. It's practically a painting. Here you will have to accurately determine the location of each tile, which has its own pattern.
Today, a very popular technology that combines tiles treated with decoupage technology and tiles with a relief front side in a single section. That is, there are actually a huge number of options as such. As mentioned above, you just need to use your imagination.
In principle, decoupage itself is not a complicated process, because it is just an appliqué. Therefore, it requires very simple tools and materials. This is a brush, glue, the application itself and varnish, which will be used to cover the front side of the ceramic tile as a protective layer.
A very important point is the correct choice of adhesive composition and varnish. They must easily withstand humidity and temperature changes. In addition, the varnish must have sufficiently high strength, because anything can happen in the kitchen. Moreover, the tiles will have to be periodically cleaned of dirt, which means they will be exposed to some household detergents.
As for the tool, it is better to choose a flat brush. It should not be too hard; you will still have to varnish the paper or fabric appliqué. And here caution is required. The brush should not be too wide, but you should not choose a small tool either. In the first case, it will simply be inconvenient to work. In the second, it will take a lot of time.
To decoupage wood or other materials, PVA glue is usually used. For tiles it is better to purchase a special composition. It’s called “decoupage glue.” Although you can dilute it with PVA varnish.
How to glue printouts?
Water-resistant prints on napkins, rice paper and tracing paper do not require thinning or special preparation, so they can be glued immediately (I glue using the file method).
The method for working with thicker prints primarily depends on whether you are gluing the image to the entire surface or just part of it. If the edges of the printout coincide with the edges of the product, then it is not necessary to delaminate them; you can glue the printout like a decoupage card (soak for 5 minutes, coat with glue, apply, “kick out” the air and coat with glue on top), and then remove the excess edges with sandpaper.
If we glue a small fragment onto a large surface, then the printout needs to be thinned so that the edges of the motif are not visible later.
Here are some ways to thin out prints:
If the printouts were made on an inkjet printer with water-based ink, then they must first be dried well, then protected with an aerosol varnish (even for hair) and thinned with tape without soaking (glue the tape to the back of the printout, then carefully tear it off with a layer paper). But remember that the image may still “bleed” when gluing.
If the printouts are made with non-aqueous ink and are not afraid of water, then the easiest way is to coat them with any elastic waterproof varnish (which does not become brittle when wet) in 3-4 layers perpendicular to each other (you can even do this without drying), dry well for 2-3 hours, soak for 3-5 minutes (no more!) in water, and then roll up the excess paper with your fingers until you get a thin film with the image (Fig. 2). You can thin it with dry tape, but this increases the risk of damaging the picture.
If the print is made on glossy photo paper, then the image is also covered with elastic varnish in several layers, then placed on the table with wet paper. We take a needle and carefully separate the varnish film and paper, slowly pull the film strictly vertically upward - and it itself separates from the thick layer of paper, without any rolling. The film turns out to be really very thin and without pellets. The main thing is to pull the film strictly vertically upward and not stretch it.
Where and on what printer can I print a picture?
First, let's talk about printers, because this is the most important and most difficult issue in this topic.
It is easiest to work with printouts made on a color laser printer. This device does not use ink, but a special chemical powder that does not flow when exposed to water, adhesives and varnishes. You can also print on inkjet printers with pigment inks (they are also not afraid of water). But printouts made with inkjet printers with water-based inks are afraid of “dampness,” and when working with them you will have to dry the printout and fix the image with a non-aqueous-based varnish. At the same time, no one can guarantee that everything will work out.
If you are seriously interested in decoupage, then the best option is to buy a laser printer (of course, replacing cartridges for such a device is expensive, but if you try, you can find people who will do it efficiently and not very expensively).
Inkjet printers are cheaper, but if you buy them, then only those that work with pigment ink.
You can, of course, find a printer at home with friends or work colleagues, you can go to photo centers and order prints on photo paper (it’s also easy to work with, we’ll talk about paper for prints later), but these are less preferable options: not very convenient for saving time and all your wishes will not always be taken into account.
Tools and materials for decoupage
You can purchase everything you need in specialized stationery or art and design stores, or in large building materials markets. Fortunately, as a rule, no exotic things are required.
Tools
The main tools are regular scissors and a soft brush. For most ordinary operations this set is quite sufficient. However, if you want to create some kind of sophisticated pattern, additional accessories may be required.
Among them:
- Contour (curly) scissors
- Die cutting
- Toothed rollers
- Tweezers
- Varnish roller
Set of tools for working with paper and fabric
For faster drying of layers of glue, varnish and contour, you may also need a regular household hair dryer.
Materials
The materials for the base of decoupage can be used:
- Special pattern sets available for sale
- Plain or tissue paper
- Paper (multi-layer) napkins
- Textile
- Model mass (for creating three-dimensional pictures)
Advice! Many people would like to create their own original image on tissue paper, but the printer refuses to “roll” it. There is an exit. It is necessary to secure the tissue paper using double-sided adhesive tape along the narrow edge on the feed side on a regular A4 sheet (you cannot use tape - it will melt and ruin the cartridge). The design should be printed on a laser printer, as the inkjet ink will blur when applying varnish.
Acrylic glue or regular PVA are used as materials for gluing the base (can give the picture a yellowish appearance).
Complete set for decoupage
For coating you should use one of the following types of varnish:
- Acrylic
- Acrylic-urethane
- Urethane
- Polyurethane
All these materials are produced on a water or alkyd basis. Water-based options should be used, as alkyd ones can corrode the image, will certainly give it an unwanted yellowness and will be more difficult to apply.
In addition, they dry much longer and have a persistent specific odor, which water-soluble varnishes lack. The list of materials is arranged in order of increasing strength and price.
Advice! If decoupage of tiles is carried out in places with difficult operating conditions (kitchen sink or work table aprons, shower stall walls), it is better to use polyurethane varnishes, although they are very expensive. Their resistance to abrasion, chemical reagents, humidity and other influences is well worth the price.
At the request of the author, the finished decoupage can be additionally decorated with some kind of pattern on top of the design. In this case, it is also necessary to purchase a special contour of the corresponding color (paint in a tube with a spout for application).
Lucky.
Separately, we need to talk about varnishes that can be used to protect the printout before thinning.
Stores sell special transfer products called transfer gels or transcryls (suitable for prints made with non-aqueous inks).
They are elastic and do not break, do not tear when wet, are used according to the instructions: the image is covered with transcryl in several layers, dried, then soaked and the film with the image is separated from the paper.
However, if transcryl is applied in a thin layer, then when the paper is separated it will stretch very much, and the image will be deformed. Therefore, I prefer to use slightly less elastic construction varnishes.
To understand whether any varnish is suitable for protecting an image, you just need to try it in action: thin
any image, having previously covered it with this varnish in several layers. If the varnish film breaks when wet and rolled, then this varnish is not suitable for thinning.
If the varnish stretches very much, then our image will stretch along with it, and it will be inconvenient to work, because due to the stretched varnish you will get a lot of folds: you need it to stretch, but in moderation. By the way, during my experiments, it turned out that most artistic and construction varnishes are quite suitable for the thinning procedure.
Let me draw your attention to the fact that using the described methods you can thin out not only printouts, but also thick decoupage cards, pictures from magazines and photographs!
As you can see, working with printouts is not so difficult: the main thing is not to be afraid, but to try. I wish every beginner (and not only) decoupage artist to master the technique of working with printouts
and expand your capabilities, get new sources of inspiration!
There are many ways to decorate various rooms of your home with your own hands. At the same time, the most ordinary and familiar building materials are transformed. One example of such an original design is that the pattern on the tile may be the same, or maybe different.
This finishing technique is especially attractive for those who like to do something with their own hands. Read more about what decoupage is and how to do it at home.
If you were involved in appliqué as a child, then you already have basic decoupage skills. After all, decoupage is nothing more than gluing cut-out figures, usually made of paper or fabric, onto various surfaces.
Almost any facing materials are finished in this way. Tile is no exception in this regard. Thanks to its smooth surface and precise geometry, it provides ample scope for imagination and ensures high quality of the final composition.
Decoupage is gaining increasing popularity as a decoration method due to several attractive properties:
- Achieving a uniquely finished surface from a standard material
- Availability and low cost of necessary accessories
- Absence of any requirements for the qualifications of the performer, except for accuracy
What to do with a napkin
In decoupage from a napkin, only a layer with an image is used, which must first be separated from the other two - by the way, they can also be used somewhere as a background. In a three-layer napkin, the layers are mechanically fastened together - with punctures along the perimeter, so they can be separated dry. To do this, the sheet is laid out and ironed with a hot iron, as a result of which the punctures lose their function, and the layers can be easily separated by simply prying one fingernail at a time.
This operation is clearly shown in the video:
If you plan to use only a fragment of a napkin, then it is better to cut out images with clear contours, especially with a contrasting background, with scissors (before the sheet separates). When the design does not have clear boundaries, and its background is the same tone as the tile and should be masked on it, the fragment is “plucked out” with your fingers.
The shapeless outline of a selected fragment is also used on contrasting tiles - in this case, its visibility is a “plus”, since such borders look original.
Important! To make it easier to work with the decorative layer of the napkin, you can spray it with aerosol varnish - this will make the fragment a little harder and stronger, but you will only need to place it on fresh glue, since it will no longer be possible to soak it.