Features of dropout
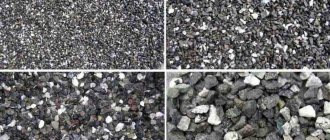
After processing natural stone, a material remains that is commonly called screenings. In its structure it is similar to sand, but only of the largest fraction. Its grains are up to 5 mm in diameter. This product has high drainage properties.
The latter circumstance makes it possible to use screenings both for the production of paving stones and for their installation on the ground. And in the latter case, sand is often reinforced with cement. And the proportions of sand and cement for laying paving slabs are 3:1. In this case, the strength of the substrate increases significantly. And the surface can carry much greater loads.
The main advantages of dropping out:
- Does not absorb moisture.
- Not afraid of sudden temperature changes.
- Tolerates frost and extreme heat.
- Creates a perfectly even bulk layer.
- Effectively fills joints between paving stones.
- Has a low price.
- It can be purchased in any quantity. From a few bags to a large batch in bulk.
The product is well suited to persistent soils where groundwater levels are low. Otherwise, you will need to lay paving slabs on sand concrete. But before this, you need to lay geotextiles, and also pre-pour coarse crushed stone.
Screening under the tile Source upload.wikimedia.org
What it is
This name refers to material from small fractions, which is a secondary product of the process of crushing various natural stones. An example would be granite or gravel; there are also other variations made from different types of stones. Individual particles are usually no larger than five millimeters in size, which is fine, although slightly coarser than sand. Is it possible to lay paving slabs on screening? Certainly. This option is used primarily when laying tiles, but not only for this purpose. Sometimes it is also what it is made from, that is, one of the key components of the molding mixture.
Sometimes screenings (primarily granite) are used for other purposes - as an independent component for creating embankment paths. The color of granite is quite attractive and fits well into most landscape design solutions. It is also used to fill the seams between ceramics.
The fraction is sold both in bulk and in large bags of 20-50 kg, which is why you can purchase volumes for both small and large-scale work.
Laying technology
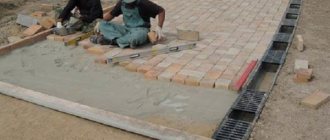
Let's look at how to lay paving slabs on screenings. For productive actions, it is advisable to have a concrete mixer and a vibrating tamping machine in your arsenal of standard tools. This technique will significantly speed up the entire process. It will also guarantee that the mixture for bedding will be mixed extremely thoroughly, and the density of screenings will be as high as possible.
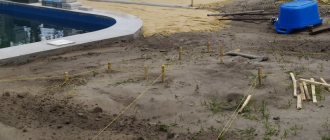
Marking
Ideally, before work, a sketch of the future site is created, which indicates the slopes for stormwater drainage. And for excavation work, cords are stretched. They are attached to cast-offs, which are carried outside the paving area at a distance of one meter.
The cord will indicate the boundaries of the future pit. But if the plan provides for curved sections, then they are marked along the soil itself. To do this, use lime mortar or any paint.
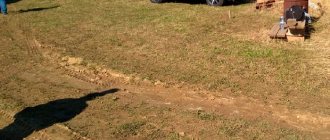
Excavation
This operation, mandatory for any construction, is needed in order to remove the fertile layer of soil, which causes severe subsidence. All soils rich in organic matter have such properties. They are replaced with non-metallic material.
Trench under the path Source housejournal.ru
The actions are as follows:
- Black soil is removed to a depth of 40 cm.
- Small slopes for storm drains are formed in advance.
- The harvested soil is either transported or distributed throughout the garden.
- To prevent mixing with the soil, geotextiles are lined.
Sandy soil significantly reduces excavation work. It is enough to deepen the pit only 10 cm. Distributing them evenly between the screenings and the tiles, since only 5 cm of bedding will be enough. But this is only possible if the groundwater is no closer than 1.5 meters from the surface.
See also: Catalog of companies that specialize in designing and performing landscape work of any complexity
Litter
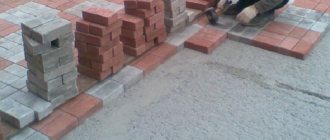
After the proportions of the mixture for laying paving slabs have been selected, backfilling begins. The work is carried out in stages. Pour a layer of 10 cm and compact it thoroughly. The next batch of screenings is laid only when the shoes no longer leave marks on the surface.
Since the depth of the pit depends on the amount of chernozem, the height of the bedding does not have a standard. Each case requires individual adjustment. But experts recommend making the thickness of the bedding layer at least 20 cm.
At the final stage, you must not forget that the contact layer of 5 cm screenings is not compacted. You also need to reserve the same amount for the paving stones themselves.
How to lay paving slabs on screening with your own hands
Laying paving slabs on screenings is advisable to achieve several goals: effective removal of moisture into drainage, uniform distribution of the load on the layer of material during operation, reducing the cost of the coating. Most often, screenings are used for paving tiles in the process of creating playgrounds, garden paths, courtyards of private territories and personal plots.
The cost of screening is much lower than sand, which makes it possible to save significantly, especially when working on large-scale areas. When screenings are placed under paving slabs, a special cushion is created that does not allow the layer of material to sag. Due to its size, the screenings are well leveled and compacted.
Due to the ease of working with the material, its cost and performance characteristics, screenings are increasingly being chosen for laying paving slabs.
What is dropout
Screenings are fine material that is produced as a by-product of the crushing process of natural stone (gravel or granite). Individual screening particles can reach a size of 5 millimeters (but usually less), so the material exhibits properties closer to sand than to stone.
Technology of laying tiles for screening
Before laying paving slabs for screening, you need to take care of the materials and tools. To complete the task, you will need the following materials: paving slabs, granite or gravel screenings, fine crushed stone, quartz sand, curb stone, cement. Tools needed: grout brush, rubber hammer, everything for digging a trench, concrete mixer, tamping vibration machine. The installation scheme is quite simple, the main thing is to carefully adhere to the technology.
Preparation and marking of the site
First you need to mark the territory and make elevation marks. Before this, it is advisable to draw up a schematic drawing indicating the location of the coating, the thickness of the tile layer, all calculations and requirements. Marking is done using a tape measure, wooden pegs, and cord. The pegs are distributed along the perimeter of the coating, the desired slope is determined, and fixed.
Soil excavation
To base the paving slabs, you need to remove the outer layer (arable) of soil, which can sag. The fertile layer is removed to a depth of 40 centimeters, and slopes are immediately made to storm water inlets and storm drainage trays (so that wastewater flows away). The soil is removed from the site or distributed on it (for beds, flower beds, etc.).
The bottom of the trench or pit is lined with any non-woven material to avoid mixing the soil with the screenings. If the top layer on the site is sand, and the groundwater level is below 1.5 meters, it is allowed to remove a layer of soil of 10 centimeters in the trench (5 centimeters for screening and 5 for the layer of paving stones).
Installation of curbs
The border must be laid before laying the tiles. They do it this way: first, they make a depression in the trench in accordance with the height of the curb, then they fill it with a layer of crushed stone in a 5-centimeter layer, compact it manually, install the curb on a cement-sand mixture, fix it on the sides with mortar, plopping it with a trowel in several places.
A storm drain tray is installed on one side of the path, so the curb can be installed on the other (not both). The tray has sufficient height, is securely fixed to the soil and can completely replace the curb, guaranteeing the rigidity of the box. During the installation process, be sure to take into account the slope so that the drains flow away by gravity.
Substrate
The stages of technological execution of the underlying layer must be followed precisely. The duration and quality of operation of the tile covering will depend on the correct arrangement of this layer.
- Lay the screenings in layers of 10-15 centimeters, tamping each layer with a vibrating plate until the shoe marks stop appearing after passing along the surface.
- The thickness of the layer should be approximately 20 centimeters, but if the soil was removed in a layer of 40 centimeters, then the height of the underlying layer is changed individually in accordance with the situation.
- Next, the crushed stone is compacted using a vibrating plate.
All work is carried out in accordance with the thickness of the tiles and the level of the layer relative to the curb. Be sure to leave 5 centimeters to place the screenings in the contact layer, which does not need to be compacted before paving the tiles.
Final layer
The classic method of installing a contact layer: installing beacons oriented to the bottom surface of the tile (a galvanized profile or profile pipe can be used as a beacon), backfilling screenings between concrete elements, smoothing the layer with a rule, removing excess screenings.
If, after removing the beacons, too large holes remain, which then also need to be filled in, you can take a T-shaped profile instead of a beacon (or rather, as one) - it will be easier.
Paving tiles
The rules for laying tiles on screenings are quite simple. Everything can be done quickly and efficiently with your own hands.
- Laying out solid tiles onto the contact layer in accordance with the layout diagram.
- Installation from a curb, any wall of a building or blind area - installation is carried out in a ledge or in rows on straight sections, the master moves forward along the coating, installing the tiles in front of him and without disturbing the fresh layer of screenings.
- Cutting solid tiles with a diamond blade into the required pieces, laying complex areas. Typically, the most time-consuming areas are near rain inlets, steps, hatches, areas adjacent to curbs, etc.
There is no need to adjust the height of the elements, since if the tiles are of high quality, then they are all the same and the layer turns out to be even. If such a need arises, you can carefully knock the tiles from above using a rubber hammer.
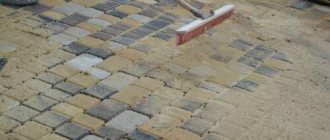
Seam design
Features of this stage depend on the screening fraction. If paths are laid to screen out coarse fractions, then they are covered with sand. It is advisable to choose coarse sand, with torn grains of sand (quartz or quarry), which are wedged between the tiles and are not washed out or blown out of the seams. The seams can also be filled with the screenings themselves on which the tiles were laid. River sand is not suitable for these purposes.
Backfilling is carried out after installation of cut pieces of tiles in difficult places, before compaction with a vibrating plate. Sand is poured in small piles over the area, the material is moved with a brush over the entire surface, and the excess is swept away. Vibratory compaction is carried out, then the path is swept again to remove any excess that may have come out.
Laying paving slabs on screenings is a relatively simple process, which is quite possible to implement on your own. By adhering to technology and choosing high-quality materials, you will be able to lay the tiles quickly, beautifully and reliably, ensuring a long service life of the coating and significant savings.
Source: https://1beton.info/izdeliya/trotuarnaya/ukladka-trotuarnoy-plitku-na-otsev
Video description
The video will tell you how much sand is needed to lay paving slabs per 1 m²:
Installation of curbs
Storm drainage trays are installed on one side of the path. They have reliable fixation with the soil and sufficient height above the surface to replace a full-fledged border. Therefore, the overall rigidity of the box will remain unchanged.
On the other hand, if necessary, deepen the trench. They sprinkle it with crushed stone and compact it manually. The curb is installed on cement mortar, making uniform splashes on the side surface.
Finishing layer
To level the contact layer, two methods are used. In the classic version, ordinary pieces of pipe or profile serve as beacons. They are mounted with orientation to the lower surface of the paving stones. Screenings for paving slabs are poured between them and perfectly leveled. The beacons are removed, and the remaining furrows are filled with the mixture.
The second method will require a special T-shaped narrow profile. After removing it, a narrow groove remains that does not need to be filled. And to level the mixture, you need to make your own rule for the width of the box. To do this, grooves for borders are cut out of a wide plank of wood.
Leveling the finishing layer Source voscem.ru
How to lay screenings for paving slabs?
Screenings for paving slabs are used for laying garden paths, playgrounds and courtyards on personal plots. This material is much cheaper than sand and can significantly save money when laying tiles over large areas.
Composition of the base for laying paving slabs.
The screening technology involves the creation of a special cushion that prevents the tiles from subsiding . Next, we will consider ways to create such a layer and the sequence of its laying.
Conclusion on the topic
Screenings are a relatively inexpensive but high-quality material used to create a cushion when laying paving slabs. It is used both independently and as part of a layered base, which includes sand, crushed stone, gravel and cement.
Path care
Colored tiles are washed with a stream of water from a hose from time to time to give them freshness. And in everyday life, the tile surface is regularly swept away from debris. If the surface is very dirty, use a stiff brush to help. And the stain is pre-treated with a washing solution.
Tile care Source ytimg.com
If a crust of ice forms in winter, the use of salt is strictly prohibited. It disrupts the structure of concrete and in the spring many chipped places form on the surface. And over time, the paving stones will begin to fall apart into pieces. Therefore, to remove ice you need to use either a scraper or special compounds.
Efflorescence often appears on paving slabs, as well as on brick. As a rule, they appear because there were a lot of salts in the water with which the solution was mixed. Or the latter were contained in large quantities in various additives. It is not difficult to fight them with the help of special means. And after just one treatment, the surface will regain its attractive appearance.
Advantages
The main advantage of this option is its price. When compared with sand, the quality of these two materials is, if not equal, then very close. And the alternative is noticeably more expensive. People think that if it costs less, then the result will be noticeably worse. But that's not true. It is enough to give such a simple example - most of the coatings in urban facilities are designed in this way. During urban construction, customers try to save as much as possible on installation costs, preferring simple materials. If you prepare the foundation correctly, then there will be no problems with this approach in principle. The advantages include the prevalence and the ability to purchase in convenient packaging. You simply choose what kind of screening for paving slabs you need and purchase it in the right quantity.
Features of laying paving slabs
- 07.02.2014
- 1314
- 39
Paving slabs are laid on screenings or sand, to which it is best to add cement in a ratio of 1:4, then the tiles will be fixed more securely.
Scheme of laying a garden path for screening.
When performing all the work yourself, you must adhere to accepted building codes and regulations, then everything will work out quickly, simply and reliably. The durability of the paving surface will depend not only on the quality of the tiles themselves, but also on compliance with the technology for preparing the bed and laying it. When paving tiles, the result of the work will be influenced not only by how it is laid and by whom, but also by the quality of preparation of the bed for laying. This stage must be performed, adhering to the rules, for any type of installation.
Tools needed for the job
Tools for laying paving slabs.
If you decide to lay paving slabs yourself, you will need:
- wooden pegs;
- cord;
- Master OK;
- building level;
- rubber hammer;
- rake and broom;
- watering hose, which should have a diffuser;
- circular saw or grinder with a diamond blade;
- device for compaction.
Before starting work, it is necessary to study the site where the installation will be carried out and determine where the water will drain. Precipitation must be drained from the blind area of the building either into special wells or onto lawns; slopes for water sap can be either longitudinal or transverse, or longitudinal-transverse. There are a lot of varieties of paving slabs, but when choosing them you need to look not only at the color, but also at the shape, since it will have to be cut. You also need to ask the seller what loads it is designed for; pay special attention to the roughness of the surface so that it is not slippery in winter.
Return to contents
Construction of paths with open and closed drainage.
- We mark the area and plan the drainage of water. Once you have decided on the place where you plan to lay the paving slabs, you need to make sure that water from precipitation does not accumulate on its surface. For effective water removal, a longitudinal or transverse slope of the surface of 1-2% is sufficient.
- We prepare the so-called “trough”. After identifying the area, it is necessary to remove the top layer of soil. The depth depends on the intensity of use of the coating and can range from 15 to 50 cm. If the soil is weak, then it is additionally compacted; if the soil is dry, then it must be moistened. Crushed stone or screenings and sand are laid on top.
- Preparing the “pillow” for installation. In order for the base to be of high quality, it must consist of at least three layers.
- First, crushed stone is poured and compacted; the thickness of the layer can be from 5 to 20 cm. Do not forget that when compacting, crushed stone shrinks, so you need to make a reserve of 10-15%. After this, the side edging is installed.
- Next, place a layer of screenings or sand up to 7 cm thick; it must also be thoroughly compacted, making a margin of about 15% for compaction. You can use granite screenings or hard sand. River or sea sand is not suitable for these purposes.
- Screenings or sand are laid last; this layer is not compacted; cement can be added to it in a ratio of 1:4, but this is not necessary. After leveling the specified layer, it should be 5 m higher than the desired tile level.
- Install the side edging.
- To do this, you can use columns, curbs or borders. Installation of curbs and curbs is carried out using a cord that is pulled to the desired height. To install curbs, it is necessary to prepare a concrete foundation 20 cm wide, the height of the concrete castle is 15 cm. To install columns or curbs, a concrete foundation 10 cm wide is sufficient, and the height of the castle is 7 cm.
- Laying paving slabs.
- When paving tiles, you must follow the pattern. Particular care must be taken when laying the first row. The tiles must be installed tightly so that they do not wobble under your hands. If any unevenness in the base is detected, it must be corrected. The quality of the installation is checked using a marking thread; if it is a narrow path, then using a strip. If you make curves, then you need to pay attention to the fact that on the outside the width of the gaps is minimal and no more than 8 mm. If it is necessary to cut the tiles, this can be done using a circular saw or grinder with a diamond blade installed.
- Sprinkling the seams. After the tiles are laid, its entire surface is covered with white river sand. Then, using a hard-bristle mop, the surface is grouted. You can also use special compounds for grouting, but they are expensive. Some craftsmen mix sand and cement in a ratio of 1:2, but if the cement remains on the surface of the tile, then after contact with water it will remain on it and will spoil the appearance. Therefore, after filling the joints, such a mixture must be removed from the surface especially carefully.
- Tamping tiles.
- After all the work has been done, if you have a vibrating plate, you can use a rubber gasket to compact the entire surface. But if there is no vibrating plate, then this operation is not necessary; the tiles will still hold firmly and reliably.
Return to contents
When carrying out all the work on their own, they often make the following mistakes:
- When planning space for paving slabs, too much space is allocated, which may be inconvenient in the future, so it is better to consult a specialist.
- Don’t rush to do everything quickly, think everything through well, so that after laying the tiles you don’t have the desire to rebuild something again, show foresight.
- Incorrect application of sealant. It should be applied 6 months after installation, and then once every 1-3 years. Earlier or later application of sealant negatively affects the durability and strength of paving slabs.
If there is a need to cover a large area that can withstand heavy loads, for example, a parking area, a pedestrian area in public places, then it is better to involve professionals. If you need to lay tiles in your yard, then you can do everything yourself.
1landscapedesign.ru