Diagram of the device of a foam generator for the production of foam concrete
To make a foam generator you will need: a metal pipe (2 blanks), a pump, hoses, valves. And also a welding machine. More detailed components are indicated in the specification that accompanies the drawing.
Drawing of a foam generator for foam concrete
Making a mixing chamber
Weld two pipes to one of the prepared pipes. Moreover, it is advisable to place one of them (through which air will be supplied) on the side. And weld the second one, intended for supplying the foaming emulsion
from the side (at an angle of 90°).
Both inlet pipes (end and side) are equipped with two valves:
In practice, after the mixture supply parameters have been adjusted, control valves are not used.
Note. The diameter of the side pipe should be 15-20% larger than the diameter of the end pipe.
Making a foam cartridge
A pipe is welded to the second pipe blank.
It is designed to release the finished mixture. It is advisable to equip the outlet pipe with a device in the form of a funnel to reduce the rate of exit of the mixture. A filter is placed in the workpiece. The purpose of which is to convert the emulsion into
foam. You can purchase a ready-made filter.
But its function can be performed with no less success by metal meshes (brushes) for cleaning dishes.
At the same time, spiral ones are not suitable, only wire ones. These meshes must be compacted as tightly as possible along the entire length of the foam cartridge pipe. So that the mesh particles do not fly out along with the mixture to the outlet of the pipe
a “Ruff” is installed, inside of which a mesh washer is installed.
DIY foam generator for foam concrete
Purchasing this module is the most expensive part of production.
The purpose is to convert the foaming agent into foam before feeding it into the solution.
The design of the foam generator consists of three components:
- feeding module. A foaming agent solution is poured into it. Any container can perform this function;
- converting module. The quintessence of the installation is foam conversion;
- dosing module. Provides the ability to supply foam to a solution of a given density (determined by the brand of foam block).
Diagram of a foam generator for the production of foam concrete
Diagram of the device of a foam generator for the production of foam concrete
To make a foam generator you will need: a metal pipe (2 blanks), a pump, hoses, valves. And also a welding machine. The components are listed in more detail in the specification that accompanies the drawing of the foam generator.
Assembling a foam generator for foam concrete (diagram-drawing)
Drawing of a foam generator for foam concrete
Making a foam generator
The specificity of the factory foam generator tube is that at first it has a narrow channel, which then widens. This technique allows you to increase the speed of passage of the emulsion through the tube. Then at the exit it will have the maximum possible speed.
Related article: How to putty slopes with your own hands correctly?
How to make a foam generator for foam concrete with your own hands?
To do this, you need to make a turbulent mixing chamber and the main foam cartridge.
Making a mixing chamber
Weld two pipes to one of the prepared pipes. Moreover, it is advisable to place one of them (through which air will be supplied) at the end. And weld the second one, intended for supplying the foaming emulsion, on the side (at an angle of 90°).
Both inlet pipes (end and side) are equipped with two valves:
- shut-off (allowing you to shut off the flow of foam concentrate);
- adjustable (allowing you to adjust the supply parameters, change the pressure, pressure, quantity, etc.).
In practice, after the mixture supply parameters have been adjusted, the control valves are not used.
Note. The diameter of the side pipe should be 15-20% larger than the diameter of the end pipe.
Making a foam cartridge
A pipe is welded to the second pipe blank. It is designed to release the finished mixture. It is advisable to equip the outlet pipe with a device in the form of a funnel to reduce the rate of exit of the mixture. A filter is placed in the blank. The purpose of which is to convert emulsion into foam. You can purchase a ready-made filter.
But its function can be performed with no less success by metal mesh (brushes) for cleaning dishes.
At the same time, spiral ones are not suitable, only wire ones. These meshes need to be compacted as tightly as possible along the entire length of the foam cartridge pipe. To prevent mesh particles from flying out along with the mixture, a “Ruff” is installed at the outlet of the pipe, inside of which a mesh washer is installed.
Connection of mixing chamber and foam cartridge
Next you need to connect the mixing chamber and the foam cartridge. Naturally, this must be done so that the welded pipes are placed at opposite ends. To ensure an increase in the speed of passage of the foam concrete mixture through the tube, you need to install a Laval nozzle or a jet washer between them. Replacing the nozzle with a jet will reduce the efficiency of the design by 30-40%, by reducing the speed of passage of the mixture through it. However, it is cheaper, easier to install and can be used as a temporary option. The installation location of the nozzle or jet is shown in the diagram.
Diagram of a foam generator for foam concrete using a washer jet
Size ratio of foam generator for foam concrete (depth and inlet diameter)
Size ratio of foam generator for foam concrete
Connecting the compressor to the end pipe of the mixing chamber
Any compressor that provides a pressure of 6 atm is suitable for operation. Using a compressor with a receiver, pressure reducing valve and pressure gauge will allow you to regulate the pressure.
Material prepared for the website www.moydomik.net
3. Connecting the foam concentrate container to the side pipe of the mixing chamber
The container is installed on the floor, a hose is attached to it, through which the foaming emulsion (foaming agent plus water) will be supplied to the mixer by moving through the side pipe. Installing a small pump (an ordinary household “trickle”) will allow for a more efficient supply of foaming agent to the foam generator. However, in order to save money, the supply can also be organized by gravity.
Related article: Installation of installation for a toilet
A foaming agent for foam concrete made in such a simple way will cost much less than a purchased one. And the resulting foam will be in no way inferior to the foam obtained from a factory generator.
Connection of mixing chamber and foam cartridge
Next you need to connect the mixing chamber and the foam cartridge. Naturally, this needs to be done so that the welded pipes are placed at opposite ends. To ensure an increase in the speed of passage of the foam concrete mixture through the tube, you need to install a Laval nozzle or a jet washer between them.
Replacing the nozzle with a jet will reduce the efficiency of the design by 30-40%, due to the reduction in the speed of passage of the mixture through it. However, it is cheaper, easier to install, and can be used as a temporary option. Installation location of the nozzle or jet
shown in the diagram.
Diagram of a foam generator for foam concrete using a washer jet
Size ratio of foam generator for foam concrete (depth and inlet diameter)
Size ratio of foam generator for foam concrete
Connecting the foam concentrate container to the side pipe of the mixing chamber
The container is installed on the floor, a hose is attached to it, through which the foaming emulsion (foaming agent plus water) will be supplied to the mixer by moving through the side pipe. Installing a small pump (an ordinary household “trickle”) will allow for a more efficient supply of foam concentrate to the foam generator. However, in order to save money,
supply can also be organized by gravity.
A foaming agent for foam concrete made in such a simple way will cost much less than a purchased one. And the resulting foam is nothing
will not be inferior to the foam obtained from the factory generator.
Homemade equipment for the production of foam blocks - video
Setting up a foam generator for foam concrete at home
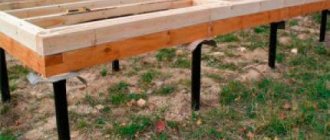
The second component of the production of foam blocks, which you can make on your own, is a mold for pouring foam concrete.
DIY foam block molds
The molding container can be made of any material: plywood, metal, plastic. The main requirement is that the material should not
deform during the process of pouring the solution.
Making a mold involves going through two stages:
How to make a foam concentrate with your own hands
Components for foam concentrate.
- Caustic soda 16 g/m3.
- Gum rosin 60 g/m3.
- Carpenter's bone glue 65 g/m3.
Instructions
- First, prepare wood glue and dilute it. Grind and soak 1 kg of glue in a bucket of water for a day.
- Heat on fire to about 60-70 degrees and mix thoroughly until it dissolves completely.
- Dilute soda to water at the rate of 1.2 kg per liter.
It is done.
The quality of the foam can be checked by turning over the container with it (bucket or bowl). If the foam holds and does not flow out, then everything turned out as it should.
Foam concentrate storage
The material is not at all capricious, it does not deteriorate in either heat or cold. Usually stored in sealed containers. Just do not allow the foaming agent to come into contact with petroleum products.
How to correctly calculate the size of the mold for foam blocks?
Building blocks (walls) are usually produced in the following ratio (proportions): length : width : height – 4 : 2 : 1. This ratio is optimal, since it allows tying the rows of masonry without trimming the blocks. Thus, if the depth of the mold is 150 mm, then its width and length
will be equal to 300 and 600 mm respectively.
For private production of foam concrete blocks, it is advisable to use a mold that allows you to simultaneously produce up to 30 foam blocks.
Please note that the length of the form will be longer than the total length of the blocks. This is due to the fact that the partitions have a certain shape
thickness.
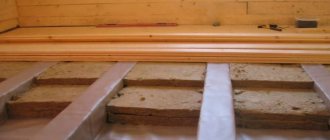
Note. It is better to install partitions in such a way that the plane of the largest area is on top. This ensures faster drying of the block and uniform strength gain.
foam concrete. For the same reason, it is not recommended to make multi-level forms.
How to make molds for foam blocks with your own hands?
The process of making a mold begins with the construction of the bottom. The side walls are rigidly attached to it and detachable inner walls are installed.
partitions.
Craftsmen advise making the mold for foam concrete blocks collapsible.
This technique will allow you to vary the size of the blocks. For the same reason, partition plates should not be welded together. It's better to do it in them
cuts up to half the width and connect through them.
If plywood is used as a material for making formwork, then the partitions must be secured with nails. Corners, spacers, etc.
items will be imprinted on the finished block. It won't harm him, but it won't be beautiful either.
will add.
Advice. It is better to use laminated plywood.
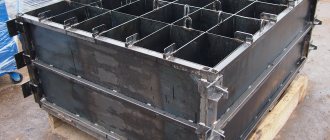
The diagram-drawing of the mold for foam blocks and the appearance are shown in the drawings.
Scheme-drawing of a mold for foam blocks
Scheme-drawing of a mold for foam blocks (dimensions of formwork elements)
Metal formwork (mold) for the production of foam blocks
Assembling a mold for the production of foam blocks
The advantage of a homemade form is the ability to produce foam blocks of non-standard length or configuration.
- Date: 02/08/2015 Comments: Rating: 53
Have you ever heard that any development occurs in a certain cycle: after the rise, there is a decline in production, then the rise begins again, and everything happens in a vicious circle? This sinusoid of development occurs in almost all spheres of life.
Components and equipment for the production of foam blocks.
They began to live richer - everyone wants to build houses, garages, bathhouses. But you never know what a person wants to build - if only the materials and equipment were at hand.
And this is where people run into a problem, since materials are the most expensive part of all construction costs. If we talk about finishing materials, then there are no other options except buying everything you need in the retail chain. But making foam concrete blocks at home is quite possible.
The technological process itself is simple, since in the production of foam concrete it is only necessary to organize the mixing of cement mortar with foam and pour the resulting mixture into molds. All necessary equipment for the production of foam concrete can be purchased in specialized stores.
Do-it-yourself foaming agent for foam concrete
Foaming agent composition:
- caustic soda (caustic soda) – 0.15 kg;
- rosin – 1 kg;
- wood glue – 0.06 kg.
The manufacturing technology is somewhat labor-intensive and time-consuming. Therefore, it is advisable only for significant volumes of work.
How to make a foaming agent for foam concrete at home
Preparation involves two stages:
- mixing the adhesive solution. To do this, pieces of dry glue are filled with water (1:10) and left for a day. During this time, the glue will swell a little, but will hold its shape. Therefore, the container with water and glue is heated to 60 ° C (with constant stirring). The adhesive solution is ready when all the pieces have dissolved and formed a homogeneous mass;
- making rosin soap. For this purpose, the sodium is brought to a boil. Then rosin is gradually introduced into it. The boiling process will take about 2 hours until the rosin is completely dissolved.
Note. Rosin should be crushed first.
Both compositions are mixed when the rosin soap has cooled to 60 ° C.
Note. When mixing, rosin soap is poured into the adhesive solution. Mixing ratio 1:6.
Related article: Installing a drain in the bathroom
The resulting mixture is poured into a foam generator and high-density foam is obtained. Foam with a density of 80 g/dm3 is considered optimal for use. Using less dense (more airy) foam will degrade the quality of the block and lead to its rapid destruction.
Note. You can check the quality of the foam by filling a bucket with it. After turning the bucket over, the foam should stay inside.
The production diagram of foam blocks is shown in the figure.
Foam block production diagram
Note that, like the first pancake, the first foam concrete blocks usually also come out lumpy. There are several reasons for this:
- the difficulty of dosing the constituent components in the solution;
- increased/decreased water content in the solution;
- increased content of foaming agent in the solution. Its consumption should not exceed 1.5 liters. per 1 m/cub.
Firstly, because the foaming agent is expensive.
Secondly, because increasing it in the mixture increases the time for concrete to harden.
Thirdly, because it will reduce the strength of the block.
- varying the kneading time;
- experimental determination of time for building strength in blocks;
- drying mode of finished (unmolded) blocks.
Unfortunately, such experiments not only prolong construction time, but lead to additional costs. However, as users testify, they are completely justified. Moreover, defective foam blocks can be used as backfill under the floor, and used equipment for the production of foam concrete can be sold.
Note. As practice shows, it is better to make structural foam blocks (grade D-900 and higher). They contain fewer pores compared to thermal insulation, and are easier for beginners to make.
Required materials and tools
Even taking into account the cost of equipment, the resulting foam concrete blocks will be cheaper than those purchased ready-made. But you can make all the equipment yourself. To do this you need to have the following:
- sheet metal; electric motor (you can also use an internal combustion engine, for example, from a walk-behind tractor); gearbox; electric welding; compressor; metal pipes of different diameters (pipe cuttings can be used); rubber hoses.
Return to contents
You will have to weld a cylinder from sheet metal.
Any cylindrical container will do. The main thing is that it is durable, since foam concrete has a decent weight. The walls of the container must not be deformed under the influence of pressure from the inside.
The location of the mixing container can be either horizontal or vertical. In the upper part of the container, it is necessary to organize a neck for filling the equipment with cement, sand and water. In the lower part there should be a pipe with a tap for unloading the finished foam concrete.
Return to contents
Diagram of a high-pressure foam generator.
Now you need to arrange mixing in the container. Inside it (in the central part) we place a metal shaft.
The lower end of the shaft must be pressed into a bearing, which is fixed in the bottom of the mixer. The shaft must be fixed as securely as possible at a distance of 20 cm from the top cut. To do this, the bearing housing is fixed in three directions to the mixer container.
It is necessary to organize a worm mechanism on the shaft for mixing. There should be a pulley at the top of the shaft, which is secured with a key. And now it is necessary to ensure a reliable drive: opposite the shaft pulley there should be a pulley from the gearbox connected to the engine.
It doesn't matter how it will be organized. The design of the frame for the location of the engine may be different. The simplest version of the mixer is ready.
The foaming agent for the production of foam concrete is the main part of all equipment. As proof of this, examples show that many craftsmen use a conventional concrete mixer for mixing.
It’s easy to guess that you can do without the mixer we were talking about. Even a regular drill with a special attachment will help you mix. But this is not a solution, since with such simple equipment you will not be able to make enough blocks.
For this reason, it is necessary to have a mixer available. Moreover, there is the following dependence: the larger the volume of the mixer, the faster all your costs will pay off. But let’s not do the calculations, but let’s get back to making the foam concentrate.
Return to contents
Diagram of a metal cassette mold for foam concrete.
Here you need to make a simple device from a metal pipe. Three pipes are welded to the pipe (two should be located at the end, and the third should be on the side), two of which should be provided with taps. The third pipe will be the outlet, so it is slightly wider than the other two.
Any compressor is connected to one pipe. To do this, it is better to use a compressor with a receiver, which is equipped with a pressure reducing valve and a pressure gauge. This will make it very easy for you to achieve a certain pressure and maintain it in the optimal operating mode for you.
A hose from a container with a foaming compound is connected to the side pipe. You should not count on the fact that this composition will be fed by gravity into the mixing chamber. Do everything securely and install a small pump.
The foaming agent is ready.
But making such equipment does not mean that you will immediately be able to obtain a thick and reliable foam composition using it. You will have to tinker with the taps for a long time before you achieve optimal operation. And understanding what is happening inside the mixing chamber will help achieve this.
Return to contents
The operating principle of the foam concentrate.
The composition of the foaming liquid supplied to the chamber must pass through a narrowed hole, then at the exit it will have a high speed. The same should be said about the supplied air. Turbulent movement of both moving media and their mixing will occur in the chamber.
The increase in volume will push foam through the outlet pipe.
This mixture should be fed through a hose to be mixed with concrete. At the outlet of the hose, it makes sense to place a tip in the shape of an expanding funnel. This way the foam will get even more volume.
You shouldn’t be afraid of too much volume, since the concrete particles will “extinguish” part of the foam during mixing. To ensure high quality foam concrete, you will have to experiment for some time with different combinations of parameters: the speed of rotation of the shaft in the mixer, the speed of foam supply, even the speed of unloading the resulting mass into the container can affect the quality of the finished product.
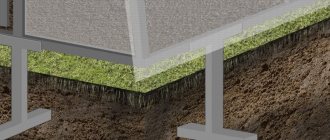
An important part of the equipment is the molding container.
It would seem that foam concrete is lightweight, so you can make a form from any material. In reality, everything is not so simple. You must first make the tank body according to the parameters of the proposed foam concrete blocks.
Dimensions of a mortar mixer for the production of foam blocks.
Typically, the proportions of all building blocks, including ordinary bricks, are 4:2:1. During construction, these proportions are optimal, since the laying of such blocks ensures reliable ligation of rows. Accordingly, if the depth of your molding container is 60 cm, then its other parameters should be a multiple of 30.
We divide the entire width of the container into 30 cm sections and install dividing plates. We install plates across them at a distance of 15 cm from each other. The plates can be joined together if you make cuts in them up to half the width.
It is advisable to make the molding container collapsible (except for the body). This option will make it possible to produce foam concrete blocks of various linear parameters. For the construction of one facility, this may not be necessary, but for the production of products for sale (to order), such a measure can be provided.
Return to contents
As already noted, the quality of foam concrete will depend on many things, so different modes of operation of the equipment can be foreseen during its production. It wouldn't hurt if you tried using a multi-stage pulley. This way you will ensure a change in the speed of rotation of the shaft in the mixing machine.
The same can be achieved by changing the current supply to the electric motor, but such a solution can be called questionable.
The electric motor will quickly fail if the current changes. But when using an internal combustion engine, you can change the shaft rotation speed using a conventional accelerator. It is optimal to use equipment equipped with such a motor in areas where power supply is difficult.
Return to contents
Foam concrete production diagram.
There is a high probability that to make foam concrete with your own hands you will need additional equipment for sifting sand.
Either a metal mesh with a small hole, or more technologically advanced equipment in the form of a simple device, is suitable for this. For this purpose, a metal frame is made in the form of a regular table, where instead of a tabletop, a metal sieve is installed on hinges. A curved shaft is fixed in the corner part of the sieve, which should drive an electric motor.
It is enough to simply throw sand on the surface of the switched-on “table” - and you can pick up the sifted sand under it. Such equipment is especially relevant in areas where the extraction of clean construction sand is difficult. And it is impossible to do without clean sand, since foam concrete with admixtures of pebbles is of low quality.
To produce foam concrete in large volumes, unnecessary time expenditure can be reduced to a minimum. For example, a cutter is installed in the receiving neck of the mixer to open bags of cement: place the bag sideways on this device, and all the cement will instantly be in the container.
Do not forget that first of all you need to pour water into the mixer.
You can get foam concrete in any order of loading materials, but if dry cement or sand is loaded first, the outlet pipe may become clogged, which will make unloading foam concrete very difficult.
So, if you decide to carry out hidden wiring when renovating a house, you need to cut grooves, also called grooves, in the walls for laying the cable. You can use a special tool for this, but its cost is quite high for one-time use. It would be much more correct to make a wall chaser with your own hands, slightly modernizing the grinder, which should be in every man’s arsenal. Read on to learn how to make a simple, but at the same time easy-to-use, homemade tool for wall slitting!
What will be needed to create and install it?
Before you start making a foam concentrate, you need to make a drawing of the future device. You can make the drawing yourself or find a ready-made version.
Diagram of a high-pressure foam generator.
Foam generators for foam concrete can be constructed using the following tools and materials:
- submersible pump;
- welding machine;
- hoses;
- metal sheets;
- compressor unit;
- special valves for regulating and locking foam;
- pipe.
The production of cellular concrete blocks means the mandatory use of foam, which is added to a special mixture. The solution is thoroughly mixed. The properties of the final material are largely based on the quality of the raw materials obtained in foam generators. The foaming agent must ensure accurate mixing of all components used.
To assemble such equipment, a certain amount of time is required. To get air into the closed chamber, you need a regular vacuum cleaner. However, such equipment does not have the ability to control foam consumption. The production of a foam concentrate begins with a chamber into which air and the mixture will flow.
For storage, you can use any metal container in the form of a cylinder. Air with the solution enters the container without stopping. To do this, you need a special pump (submersible type) and a hose. Compressed air will be directed into the chamber from the compressor unit through the second hose. The load in such a device will be adjusted using a valve. To increase the pressure, the valve is screwed on tighter. Water also enters the system.
The foam generator is equipped with a special nozzle, which is installed separately in the casing. There is a channel inside this element; first it contracts and then increases. The solution comes out of the nozzle and ends up in the foam cartridge. The foam cartridge is of great importance in the foam formation process. Metal mesh is placed inside it, which is used for washing dishes. It is made from small diameter wire. The solution from the nozzle falls onto the filter. This filter can be purchased at any plumbing supply store.
Dense, homogeneous foam is a sign of quality material.
We must not forget that all connections require sealing. The legs of such equipment are made of metal pipe. They are welded to the casing using a welding machine.
Experts advise making a foaming agent yourself, but taking into account the following points:
- the depth of the nozzle and its inlet diameter must be equal;
- the outlet diameter of the nozzle should be three times less than its depth;
- The diameter of the hole in the center of the nozzle should be approximately 10 millimeters.
In the case of assembling a foam concentrate producing 200 liters of foam, the diameter of the foam cartridge is 40 millimeters and its length is about 70 centimeters.
If the foam output per hour is 500 liters, then the diameter is 70 millimeters and the length is 70 centimeters. The dimensions of other elements of the foam concentrate are selected individually in each individual case.
Return to contents
Simple homemade product
To begin with, we will provide simple instructions in pictures for making a wall chaser based on an angle grinder with your own hands. In this case, you will need the grinder itself, an additional nut and two diamond discs for concrete.
The assembly consists of two simple steps, namely:
- We install the first disk as usual, carefully tightening it with a nut. After the nut, attach another disk and tighten it with the nut again.
We draw your attention to one important point - if the thread is not enough to completely tighten the nut, it is better not to take risks using such a homemade product. In this case, instead of a nut, you can use a metal ring of the same diameter, but smaller width, or a set of washers. The last option is convenient in that you can make the most suitable groove width depending on the selected cable cross-section.
That's all the instructions for creating a wall chaser from an angle grinder with your own hands. The disadvantage of this option is that all the dust will spread throughout the room and worsen working conditions. That is why it is recommended to make a more modernized version - with a protective casing, which we will talk about later.
Types and compositions of material
Foaming agents can be organic or synthetic. Organic foaming agent is created from natural raw materials. Foam concrete is environmentally friendly and strong. Synthetic is cheaper, but the least high quality and strong.
To this day, there is no universally accepted approach to how effective one or another foaming agent is. As is clear, an uncontaminated liquid does not actually form foam. But if you add a little surfactant to it, its surface tension will decrease, and hence the energy costs for foam formation. Surfactants for water have long been well known - this is soap. It appears with the assistance of animal or vegetable fat with alkali. Sodium soaps are solid, while potassium soaps are watery. Almost all beginning foam concrete makers have tried using soap as a base when making a foam concentrate with their own hands. What comes out is beautiful foam, but foam concrete is no good.
The fact is that cement contains a lot of calcium. Potassium and sodium ions in soap molecules are rapidly replaced by calcium ions, and calcium soaps do not dissolve in water. Accordingly, the finished foam rapidly collapses. If instead of animal or vegetable fat you take resin or naphthenic acid, you will get soap, which in the presence of calcium does not reduce its foaming characteristics, but increases it. This soap can become the basis for a homemade foaming agent.
The foaming agent may be organic-based, but it may also be synthetic. Synthetic is cheaper and more unpretentious in production, but it produces the least high-quality and least strong foam concrete. Based on environmental beliefs, there are also claims against him. Organic – environmentally friendly, created from natural raw materials. Foam concrete based on this foaming agent is stronger, since the foam binds more actively to the substance, and the interbubble partitions are the thickest.
Advanced tool
To ensure that all the dust immediately disappears while wall shaving, you can equip your homemade wall chaser with a vacuum cleaner.
The suction hose is fixed above the cutting part, thereby instantly picking up the so-called “dust cloud”. You can buy a modernized casing, or you can make it yourself. In the first case, you will spend a considerable amount of money on a part from a well-known manufacturer, so it is better to use the second option.
In order to make a wall chaser with a vacuum cleaner, you need to take consumables and use your imagination. There are many ideas for assembling a casing from a metal pipe, a durable pan sheet, or even a plastic container. We recommend viewing photo ideas to gain inspiration and make your own version of a casing with a dust extraction:
Please note that the pipe must be installed on top of the homemade wall chaser, as shown in the drawing.
This is due to the fact that the cutting wheel rotates in the opposite direction and, just with this arrangement of the suction hose, all dust will be immediately removed from the working area. An interesting idea for manufacturing. If you decide to make your own protective casing, we recommend that you measure the diameter before creating the nozzle hose from the vacuum cleaner, so that when fastening the outlet does not dangle and at the same time can fit normally into the seat. Also, do not forget that to connect such a model of a homemade wall chaser you need two electrical “points”. In this case, we advise you to make an electrical extension cable with two sockets yourself. We are considering another homemade device