WHAT TO FILL THE SEAM OF PAVERS. DIFFERENT FILLING OPTIONS.
If the paving technique is violated, then over time subsidence will occur, as well as the seams are cleaned and weeds begin to grow in them.
To ensure that the tiled surface does not lose its qualities and appearance, it is necessary to strictly follow both the technology for laying paving slabs and the technology for grouting joints between elements.
First, let's figure out why seal the seams of paving slabs at all?
Why grout the seams of paving stones?
Like any concrete product, paving slabs have pores and microcracks. Water gets into the pores and does not dry out completely, causing moisture to accumulate in the paving stones. When the temperature drops, the water in the pores expands, which leads to the appearance of even more cracks and soon the pavement surface collapses.
Also, if the cracks between the paving stones are not filled, all sorts of debris can get there, which will scratch and destroy the stone, and some of them may begin to rot, as a result - the appearance of excess moisture, insects, and foreign odors.
Another reason is vibration. If there are gaps between the paving elements, then vibration from a car driving in, a person walking, etc. more easily affects the surface, resulting in the tiles being torn off from the base.
Conclusion: Tile joints should always be filled. And there are several material options for this. How to fill the seams of paving slabs so that they serve you for many years?
Sand-cement mixture
Many manufacturers do not recommend filling the seams with a cement-sand mixture (prance). This is due to the fact that such grout for paving slabs, as a rule, does not look aesthetically pleasing. Few people manage to grout a tile joint with a grout without getting it dirty. This looks especially bad on colored paving slabs, which turn gray after the cement dries. Having filled the cracks with a sand-cement mixture, they need to be spilled with water, and it is at this moment that the stone gets dirty.
If the contractor guarantees that the aesthetic component will not be damaged, or this does not bother you, then the grout is suitable for these purposes: you need to fill the seams, spill water, and fill them again after the grout shrinks. In addition, when using it, the saturation of the joints with moisture will be less than when using just sand; such filling more inhibits the growth of grass, it is less likely to erode and be washed away by rain.
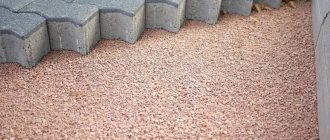
river sand
In most cases, the seams of paving slabs are sealed with river sand. It is best to use a dry fraction of 0−2 mm without impurities. Coarse sand can fill gaps unevenly, and the presence of impurities such as clay can leave stains on the pavement surface. Seal the seams with sand in two stages:
- filling with sand before tamping FEM: after laying the tiles, sprinkle the seams with sand, let them stand, if necessary, spill with water, then sweep away the remains and tamp the tiles;
- filling with sand after compacting: after compacting the paving stones, the resulting voids are sprinkled with sand again, and then the excess layer is finally swept away.
Sand, especially in the first year of operation of the sidewalk, can erode and be washed away during rains, so you need to monitor its level in the seams and add it in a timely manner if necessary.
After some time, grass and moss may begin to grow between the tiles. To reduce the likelihood of vegetation growing, use a sidewalk brush. If moss has already appeared and greatly spoils the appearance, use a water supply device with a high-pressure jet. It will help you get rid of unwanted weeds, but with such cleaning, grout may also come out of the cracks, so after finishing the cleaning work, add sand, using a brush, where it is needed.
river sand
In most cases, the seams of paving slabs are sealed with river sand. It is best to use a dry fraction of 0-2 mm without impurities. Coarse sand can fill gaps unevenly, and the presence of impurities such as clay can leave stains on the pavement surface. Seal the seams with sand in two stages:
- filling with sand before tamping FEM: after laying the tiles, sprinkle the seams with sand, let them stand, if necessary, spill with water, then sweep away the remains and tamp the tiles;
- filling with sand after compacting: after compacting the paving stones, the resulting voids are sprinkled with sand again, and then the excess layer is finally swept away.
Sand, especially in the first year of operation of the sidewalk, can erode and be washed away during rains, so you need to monitor its level in the seams and add it in a timely manner if necessary.
After some time, grass and moss may begin to grow between the tiles. To reduce the likelihood of vegetation growing, use a sidewalk brush. If moss has already appeared and greatly spoils the appearance, use a water supply device with a high-pressure jet. It will help you get rid of unwanted weeds, but with such cleaning, grout may also come out of the cracks, so after finishing the cleaning work, add sand, using a brush, where it is needed.
Why do you need to grout paving slabs?
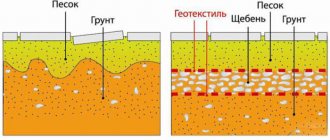
The durability of a path or platform paved with paving slabs depends on compaction. It is important not only that the base is dense and well compacted, but also that the tile fits tightly element to element. The surface of vibropressed paving slabs is rough. Therefore, there are gaps between the elements in any case, no matter what precise geometry the products of one or another manufacturer have. Accordingly, such a surface cannot be called fully strong and dense.
Another reason why backfilling tile joints is important is due to natural and biological debris. The sand that is poured has a very fine fraction, which does not allow it to spoil the appearance of the tiles if dismantling and subsequent installation in another place are suddenly necessary. Solid debris, getting into the seams, can begin to destroy tile elements from natural vibration when cars pass and pedestrians walk. Biological debris can attract birds, which can undermine the tiles with their beaks. Rotting biological waste is accompanied by the release of moisture. The appearance of the tiles will deteriorate due to stains from rotting.
However, there is an even more compelling reason for the need to backfill joints. This reason is water. Most building materials can be damaged by water. And in most cases, this harm is caused by a change in the state of aggregation of water. In autumn or spring, when frosts occur at night, rainy weather is extremely dangerous. Water enters the cracks in a liquid state. At night she freezes. As you know, water increases in volume when it freezes. And this property of water is detrimental to concrete materials, which include paving slabs. If there are cracks between the tiles that are not filled with sand, then the water frozen in them will begin to press, expanding in volume. As a result, paving slabs can quickly begin to deteriorate and crumble.
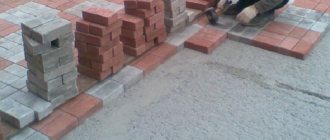
The process of filling the seams of paving slabs
After laying the paving slabs on the work surface is completed, it will be necessary to fill it with a grout mixture. Next, using a broom, the mixture will need to be rubbed into the seams between the tiles. The mixture must be carefully sifted, since the seams can be extremely small. It is best to use a cement-sand mixture for grouting paving stones. As soon as the seams are rubbed, the paving slabs are filled with water through a sprayer. The cement will set with the sand in the joints and the tiles will stick together.
Sealing technologies
For two materials of different consistency - wet solutions and dry mixtures, respectively, different installation methods are used. In the first case, grouting is done, in the second, grouting is done.
Backfill
Dry materials should be laid only after the paving surface has been leveled and compacted using an electric or gasoline-powered vibrating plate. In this case, some part of the leveling mixture on which the FEM is laid will be squeezed into the seams from below. This, firstly, will reduce material consumption, and secondly, will increase the durability of the paving surface. After this, the seams must be opened in the following sequence:
- the cement-sand mixture is poured into a dry pile and brushed along the path;
- clean sand is first slightly moistened from a watering can or distilled with a brush with abundant watering;
- special mixtures of Tubag with track rock are swept dry, then moistened with a watering can.
The manufacturer of Quick-Mix recommends covering the seams with film for a day until the binder has completely hardened.
Is it possible to grout colored paving slabs with a cement-sand mixture?
We do not recommend filling the seams of colored paving slabs with a cement-sand mixture. To do this, it is better to use well-sifted clean sand. Even dry cement settles as dust on the surface of the tile, reducing the brightness of its color. If you try to wash off the cement dust, the cement will set and the bright tiles will take on a cement gray tint. Accordingly, the appearance of the entire site or garden path will be spoiled.
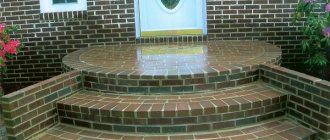
Paths in the country, paved with tiles, can be ruined by the sloppy appearance of the seams. To improve the aesthetics of paving, it is necessary to grout the seams of paving slabs.
Why do you need to seal seams?
The tiles are laid on a sand bed, and external factors can cause its destruction. Therefore, tile seams must be sealed (jointed) - waterproof grout will become an additional fastening element that preserves the integrity of the paving. In addition, the destruction of the coating leads to the appearance of cracks and spoils the appearance of the tiles.
Destructive factors include:
- water;
- weed;
- vibrating earth tremors.
Getting into the seam, rain and melt water erode the sandy base, flooding it. This leads to drying out of the installation and retention of moisture in the sand cushion. Since the base for laying tiles is most often concrete, moisture, penetrating into the pores of the monolithic structure, turns into ice at low temperatures and, expanding, destroys both the base and the tile.
Garbage
It is the second negative factor that has a destructive effect on the tracks. When plant seeds get into the tile joints, they germinate; the roots can lift individual pieces of paving and ruin its appearance. Accumulating debris rots and attracts insects and birds, which also leads to the destruction of the coating.
Vibration
As a result of earth tremors, poorly fastened fragments of pavement coverage crack. Driving a car can also lead to destruction - vibration, affecting the tiles, promotes its peeling off from the base. The gaps may widen, tile fragments will come apart and the paths will become unsuitable for walking.
Required materials and tools
The grout material must meet the main requirement - to be waterproof. Grouting compounds can be loose (dry) or ready-made.
These include:
- polymer mixtures;
- putty and primer;
- cement-sand mixture;
- river sand.
Polymer mixtures are divided into dry and solutions. The first ones are free-flowing and must be mixed immediately before use. The second are ready-made solutions, they are used immediately. The polymer components included in the grout give the coating additional strength; the grout for paving stones is wear-resistant, frost-resistant and water-repellent. When applying such mixtures, no stains remain on the coating. However, along with the quality of the seal, there is also a disadvantage - high cost.
Putty mixed with a primer to a creamy consistency will be cheaper than polymer grout, but it is not recommended to use it for colored tiles, since over time such grout will lose its appearance and fade.
Cement-sand mixture is another option for putty. However, experts do not recommend covering the seams with this composition on colored tiles, because The mixture must be spilled with water after waking up, and not everyone can do this carefully. Therefore, it is advisable to use such grout for sealing the seams of gray paving slabs.
River sand is a budget option for sealing joints, but its use requires constant attention. Sand without additional strengthening is washed out of the gaps over time and erodes, so you will have to monitor its level and, if necessary, add it from time to time.
Little tricks to simplify the process
To speed up and simplify the process of cleaning seams and surfaces of paths, you can use blowers. They allow you not only to quickly remove debris from the surface, but also to quickly and efficiently clean the seams. Such a device can also be used to remove dry mixture from tiles before pouring water. If necessary, specialized devices can be replaced with old Soviet vacuum cleaners that have an air blowing mode.
READ Ceiling insulation with sawdust in a private house
To maintain the integrity of the tiles, the surface should be cleaned after each pour. In this case, you should wait several hours until the mixture sets. Then it will be easy to remove. However, you should not delay it - if the mixture hardens, then its removal will become almost impossible without damage.
Stages of work
- Checking whether the solution has hardened. Use dry fingers to feel the composition: has the skin become wet? If you can't do it with your fingers, push a small piece of paper into the gap between the paving stones. If it is wet, it means the solution has not yet hardened.
- Cleaning up debris First, simply sweep the flooring with a broom. It is also necessary to remove accidentally rolled debris from the gaps.
- Choosing a grout How to seal the seams of paving slabs should be chosen based on its type: for seams of ceramics and marble, only sand is used; for granite surfaces - cement mortar; any composition is suitable for coating made from paving or cement elements.
- Preparation of the solution
Regardless of what type of mixture will be prepared, it is necessary to sift the sand: this will allow you to sift out grains of sand whose size is greater than 0.2-0.3 mm. If you only need to use sand and nothing else, then it is already ready to use.
Cement-sand mixture: mix cement and sand 1 to 5 (or 6). Concrete mixture: mix cement and sand 1 to 3.
- Backfill Sand or dry mortar is poured onto the coating. Important: you don’t need to pour it exactly into the cracks, since then you need to sweep it there with a broom. Then the mixture must be leveled using a rubber spatula to a height of approximately 50% or 75% of the height of the tile. Unused composition must be removed from the coating.
- Filling Either pour in buckets pointwise, or water the entire surface with a hose.
- Waiting until the solution dries - from 1 to 3 days.
- Repeated filling and filling Everything is the same, except that now the composition is filled flush with the coating. If after three days the mixture sags again (no matter over the entire surface or in some places), then be sure to backfill and fill again.
- Cleaning It is necessary to remove all debris with a broom and/or rag.
Execution of work
After preparing the tools and material, you can begin grouting. First, preparatory work is carried out: dust is cleared and debris is removed from the coating, then it is checked how hard the solution has hardened and how firmly the tile has set. Small debris caught in the gap between the coating fragments should be removed.
Sealing with dry mixture
You can prepare the dry mixture yourself: for this purpose, use fine-grained sand and cement grades M400 or M500. Cooking steps:
- Before mixing, the sand must be sifted through a sieve to remove the fraction larger than 0.2 mm.
- The cement-sand mixture is prepared in a ratio of 1:5 (cement-sand) for cement grade M400 and 1:6 for grade M500.
- After thorough mixing, the grout is poured into the gaps between the tiles, and the remains scattered on the tiles are swept away with a broom.
- After filling, the seams are carefully poured with water.
Wet grout sets in 3-4 days. Since it sags during this time, the seams must be refilled.
Sealing with cement mortar
The sand also needs to be sifted. Cement of grades M400 and M500 is used for the mortar, and the proportions for preparing the mortar are as follows: 1:3 (cement-sand) for grade M400 and 1:4 for grade M500.
After mixing, water is added - its quantity is adjusted so that the resulting solution resembles the consistency of thick sour cream. The solution is prepared in a concrete mixer. The finished cement-sand mixture is poured into the gaps and leveled with a spatula - the sooner the joints are sealed, the easier it is to remove remaining contaminants from the surface of the paving slabs.
After 5 days, when the grout has set, you need to check whether the solution has shrunk. If necessary, sealing the seams can be repeated.
Putty with primer
The mixture is prepared and used as follows:
- The grout is mixed to the consistency of liquid sour cream.
- The resulting mixture (fugue) is used to fill the seams using a construction syringe so that the filler protrudes 1 mm above the surface of the coating. The finished coating is left to dry for 24 hours.
- Filling should be done carefully and carefully - subsequently it will be difficult to remove dirt from the surface of the coating.
The disadvantage of using such grout is its poor resistance to high and low temperatures: the grout can melt at +40°C and above and collapse at -35°C.
Tools and materials for work
High-quality grouting of tile joints requires the presence of a special ready-made mixture or the following materials:
- branded cement (PTs400, PTs500);
- river or washed sand;
- water.
Quarry sand is not suitable for work. Clay and impurities in the composition will spoil the quality of the final grout mixture. Required tools:
- concrete mixer or utensils for preparing the mixture;
- rubber spatula;
- sand sieve;
- scoop;
- brush or broom;
- bucket;
- rags;
- watering hose.
READ Laying tiles on the floor in the toilet
After preparing the tools and purchasing what is necessary for the job, the grouting process begins.
Useful tips
When sealing the seams of paving slabs, you can resort to the following tips:
- To check whether the mortar on which the tiles were placed has hardened in hard-to-reach places, you can insert paper into the gap. If it is damp, the mortar has not yet set, and grouting will have to be postponed.
- When sealing seams in coatings made of ceramics, concrete and other materials with a fine-porous structure, it is recommended to use a dry mixture, and for marble and granite it is better to choose a cement mortar.
- When preparing a dry mixture of cement and sand, it is recommended to first add half of the sand, followed by cement, and add the remaining sand on top. This will help mix the composition better and more thoroughly, and this can also reduce the amount of cement dust. After this, the mixture can be diluted with water.
- To improve the quality of the cement-sand mortar, it is recommended to add plasticizers to the dry mixture - they will increase the setting strength of the grout. Instead of additives, you can use liquid detergent. In this case, the solution is mixed thicker.
- The bulk of cement mortar residues should be removed from the coating immediately, but final removal of the grout can be done a few hours after sealing the tile joints using a dry rag.
- When using white grout for colored tiles, you can select a coloring pigment to match the coating.
If the seams are sealed carefully and carefully, the paving slabs will last a long time.
Preliminary preparation
There are several options for sealing seams:
- using concrete mortar;
- dry mixture of sand and cement;
- special putty mass.
Each method involves surface preparation. Before starting work, the paving stones are treated with water from a hose under pressure.
If a concrete base is used, the sealing is carried out after 3 days, after the solution has completely dried. Laying tiles on a cement-sand base involves grouting the cracks immediately.
The seam sealing procedure is carried out in dry weather conditions. The cracks between the tiles must dry completely (the humidity is checked with paper napkins).
Debris is swept away from the working surface, the distance between the paving stones is cleaned with a thin rod, a compressor or a vacuum cleaner. A jet of compressed air will more effectively and quickly remove excess dirt and speed up the drying of cracks. If there is no compressor, an old vacuum cleaner is used. By installing a tube on the exhaust pipe, a kind of compressor is created. After preparing and cleaning the required area, the grouting method is determined.
Grouting paving slabs
Porous materials (ceramic tiles, concrete) are sealed with a dry mixture of cement and sand; materials with a smooth and dense texture (marble, granite) are preferably sealed with concrete mortar. For colored tiles, a ready-made mixture is used.