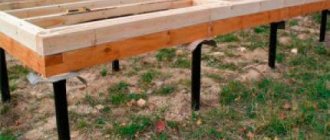
House on a pile-strip foundation.
A column-and-strip foundation combines the advantages of columnar and strip foundations in one design. Subject to compliance with all regulatory requirements, it will have high performance characteristics. When constructing such a support for a house, labor costs are reduced and a significant portion of funds is saved.
General information
The design of a strip-column foundation is carried out together with the creation of a project for the house itself. In this case, it is necessary to correctly calculate the load from house construction, taking into account all the building materials used, furniture, objects, people who will be in the house, and the maximum layer of snow that can be on the roof in winter.
In climatic zones with deep levels of soil freezing, installing a strip foundation is expensive and takes a lot of time and effort. The foundation must be laid 20 cm below the freezing point of the soil. At this level there are dense layers of soil, which guarantee protection against the foundation being pushed out during frost heaving.
The required number of pillars is buried in the ground at the design level, and a concrete strip is mounted on top of them, which takes over and distributes the load from house construction onto the pillars.
When the construction site has significant differences in height or is located on a slope, this type of foundation is indispensable.
In areas with close groundwater, strip foundations with pillars should not be erected.
There should be a gap of 15-20 cm between the lower surface of the grillage and the soil. This will protect the structure from destruction even with severe frost heaving of the soil.
Types of columnar foundation
The type of columnar foundation is selected depending on the type of soil.
They are divided into two types:
Prefabricated columnar foundations are erected in areas where there is groundwater or the soil is very frozen. This type can be made faster than a monolithic one. But if you compare it in terms of strength, the latter is undoubtedly better.
A columnar foundation is also good for areas with large surface slopes
Depending on the degree of penetration into the ground, they can be:
- recessed; shallowly recessed; not recessed.
Their construction differs somewhat in technology. In this article we will talk about how to make a non-buried strip-and-column foundation with your own hands.
Advantages of a column-strip foundation
Compared to installing a strip foundation, a combined foundation with a strip-column base has the following advantages:
- reduction of labor costs, no need to carry out a large amount of land work;
- the possibility of erecting reliable buildings on peat, heaving soils;
- installation of a drainage system is not required;
- a bored pile can withstand significant loads;
- it is possible to install the pile to a considerable depth so that the support reaches dense soils with high bearing capacities;
- the consumption of building materials is reduced, the time for constructing the foundation is reduced.
Thanks to the technology of installing a column-strip foundation with a monolithic screed and bored supports, it is possible to carry out work in densely built-up areas where it is impossible to drive construction equipment to dig a pit under a strip foundation.
Advantages and disadvantages
The design of the system has many positive aspects:
- Excellent protection against soil movements and vibration effects.
- Strength and stability.
- Combining different types of material when installing a grillage.
- High thermal insulation properties due to the lack of contact with the ground.
- Minimum amount of excavation work.
- Construction on any construction site without prior preparation.
- It's easy to make the base yourself.
When choosing a column-and-strip foundation, the owner of a future facility may encounter difficulties:
- Complex preparation of design and estimate documentation.
- No basement.
- It is difficult to determine the influence of soil heaving; it is necessary to provide a large margin of safety.
- The support sections along the height and perimeter of the object may differ.
The calculation of a column-strip foundation should be trusted only to specialists.
Flaws
Like any technology, strip foundations with bored piles have disadvantages:
- it is difficult to calculate what average load one pile will withstand; supports of the same type under the same conditions can withstand different load-bearing loads;
- the bulk of the work is performed using manual labor;
- A lot of concrete mortar is consumed to compact the soil around the support being installed.
- It is difficult to control all stages of the pile production process directly in the ground.
Due to the listed disadvantages, strip foundations with pillars are not used everywhere, but are used when justifiably necessary.
Cost of erecting a columnar foundation
The cost of the finished product depends on many indicators:
- the area where the future building will be located; on the type of soil; on the width of the base and its depth; on the materials used for the construction of the columnar foundation (their quality, size, manufacturer and type).
When hiring specialists, in addition to these parameters, the volume of work and the number of workdays are taken into account. It should be noted that the price for building a monolithic strip foundation is slightly higher compared to other options.
Prices for the construction of a columnar foundation per 1 linear meter, taking into account different types of concrete, are shown in the table:
Foundation size Brand of concrete, (diameter of reinforcement, mm) Price per 1 linear meter (RUB) 300 x 500M-200, (B-7.5) 4200 300 x 500M-300, (B-22.5) 4100 300 x 800M-200, (B-7.5 )6750300 x 800M-300, (V-22.5)6850300 x 1000M-200, (V-7.5)8400300 x 1000M-300, (V-22.5)8500300 x 1200M-200, (V-7.5)10100300 x 12 00M-300 , (V-22.5)10200
The cost of the foundation itself is relatively insignificant, which will reduce the overall costs of building a wooden house or bathhouse on a summer cottage.
More information about the stages of constructing a columnar strip foundation with your own hands can be seen in the video:
How to choose material for pillars
It must be remembered that the durability, reliability and safety of the building will depend on the strength of the material used to make a strip foundation with a monolithic screed.
The materials used for the columnar base and their characteristics are presented in the table:
| № | Support material | Characteristics |
| 1 | Wood | Rarely used due to short service life. Such material can be used as a support in the construction of lightweight small structures in the case of a limited construction budget. The diameter of the wood must be at least 150 mm. It is mandatory to treat it before burying it in the ground with compounds that protect against fire, damage by pests and rotting. Waterproofing is carried out with bitumen mastics. |
| 2 | Concrete | Reinforced concrete supports are strong and reliable. They can be manufactured as a monolithic structure or consist of several blocks. The cross-section of the pillars must be at least 400 mm. |
| 3 | Iron ore brick | Used for constructing a shallow foundation. The width of the brick support should be 400-500 mm. |
| 4 | Metal or asbestos-cement pipes | A well is prepared into which a hollow pipe is installed, which is subsequently filled with concrete. |
The construction of bored piles is optimal for foundations installed in small areas located near water bodies, on cliffs, rocky, soft soils prone to flooding.
Sometimes it is the only possible option for foundation in densely built-up areas due to the small dynamic impact on housing construction located near the site of construction work.
Instructions - how to arrange the foundation yourself
Columnar foundations are erected using technology in four stages:
- Excavation work involves drilling holes for support pillars and placing sand cushions at the bottom.
- Installation of permanent formwork for foundation supports followed by pouring concrete or laying them out of brick or concrete blocks.
- The device for this type of pile-grillage foundation is an upper load-distributing part made of reinforced concrete, steel channel or wood.
- Waterproofing the entire structure and covering the supports around the perimeter of the building with siding or corrugated sheets.
Everything is quite simple, but there are a number of nuances in this process. The first of them is that, regardless of the level of the grillage, the retaining piles of the columnar version of the foundation for a private low-rise building should be immersed below the freezing point. To speed up the work, in some cases it would be best to use specialized equipment with a drill.
The base supports themselves can be made of:
- Reinforced concrete poured into an asbestos-cement pipe;
- Brick;
- FBS (factory-made reinforced concrete blocks for foundations);
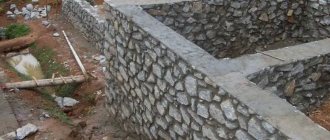
- Natural stone.
Below is a step-by-step photo instruction for a columnar foundation on foam blocks:
We transfer the foundation plan to the area - we mark future boundaries with pegs
Digging holes
We fill the holes with crushed stone, top with sand and spill them several times and repeat the procedure of filling with sand.
We place the first 4 blocks on the pillow in the corners and align them according to the lace and size
We substitute the second block and level it
Using a hydraulic level, we measure the zero level of the foundation - its height
We set the following levels of blocks of our foundation
We make all the other pillars according to the level
We lay roofing felt on the posts for waterproofing
It is also possible to use steel screw piles. But this will already be one of the variations of the pile-screw foundation. Previously, supports were even made from moisture-resistant larch. However, today most private developers prefer to install something more durable and concrete under their house.
The supports are placed at intervals of 1.5–2.5 meters so that they are located at the corners of the building, at the intersection of internal walls and load-bearing beams, as well as under stoves and fireplaces. These are the main load points. The grillage is quite capable of distributing some of them throughout the entire structure. But ideally, the main weight should fall precisely on the support piles on which the columnar-strip foundation rests.
When choosing a brick, you should immediately exclude the silicate variety. And ceramic should be taken with the highest possible frost resistance. In general, if you don’t want to mix and pour concrete, then it is best to choose FBS. These blocks were originally intended for the construction of foundations for various buildings.
By design, the concrete grillage on top of the pillars is a small strip foundation. A separate formwork is assembled for it with reinforcement made of 10–12 mm steel rods placed in it. After tying them together, the finished reinforcing belt will only need to be filled with concrete mortar with a grade of at least M-300. At the same time, for wooden buildings, the grillage part is often made entirely of timber. In many cases, it is quite enough to redistribute loads.
To waterproof the elements of a columnar base, you can use roofing material or liquid bitumen mastic. Even soft tiles are suitable if they were left unused when covering the roof of an already constructed building.
How to determine soil type
When constructing state and public facilities, a mandatory requirement is to conduct geological and laboratory soil studies. Such activities are quite expensive and are carried out in special certified laboratories.
When conducting individual construction, you can independently determine the composition of the soil. To do this, in several places on the site, they dig holes using a drill, the depth of which will be 50 cm greater than the expected length of the pile. Determine which layers of soil are on the drill blades.
The depth of underground sources can be found out from people living nearby or determined by the filling of water-bearing wells at the construction site.
If a flooded area of a small area is found, you need to position the piles so that they do not affect it.
In areas with differences in height, piles of various lengths are used.
How to make a columnar foundation with your own hands
At its core, a foundation is a system of supports located:
- at the corners of the building; at the intersection point of the walls; under supporting structures.
If a stone oven is planned on the ground floor, then it is also better to lay support piles under it
Before performing any work, be sure to draw up a detailed future design and then try to strictly adhere to it, taking into account all the documentation for the project. Then the building is guaranteed to be able to stand for a long time.
The possible load on the foundation is also of great importance when choosing a support.
So, you need to take into account the following parameters:
- approximate weight of the future building, furniture; number of residents; weight of the base and the entire building; snow load.
This determines which material is best to choose and how much of it is required.
It must be filled in time before winter arrives, because if left for this period, it will become deformed and you will have to start all over again.
To build a columnar foundation with your own hands, you need to stock up on the following tools and materials:
- reinforced concrete, concrete or brick supports; reinforcement; boards for formwork; sand; crushed stone; cement.
For formwork, it is better to take a board whose thickness is 20 mm.
You can, of course, purchase special metal plates or particle boards for these purposes, but the cost of wood is much lower. Next, the following work is performed: assemble boards from the boards, and boxes from them; insert them into a pre-prepared depression in the soil on site where the supports are located; completely moisten the inside of the surface of the box with water. This will prevent water from being absorbed from the concrete and will make it easier to dismantle the box after the concrete mixture has dried. Then it is necessary to reinforce the foundation using reinforcement with a diameter of 12-16 mm. It is better to place it inside the box so that the edge of the reinforcement does not reach the walls of the box 5 mm . For a longitudinal arrangement, rods with a diameter of 6 mm are used, welded after 30-40 cm.
After the grillage frame is completed, the excess rods are simply removed. Lastly, the columnar foundation is insulated and waterproofed. This work increases the service life of the foundation. But this is not typical for all types of foundations. For example, a screw foundation does not require waterproofing and insulation work. Experts recommend that it is better not to weld the reinforcement, but to tie it with wire
Determination of pile length
For areas with stable, dense soil, a support length of 2500 mm will be sufficient. If construction is carried out on a slope, height differences must be taken into account. On uneven areas, supports of varying lengths are used, depending on the height of the terrain.
When building on unstable soil, the length of the support should reach the layer of dense soil. Its location is determined by test drilling. Insert the drill into the soil, take it out after a short distance and look at the type of soil on the blades.
If there is peat, quicksand or wet soil on the drill blades, then you need to drill a well until a sandy or clay layer appears. After reaching a dense layer, measure the depth of the well using a stone or other heavy object lowered on a rope.
Fundamental design points
The column-and-strip foundation is a combined type and combines:
- tape;
- columnar.
This type of foundation is chosen for the construction of heavy structures on unstable soil. The strip foundation on pillars is similar in design to a base on piles. But it is fundamentally different: there is no need to use special equipment and drill deep wells. The owner will be able to save money during construction.
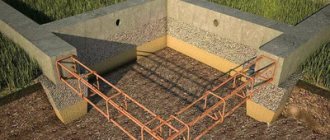
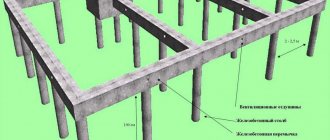
The foundation consists of support pillars on which reinforced concrete grillages rest. Frames take on the weight load of the object. In general, the design consists of the main elements:
- The calculated number of reinforced concrete supports resting on solid layers of soil. Installation is carried out below the freezing level of the ground, bypassing soft layers.
- Reinforced frame;
- A belt system that takes the load and distributes it evenly between the supports. The structure is made of blocks or bricks.
- Vertical supports that absorb loads from load-bearing and internal walls.
The foundation strip connects the pillars without affecting the soil.
Determination of the number of piles
The number of supports used depends on the weight, size, and design of the building.
What to consider when calculating:
- The spacing between supports in frame and wooden buildings should not exceed 3 m.
- In buildings made of light building materials: foam and gas blocks, the pitch should not be more than 2 m.
- For brick houses with several floors, the distance between supports is reduced to 1-1.5 m.
The calculation is carried out according to the formula: the result obtained by adding all the loads is multiplied by the reliability coefficient. The final indicator is divided by the load-bearing capacity of one support.
Calculation of a columnar foundation with a grillage
If you need to build a columnar foundation with a grillage with your own hands, first of all you should calculate how many supports you will need to make in order for it to be used for a long time.
As in the previous case, work begins with geological surveys in order to determine the bearing capacity of the soil. This indicator can help calculate the area of support, information about which can be easily found on the Internet or specialized literature.
Then you need to calculate the weight of the entire building. It depends on the weight of the materials used plus wind and snow loads.
The resulting number must be divided by the weight that 1 cm2 of soil can support. This will be an indicator of the area of the foundation. For the final result, it is necessary to add 30% to the resulting figure as a safety margin.
In order to calculate the required number of pillars for a columnar base with a grillage, the supporting area is divided by the area of the base of the support.
This type of foundation is extremely popular precisely because of its simplicity, strength and the ability to do all the work with your own hands in the shortest possible time, even without much construction experience. And by comparing the prices of the material, you can calculate that it will cost 1.5-2 times cheaper than any other type.
But it also has a drawback that must be taken into account at the design stage. It is highly not recommended to build it on moving soil, as well as in areas where groundwater flows or large differences in height are observed.
Installation of a column-strip foundation
The construction of such a foundation consists of two stages: installation of supports and installation of a concrete strip.
Before starting construction work, it is necessary to calculate all the loads and determine the depth of the foundation and the characteristics of the supports.
When calculating, the following parameters are taken into account:
- depth of groundwater;
- level of soil freezing and its characteristics.
- load from the building.
The reliability and safety of your home will depend on proper adherence to installation technology.
The foundation can be shallow up to 400 mm or laid to a greater depth. The pillars are installed, depending on the load-bearing load of the building, at a distance of 1000-2000 mm from each other.
The larger the step between the supports, the lower the load they can withstand. The supports should be located in the corners of the house, at the intersection of load-bearing walls, under columns, fireplaces and other heavy elements.
Site marking
From the very beginning, the site is marked out according to the design documentation. First, a drawing is drawn on paper on which the locations of the piles are marked. Only after this construction work begins.
According to the drawing, the construction site is marked. The installation locations for the supports are marked with wooden pegs or metal rods. A cord is pulled between the posts along the perimeter and diagonally, strictly ensuring that the level is maintained. Check to make sure they are even rectangles. The cord marks the outer and inner contour of the location of the concrete tape.
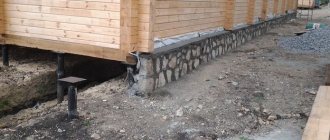
Preparation for installation of the pile-tape foundation.
Do-it-yourself foundation construction
A column-and-strip foundation united by a monolithic concrete screed is quite easy to make. It is important to correctly perform all calculations and follow the technology.
Foundation Installation Guide:
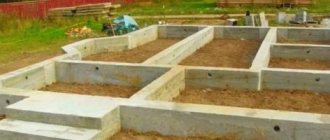
- According to the markings, they dig a trench under the strip base, 40 cm deep. The width of the trench should be 7-10 cm greater than the width of the foundation, so that there is space left for installing the formwork.
- In the places where the pillars are installed, a recess is made using a shovel or a drill. The diameter of the support pillars depends on the bearing load on the supports. The greater the gravity force, the larger the cross-section of the pile should be.
- The pillars are installed and filled with concrete to obtain a stronger base.
- They make formwork from boards and install supports so that the form does not fall apart under the gravity of the concrete.
- A concrete strip is poured around the entire perimeter of the house.
There should be no gaps in the formwork so that the concrete solution does not leak out.
The installation of the base begins only after the concrete strip has completely dried.
All metal parts must be pre-treated with protective compounds to protect them from moisture damage.
Installation of a bored foundation
After marking the site, they begin to carry out the main work of laying the foundation of the house. A strip foundation on bored piles will last more than 70 years, provided that all stages of the technological process are completed.
Step-by-step instructions for installing a columnar strip foundation with your own hands:
- The well is drilled in several stages. The first 150-200 cm of soil is selected using a drill bit. Then a well is drilled using an auger.
- When a well of the required depth is ready, a sand layer 300-400 mm thick is poured onto the bottom; it helps to increase the load-bearing characteristics of the soil.
- Using a crane, metal reinforcement made of vertical rods with a cross-section of 10-16 mm is inserted into the well. The metal frame is made with horizontal strapping, which increases its strength.
- The well is filled with concrete mortar, and as the cavity is filled, the column pipe is raised. The solution is poured continuously until the hole is completely filled.
- The casing pipe is removed and the pile head is formed.
Most often, bored supports are poured with cement mortar through one adjacent pile and installed after the previous one has hardened by 25%.
You can see how to make a pile-strip foundation with your own hands in the video: A pile-strip foundation in some cases is the best option for arranging the foundation for a house. The technology of its construction allows you to save significant money and time on construction work.
Step-by-step instructions for the device
The installation of strip-column foundations is carried out in the following order:
Calculation
Calculation and selection of the number, dimensions of pillars, their location. To make the calculation, you need to have: a house design with precise layouts and data on the construction of walls and ceilings, information about the type of soil, freezing depth and snow load in the construction region. An example of the calculation can be found here: link.
Marking
Breakdown of the axes of the building and the location of the pillars in situ at the construction site. Layout should be done using precise geodetic instruments - theodolite, level, laser level, point plotter and laser range finder, and the diagonal method is also used.
Advice: Since the accuracy of the entire subsequent construction will depend on the accuracy of the alignment of the axes (according to SP 126.13330 “Construction Geodesy”, an error in alignment of no more than 10 mm is allowed), then if you do not have the skills to handle such devices, it is better to contact specialist surveyors.
The axes of the building are fixed on the site using cast-offs, which are driven into the ground at a distance of 1.5 - 2 meters from the edge of the trenches or pit and leveled to a single level using a level or laser level. After securing the axes to the cast-offs, you can, as needed, pull the marking cords that mark the axes of the building, the outer and inner edges of the strips and pillars.
More details about the markup here: link.
Digging holes for pillars
After marking the axes of the building and the locations of the pillars and trenches, they begin to dig holes for the pillars. The depth and dimensions of the pillars must be determined earlier when calculating the foundation. In the case when, according to calculations, the dimensions of the base of the post allow you to sit in the hole and work there when digging, the walls of the hole can be made vertical. If the dimensions of the sole are small, then holes are dug with slopes. The excavated soil should be stored close to the pit - it will be needed later for backfilling.
Formwork for the sole is laid at the bottom of the pit - a film with a film running onto the walls at the bottom, roofing material in a circle, which is attached to the wall with ordinary nails. Formwork is needed to prevent the concrete from drying out.
Pillar reinforcement
Production of frames and meshes for reinforcing pillars. The column is reinforced with a spatial frame over its entire height, and a mesh that is laid along the sole. For vertical frame rods, you should use reinforcement with a diameter of 12-14 mm of class A3 according to the old marking or A400 according to the new standard. The length of the frame is taken taking into account the fact that the rods must protrude 250 mm above the upper plane of the post for connection with the tape, and be bent from below for installation on the sole mesh. For transverse clamps of the spatial frame, reinforcement with a diameter of 6 or 8 mm of class A1 (A240) can be used.
For a spatial frame, 4 rods are sufficient, the lower ends of which must be bent at a right angle by 200 mm each to be installed on the mesh and tied to it. The clamps are installed every 300 mm along the height of the frame. For the mesh, you need to use reinforcement with a diameter of 10-12 mm of class A3 (A400), the rods of which are connected to a cell of 150x150 mm. All connections of the rods to each other and to the clamps are made using binding wire. Plastic spacers (“cups”) are installed underneath the mesh.
Filling the sole
A reinforcing mesh with a vertical spatial frame tied to it is laid at the bottom of the pit. The mesh must be laid on special inventory plastic pads that provide a protective layer of concrete.
The lower part is poured with concrete to the designed thickness; a deep vibrator is necessarily used to compact the mixture. Before concreting, the frame is securely fixed by laying a board on top of the pit, which is pressed to the ground with a brick or other weight, and the frame rods are tied with wire to this board.
Formwork for pillars and backfill
To make formwork for pillars, wooden boards, plywood, chipboard or OSB sheets are used.
Important! Since crushed stone, sand, cement and water are used to prepare concrete, so-called cement laitance is formed in the finished concrete mixture - a liquid substance of cement in water. If you pour concrete into a hole without formwork, which is sometimes done by illiterate builders, then the cement milk will seep into the ground, thereby worsening the strength qualities of the concrete. Therefore, all concrete structures must be constructed in reliable formwork, even if the pillar is without widening at the bottom.
Previously manufactured formwork is installed on top of the reinforced frame. It is covered with a film on top, which is secured around the perimeter with a construction stapler. The film is needed to prevent debris and soil from getting into the formwork.
Next, backfilling is carried out with layer-by-layer compaction and pouring water every 15 cm using a manual tamper - a beam with a crossbar.
Pouring pillars
A little sand and dust will still get into the formwork when backfilling; you can use an old vacuum cleaner to remove the dirt.
For pouring, you need to use concrete class B15-B20 or grade M200-M250. If concrete is mixed on site, it is necessary to strictly maintain the proportions of the mixed components. To prepare concrete in a concrete mixer, you should adhere to the following ratios: for B15 concrete – 1 bag of cement: 6 buckets of sand with a capacity of 10 liters: 14 buckets of crushed stone: 4 buckets of water. For B20 concrete, respectively: 1 bag of cement: 5 buckets of sand: 12 buckets of crushed stone: 3.5 buckets of water.
Read more about concrete proportions here.
Tip: First of all, you should fill the pillars located at the corners of the house and the intersections of the walls. In this case, you need to especially carefully check the correct installation of formwork and frames. After concrete has been poured and set, marking cords can be pulled onto the protruding reinforcement of the outer pillars and the installation of the formwork and intermediate pillar frames can be adjusted using them.
Concrete pouring of pillars must be done layer by layer, in layers of 300-400 mm, compacting each layer with an in-depth vibrator.
After pouring, the pillars are covered with the same film that was used earlier to cover it from debris.
Waterproofing
It is advisable to waterproof the surfaces of the pillars in contact with the ground. This is done to protect against the effects of ground moisture, which can lead to corrosion and gradual destruction of concrete and reinforcement. If the formwork is removed for reuse, then the surfaces of the pillars are covered with bitumen mastic in two times, while backfilling is not performed, but the formwork frames must be made more durable. In cases where the formwork cannot be removed, the surfaces of the formwork should first be coated with mastic.
Trenches under the tape
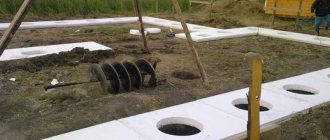
After all the pillars are filled with concrete, trenches are dug for the tape. The cross-section of the tape is determined by calculations during design. Depending on the design of the walls of the house, the width of the tape can be in the range of 300-500 mm, and the height 300-400 mm. Therefore, the trench is dug in width in accordance with these dimensions, depth taking into account the thickness of the crushed stone cushion and the projected height of the base. For example, if the section of the tape is 400x400 mm, then the width of the trench should be 450 mm with a margin for installing formwork, and the depth should be 200-300 mm, taking into account a 200 mm thick crushed stone cushion and a 100 mm thick foam layer.
Crushed stone filling is carried out with thorough compaction using surface compaction.
If the soil is not heaving (sand), then a 100 mm layer of loose foam plastic is laid on top of the crushed stone layer. It serves as a damper when the grillage is bending, the tape turns out to be hanging (supported on the pillars), this is a fundamental point of the design, since if you rest the tape on the ground, the pillars will seem to hang in the ground and the result will not be a columnar-strip foundation, but a shallow-depth strip foundation, it must be calculated accordingly. The question arises, why then are there pillars at all?
If the soil is heaving (clay), then the filling is not crushed stone, but sand, which is removed after the tape is poured, resulting in an air gap. It turns out to be a hanging grillage, the pillars work, everything is as it should be.
In detail: Which soil is heaving and which is not.
Tape formwork
Formwork for tapes is made of boards or sheet materials - chipboard, OSB, plywood, from which panels are assembled. First, fasteners made of bars are installed along the cord, which are driven into the ground along the edges of the trench in increments of 800-1000 mm. Shields are attached to the racks, which are additionally secured on top with wire ties or wooden blocks, and on the outer walls with stops. The formwork is covered from the inside with plastic film - this will protect against the seepage of cement laitance.
Tape reinforcement
The frame is assembled from 4 or 6 working rods, two (three) of which should be located in the lower belt belt, two (three) in the upper belt, and clamps fastening the working reinforcement every 400 mm along the length. The number of working rods depends on the width of the tape: if the beam is 300-400 mm wide, then 4 rods are enough, if 500 or more, then 6 rods must be used. For working reinforcement, rods with a diameter of 12-14 mm of class A3 (A400) are used, for clamps - with a diameter of 6 mm of class A1 (A240). The frame is made in sections 4-6 m long, which are laid in formwork with an overlap, the value of which should be at least 40 diameters of the reinforcement. If the reinforcement has a diameter of 12 mm, then the overlap should be 480 mm. The joints are connected with knitting wire.
External corners and junctions cannot be reinforced by simply bending the reinforcement; they must be tied with U-shaped and L-shaped clamps, as in the diagram below.
Drawing of the correct reinforcement of the corners and junctions of the grillage.
The junction of the pillar and the grillage is tied as in the diagram below.
Connection diagram of the reinforcement frames of the pillar and grillage.
In detail: How to properly reinforce a grillage.
Concreting tape
After installing the frames, it is necessary to mark the upper plane of the structure on the inner surface of the formwork, which will serve as a guide during concreting. Marking is done using a level or laser level and marking tape - it is attached to the formwork with a construction stapler.
It is advisable to pour concrete in one step, for which you should order the entire required volume at once from the factory and deliver it with a mixer. In this case, the required grade of concrete M200 or M250 will be guaranteed. When pouring, you need to use a deep vibrator to compact the mixture; after pouring, smooth the surface of the structure using a float.
Stripping and waterproofing
The formwork can be removed after the concrete reaches 70% of its design strength. In warm weather, this occurs 2-3 weeks after pouring.
Important: While the concrete is gaining strength, it is necessary to take care of it: cover the foundation with plastic film, and in hot weather, periodically water it with water, preventing cracking of the surface of the structure.
After removing the formwork, the side surfaces of the monolithic tape must be covered in two layers of bitumen mastic for waterproofing.