Calculation of brick requirements for laying a plinth: technical nuances, construction calculator
From a technological point of view, it is more expedient to calculate red brick for the basement of a building at the stage of designing a house in order to include the financial costs of purchasing the material in the estimate. But in practice, quite often this is done already when planning the construction of the base.
Technical aspects of calculation
To calculate ordinary bricks (regardless of whether this will be done on a calculator or independently), we need to know the thickness of the future base and its height. These parameters are multiples of the dimensions of the masonry material used, taking into account the thickness of the joints, which are usually 10-12 mm.
Possible masonry thickness options are shown in Fig. 1:
Figure 1. Types of masonry of different thicknesses
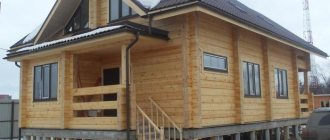
As a rule, the basement of the house is laid out with a thickness of 380 or 510 mm. Laying a base with 1 brick (see photo 6) is used mainly in the construction of wooden buildings, seasonal country houses, bathhouses and other small buildings.
Photo 6. An example of laying out a base part 250 mm thick
Laying ½ brick is used only for cladding the base (see photo 7).
Photo 7. Basement lined with brick
The height is calculated after you decide what type of brick goes to the base - 1NF or 1.4NF. When calculating, horizontal seams must be taken into account.
The average consumption of masonry elements depending on the thickness of the structure is presented in the table below. But the specific amount of material is calculated individually for a specific building. At the same time, it is recommended to buy with a small margin (within 5-7%) in order to avoid downtime due to lack of material.
Table 1. Average brick consumption per 1 m 2 of masonry
Number of bricks in the masonry (including mortar joints), pcs.
Brick plinth laying
After waterproofing the foundation, you can begin laying the base:
- First, we form one of the corners - then we draw the first row to the adjacent corner. There we make a 90-degree turn and continue laying to the next corner until the first row around the entire perimeter is completed. During work, it is necessary to check the horizontality of the masonry using plumb lines. This will eliminate the bias in one direction or the other.
- The arrangement of bricks in the masonry directly depends on the plinth wall, which can be a multiple of either a whole brick or its half. If the design involves a layer of insulation inside the wall, then this should also be taken into account when constructing walls between which insulation is poured.
- We use a solution M-75 or M-100 - this is what is applied to the waterproofing layer, and then to each layer of brick - its thickness should not exceed 20 mm.
- If the building is massive and tall, it makes sense to strengthen the base with reinforcing mesh - it is laid between the rows of the brickwork. The most commonly used wire is VR-1 with a cell size of 50x50 mm. Please note that the mesh is laid on a layer of brick and only after that a layer of mixture is laid on top. Reinforcement is laid out every 3-4 rows.
Base thickness for aerated concrete
Another rather important issue concerns the thickness of the base and its insulation. The thickness of the base can be:
- Less than the thickness of the main wall.
- Greater than the thickness of the main wall.
- Same thickness as the wall.
It is important to remember here that for a shallow foundation it is necessary to insulate the base and blind area so that frost along the foundation tape does not reach under the heel of the foundation. If you do not plan to insulate aerated concrete walls, it is better to make the base 5 cm thinner so that the EPS boards with which you need to insulate the base are just below the level of the wall
If you do not plan to insulate aerated concrete walls, it is better to make the base 5 cm thinner so that the EPS boards with which you need to insulate the base are just below the level of the wall.
If you plan to insulate aerated concrete walls, then also take into account the thickness of the insulation.
It looks more beautiful if the main wall is level with the foundation, without any steps. But if this is not critical for you, then you can choose any option for the base: protruding, flowing, according to level. The main thing is to ensure proper drainage of water from the wall and provide the necessary insulation of the basement.
Setting the corners when constructing a plinth.
When laying the base, as well as later, when laying the first row of walls, it is VERY IMPORTANT to set the corners correctly. Incorrectly set angles will lead, in the future, to incorrect wall laying. Incorrectly set corners of the plinth, if the deviation is insignificant, can be corrected when laying the first row of walls. However, you shouldn't count on this. It's better to do everything right at once.
The first thing to do is to initially lay out bricks in the four corners without mortar along the width of the future base. The bricks in the corners must be leveled.
Then, using a tape measure or using a strong thread (the thread should not stretch!) we very accurately measure the length and width of the sides of the future house, taking into account the laid out corners. It is also necessary to measure both diagonals. All measurements must be correspondingly equal: the length of one side must be equal to the length of the other side of the wall, etc.
If the measurements are equal, then you have done everything correctly and you can start laying the base. If some measurements do not match, this means that not all angles are equal to 90 degrees. and this needs to be fixed urgently. How can this be done?
It is necessary, by constantly rechecking all the measurements described above, by simultaneously moving the corner bricks along one of the sides (you didn’t use mortar when setting the corners, did you?), to find their optimal location in the corners, at which the measurements of the sides will respectively coincide or have no deviation more than 2-3 cm. With further laying, this difference can be eliminated.
Protective coating for basement walls
To protect the brick, which is laid on a strip foundation, the masonry is lined with various materials:
- plaster;
- siding;
- a natural stone;
- artificial tiles.
Plaster
Plastering the plinth is the most common method of protecting brickwork. There are various compositions of plaster mortars on cement and gypsum bases. One of the popular methods of plastering is covering the walls with a “fur coat”. By adding pigments of the desired color, an overall harmony of color is achieved with the overall appearance of the facade of the house.
Siding
Facing the base with siding involves covering the brickwork with panels made of plastic or galvanized metal. Before installing siding, the walls are insulated with slabs of expanded polystyrene or polystyrene foam.
A natural stone
There are two types of facing masonry with natural stone.
In the first option, natural stone is used in the form of slabs of regular geometric shape.
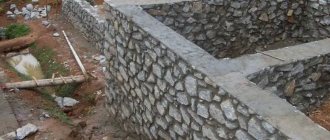
In the second case, the base is covered with wild stone or flagstone.
Artificial tiles
The tiles are laid in the same way as natural stone slabs.
Using artificial cladding is very beneficial.
Modern technologies for the production of building materials make it possible to obtain artificial cladding that completely imitates the structure of valuable rocks, and the cost of artificial material is much cheaper than cladding made of marble or granite.
Which brick to choose for the plinth?
The most important question that interests many developers is which brick is best for the plinth on the foundation. Since the basement part of the building is located in the most vulnerable place from the external environment, the material for its masonry must have not only increased strength to withstand the load-bearing loads from the building’s structures above, but also high resistance to various adverse factors, primarily high humidity.
In this regard, sand-lime brick, which has a fairly high tendency to absorb moisture, which, as a result of cyclic freezing and thawing, leads to the gradual destruction of its structure, can be immediately excluded from the list of materials used.
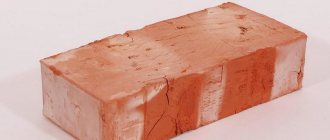
To the question of what kind of brick to lay the plinth with, we can unequivocally answer that the most suitable material from both an economic and practical point of view is ceramic (see photo 2).
Photo 2. Ceramic bricks on pallets
What brand of brick is needed for the plinth?
- M-250 is a reliable material with increased resistance to any external influences.
- M-150 is the minimum acceptable grade of red brick for the plinth. Its use is desirable with subsequent cladding with protective and decorative materials. For finishing, cement plaster, facing tiles are usually used, and less often (due to the high price) clinker bricks.
The numerical indicator of the brand reflects the maximum load that the material can withstand before destruction begins, which for M-250 will be 250 kg/cm 2 .
The plinth can be made from backing brick (also known as construction brick) - in this case, the masonry is usually faced to add aesthetics, but it is often done “for jointing” (when using products of decent quality). When building premium-class houses, they can use a facing material for laying out the basement, the cost and decorative qualities of which are much higher, but subsequent finishing is not required.
Photo 3. Ordinary (backfill) ceramic material
As for the brand of brick for the plinth in terms of frost resistance, it all depends on the construction budget. But it should not be less than F50 – i.e. The product must withstand at least 50 freeze/thaw cycles. There are also materials on sale with higher performance (up to F100), the use of which is preferable, but their price is appropriate.
Which red brick is better for the base: solid or hollow?
Hollow ceramic material is characterized by the presence of a different number of technological holes (13-46%), which contribute to lower thermal conductivity. The specific gravity is lower compared to solid products, but so is the strength.
Solid brick for the base (see photo 4) has a solid structure (emptiness no more than 13%), therefore the thermal conductivity is slightly higher. But in terms of strength, it is significantly superior, which allows it to be used for the construction of critical load-bearing structures.
Photo 4. Solid ceramic material
If you have not yet decided which brick is better to choose for the plinth, we recommend buying solid products that are characterized by greater compressive strength.
It is also possible to use hollow material (see photo 5), but only for the construction of buildings with a height of no more than 1 floor, which do not create excessive loads on the foundation. At the same time, during the selection process, keep in mind that voidness is a variable indicator. That is, for some elements it can be 15%, and for others – 46%. Accordingly, their permissible load will be different. In this case, you don’t need to think long about what brick to make the plinth from - choose the “golden mean”.
Photo 5. Hollow red brick
What size should the brick for the plinth be?
- 1NF – single with dimensions 250×120×65 mm;
- 1.4NF – one-and-a-half with dimensions 250×120×88 mm.
There is no fundamental difference in which of these types of bricks to use for the basement of a house. Focus on the expected height of the basement of the building - this will help you choose the right size material.
It is worth noting that ceramic products can also be double (2.1NF, 250×120×140 mm), but they are produced only in the hollow type. In practice, such a brick is not used for the plinth.
Brick laying pattern and plinth width
Brick base
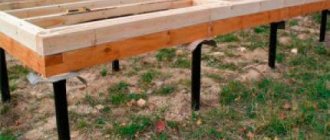
We began preparing the ditch for the strip foundation after completing the house project. Then I knew exactly what the width of the brick plinth should be, based on the calculated loads. The weight of a two-story brick building is large. If the masonry is narrow - 250 mm, then the brick for the plinth may not withstand it. Cracks will form on the walls. Repairing and strengthening a house will cost more than construction.
How wide the foundation should be is determined by laying the base. Standard brick dimensions are 250x120x50 mm. The minimum size can be laid out by alternating rows with transverse laying in one row and longitudinal laying in two. Such a foundation is made for lightweight houses made of wood, foam concrete, and shell rock. For walls made of wood and light material for cottages with 2 floors, one and a half bricks (380 mm) are suitable. Vadik plans 2 levels, a residential attic with insulation. It is better to use wide masonry for a brick plinth in two rows (520 mm). House repairs will need to be done with this foundation in about 15 years.
Related article: A loggia is... Definition and differences from a balcony
It’s easy to determine the width of the finished plinth. 10 mm is added to the dimensions of the brick for each seam. I did alternating rows:
- two rows of bricks across the foundation;
- the outer and inner rows are lengthwise, the middle is filled with artificial stones laid transversely.
Such a base guaranteed stability for a multi-story building made of heavy building material. Repairs to the exterior of the basement may be required after a few years.
Basement finishing.
The finishing of the base is carried out using various construction methods:
- Plastering with cement mortar and painting;
- Concreting the external surface;
- Modern finishing with tiles or artificial stone;
- Durable siding finish.
- Finishing with plinth panels
The first two types of finishes are suitable for updating the appearance of the base from time to time, that is, repainting it in a different color.
Today, there are various finishing materials for the foundation on the market, but thickened plinth panels for finishing the plinth are especially popular, as they have several advantages:
- Can withstand significant loads;
- The appearance does not deteriorate over time;
- Not affected by chemicals;
- Fireproof and frost-resistant.
The insulating layer of the panel is made of PVC material. The panel is a kind of mosaic that is mounted on a foundation of equal-sized elements. The elements themselves are attached to a pre-prepared wooden or metal sheathing using self-tapping screws. As you can see, the option of lining the foundation with plinth panels is a quick, modern solution to the task of lining your foundation.
A well-finished plinth will not only decorate the building, but also serve as its reliable protection. Each owner decides for himself how to cover the basement of his house. The task of the builders is to have the work done professionally, then such a plinth will last for decades. If you approach the finishing of the plinth with imagination, then your plinth will successfully highlight the architecture of the building.
Concrete plinth - objection
Concrete is a universal and most common material for foundations. However, working with it is associated with certain difficulties.
What causes the difficulties of working with concrete:
- During individual construction, it is difficult to calculate the volume of the required mixture with an accuracy of up to a cubic decimeter.
- The limited volume of the solution, along with low plasticity, can prevent the leveling of the horizontal surface of the foundation.
- Homemade formwork does not always provide the ideal bowl shape. Moreover, the higher the height of the base, the higher the complexity of the preparatory work.
Due to these factors and a number of others, the surface of the poured concrete strip after hardening may turn out to be uneven.
In addition, concrete is not cheap. Pouring the foundation requires the use of expensive equipment. Work with the material should be carried out promptly - it cannot be stretched out over time.
The minimum pre-setting time for the concrete mixture is 28 days. However, in humid weather and low temperatures, the curing time of concrete can double.
For the reasons listed above, a low concrete plinth is first made, and after hardening its height is adjusted using other, more technologically advanced materials. Traditionally, the most convenient building material is brick.
Construction of a brick plinth on a strip foundation
The first thing you need to pay attention to before laying a brick plinth begins is the diagonals. The main problem with skewed building walls lies precisely in this. After the construction of such a foundation, the house will quickly begin to wear out. It is also important to know how to reset the foundation of a house. After all, this can also lead to distortion.
The easiest way to set the corners is to place a brick around the perimeter and use a tape measure to measure all sides and diagonals. The indicators must match. If not, then you should level it to the nearest centimeter. Using a level or plumb line, it is worth determining the slope of the wall during construction.
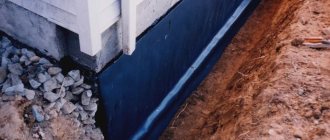
The second important issue is protecting the top surface of the foundation. Waterproofing is essential to protect the zero from additional moisture. Most often, roofing felt is used as insulation. It is attached to hot bitumen or using a burner. Materials such as rubemast, glass roofing felt and euroroofing felt are also popular.
When starting the installation process, it is worth noting that no types of sand-lime brick are used, as it strongly absorbs moisture. Only red solid brick is recommended. When constructing, you should adhere to a certain scheme of actions.
Lay the walls evenly, with a mortar layer thickness of 20 mm. It all starts from the corners of the base, and then moves towards the center. Every 4-5 rows it is recommended to check the slope of the wall using a plumb line. After the corners are erected, a fishing line is stretched between them to facilitate the process of constructing the walls. The minimum height is considered to be a base of 4-5 bricks. If you are planning a basement floor, then you should leave 10 cm holes for ventilation of the room.
The basement waterproofing should be located between the base and the wall for additional insulation from both precipitation and groundwater. The best option is roofing felt. It is recommended to fold it together. This is not the only insulation option, but it is the cheapest and most practical.
Stages of work execution
We figured out what the base is for and what to make it from. It remains to figure out how to properly fill the element so that it turns out reliable and durable.
Preparation
Before starting construction of the foundation for the plinth, you should carefully study the condition of the soil at the construction site. The depth of groundwater is of great importance, the presence of which at the one and a half meter mark can limit the excavation bottom to one meter. In this case, you will have to install drainage to remove water from the foundation.
The bottom is leveled and compacted, and the future foundation is marked. To place the walls, trenches with a depth of thirty centimeters are made, at the bottom of which a sand-crushed stone cushion is placed.
Installation of formwork
A formwork structure made of wooden panels up to half a meter high is placed along the trench walls. Inside it there is a frame base made of reinforcement. This measure will give the structure strength and reliability, and it is not recommended to neglect it.
Concreting
The prepared trench is filled with concrete mortar, which gains strength within three to four weeks.
Block laying
Most often, the foundation for a house with a basement is built from FBS blocks. This method makes it possible to quickly erect foundation and basement walls, even though renting a crane is expensive.
The masonry alternates with ligation of the suture areas. Block stones are connected to each other with a solution based on sand and cement. During work, you should consider where windows and ventilation openings will be located so that there is always an influx of fresh air and daylight in the basement.
The foundation of the plinth must rise above the soil surface, the recommended level is up to one meter. A brick or reinforced concrete belt is laid along the upper block row to level the base horizontally.
Construction of a monolithic basement tier
Such a base is more difficult to construct, so construction work will have to be taken with full responsibility. The algorithm of actions is as follows:
installation of the formwork system. Formwork panels can be made from planed lumber, or you can rent a ready-made structure
When assembling the shields yourself, pay attention to their inner side so that its surface is smooth. The boards are fixed carefully so that they do not become deformed due to the gravity of the concrete solution; reinforcement
To give the structure additional strength, reinforcement is performed. Reinforcing mesh made of metal rods is prepared in advance, the cell parameters of which are 150 by 150, 200 by 200 or 250 by 250 mm. The reinforcing bars are fixed together by welding. The dimensions of the mesh should be smaller than the width of the formwork so that they are covered on all sides by the concrete mass. The number of reinforcing mesh is determined by the height of the base part; it is recommended to place them every thirty to fifty centimeters;
concreting. At this stage, it is recommended to act according to a certain scheme: first, the solution is poured to a fifteen-centimeter height, it is given time to thicken slightly, a reinforcing mesh is laid, the filling is performed again, etc., to the designed height. The plinth arranged in this way is distinguished by its reliability and high strength index.
Waterproofing
This construction stage is considered mandatory, since exposure to moisture will cause the destruction of not only the foundation, but also the entire structure.
The waterproofing layer can be performed in two ways - coating and pasting. The first option uses bitumen-based mixtures that are melted before application. In the second case, roll materials are used, working with which requires adherence to certain technologies.
Construction of a brick plinth
The height of the plinth is usually determined by practical use. If the project provides for the location of auxiliary premises below the first floor, for example, a boiler room or a garage, then the base will be high. By the way, this solution gives the building a noble and elegant look. The brick base has not lost its position for many years.
Before starting work on the construction of the main structure, it is necessary to reliably isolate the foundation from moisture penetration.
Which brick to choose
There are many types of bricks currently produced
Bricks are produced in various types: clay, silicate, with and without voids, single and one-and-a-half, shaped.
Types of material with voids are not suitable for a brick foundation base for the reason that it can condense moisture, which will certainly destroy it over time, which poses a danger to the entire building.
Therefore, it is most reliable to construct a plinth from solid clay, clinker, silicate or acid-resistant bricks. Materials are produced by manufacturers with different physical and technical characteristics. You should choose a brick with high strength, resistance to temperature changes, and also poorly resistant to moisture.
If you plan to build a basement using brick, then the width of the foundation should be calculated based on the geometry of the brick. So, the thickness of one brick means a size of 25 cm, one and a half bricks - 38 cm, and two - 51 cm.
Waterproofing
Mastic is indispensable when waterproofing the base
Waterproofing the foundation is not just a necessary procedure, but a mandatory one. Otherwise, the entire building will suffer: mold and dampness will be permanent guests.
The most famous option is to lay two layers of roofing felt on bitumen mastic and one layer of glass insulation. Not only the top, but also the vertical surfaces of the foundation are also treated with bitumen mastic.
A damp foundation is a danger to the entire structure
That’s why so much attention is paid to waterproofing work.
How to set corners
Laying a brick plinth begins at the corners. Usually solid brick is used. Due to a certain complexity and responsibility, this work is entrusted to experienced masons.
- On the waterproofing layer in the corners, first, without mortar, the first row of bricks is laid out to the required width of the plinth.
- The correctness of the angles is verified by level and plumb line;
- Linear measuring instruments are used to check the geometric parameters of the perimeter of the building and its diagonals at the corners.
Brickwork
Only after completing all the previous stages do they begin to lay out the base (from the corners to the middle of the wall). The main assistants of every mason are a plumb line, level, twine or rope.
When laying the plinth, it is necessary to constantly monitor the horizontality of the structure
In order for the wall to be smooth and strictly vertical, it is necessary to check all dimensions every three to four rows. The rope is stretched from one corner to the other so that the mason can lay out the wall as evenly as possible.
A brick plinth can be erected on a foundation made of any material. In this case, it is necessary to take into account the weight of the walls so that it does not exceed the bearing capacity of the base.
Most of all, a brick base is suitable for light walls made of wood or half-timbered walls. To fasten the bricks together, a cement-sand mortar of grade M75 is used. In order for the structure to be stronger and to withstand loads well, after 4-5 rows of masonry in height it is necessary to reinforce it with steel meshes.
The diameter of the wire for reinforcement must be at least 3 mm, the cell size must be from 4 to 120 mm. Welded meshes are used. The mortar for brickwork is laid in such a way that it completely covers the reinforcement to avoid corrosion.
Brick rows are laid out in strictly horizontal rows in a certain order, which is called a dressing system. The seams in height in adjacent rows should not coincide; they are placed in a “checkerboard” order. That is, the stones are positioned with a shift relative to each other. This effect is also achieved by alternating spoon (along the longitudinal sides of the brick) and bonded (along the end sides of the stone) rows.
We recommend watching a video on how to lay the material yourself.
Along the entire perimeter of the base it is necessary to install ventilation holes measuring 150-250 mm every three meters, at some distance from the soil surface. The height of the windows can be equal to the width or be slightly larger.
Checking the dimensions and geometry of the foundation for the plinth
Bassoon base
Before starting work, I decided to check the strip foundation. Time passed after it was filled. It could shrink, washed away by rainwater. Unevenness of the base plane will lead to the distortion of the entire house and constant repair of walls and ceilings. Measurements are carried out using a ruler level, tape measure and cord.
- I measured the strip foundation using a rack level along and across in several places. It is better to do this in the corners and every 2 meters in length. By placing a long device, it is easy to determine the presence of a slope. If you only have a corner level with short sides, place a board underneath.
- On the foundation in the corners I laid dry brick along the outer edge. Then, with the help of Vadik, I checked the diagonal. A regular rectangle has the same cord size from corner to corner. If the lengths are different, then the angles are not right. For a brick base of a residential building, a difference in the length of the diagonals of up to 2 centimeters is permissible.
- Find the distortion and check the dimensions better with a tape measure. We measured in the corners. The foundation was poured without formwork. The outer walls are uneven. Brick simplifies measurements.
Related article: How to decorate toilet walls beautifully and inexpensively
Having adjusted the dimensions by shifting the corners, we checked the diagonals again with a cord. I then marked the position of the brick base. Now, having pulled the cord and secured it to the pegs, I marked the outer side of the walls. All that remains is to lay out the brick base. I was confident that the geometry of the house frame was correct.
My friend applied glue to the top of the strip foundation with his own hands and laid layers of prepared roofing material connected together with a bitumen mixture. The bottom waterproofing is ready. The walls will not become damp from moisture from the soil. Under the brick, for waterproofing, I laid a layer of cement mortar 2 cm thick. It will serve as a cushion and compensate for unevenness. For strength, I embedded a metal mesh with a 50 mm mesh in it, cutting it slightly narrower in width than the base.
Types of brick foundations
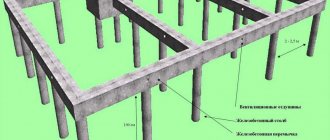
The brick foundation can be made of strip or columnar. From the names it is clear that the strip is a ribbon laid out of brick, running along the entire perimeter and under the walls of the future building. Columnar construction involves placing the building on free-standing brick masonry pillars.
Which brick to choose for the foundation
Not just any brick is suitable for constructing a good, solid foundation that will last for many years. Since brick is the main material used in the construction of this type of foundation, the strength, durability, reliability and load-bearing capacity of the foundation of the house depend on its quality.
Facing or sand-lime bricks are not suitable at all, since they are not intended for long-term use and are subject to rapid destruction. Only solid red fired (ceramic) bricks with high resistance to freezing are suitable for the foundation.
Sometimes a brick foundation is built using materials left over from old masonry. Although this option will be quite economical, one has to doubt its quality.
Reasons for installing a brick plinth
Why do you need to lay brick from the base? The base belt can be made of brick, rubble stone, reinforced concrete or blocks. Each of these materials has different performance characteristics. A correctly executed design must meet the following requirements:
- high strength;
- low water absorption;
- low thermal conductivity;
- frost resistance;
- affordable price;
- simple installation technology.
As practice has shown, brick is the most consistent with these indicators, as a material with the best balance of strength, cost and ease of laying. Reinforced concrete and rubble stone are durable and strong, but will require increased financial and labor costs. The blocks do not have high strength and can only be used in the construction of light one-story buildings. Taking this into account, private developers most often choose brick to build a basement.
How to lay out the basement part: materials for construction
The base part of the foundation helps protect the building from getting wet and prevents moisture from penetrating into the structure. This structural element is especially important in wooden houses, where protection of the lower part is required. There are several materials from which the base is made.
Reinforced concrete
The base part made of reinforced concrete is used for monolithic pouring. This is one of the most durable and reliable types of plinth arrangement. When pouring concrete, the presence of air ducts and openings for the outlet of communications is provided.
The advantages of this choice:
- reliable protection from moisture;
- simplicity;
- short construction time;
- high strength indicators.
The disadvantage of this material is poor thermal insulation, as well as the high cost of work. Reinforced concrete is suitable for the construction of plinths on a strip foundation.
Tree
People who want to have a completely wooden cottage choose to arrange a basement made of wood. This includes two main materials - timber and logs. The second option is more suitable for wooden log houses - it perfectly complements the overall exterior of the house.
The base itself is built from larch, since its lower part will constantly be in contact with the ground, and this will lead to exposure to moisture. The tree does not like excessive moisture, and larch is resistant to water.
The advantages of this solution:
- Durability.
- Attractive appearance.
- Environmentally friendly.
- Health safety.
A base made of timber or logs protects wooden walls from destruction, but this plus can turn into a major disadvantage if the arrangement of the base part is carried out in violation of the technology.
Natural stone
The foundation is often made of natural stone, and accordingly, the basement is built from this material. The masonry is made of large stones. Due to their strength, the structure becomes resistant to heavy loads. A combination of concrete and stone is often used: then the masonry is made of natural material, and the voids between it and the corners are filled with reinforced concrete.
What are the advantages of a plinth made of natural stone:
- pressure resistance;
- low cost of work;
- availability of stone in each geological region.
An option with a plinth made of natural stone can be considered in those houses where it is necessary to reduce the cost of construction. This method has several disadvantages: the house must be built in an area without seismic activity, as well as in a favorable geological environment.
Brick
For a brick plinth, red solid brick is used. The complexity of the procedure is one of the main disadvantages, since you constantly need to monitor the evenness of the masonry using a building level. But such a base does not need to be additionally coated.
Its advantages:
- Durability all around.
- Lack of special care.
- Environmental friendliness of the material.
- Resistance to temperature changes and weather vagaries.
- Availability.
There is another disadvantage - the need for additional protection of the material from moisture. For this purpose, special hydrophobic impregnations are used.
Blocks
The dimensions of aerated concrete or foam concrete blocks must be no less than the height of the base itself. When arranging, be sure to ensure that there are no horizontal seams. This is one of the difficulties when laying the base part along with maintaining the weight of each block. This type of plinth is used with strip foundations.
Its advantages:
- fast construction;
- availability;
- evenness of masonry;
- good thermal insulation characteristics.
Craftsmen advise making a special drainage under the base, which will remove moisture from the material. This procedure is carried out at the stage of pit construction.
Choosing the best brick for building a basement
By plinth we mean the part of the foundation that protrudes above the zero level. The load on the basement is determined by the number of floors and the materials used in the construction of a private house. It is important to take into account such building elements as reinforced concrete floor slabs of the first floor - they provide a significant load and impose high demands on the strength and load-bearing capacity of the base. In this case, the masonry of the upper part of the foundation should be wider than the walls of the house.
If the load is small, then the dimensions of the plinth may not differ from the dimensions of the facade walls. As for the choice of material, plinth brick is an affordable option. If we take into account the operational characteristics, then in comparison with the same concrete, brickwork is preferable even for a full basement floor, since it has better thermal insulation properties, which means it will ensure the maintenance of a comfortable microclimate.
Environmental impact on the material
When deciding to build a brick plinth, it is necessary to choose the right material, since not every brick is suitable for this part of the foundation. Differences in manufacturing technologies for building materials cause significant differences in performance characteristics, so some samples are optimal for internal partitions, while others are optimal for stoves, fireplaces, external walls, cladding, and so on. The base is exposed to serious influence of negative factors, therefore the following requirements are put forward to the material:
- Resistance to ultraviolet radiation;
- Minimal hygroscopicity;
- Resistance to cyclic freezing and thawing;
- Strength.
Red brick
Red brick for the plinth is the best option; the only thing you need to pay attention to is the strength grade - it should be at least M150. This brick has an optimal price/strength ratio, but due to its porous structure it is hygroscopic, therefore at low temperatures it inevitably collapses due to the thermal expansion of moisture. This inevitably leads to a weakening of the supporting structure - after 50-60 winter cycles, such a brick collapses. Therefore, when choosing this material, you will have to take care of waterproofing the foundation and reliable protection of the basement walls. The M-250 grade is more durable and resistant to aggressive environmental influences. Such masonry does not even need a protective cladding, while M-250 can be used to create a foundation even in regions with high humidity. Due to its high resistance to loads, it is used even in the construction of multi-story buildings.
Sand-lime brick
A base made of sand-lime brick is not the best solution, since it is not strong enough, but is porous and hygroscopic. It is better to use it for interior work. The operational characteristics make it quite possible to construct partitions or internal and external walls made of silicate, whereas it is not suitable for building a foundation.
Clinker brick
Solid brick for the plinth boasts low hygroscopicity, high service life and strength. It does not require external decorative finishing, but the high price does not allow us to call it the best option.
Acid resistant brick
If we talk about the price of acid-resistant brick, it costs 2-3 times more than conventional material. Moreover, for it you will have to purchase a special acid-resistant building mixture, which will also affect costs. So it is simply not practical to use such a brick for the foundation plinth.
Acid-resistant brick is used to build a plinth when it is necessary to provide protection from high temperatures due to an aggressive environment
Tools and materials used during work
To lay brick on the foundation surface, you need to prepare the following materials and tools:
Bricklaying Tools
- trowel or trowel. Used for laying and mixing the solution, removing excess;
- bushhammer. It will come in handy when it is necessary to split a brick into pieces of a certain size;
- plumb line Designed to check the verticality of the created structure;
- construction cord. It is stretched between the outer bricks and allows masonry to be carried out strictly along one line;
- brick ordering is used to speed up the masonry process, since it marks rows according to the thickness of all elements present;
- wooden rule. Used to control the quality of the external surface of the structure being created;
- container for preparing mortar or concrete mixer;
- building level. Improves the quality of the base as it helps control the presence of even minor level differences.
Pros and cons of a brick plinth on a strip foundation
The brick base has the following advantages:
- Assembly from piece materials is slower, but does not require curing time for the material, so it is ultimately much faster than concrete casting.
- The brick plinth allows you to correct shortcomings made during the casting of the tape. In particular, you can correct the shape, align the corners, etc.
- An intermediate layer appears between the walls and the tape, allowing you to redistribute the load and more evenly transfer it to the tape.
- Brick has certain thermal insulation abilities that make it possible to improve the microclimate of the zero level or first floor.
The disadvantages include:
- Brick can absorb moisture, which creates problems for the structure of the entire house and requires appropriate measures to be taken.
- Bricklaying is a labor-intensive process that requires skill and experience.
- The load-bearing capacity of brick is lower than that of concrete casting.
- A large number of connecting seams significantly weakens the masonry, making the base vulnerable to mechanical stress and moisture.
Both advantages and disadvantages directly follow from the properties of bricks, so they should be considered typical features of a building material.
How to make and fill a brick plinth for a private house with your own hands?
To do everything yourself, without being distracted by additional purchases, you will need the following:
Scheme of a sunken base.
- cement;
- sand;
- crushed stone to fill the structure;
- water;
- tape measure or strong thread;
- brick;
- roofing felt;
- polyethylene film;
- pipe cuttings;
- trowel;
- plumb line;
- building level.
Setting the corners when building a brick structure with your own hands
Before laying is done, the corners must be set correctly. If this is not done, the walls may be laid incorrectly in the future. If the deviation is insignificant, unevenly aligned corners can be corrected when laying the first row. It should be noted that it is not recommended to rely on this at all. It's best to do everything right from the beginning.
The first thing you need to do is lay bricks in the four corners without mortar along the width of the base being made. In the corners they must be leveled.
After this, using a tape measure or using a strong thread (it should not stretch under any circumstances), you will need to accurately measure the length and width of the sides of the future private house, taking into account the corners that were laid out earlier. In addition, it is necessary to measure 2 diagonals. All measurements must be equal: the length of one side must be equal to the length of the other side of the wall, and so on.
Scheme of types of basement floors
If the measurements are equal, everything was done correctly. Therefore, it can be made of brick with your own hands. If any measurements do not match, it means that not all angles are equal to 90°. This will need to be fixed urgently. This can be done as follows: constantly rechecking all the measurements that were described above and at the same time moving the corner bricks on any of the sides, find the correct location in the corners so that the measurements on all sides coincide, the permissible deviation is a maximum of 2-3 cm. With further masonry the difference can be eliminated.
Brick bonding in the basement and waterproofing
Laying a brick plinth with your own hands
Article on the topic: Wallpaper for the hallway and corridor photo: wallpaper in the hallway in an apartment, in a small interior, renovation in Khrushchev, liquid wallpaper, views, video
My friend laid a layer of concrete on top of the waterproofing layer and pressed the mesh into it. Now I was laying the base. I need a helper to prepare the solution. But Vadik wanted to try to do everything with his own hands. He asked me to choose a site that was simpler, along a straight line without corners. He carefully aligned the outer row along the stretched cord and then laid the rest of the brick tightly. After a couple of hours I got used to doing everything myself. I secured 2 boards at each corner close to the masonry. Now all that remained was to lay the brick, pressing it against them. Nails for the outer line cord were easily driven into the wood. This device comes in handy when you need to repair the corners and façade of a house.
Every 4 rows, now I, as a helper, laid the mesh for strength. While the concrete mixer was working, I marked openings for vents - holes for ventilation of the underground space of the house. I prepared the top layer of waterproofing, which was additionally laid under the wall masonry.
I advised Vadik to choose masonry with a bandage half the width of the brick. Our outer layer alternated with transverse and longitudinal rows. Now, when laying, the joints did not match. This made the base durable and eliminated any repairs in the near future.
Waterproofing and marking
Waterproofing and marking the foundation for the plinth must be carried out at the initial stage of work. The service life and appearance of the created structure depend on the correct execution of these processes.
Foundation waterproofing
Foundation waterproofing scheme
Waterproofing the foundation along a horizontal surface is necessary to prevent the penetration of capillary moisture into the brickwork and wall structure. In this case, experts recommend installing the waterproof layer twice. The first time the waterproofing is laid on the surface of the foundation, the second time - on the finished base.
Roofing felt is most often used for this purpose. It is best to lay it in two layers, so that the first overlaps the seams of the second by 10–15 cm. Installation of roofing felt can only be done on a perfectly flat surface, on which there are no dents or bulges.
The maximum permissible difference in height should be 1.5 cm. If it exceeds 2 cm, it is necessary to level the surface. This can be done using a thickened masonry joint or a thin screed made of ordinary cement-sand mortar.
Installation of waterproofing in the form of roofing felt is carried out in several ways:
- directly onto the surface of the foundation without the use of additional adhesives;
- using hot bitumen;
- heating the surface of the roofing material with a burner.
Foundation marking
Foundation marking scheme
Experts lay the brick on a cement-sand mortar, but it is first recommended to lay it out dry. This is necessary in order to determine the thickness of the vertical seam. The standard value is 1 cm. If after laying out it turns out that the row protrudes or is shorter from the foundation, it is recommended to increase or decrease the width of the seam by 0.2 cm.
This approach will help to carry out masonry from solid elements without halves or quarters. Such a base will look more attractive. If you cannot do without halves and quarters, you need to accurately determine their size and placement.
After laying out the materials without mortar, it is necessary to mark the locations of the vertical joints on the foundation. After this, each element is carefully removed and installed using an adhesive. The bricks are laid in the same order. Otherwise, the vertical seams may move due to deviations from the standard dimensions of the materials used.
Laying the plinth in stages
The process of arranging a basement is quite complex and responsible, requiring the participation of professionals. The brick base plan is as follows:
- from the 1st to the 4th row - masonry;
- 5th row – transverse wall;
- 6th row – brick layout;
- Row 7 – filling the space with insulation.
Before starting laying, it is necessary to correctly set the corners for the subsequent laying of the base. At the preliminary stage, the solution is not used. This row is set purely according to level, since subsequent rows can no longer be moved. After the first row is set, measure all sides, two diagonals and make sure the structure is even. The evenness of the masonry must be perfect.
The largest permissible discrepancy should not exceed 2 cm. In this case, the discrepancy can still be corrected during further laying.
After completing the measurements, they begin to equip the ground floor. It is laid out with bricks with cement-sand mortar having the following proportions 3:1:1 (purified sand, cement, water).
Laying out the baseSource superarch.ru
Minimum plinth width 380 mm. If the plinth wall involves only brick laying without insulation, the thickness is at least 500 mm. If the insulation is supposed to be polystyrene foam, the thickness of the base is 380 mm.
When arranging the base, the foundation should be 30-40 cm. This width provides a beautiful base, of sufficient height, allowing you to equip a large room that can be equipped as a boiler room or utility room.
You can see the choice of brick for building a basement in the following video:
Drawing out the foundation level with a watering hose
The foundation is the foundation of any home, and if you draw the foundation of any building by eye, it will most likely lead to the Leaning Tower of Pisa in your backyard. To prevent such an architectural misunderstanding from happening, the foundation should be laid out horizontally. This procedure is much easier to perform than it might seem at first glance. And the tool for this work can be found on any personal plot. At the first stage of manufacturing the foundation strip for the future structure, it is necessary to dig a trench. The depth of this trench, first of all, must correspond to the “monumentality” of the structure and the type of soil
However, you should not focus on small differences in the depth of the dug trench.
The next step is to determine control points and their locations. They should be placed in the corners, but if the length of the foundation is too long, then it is possible between the corners. Sufficiently strong pegs of the required height should be driven into these places. After this, with the help of an assistant, you need to pour water into the watering hose, which should be transparent, then remove all air bubbles. The result should be a system of communicating vessels, familiar to everyone from physics lessons, thanks to which you can easily set the surfaces of the liquid in the elbows at the same level horizontally. Use a hose. This liquid-filled hose is called a water level. Without this tool it is almost impossible to build a house or even a barn. As soon as the liquid stops moving, you can make marks opposite the liquid boundary on all pegs, moving sequentially from those already marked. Then you need to decide to what level you are going to pour the stone-concrete mixture. To do this, you should lower the resulting marks to the same length in advance without losing accuracy. The fill level will help determine the twine that is stretched between the new marks. After pouring concrete, all pegs must be removed. As soon as the concrete has hardened, you can begin laying the foundation with bricks, checking at every 2nd and 3rd level. Interim checks are recommended to be carried out as often as possible.