Advantages and disadvantages of a columnar foundation
Advantages
- Economical. Requires less materials, namely concrete and reinforcement, compared to strip and slab foundations.
- Does not require the manufacture of removable formwork. Permanent formwork is used, the production of which takes a small amount of time.
- A foundation made from bored piles can easily be made independently without the use of special equipment or hired labor.
Flaws
- Unlike a strip one, it is not possible to make a cellar and a basement floor.
- A more detailed design is required in contrast to strip and slab.
Average service life of a columnar foundation made of bored piles: 150 years.
Advantages and disadvantages of roofing felt formwork
Before using roofing felt formwork, you should familiarize yourself with its advantages and disadvantages so that serious mistakes can be avoided during the installation process.
Pros:
• affordable type of design;
• production takes a minimum amount of time;
• the quality of the concrete pillar does not decrease;
• there is no need to dismantle the formwork;
• roofing felt creates a waterproofing barrier for concrete, which increases the service life of columnar foundation supports.
Minuses:
• pouring concrete into a roofing felt roll is more difficult than a structure with rigid sides;
• during the installation of formwork it is necessary to use additional clamps to give the structure verticality;
• roofing felt is suitable for the diameter of supporting elements not exceeding 200-250 mm.
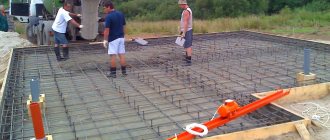
Design of a columnar foundation made of bored piles
- The total weight of the future house is calculated.
- We carry out soil examination (test drilling). We find out the bearing capacity of the soil, the groundwater level (GWL) and the depth of soil freezing (GFD).
- We calculate the number of pillars of our foundation and their location around the perimeter of the house. The calculation will depend on 2 factors:
- The poles must carry the full load of the house. The calculation takes into account the bearing capacity of the soil. In order to increase the area of the surface resting on the ground, a widening is used at the bottom of the post (the average heel diameter is 400-600 mm).
- The distance between the pillars should be within 1-3m (average value 1.5-2m).
Calculator Stolby-Online v.1.0 - design of a columnar foundation.
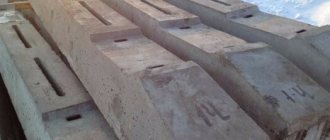
Materials
Permanent formwork:
- Shirt made of roofing felt (the most economical option).
- PVC pipes (preferably orange for external sewerage).
- Asbestos-cement pipes.
- Any other pipes that have a suitable diameter, good geometry, sufficient strength and rigidity (chimney pipes, etc.)
| Ruberoid | PVC pipes | A/C pipes | Chimney pipes |
Materials for a pole with widening. Permanent formwork: roofing felt
- Fittings. D10-D12. For the reinforcement frame, knitting wire.
- Concrete M150-M400. Cement + coarse river sand + crushed stone 5-20 fr (the smaller the crushed stone fraction, the better).
- Permanent formwork: roofing felt.
- Garbage bag (thick 120 l). To form the heel (widening at the bottom of the post).
- Scotch. For fastening a garbage bag and for fastening roofing felt. Stretch film for fastening roofing felt.
| Ruberoid | Concrete | Armature | Rubbish bag | Scotch |
Tools
- Boer. You can use garden, TISE or homemade. Instead of a drill, you can use automated equipment or an analogue. The length of the drill should be slightly greater than the freezing depth. If the drill handle is short, then you will need an extension cord, which you can either buy along with the drill or make yourself.
- To create a widening at the bottom we will use a TISE drill or a homemade tool. For example, a bayonet shovel with cut edges. Bayonet 10cm + if you need to extend the shovel handle.
- If we make concrete ourselves, we need the following tools:
- Concrete mixer
- Master OK
- Bucket
- Shovel
| TISE drill with extension | Garden auger with extension |
| Widening with TISE drill | Widening with a bayonet shovel |
| Concrete mixer | Master OK | Construction bucket | Shovel |
Instructions for the construction of a bored pile foundation with widening
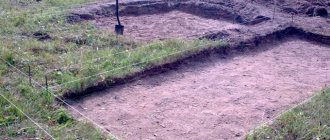
Site marking
1. We install a cast-off for pulling the twine, along which we will mark the location of the pillars (piles). Instead of cast-offs, you can simply use pegs or reinforcement firmly fixed in the soil. Before placing the cast-off, we must first draw up a project for the number and location of pillars.
We stretch a string (cord, thick thread or any analogue) to mark the location of future piles. The intersections of the string will be the centers of the wells. In our example, we will make the distance between the centers of the pillars 2 m. Provided that the diameter of the bored pile is 25 cm, therefore, the distance between the piles will be 1.75 m.
2. We outline the centers of future wells. For this task we will use a plumb line, which will be lowered from the intersection of the string.
3. Drive the peg exactly plumb. Instead of a peg, you can use anything, the main thing is that it stays securely in the ground and is visible so as not to accidentally knock it over.
As a result, we get a marked area for future pillars. We remove the cast-offs so that they do not bother us. Only the pegs remain.
More detailed instructions on marking the foundation can be read in the article: Marking for the foundation. Rules for constructing a rectangular foundation. For a columnar foundation: Marking for a columnar foundation with a grillage.
Types of formwork for columnar foundations
The formwork system is designed to perform certain tasks, the main of which is to create maximum strength indicators and better differences in shaped structures for the structure under construction.
Naturally, this goal is not the only one that formwork for a columnar foundation is designed to solve. In addition, the system successfully solves the following problems:
- formwork is needed to withstand the pressure created by the poured concrete material;
- when constructing the foundation, it is prohibited to change the original formwork forms;
- elements of the formwork system must be installed and disassembled quickly and easily;
- Such formworks are subject to special requirements for a dense insulating layer and tightness in order to eliminate the possibility of leakage of the concrete mass.
Today, two main types of formwork are known:
- non-removable. The main advantage is considered to be quick and easy installation. After laying the concrete solution, the formwork remains to act as a constituent element of the foundation. Such structures can be assembled from scrap materials;
- removable. In most cases it is made of wood material. The main difference from the previous option is dismantling when the foundation gains the required strength.
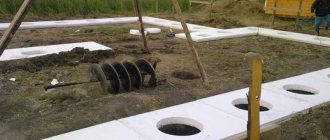
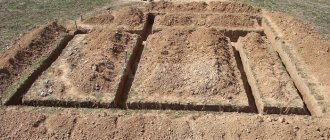
Drilling of the wells
We drill wells for piles. In this example, we will make the diameter of the holes 25 cm to a depth below the freezing depth for the given area. Let’s assume that our freezing depth is 1.5 m, therefore, we will drill to a depth of about 1.7 m.
To calculate the depth of soil freezing, you can use our calculator: Calculation of the depth of soil freezing. © www.gvozdem.ru
For drilling, you can use a TISE drill with a diameter of 25 cm, a garden drill with a diameter of 25 cm, or automated equipment.
Another important point. You can drill all the wells at once. But in some cases, it is advisable to drill one well at a time and immediately pour the concrete mixture (concrete). This is due to weather conditions in the form of rain or high groundwater levels. Water will wash away the soil of the well walls, as a result of which it will crumble, and we do not need this at all.
We make widening at the bottom of the wells
What is it for. By widening the well, a heel of the pillar will be formed, which will perform 2 tasks: increasing the bearing capacity of the pillar and preventing the pile from being pulled out by tangential forces during the freezing of heaving soils.
Work plan. For this task, you can use a TISE drill specially designed for this purpose. It will allow you to make a widening with a diameter of 40-60 cm. But it is worth noting that in dense soil it is very difficult to work with this device. Therefore, it is advisable to check everything during test drilling during the design of a columnar foundation.
There is an alternative and inexpensive way to make the widening using a modernized bayonet shovel. To do this, it is necessary to trim the edges of the shovel blade so that the working area is within 10 cm. Well, lengthen the handle of the shovel if necessary. In order to lift the soil from such a widening, you can use some kind of device, or simply drill deeper and shovel all the soil from our widening into this depression. The main thing is not to forget to compact our “burial” later.
Creation of permanent formwork from roofing felt
1. In this example, we will use the most economical option, namely roofing felt, as formwork for a bored foundation.
We prepare a piece of roofing felt of the length we need. In our example, we need a piece 2 m long (1.7 m underground – 0.3 m widening without roofing felt + 0.3 m above the ground + 0.3 m margin for level trimming). We twist the roofing felt of the diameter we need (25cm) into a pipe. For this task, it is better to use a certain template onto which we will wind the roofing material. In our example we have a metal pipe. You can make the template yourself, showing ingenuity. There are many options.
After the roofing felt has been rolled up (2 layers thick), it is necessary to secure the resulting roofing felt shirt from unwinding. Wide packing tape will help us here. We will fasten it in 4 places (more is possible, the main thing is to secure it). If you have roofing felt with a dusty coating, then the tape will not stick to it. There is an option to wrap the roofing felt sleeve first with stretch film and then with tape. This will also give more rigidity to your formwork.
2. Attach a garbage bag to the bottom of the roofing felt formwork. What is it for. If you have high groundwater or simply standing water from rain, then pouring concrete into water is not recommended. The package will also act as a kind of barrier between the soil environment and concrete. According to TISE technology, the package is not used. Cement laitance enters directly into the ground forming soil concrete, which is an additional reinforcement for support (according to Yakovlev, the author of the TISE technology).
Do not confuse a garbage bag for a garbage can with a 120 liter garbage bag, which is used to collect garbage during cleanup days. It is large and quite dense. This is what we will use. We attach it to the bottom of our formwork with tape. Our roofing felt formwork is movable, so try to use tape so that it really firmly fixes the package (tightly wrap the edge of the package to the roofing felt shirt with tape). © www.gvozdem.ru
3. The part of the package that will be used for widening can be carefully hidden in the formwork pipe. Important! Consider the placement of the package so that when filling the concrete, folds do not form, which could make our widening not a solid structure.
Installation of formwork from different materials
What can formwork for a columnar foundation be made from? To do this, you can use various source materials:
- frame bases made of wood and metal;
- steel or asbestos-cement pipes;
- structures that improve the durability of the foundation.
Let's try to figure out how to make a formwork system for a columnar foundation. The technology is not particularly complex; it consists of certain working stages:
- a pit is prepared, the bottom of which is carefully compacted;
- a cushion of crushed stone and sand is arranged;
- the material for formwork and the tools necessary for the work are being prepared;
- frames are installed for pouring the foundation pillars.
Let's take a closer look at popular technologies for constructing formwork for foundation pillars.
To complete the work you will need nails, a construction tape, a hacksaw, a hammer, lumber, a level and a pencil. The easiest way to work is with an edged board, and we will consider this option in more detail.
To begin with, we will prepare the site for construction work by removing debris and vegetation and green spaces from it. Using a cord and pegs, we mark the contours of the future object, select places for holes for installing foundation supports.
We begin to dig holes, the depth of which depends on the type of foundation being installed. At the same time, we take into account that the bottom must be lower than the level of the pillar in order to arrange a sand bed of ten to fifteen centimeters. The width of the pits is determined by the formwork used. If boards and spacers are installed, the width of the pit is increased in all directions by twenty centimeters. When installing a permanent formwork system made of pipes, holes are drilled two to five centimeters wider than the diameter of the supporting element.
At the bottom of each pit we arrange a sand-crushed stone cushion, spill it with water and tamp it thoroughly. To prevent water leakage from the concrete solution into the ground, the top of the bedding is lined with plastic film or roofing felt.
We begin preparing the material for assembling the formwork structure. Uneven surfaces of the boards are sanded and processed with a plane. To form reliable frames, support bars, cut to the required size, are driven into the corner sections of each hole. Shields made of boards are attached to them, covered on the inside with polyethylene to improve the tightness. This additional measure will help to easily dismantle the formwork elements after the concrete solution has completely hardened.
To prevent the wood from bursting due to the poured mortar, oblique spacer elements in the form of wooden blocks are placed on the reverse sides. As a rule, they are attached at the corners and in the center of each shield.
At the time of installation of the formwork, it is periodically checked for verticality, for which a building level is used. In addition, it is recommended not to leave large gaps between the boards into which concrete mortar can leak. The height of the formwork panels should be several centimeters higher than the level of the poured column.
So, we installed the boxes, checked their vertical position, and made sure they were tight. Now we lay the internal surfaces with roofing felt material to create a waterproofing layer. Seam areas can be joined by hot melting. The structure is completely ready, and we lower it into a frame base prepared from steel reinforcing bars. We set it level and fix it with support bars.
We suggest you find out at what temperature you can pour the foundation
Everything is ready and you can pour the solution. After a week, the formwork structure can be dismantled.
Pipe construction
It is possible to prepare formwork for a columnar foundation from metal pipes. With this option, the concrete will receive additional strength, because part of the load will be absorbed by the permanent formwork. By the way, in addition to metal pipes, it is allowed to use analogues made of asbestos cement and plastic.
The algorithm for constructing such formwork is as follows:
- after preparatory and marking work, wells are drilled under each supporting element, the depth of which is ten to fifteen centimeters greater than the calculated value in order to create a protective cushion. The width of the well is determined by the diameter of the pipe with the addition of the required gap;
- pipes are pre-cut to the designed length and lowered into prepared pits;
- a mixture of crushed stone, sand and cement is poured inside, after which the formwork is lifted and fixed in a new position, having previously checked for verticality;
- As soon as the mortar mass at the bottom of the pits hardens, a frame skeleton made of reinforcement is placed in the pipes, the concrete mass is poured, after hardening the formwork elements are no longer dismantled.
This version of the formwork system is quite economical, but does not harm the foundation being poured.
First, the raw materials are prepared. The roofing felt sections are adjusted in such a way that a quarter of the entire length of the column will be located above the surface of the soil composition. The sheets are rolled into rolls with a diameter of 20–25 cm. For convenience, it is recommended to use template elements, an example of which is a regular plastic bottle. The thickness of each roll is at least two layers of roofing material.
Once everything is ready, the rolls are wrapped to maintain their shape. To do this, use construction tape or thin wire. It is best to fix it in at least four places for greater reliability.
Polyethylene is placed at the bottom of the well, a roofing felt mold is installed, into which concrete is poured.
You should know that the version of the formwork system made of roofing felt material is intended only for bored pillars installed at great depths. If heaving soil compacts spontaneously, after a few years the following consequences may appear:
- in the winter season, the layer of soil located near the foundation pillar freezes;
- heaving forces are directed upward, moving tangentially to the columnar support;
- the structure is pushed three to five centimeters out of the ground;
- soil accumulates under the flooded cushion, preventing the support from returning to the required height;
- As a result, the object begins to warp, cracks appear along the walls, the chimney pipe and roofing break.
The roofing material structure in the well is not capable of providing the openings necessary for backfilling with sand. Concrete is heavy, and it pushes the roofing material tightly against the walls of the well.
We create reinforcement cages for our piles
For this task we will use reinforcement with a diameter of 10 mm. The reinforcement frame can be manufactured in 2 versions: with reinforcement for the pillar widening and without reinforcement for the widening. How much reinforcement is needed for the widening of a pillar is a controversial issue and can only be resolved as a result of accurate design calculations taking into account all the technical characteristics of materials, loads and taking into account all possible factors. Therefore, in this article we will take the difficult path and consider a more reliable option for reinforcing the heel of the pillar.
Work plan. We prepare 4 rods about 2.4 m long (1.65 m in the ground + 0.3 m above the ground + 0.3 for connection with the grillage + 0.1 m for the heel of the pillar). To reinforce the widening of the pillar, we will bend the ends of the reinforcement so that it looks like the letter L. The length of the bend will depend on the diameter of the heel in the place where its reinforcement will take place (3-5 cm from the bottom of the widening). In our case, the length of the bend is somewhere around 10-13cm. After we have the rods ready, we sew them into a reinforcement frame. Welding, of course, is not suitable here, so we will tie it together using binding wire. At the same time, we make the connection not very strong, so that it is possible to rotate the reinforcement along its axis. It is advisable to make notches at the ends of the top of the reinforcement so that there is a guideline for how much to twist the reinforcement so that it is placed in our widening at the desired angle.
If you decide to make a reinforcement frame without widening reinforcement, then in this case we do everything the same as above, only we make the connection of the reinforcement rigid (by welding or knitting wire).
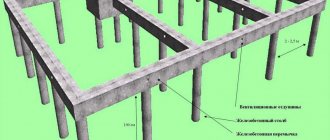
Types of columnar foundation
Based on depth, shallow and recessed foundations can be distinguished. The first type is laid at a depth of 55–70 cm. It is suitable for rocky soil with low groundwater levels. The recessed structure is used for liquid soil and areas with excess moisture. In this case, the supporting parts should be immersed to a depth of up to 2 m and 50 cm below the freezing level of the ground.
In addition, the columnar base can be divided by type of construction:
- The monolithic type is similar in construction technology to the strip construction. A one-piece structure without seams can enhance performance characteristics, increase the reliability and strength of the foundation. However, the installation is difficult to complete, since you will need to build a frame and reinforce it with reinforcement. Another disadvantage is that such a foundation is comparable in price to a strip structure.
- Pipe column base is a popular type due to its low cost and ease of installation. Installation takes place using pipes made of asbestos cement or steel. The process consists of the following stages: preparing holes for pillars, waterproofing the base and installing pipes, installing reinforcement formwork and pouring concrete mortar.
- Prefabricated columnar base made of reinforced concrete blocks. Features high installation speed. The installation consists of the following stages: organizing a sand cushion, waterproofing and constructing pillars. The parts are fixed using cement mortar. It is important to securely fix each support, and then plaster the base of the structure.
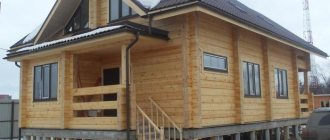
- A columnar base with a high grillage is most often used for the construction of residential buildings outside the city.
It is suitable for soils with a high clay content, as the design is able to evenly distribute the weight of the building onto the pillars and reduce lateral loads. During the installation process, the supports must be tied together using a grillage raised above the soil surface by 15–20 cm. For soils with a high clay content, a columnar foundation with a high grillage is best suited
Speaking about what material to make the pillars from, it is worth noting that you do not need to make a decision on your own, since there are many dependencies. Characteristics that influence the choice:
- type of building;
- soil parameters;
- groundwater level;
- availability of materials for construction.
Before installing the foundation, you will need to perform a soil analysis, select and calculate the required amount of materials.
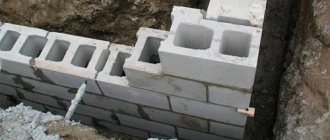
Columnar block foundation
Block structures are most often used in private construction work. The bases do not have a high load-bearing capacity, and therefore the scope of use is greatly limited. On slightly heaving soil, small frame, wooden or panel buildings can be erected. It could be a low house or a bathhouse.
A wooden house with low weight can be placed on a foundation made of blocks. Can be with or without grillage
If construction work is planned to be carried out in a region with sandy or dense rocky soil, then the load-bearing characteristics of the block base will be sufficient for the construction of full-fledged buildings from timber or foam concrete blocks.
Below you can see a diagram of such a design:
Scheme of a columnar foundation made of blocks that are laid on cement mortar
The optimal laying depth is less than 1 m. If the type of soil or the weight of the house requires a greater laying depth, then it is recommended to equip the base with asbestos-cement pipes. A columnar base made of blocks should not be constructed in the following cases:
- In the case of construction of heavy houses with walls made of heavy materials.
- On soils with low bearing capacity.
- On moving ground.
- In areas with a height difference of more than 1 m.
Blocks that can be used to make a foundation must be marked FBS. Parts are created from concrete grade M-100 or higher.
The dimensional grid of foundation blocks allows you to determine the appropriate material
Large size reinforced concrete blocks can be found on sale. They are intended for installation using large-sized equipment. The parts will need to be reinforced with A3 reinforcing bars. The diameter of the metal rods will depend on the size of the blocks.
For manual masonry, it is best to purchase expanded clay concrete blocks. The best option is parts measuring 20x20x40 cm.
The laying of blocks should be done using an adhesive mixture or a solution of sand and cement. A block of this material has pores in its structure, and therefore it absorbs moisture. The disadvantage can be eliminated by waterproofing the part.
Made of brick
Brick pillars are most often made in dry soil, which is not prone to horizontal movement.
Brick supports can support the weight of a two- or three-story frame building. A foundation with brick piers is an economical option. The service life of the structure is 35–50 years. Durability depends on the following factors:
- quality of materials;
- nature of the soil;
- quality of brickwork.
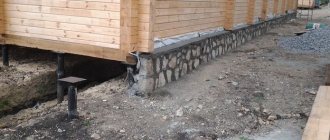
A diagram of the foundation with brick supports can be seen in the figure:
Brick supports of a columnar foundation are laid on a sand fill
The construction of a base of this type is possible using fired red ceramic bricks. If waterproofing is done correctly, a foundation made of this material can be used for several decades without loss of quality.
When choosing a brick, you need to pay attention to the frost resistance index (F). It shows how many freezing and thawing cycles the material can withstand. For example, if the value is F40, then the manufacturer guarantees that the brick can last 40 years without noticeable signs of deformation of the base.
It is allowed to use only bricks without cracks. When struck, the material should produce a ringing sound. Recommended brick brands are M150 and M200. Do not use silicate or hollow stone.
Features of a foundation with brick supporting parts:
- The structure can be erected with your own hands, without the need for heavy construction equipment.
- If the base has partially collapsed, individual parts of the brickwork can be replaced.
Rules for laying a foundation with brick supports:
- It is important to carefully select the material for masonry. The use of hollow bricks is not permitted.
- Masonry should be carried out using a solution of sand and high-strength cement. The composition must contain waterproofing additives.
- If groundwater lies close to the base of the soil, then it is necessary to arrange thorough waterproofing.
- To improve the conditions of use and strengthen the brick foundation, you will need to make the base of the base by casting concrete. You also need special backfill.
- The depth of a brick structure is calculated according to the basic rules, but the main requirement is its installation on a layer of stable, hard soil.
It is not allowed to build a brick structure:
- on loose horizontally moving soil;
- in areas with a height difference of 2 m or more.
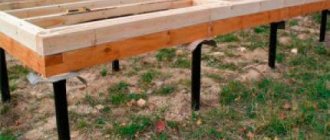
Columns should be erected in corners, at intersections of walls, under purlins and in places with increased load. The installation step of the elements is 1.5–2 m. Beams are tied on top of the supporting parts.
Bandaging the pillars with beams is necessary to impart rigidity to the structure
The cross-section of the supports is determined based on the calculated indicators of the sole area. The most commonly used are square or rectangular supports. For a one-story building, the rib size of a square pillar should be 380 mm. The sides of the rectangle should be 380 and 510 mm. The cross-section of the intermediate supporting parts is 250x380 mm. If you plan to build a two-story building, the pillars must have a cross-section of at least 510x510 mm.
Wood
The structure is arranged for bathhouses, courtyard buildings made of frames, timber or logs with low weight. The construction diagram with wooden supports can be seen in the figure:
The wooden support of a columnar foundation must have waterproofing
To make the base, oak, pine or larch wood is used. With proper antiseptic treatment, log supports made from these species can stand in the soil for several decades without damage. The most commonly used part is the lower part of the tree trunk, called the butt. The diameter of the logs must be at least 200 mm. The recommended foundation depth is as follows:
- for external walls - 800–1500 mm;
- for internal walls - more than 500 mm.
Before installation, the supports should be treated with an antiseptic. Subject to processing:
- lower end part;
- the entire part of the pillar is underground;
- part of the support 250 mm high, which is located above the soil level.
Advantages of wood construction:
- low cost;
- property of elastic deformation, which allows it not to be damaged by excessive pressure;
- buildings built on a wooden base retain heat, since wood naturally has thermal insulating characteristics.
It is recommended to prepare the pillars from November to January. Before treating with antiseptic agents, you need to clean the workpieces from the bark and mark the top and bottom parts. This is necessary for ease of installation.
Processing can be done in two ways:
- Firing to a black crust. The method allows you to protect the material from contact with the soil and the formation of rotting processes. Firing is performed using a soldering iron or over a fire. The entire part underground, as well as the part 220–250 mm high above the base of the soil, should be burned. Before processing, a layer of clay 10 mm thick must be applied to the support. The maximum charring depth is 20 mm. At the end, the support must be treated with bitumen or resin.
Firing the timber to a black crust will protect the material from rotting - Chemical method. It consists of impregnating the supports with readily available chemicals before installation. You can use: an aqueous solution, an oily antiseptic, or an antiseptic bandage.
The technology for manufacturing a base with wooden supports does not differ from the options for installing structures with pillars made of other materials.
Columnar monolithic foundation
The structure is made of a monolithic or prefabricated reinforced concrete slab. The part is most often used as an additional support that will prevent excessive soil subsidence.
The monolithic base is poured from reinforced concrete using a special mold. This could be, for example, formwork with pipes. This type of base is the most durable. It is obtained due to a homogeneous structure without seams.
The recommended depth of the base is 0.7 m. The supports are immersed to the bearing layer, and the level of freezing of the ground is not important. The monolithic type of construction is characterized by increased labor intensity of work, so the economic effect is reduced.
Work plan for the formation of a pillar with widening
1. We lower our formwork into the well until the end.
2. We will fill the pillar with concrete in two steps. First, we pour a mixture of concrete to create the heel of the bored pile. It is not worth pouring a lot at once, since it will be difficult to lift the formwork and the load on the package will be too great. Adjust the fill to your liking. To calculate the composition of concrete, we suggest using our service: Calculator for calculating the composition of concrete.
3. Raise our roofing felt glass up to the height of the widening. As a result, the poured concrete fills the package and forms the heel of our pillar. Then we press the formwork down a little.
4. We insert the reinforcement cage into the formwork and push it into the concrete solution to the depth we need.
5. We unfold the reinforcement bars along the axis to reinforce the heel of the post. How to do this and how the heel reinforcement will look, see the pictures below.
6. We bring the pillars to one level. When the concrete has set a little and the formwork has already been fixed, we mark the general level of all bored piles using a laser level or hydraulic level. As a mark on roofing felt formwork, you can use a self-tapping screw or a nail inserted into the formwork at the marked level. It is up to this mark that we will pour concrete into our piles.
7. We pour concrete to the level marks with the obligatory compaction of the solution using vibration or bayonet. For bayoneting, you can use conventional reinforcement D10-D12. In order not to damage the above-ground part of the formwork during concrete pouring, you can build a kind of removable rigid frame. A piece of metal pipe with a diameter close to our formwork is suitable for this role. You can simply build formwork from boards, which we will transfer from one pillar to another during pouring.
After pouring, the concrete must mature. To prevent it from drying out in the first days, you can pour wet sawdust on the top of the post and cover it with a bag.
If you are going to build a frame house, then to connect the pillar with the timber frame, use anchors (stud with nut) poured into the concrete of the pillar. Detailed instructions can be found in the article: Installation of an anchor to connect a pole and a timber frame.
8. We cut our formwork to the marked level.
This is what a finished columnar foundation made of bored piles will look like. © www.gvozdem.ru
Features of a columnar foundation
When constructing lightweight structures, a columnar type of foundation is often used. The process of its construction includes:
• pit marking;
• excavation;
• preparing holes for installation of supports (filling with sand and gravel cushion, compaction);
• installation of formwork;
• pouring concrete or installing supporting elements from various materials.
Depending on the type of structure, weight load, and type of soil, a variant of the supporting structure is selected. Among the most popular materials:
• wood – currently rarely used due to its fragility and low resistance to moisture and microbiological processes, wood blocks or beams are used mainly for the construction of temporary premises or utility rooms;
• metal or asbestos pipe - surfaces immersed in the ground are covered with bitumen mastic for waterproofing, and the cavity is filled with concrete (a support structure is obtained that combines permanent formwork and a pile);
• brick – for the construction of supporting elements, material that has undergone heat treatment is used (ordinary sand-lime brick will quickly collapse under the influence of wet soil);
Comments
03/24/2016 21:36:37 Mikhail
I bent the outlets of the reinforcement at the top of the pillars to connect the pillar with the grillage. The heel of the pillar was made without a package using TISE technology. He threw the concrete directly into the hole, then inserted the reinforcement cage into the concrete, pressing it into the widening. Then he put the sleeve on top and topped it up to level. The excess roofing felt was cut off from above. The post was covered with oilcloth for maturation.
Answer
03/24/2016 21:36:49 Sophia1
Good instructions. I haven't seen anything like it on the Internet. My husband and I are planning to build one myself. The son will be the assistant and that’s it. Therefore, we also decided to make a columnar foundation, since it is feasible for us to do it without outside force. I'm just afraid of making a mistake in my calculations. We are not experts in this. If there is a program, I would be grateful for the information.
Answer
03/24/2016 21:37:04 Almost a builder
You can immediately install a cast-off not only to mark the centers of the piles, but also to bring the pillars to zero. To prevent the lace from sagging, I recommend using a 1.5-2mm nylon thread. it is easy to pull, but the wear must be durable.
Answer
03/24/2016 21:37:15 advice
For the sleeve at the top, I would recommend making a template not just from a pipe, but also adding a frame made from wooden blocks. I can’t insert a photo in the comment, but there are a lot of such devices in Yandex.Images. It’s just more convenient to put on the sleeve and you can keep it horizontal.
Answer
03/24/2016 21:37:27 Mikhail
Thank you! Quite informative. I saw your soil freezing calculator. Make another calculator for calculating pillars for a house. You can also add a function for calculating reinforcement and concrete.
Answer
03/24/2016 21:37:40 Fedya77
I made a bored foundation with roofing felt without expansion for a bathhouse. Everything is fine. The tangential forces did not disturb him. Piles below freezing depth. Therefore, I still leave the extensions in question. Of course, if you do them, it definitely won’t be worse, but there is an overconsumption of concrete. Judging by the look on the TISE website, this widening with a diameter of 60 cm will take 0.5 m3 of concrete)) is it necessary?
Answer
03/24/2016 21:37:56 dimax111
For me, the stove is better. There is no need to worry about calculating pillars, bearing capacity of the soil, or calculating the house. And the technology of the stove itself is not so complicated. The advantage of the pile type is that it is cheaper. IMHO
Answer
03/24/2016 21:38:11 Dmitry
For FEDI 77, well, you shouldn’t bother with calculations, since you have half a cube of concrete on the heel of the pile! Are you probably ordering 4 cubes for the whole pile?
Answer
03/24/2016 21:38:27 Christmas tree
By the way, it would be nice to have a calculator for calculating piles and calculating materials. If anyone has good calculators, please post them. Based on the calculation of concrete per pillar. I don’t know how to calculate the base (it’s not clear what kind of figure there is). And the volume of a cylinder column is calculated by the formula: volume = PI number x radius squared x column height = 3.14*0.125sqr*1.7= 0.083m3
Answer
03/24/2016 21:38:42 Dima Siz.
Everything is well presented. On the shelves. Push. Ruberoid is good for these purposes. You just need to take into account that if the height of the pile above the ground is large, then hernias will appear on the formwork. You will be bayoneted. So you'll tear it up. Of course, it’s easier to make from pipes, but the price is higher.
Answer
03/24/2016 21:38:55 nerd
The problem of preparing concrete is not covered. After all, the strength of the pillars will depend mainly on the quality of the concrete. Although here you also need to understand that the generally accepted strength of M200 will be enough for the eyes and you can even work with concrete strength less than this value. For example, M150 will be enough. Pillars, unlike a tape or slab, have a smaller area of support on the ground. Therefore, it is necessary to calculate here taking into account the bearing capacity of the soil. Usually this is about 2 tons. A reinforced concrete pillar, of course, can withstand 10 tons. But don't judge. Make concrete of high quality and with the correct ratio of all ingredients. Do not forget that excess water in concrete significantly reduces its strength. Ratio C:P:SH 1:3:5 To achieve the required plasticity, plasticizers and superplasticizers can be used. Very popular, became S-3. Good luck with the construction!
Answer
03/24/2016 21:39:08 recommendation
I calculated concrete according to Sizov. I found a topic on the website allbeton.ru about concrete calculations. I recommend this site for those who do not prepare concrete from scratch or simply using the 1-3-5 ratio. If it’s thick, add some water and let’s stir. The quality of such concrete is very low. Well, in general, the author announced this below. Of course you can order it. If you order, make a container for draining concrete. Then at least 4 people and spread it out faster. Each time you scoop the mixture, be sure to stir it quickly. At least a little. After all, concrete sets first from above.
Answer
03/24/2016 21:39:23 YaroslavPeter
Why bend the reinforcement? I think it’s stupid to reinforce the heel. I’m even afraid to imagine what it looks like when the soil tears off the heel of a post during heaving. I understand that concrete does not work well in tension. But still, these are just lateral forces. They won't tear your mushroom, don't worry. As I understand it, people generally like to pervert) But in general, maybe I’m wrong and you’re wrong. Design and laboratory testing are required. IMHO
Answer
Types of formwork
There are several formwork options, which depend on several factors.
Taking into account the shape of the future building, the size of the planned load, and the personal wishes of the homeowner, it is possible to fill the foundation in three different shapes: circle, square, rectangle.
Round pillars
The greater the pressure, the thicker the support is poured.
Unlike a tape or monolith, the pillars cannot be made shallow - winter heaving of the soil will push them out of their place of origin. The result will be a distortion that will lead to the destruction of the house. It is recommended to do columnar filling below the level of groundwater flow.
Any formwork exists in two variations - removable and non-removable. Often, a week after pouring the solution, the formwork is completely dismantled, but if you use iron sheets or a plastic pipe, you don’t have to worry about this.
A collapsible form is often made from wood without a hardening coating for one-time use, and with processing - for repeated use of the material.
The non-dismountable design allows for faster construction - the stages of dismantling and backfilling are skipped. After concreting, the formwork remains part of the structure, further strengthening the foundation.
Any formwork must withstand the pressure from the poured mortar without bending or moving. When filling the form with concrete, it should not change, but maintain its original rigidity.
If a removable structure is being installed, fasteners must be installed to make dismantling easy, but without compromising the tensile strength.
It is unacceptable to leave unsealed joints through which the building mixture can leak.