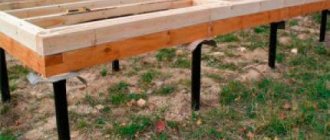
Any building must rest on a solid foundation - a foundation. Its stability and reliability largely depend on how correctly the foundation pit or trench is dug. Excavation work is perceived by many as simple and uncomplicated, but this is not entirely true. Digging the foundation requires strict adherence to the technology and design dimensions of the trench, and proper organization of work. The trench for the strip foundation can be dug manually or using an excavator.
Necessary calculations
A high-quality foundation for a house can be cast or laid only if:
- a professional project was completed based on accurate calculations;
- excavation work was carried out correctly.
To minimize the cost of excavation work, it is necessary to correctly calculate the amount of work and decide on the use of equipment or the possibility of digging the foundation manually. The need to use equipment directly depends on the size of the building, the depth of the belt, the volume of the pit, the density of the soil and the time of year.
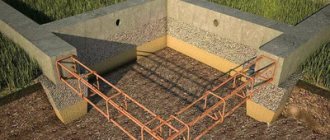
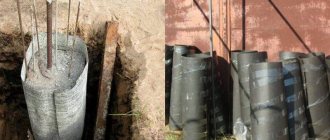
It is best if there is a project with the exact dimensions of the foundation and crushed stone-sand cushion. In any case, the foundation strip is deepened into the ground 200 mm below the freezing depth (except for shallow and slab foundations). The trench must be wider than the foundation - space is required for installing the formwork. To carry out waterproofing, you will need a place so that a person can go down into the trench - i.e. 650-700 mm from the outside of the foundation strip. When calculating the depth, add 300-350 mm - this is how much space the underlying cushion of crushed stone and sand will take up.
Having calculated the volume of soil to be removed, the density of the soil, the shape and length of the base of the walls, a decision is made on the advisability of using earthmoving equipment.
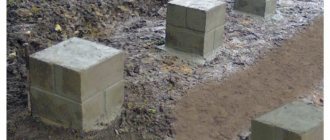
Only after calculations do they choose the method of digging the foundation
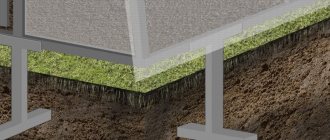
Foundation depth depending on groundwater level
All design features are described in SNiP 2.02.01-83*. In general, everything can be reduced to the following recommendations:
- When planning on rocky, sandy coarse and medium-sized soils, gravelly, coarse-clastic soils with sandy filler, the depth of the foundation does not depend on the level of groundwater.
- If there are fine or dusty sands under the base of the foundation, then if the groundwater level is located 2 meters below the freezing level of the soil, the depth of the foundation can be any. If the waters are above this mark, then the foundation must be laid below the freezing level.
- If under the base there are clays, loams, coarse soils with silty or clayey filler, then the foundation must definitely be below the freezing level (it does not depend on the groundwater level).
Table with recommended foundation depth depending on soil type and groundwater level
As you can see, the foundation level of the foundation is mainly determined by the presence of groundwater and how strongly the soil freezes in the region. It is frost heaving that causes problems with foundations (or changes in groundwater levels).
What time of year is best to dig?
The ideal time for excavation work is summer combined with dry weather. Rain will lead to wet ground, complicating digging, erosion of the walls and stagnation of water at the bottom of the trench or pit. Work can also be done in dry weather in the fall. In winter, site planning and soil sampling can only be done with the help of equipment.
In fact, construction usually begins in the spring, after the top layer of soil has thawed and dried. In any case, it makes no sense to dig a trench in late autumn and leave it in the winter - by spring the digging will have to be done again.
Performing markup
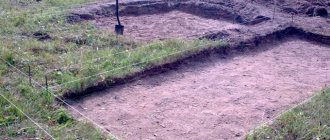
Before marking begins, trees, bushes, growth, and large debris are removed. Then the surface of the earth is leveled - it must be strictly horizontal. If the site is sloping, you will have to remove a fairly large layer of earth using machinery. Contours are marked using non-stretch cords and long steel rods or pieces of reinforcement. It is better not to use wooden stakes - they are less likely to be driven into the ground, so they are unstable and difficult to pull the cord on.
Correct marking of the foundation
First, determine the location of the tape under the longest wall. The dimensions of the foundation are marked using pegs and cords. The pegs are driven into the soil at some distance outside the dimensions of the building - then they will not tilt when digging out the soil. The distance is at least half a meter.
Then perpendicular sections of the tape are marked, then parallel ones. Right angles are set using an “Egyptian” triangle, knitted from ropes with lengths of 3, 4, 5 m. When stretched, sides 3 and 4 m long form an angle of exactly 90°. First, mark the outer walls, then the inner ones.
Corners and diagonals of the foundation
How to check the markup is correct
For a rectangular and square building, pull the cords diagonally and measure their length. The difference should be no more than 10 mm. Otherwise, the markup will have to be adjusted.
Applying markings to the area
Correct marking is the basis for the quality of trenching work. Options:
- using measuring instruments: theodolite, laser level and level.
- manual method using a cord, tape measure, pegs and a hydraulic level.
The marking forms the geometrically correct shape of the building, transfers the plan of the house to the site, and determines the position relative to the boundaries of the territory.
How to make markup yourself:
Determine your baseline. This is the position of one of the walls of houses relative to other objects (fences, buildings, site boundaries).
It is carried out at a distance of at least 3 meters at a right angle from the landmark using a metal tape measure. Drive in 2 pegs and stretch a cord between them. The length corresponds to the dimensions of the wall. Construct right angles along the contour of the future building. Use ready-made small right angles from wooden boards or the Pythagorean rule. Measure the length of the perpendicular wall and place a peg, stretch the cord.
Checking the angle: on the resulting lines from the cord, separate 3 m on one side and 4 m on the other. Drive control pegs, tie a 5 m long cord to one of them. Pull the other end diagonally to the second peg, the length of the cord should match. If you get a right triangle with sides 3 and 4 m, a diagonal of 5 m, then everything is correct. If not, you need to adjust the angle until it matches. Construct the remaining corners according to the same scheme, be sure to check.
Trench dimensions
The dimensions of the trench and pit directly depend on the design dimensions of the foundation. The dimensions of the trench will be larger in any case. To construct the foundation, formwork panels and the ability to assemble and dismantle them are required; space so that waterproofing can be done. For the installation of formwork panels, 200-300 mm on both sides of the foundation markings will be enough. To install waterproofing, the width of the trench is increased by 600-700 mm from the outside.
When digging a trench for a strip foundation, its depth is increased by 350 mm - to install a cushion of crushed stone and sand. If the soil under the foundation is loose, then the walls of the trench will have to be made with a slight slope. In light, dry soils, the deviation from the vertical can be up to a quarter of the depth of the hole. In loose sandy soils - up to half the height (i.e. up to 30°).
Pit dimensions
If everything is very clear with the shape of the pit: for a strip pit you need to dig a trench, for a slab pit you need to dig a pit, then with the dimensions the situation is much more serious.
Incorrect determination of values can lead to freezing of the foundation or filling of the space under the floor with groundwater.
Depth
The pit must be at least 0.4 m.
The development of a pit for the foundation must be carried out by accurately determining the level of groundwater and the depth of soil freezing in the area. According to the second requirement, it is necessary to make a hole of at least 0.4 m.
The first parameter, on the contrary, limits the depth, since installing foundations on watery soil will require the construction of high-quality waterproofing, which will significantly increase the cost of the work.
Therefore, the pit level should be located between these two parameters.
The lower part of the foundation must be located at a distance of at least 0.5 m from the groundwater level.
| Estimated freezing depth of non-heaving soil, m | Estimated freezing depth of slightly heaving soil of solid and semi-solid consistency, m | Foundation depth, m |
| Up to 2 | Up to 1 | 0,5 |
| Until 3 | Up to 1.5 | 0,75 |
| More than 3 | From 1.5 to 2.5 | 1 |
Lenght and width
The size of the foundation should be 0.3 - 0.4 m larger than the facade of the house.
Here the situation is somewhat simpler: the length and width of the trench for the strip foundation is guided by the architectural plan of the house. It will run along the entire perimeter of the load-bearing walls of the future building. The values should exceed the dimensions of the facade by 0.3 - 0.4 m, approximately 0.15 - 0.2 m on each side.
It should be taken into account that such values relate only to the base of the foundation; the upper part, located at the level of the soil surface, is made equal to the dimensions equal to the installation depth of the base. These parameters make it possible to create a 45-degree slope of the walls, which protects the soil from crumbling.
As an example, consider the following situation. If the foundation strip is 0.4 m, the width of the trench for the strip base must be at least 1 m. This value provides for the installation of formwork and a trapezoidal foundation.
If the depth of the trench for a strip foundation is more than 0.5 m, the requirement can be ignored and a hole can be made with straight walls located at right angles.
Digging using special equipment
Excavation work is best done using special equipment - an excavator. Especially if they are digging not only a trench for a strip foundation, but also a large hole for the ground floor or basement. With the help of technology, digging a trench for the foundation with an excavator is done as quickly and easily as possible. It is convenient to use an excavator to load soil into a vehicle when removing it.
The excavator will quickly dig a trench for the foundation, all that remains is to straighten the walls
Disadvantages of this method:
- uneven walls of a trench or pit;
- a lot of space is required to move, work, turn the excavator bucket and throw out soil;
- the lower infertile layer of soil is mixed with the upper fertile one;
- neighboring buildings and trees may be damaged;
- The work of special equipment is more expensive than manual digging.
It is important to order equipment with a bucket size so that its width approximately matches the width of the trench.
How to dig?
If the depth of the trench exceeds 1 m, it is recommended to make beveled walls to avoid soil shedding.
Slope width:
- equal to the depth for sandy soil;
- ½ depth when clayey.
Leave room for the soil that will be dug out of the trench so that it can be easily removed afterwards. Or use the soil to lay mounds.
The method is selected based on the scale of excavation work, taking into account the required depth. Options:
- Mechanized. Used for developing buried foundations. The procedure involves earthmoving equipment. For small private houses and summer cottages, an excavator with a backhoe or a backhoe loader is suitable. Afterwards it is adjusted manually using a shovel.
- Manual. Suitable for small workloads and shallow foundations.
Pay attention to the condition of the soil. In some cases, it will be necessary to moisten the area if the surface is loose, or loosen it if it is compacted. For frozen soil, it is more reasonable to use equipment followed by manual modification.
This article will tell you how to dig a trench with an excavator, and this article by hand. You can find out how much it costs to dig a trench for a foundation here.
How to dig a trench by hand
This method is used in the following cases:
- they are building a small building - a garage, a summer kitchen, a bathhouse, an outbuilding;
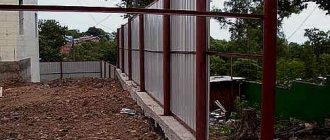
- when installing a shallow foundation - for a terrace, gazebo, fence, etc.;
- It is impossible to drive an excavator onto the site due to the size of the site. For example, they often manually dig a hole for a foundation in a narrow area or if the foundation is located close to a neighbor’s property;
- they do not want to damage trees, a well, an existing building, etc.;
- There is not enough space for an excavator to unload soil away from the construction site.
When digging the foundation manually, the walls will be neater and smoother
Advantages of manual excavation with your own hands:
- neat walls and bottom of the trench;
- exact observance of trench dimensions;
- the ability to separate the fertile layer from the rocky and loamy layer;
- the ability to dig a hole in the most inconvenient place.
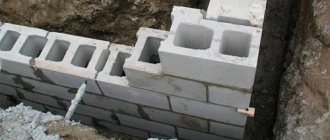
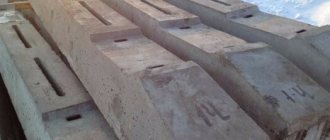
Foundation trench width
The trench itself will always be wider than the foundation blocks that will fall into it. In turn, the foundation should be slightly wider than the main planned walls.
In practice, the width is calculated based on the dimensions of the structure, including formwork and supports plus 0.4 m (0.2 outside and 0.2 m inside the building).
As a rule, a trench for a private house is manually dug with a width of 0.7-0.8 m. With these dimensions, it is convenient to remove soil and move freely when carrying out work.
When digging a foundation manually, the bottom layer of soil must be removed as horizontally as possible, without disturbing the natural density of the soil.
The crumbled soil should not be trampled down, but must be removed. This is important because even compacted earth is much inferior to the natural density of the soil.
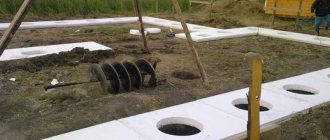
Digging a pit for a slab foundation
The slab foundation is shallow. The hole for its device is dug shallow. Dimensions – slightly larger than the dimensions of the foundation according to the project. 150-200 mm on all sides will be enough to install formwork and perform waterproofing.
Before digging a foundation pit, the top layer of soil 300 mm thick is removed. Then the marking is done. Excavation begins from the center, moving towards the edges. The soil is selected layer by layer, in “steps” of 400-500-600 mm (when working with an excavator). When working manually, the steps can be made smaller. The depth of the pit is determined according to the project.
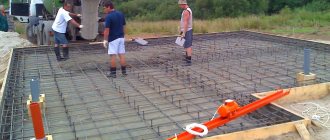
Preparatory work
Entrust specialists to calculate the width and depth of the foundation
As a rule, specialists calculate the width and depth of the foundation after conducting the necessary soil studies. Let's say the dimensions of the trench are known and it is decided to dig the trench manually.
It is necessary to mark the area. Please note that the law prohibits building a house at a distance closer than 1 m to the boundary line. It is best to contact your local administration and clarify this standard. In some areas, due to the specifics of the soil, this norm may differ.