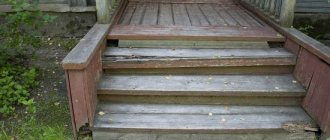
Required tools and materials
Sledgehammer Crushed stone Channel Roofing felt Wire Sand Sand concrete Board Gravel Reinforcement Level Welding tool Shovel Drills Show all
The foundation for the porch of a residential building is constructed using different methods. The optimal one should be selected taking into account financial capabilities, design requirements and geometric parameters of the entrance group.
- 2 Floating slab - ideal for problem soils
- 3 Monolithic foundation - arrangement technology
- 4 Columnar foundation - a simple solution
- 5 Floating strip base - durable and inexpensive
- 6 A few words about binding – to do it or not?
Calculation of the depth of a columnar foundation
Before starting work, it is important to find out the optimal installation depth for the porch base. To do this, first determine the depth of soil freezing and the location of groundwater. If these parameters are not taken into account, cracks may appear at the base of the porch during soil freezing or erosion.
It is also worth considering the slope of the site. In some cases, the difference in the installation depth of pillars can be more than 30 cm. In such situations, the greatest depth is determined and it is taken as the basis. After this, it is necessary to determine the number of foundation pillars.
The pillars are located at key points and in places where the base bears a large load. The distance between supports should be from 1.5 to 2.5 meters. The greater the load on the base, the smaller the distance should be. The height of the pillars should not be less than 30 cm.
Types of bases for the porch of a private house
The main task of any foundation is to effectively disperse the loads from the roof and walls of the building. Without a reliable foundation, it is impossible to build a quality structure. The porch of the house is no exception. Structurally it happens:
- With a canopy that does not come into contact with the wall of the house, mounted on vertical posts.
- With a canopy on posts in contact with the load-bearing wall.
- In the form of an ordinary platform on which steps are mounted.
Porch of a private house with a canopy
Each of these types of porch has its own base. Its choice, in addition, depends on the size of the entrance group and the type of soil. You can make a foundation for the porch in the form of: a floating shallow slab; monolithic slab; strip floating structure. You are also allowed to make a columnar base with your own hands, which is recommended for buildings with small dimensions.
General information
So, the foundation for the stated goals can be done in several ways. Moreover, the choice depends on the porch itself, its size, the materials from which it is made and the design features.
Conventionally, all options for constructing a porch can be divided into three types:
| Regular porch | It is a no-frills platform with steps. |
| With vertical posts | In addition to the steps, the structure has a canopy that is connected to the load-bearing wall of the building. |
| Independent porch | The canopy is completely located on the posts, so it does not come into contact with the wall of the building. |
Each of these options requires a special approach to the construction of the base.
Massive porch
Floating slab - ideal for problem soils
We recommend installing this type of foundation for a porch in situations where the soil on the site is characterized by increased instability. You can make a floating slab with your own hands like this:
- Carry out markings - mark the corner points of the future structure with wooden stakes and stretch a nylon rope between them.
- Remove 0.4–0.5 m of soil from the area allocated for construction. The depth of the base should be greater, the more moist and heaving the soil you are processing.
- Compact the walls of the pit, spill water on the soil, level it and tamp it.
- Place a geotextile fabric at the bottom of the hole.
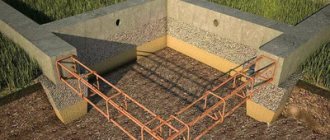
- Fill the pit with construction sand. Perform the procedure gradually, pour 4–5 cm layers of material onto the bottom of the pit, pour water over them and tamp them down. It is optimal to compact sand layers using a vibrating plate. If one is not available, tamping should be done with a large-section block (the end of such a product). The total height of the sand cushion is up to 30 cm (minimum 15 cm).
- A reinforcing mesh is placed on the sand.
Porch foundation on a floating slab
Now proceed directly to pouring the foundation for the porch with a concrete mixture. This procedure must be done immediately; no interruptions are allowed in the work. Then you are guaranteed to receive a reliable foundation for the porch of the house, built with your own hands. After the concrete mixture has hardened, it is advisable to apply waterproofing to the surface of the slab. Typically, such an event is carried out in situations where the porch is built as a separate structure from the house. The waterproofing agent is not used if you subsequently plan to pour steps along the slab.
DIY brick porch
Brickwork is characterized by stability/rigidity, frost resistance and ease of execution. That is why it will be easy for even a novice builder to build a brick porch with his own hands. Before you begin, you need to prepare the necessary materials :
- crushed stone, sand and cement;
- fittings (metal rods) and waterproofing material;
- porcelain stoneware tiles for finishing;
- bricks - experts recommend giving preference to the ceramic type of this material, but even used ones will do.
It is advisable to immediately prepare the instrument:
- building level;
- shovel and trough for mixing cement mortar (or concrete mixer);
- grinder with diamond blade;
- rubber mallet - you will need it to work with tiles;
- two types of spatula - simple and serrated.
Foundation for a brick porch
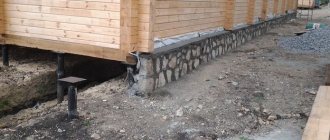
Before you start laying bricks, you need to build a foundation. And this stage is perhaps the most important in the entire process - the foundation is a protective structure that prevents moisture from entering both the brickwork and directly into the house. Let us clarify right away: ideally, the depth of the foundation for a brick porch should be the same as the depth of the foundation of the house. The fact is that any structure has the ability to “settle” and if the foundation depth is different, the house and porch will undergo this process disproportionately. The result will be cracks in the brickwork.
If it is not possible to deepen the foundation to a distance identical to the foundation of the house, then it will be enough to dig a trench 20 cm deep, but in no case less! Do not forget to first mark the foundation using pegs and stretched ropes, taking into account the recommended width of the porch - 30-60 cm more than the width of the front door.
Well, then everything is simple:
- A layer of sand and a layer of crushed stone (20 cm each) are placed in the excavated recess under the foundation, then a frame of reinforcement (metal rods) is installed, which are more practical to fasten together with wire.
- A solution is prepared from 1 part cement (it is better to take the M-400 brand), 2 parts sand and 4 parts crushed stone.
- The finished cement mortar is poured into the recess under the foundation, hiding the reinforcement cage under its volume.
- The resulting “creation” is left alone for at least a week - this is the drying time.
Masonry of a brick porch
Before you start laying steps, be sure to lay waterproofing - this can be roofing felt folded in half (the most economical option). And then we begin to lay the first step - both it and all subsequent ones should have a width of 30 cm and a height of 15 cm (in accordance with building regulations). The upper platform should be at least 100 cm deep - it is at this size that a person will feel comfortable opening/closing the front door.
The principle of brick laying is probably known to everyone: each brick is smeared with cement mortar on the bottom and one side using a spatula, and then installed and firmly pressed against the already installed bricks.
Please note: if you decide to use hollow bricks to build a porch with your own hands, then you can forget about saving. The fact is that this type of basic building material will require much more cement mortar.
After the bricklaying is completed, you need to let the entire structure dry completely. As a rule, this will take only 24 hours, but experienced builders advise not to rush - it’s better to let 2 days pass. And only after the brickwork has completely dried can you begin finishing work.
As a rule, this type of porch is finished with porcelain tiles - they allow you to hide some inaccuracies/irregularities, have a wide range of colors and images, and are easy to use. Just keep one thing in mind: when finishing a brick porch, choose tiles designed for laying outdoors. Otherwise, the result will be a very unpleasant effect - in rainy and frosty weather, the porch will turn into an ice slide.
A do-it-yourself porch is a creative process, because you will need to choose not only the material from which the steps will be built. You will need to study a lot of photo examples to decide on the shape and size of the porch. Even a brick one can be decorated with metal railings with forged fragments, and a wooden one - with skillful carvings. But the decor of the porch will come later, it is important to complete the main work with an A+ - such a design can be safely demonstrated to friends and relatives.
( 85 votes, average: 4.62 out of 5)
Finishing the basement of a private house: materials, options, methods, which is better
Do-it-yourself attic arrangement
Related Posts
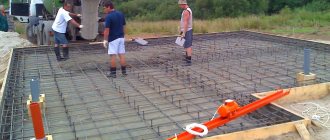
Monolithic foundation - arrangement technology
This foundation for the porch is built on soils that are normal in their characteristics. If you decide to do just that, adhere to the following work flow diagram:
- Mark out the pit, dig it out and arrange it according to the method described above.
- After compacting the soil in the hole, roofing felt or other waterproofing material should be placed at the bottom. Its sheets are laid with a 10–20 cm overlap.
- Pour 5–7 cm of sand and compact the resulting layer. Then pour 10–15 cm of gravel or crushed stone and compact it again. Experts recommend additionally pouring liquid concrete over this cake to improve the quality of waterproofing of the base.
After this, the work is done a little differently. If the soil is highly mobile, you need to make your own formwork. You shouldn't have any problems. Most often, boards are used for formwork, but it can be built using any other lumber, from OSB boards to sheets of moisture-resistant plywood. It is advisable to achieve maximum tightness of the formwork walls. Just cover them with plastic film or pieces of roofing felt.
Foundation formwork
If the soil on the site does not crumble, formwork may not be done. It will be enough to lay a reinforcing mesh at the bottom of the pit and fill the base. Concrete is fed into the pit in separate layers, each of which is carefully compacted (use a metal rod for these purposes). Compaction eliminates the risk of cavities in the porch foundation.
A self-filled slab should be periodically shed with plain water while it dries. This will prevent it from drying out. You should also cover the foundation under the porch at night with polyethylene film or a tarpaulin. The constructed base will dry completely 22–30 days after pouring. But the formwork, if you made it, can be dismantled in 3-4 days.
Construction of a foundation for a metal porch
A metal porch is another common solution for a country house. It attracts owners with its light weight, durability and external beauty: many people like forged metal, and such a porch will become a full-fledged decorative element. How to make a foundation for a porch?
For a metal porch, several types of foundation are used: it can be a monolithic base in the form of a concrete slab, or metal support pillars installed in concrete-filled pits. In addition, there is an option when the porch supports and the bottom step are installed on concrete pads.
The choice depends on the weight of the structure: to reduce it, metal steps are often replaced with wooden steps attached to a metal frame.
To prepare a standard foundation, a pit is dug according to the dimensions reflected in the drawings.
A layer of sand is poured into it, reinforcement is laid, and after installing the formwork, concrete is poured.
The depth of such a foundation should be below the depth of soil freezing. The porch frame is installed on a concrete base; it can withstand a lot of weight.
For the pile foundation, holes are prepared using a drill, into which support pillars made of profile pipes are installed. The piles are poured with concrete, and after the solution has hardened, the frame of the support platform can be attached to them. A completely metal porch is rarely made.
Most often, plank flooring or other materials are combined with a frame made of corners. Steps installed on stringers can also be made of wood, which must be treated with an antiseptic and painted with compounds for outdoor use. The porch will gain durability, and, if necessary, worn-out elements can be replaced.
Building a porch yourself is not as difficult as it might seem. During construction, many factors have to be taken into account: the location and size of the porch, the foundation of the house, the soil, the material of the porch and much more. Accurate calculations and drawings will be required to make such an extension reliable and durable.
Pavel Smirnov
Author of publications on 1Drevo.ru with topics: Roof windows | Material for a wooden house | Imitation timber | Double-circuit gas boiler| Geothermal heating | Log house | Log house | Decorating a wooden house | Solid or laminated timber | Log house made of laminated veneer lumber | Gazebo made of timber | Siding | Sealant and others.
Collections of publications on topics:
Concrete foundation for a house Pile strip foundation
Was this publication useful to you?
Bookmark it on social networks!
Total score: 0Votes: 0
How to properly pour a foundation for a veranda: work order
How to properly attach a foundation to an old one: step-by-step instructions
We recommend! — Encyclopedia Wooden Houses — NEW
You can find out detailed and expanded information on the topic of the article from the book “Wooden Houses,” which reflects all stages of building a house, from laying the foundation to installing the roof. Book price = 77 rubles.
You may also be interested in other BOOKS on building houses from wood with your own hands.
We recommend other posts on this topic:
Features of pouring a strip foundation for a timber house
Pile foundation for a timber house: construction technology
Construction of a monolithic strip foundation
Stages of construction of a basement under a wooden house
How to make a foundation for an extension to a wooden house
How to build a foundation for a 2-story house made of timber
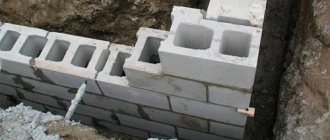
Columnar foundation - a simple solution
A similar foundation for the porch of a wooden house can be installed without any special labor costs. It does not require large financial resources; you can do it yourself quite quickly. But there is one limitation. A columnar foundation is built exclusively for a modest-sized porch.
Supports for such a foundation are mounted in the corners of the future building. Usually they put two pillars near the house and the same number opposite. It is advisable to make the supporting elements with a slight expansion. It is not easy to arrange such holes with your own hands. Usually they are made with a special TISE drill. With this device, the required configuration holes for pillars are drilled in a couple of minutes.
Columnar foundation supports
Supporting elements can be made independently from wood or from asbestos-cement pipe products. It’s even easier to purchase a ready-made channel of suitable sizes. How to make a columnar base for the porch of a house? According to this scheme:
- Level the area allocated for the construction of the foundation. Remove all debris and plant roots from the ground and mark.
- Make holes in the ground (with a drill or with your own hands using a shovel) and install supports in them. Drive channels or wooden posts with a sledgehammer. You can make formwork; reinforcing bars should be placed in it (their diameter is about 1.3 cm).
- Carefully align the pillars in a vertical position, then secure the mounted support elements with spacers.
- Fill the holes with sand and gravel. The work is done in layers. Each layer is compacted (it is recommended to spray the materials with water).
If you want, you can do the concreting of the pillars yourself so that the columnar foundation is guaranteed to be reliable. When pouring, strictly control the verticality of the supports with a level.
Second option:
We are attaching a porch to the house separately. We dig a hole in the place where the porch will stand:
It is best to dig a hole to the depth of the foundation of the house. In this case, they dug a hole 800 mm deep, since groundwater is far away.
During the construction of the basement, in the place where the porch will be, five reinforcement pins were released.
We knit a mesh from reinforcement. In this case, ribbed reinforcement with a diameter of 12 mm was used:
Fill the mesh with concrete. The composition of the concrete is one bucket of grade 400 cement, two buckets of sand and 4 – 5 buckets of crushed stone.
We lay backfill bricks on top of the concrete using mortar:
The second very important point is the waterproofing of the porch; unfortunately, it is done very rarely. Waterproofing is necessary to cut off moisture. Waterproofing is done very simply.
We level the backing masonry with a solution:
We do horizontal and vertical waterproofing. Roll out regular aquaizol (thin, without mesh inside) into one layer. You can replace it with two layers of roofing material:
Vertical waterproofing in this case is necessary, since the base to which the porch adjoins does not have waterproofing. Therefore, we cut off the porch from the base with aquaizol (or roofing felt).
We assemble the first step from face brick. In this case, a bassoon was used (not the best option). You can also use higher quality facing bricks. Or completely assemble the steps from backfill bricks and cover them with tiles.
Then we lay the backing brick inside the steps. Next, we assemble the next step from face brick and again lay the backing brick inside the step. Ceramic granite tiles will be laid on top of these steps.
The waterproofing must be laid slightly below the front covering (so that the aquaizol does not stick out).
In this case, the blind area near the porch will be covered with FEM. And the waterproofing will be slightly below the front surface of the FEM.
Some developers think that if they make a porch entirely of concrete and line it with tiles, then such a porch will not be afraid of moisture and destruction from frost, but this is not so. As you already understand, without waterproofing, a porch made of any materials will not last long (without visible damage).
Often a porch is built from used red backfill bricks. Some developers believe that any used red brick is a good brand. But it is not always the case.
When they dismantle a house for bricks, they break the outer walls, partitions, and basement and put the bricks in one pile (mix the bricks). According to the standards, red bricks of different grades are used for the plinth and internal partitions.
For example, for internal partitions you can use red brick of the lowest grade (to save money), but in no case should it be laid in the ground or in a more aggressive environment (it will fall apart). Therefore, red brick differs in its quality characteristics.
For the porch it is better to use red backfill brick grade 150.
There are a huge number of good building materials for building a porch. Therefore, choose local materials for exterior work so that waterproofing can be done conveniently.
The best option is:
– Step length – 300 mm.
– Step height (tread) – 150 mm (two rows of bricks).
Most often we build a porch with three steps. The fewer steps, the faster you get into the house. In some countries with heavy snowfall, it is better to make the base higher and, accordingly, there will be more steps. In southern countries, low plinths with a minimum number of steps are more often made.
Some developers deliberately make the base higher to make the house look better. When one house stands on a high plinth and the other on a low one, the first one certainly looks more impressive.
The higher the base, the more steps there will be and, accordingly, the greater the financial costs.
We almost always build a canopy over the porch. It protects the porch in winter from precipitation and icing of the steps. In summer, the canopy protects the porch from excessive soaking. A canopy can either detract from the appearance of your home or enhance it.
It is better to cladding the steps of the porch (and landing), for example with tiles, with a slight slope. If slanting rain falls on the tiles (on the steps), then a slight slope of the tiles (towards the lower step) will allow the water to run down. Your porch cover will always remain dry.
A very common mistake when building a porch is a porch with a flower bed without waterproofing. Almost all porches with flower beds are not built correctly! Most often, a porch with a flower bed is built in front of the entrance to a public space.
Floating strip base - durable and inexpensive
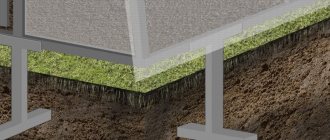
Compared to a slab foundation, a strip structure has several advantages. Firstly, all work on its arrangement can be easily completed by one person. Secondly, the cost of such an event is minimal. In addition, strip foundations can be built on complex terrain. It is also important that such foundations are not afraid of seasonal soil heaving. As a rule, strip foundations are laid on sandy soils. It is also recommended for loam and clay areas.
Ribbon structure
Fill the strip base for the porch of the house with your own hands like this:
- Mark the structure. It is necessary to draw the outer and inner contours. The distance between them corresponds to the width of the concrete strip (usually this distance is taken at 0.3 m).
- Dig a fairly deep pit (0.6–0.7 m) and lay roofing material on its bottom.
- Pour sand onto the waterproofing (a layer of about 10 cm), compact it, place crushed stone on top (compact it again). The resulting pillow should be watered for several days so that it settles well.
Types of bases for the porch of a house
When choosing a support for the porch of a house, it is important to take into account the design features of the building, its weight and the condition of the soil at the construction site. Depending on the totality of these indicators, three main types of foundations for the porch are used:
Types of foundations for porches
- Floating base.
- Monolithic slab. Such a foundation can be equipped for heavy volumetric structures. In particular, a monolithic slab is ideal for constructing a concrete or brick porch with more than three steps. A monolithic base is a reliable and durable option, but its cost is several times higher than other options.
- Tape base. A foundation in the form of a monolithic strip is also a durable option that can withstand heavy loads. When connected to the base of the main building, a single, strong structure is formed. The main advantage of a strip foundation is its low cost.
- Support on pillars. For the construction of lightweight structures, you can use a columnar base. It is based on pillars made of concrete blocks or monolithic concrete.
Do-it-yourself strip base for a porch
The simplest and most affordable option is to build a porch on a strip foundation. In order for the entrance to the house to last for a long time, it is necessary to carry out work on arranging the foundation in a certain sequence:
- First you need to prepare the surface in the area reserved for the porch. To do this, remove debris, stones and excess vegetation. The top layer of soil is removed and the cleared area is leveled.
- Now you need to mark the boundaries of the trench. Wooden or metal pegs are installed along the outer perimeter of the future foundation, and a cord is pulled between them. Similar actions are performed on the inside of the base. This will allow you to pour a level base for the future porch. When marking the trench, you should take into account the thickness of the formwork and drainage layer.
- After thoroughly preparing the surface, you can begin to dig a trench. Its width lies within the established markings, and its depth should be 20 cm greater than the norm. This is necessary for arranging drainage in the trench.
- The drainage pad is made of crushed stone, the layer thickness of which must be at least 10 cm, and a layer of sand 5 cm. Each layer is leveled and thoroughly compacted.
- Now the formwork for the strip foundation is being installed. Most often it is made from wooden boards, since this is the most accessible and less expensive material. To support the formwork boards, pegs are installed along the edges of the trench, maintaining a distance of 0.5 meters between them.
- If you plan to build a large porch using heavy building materials, then it is recommended to reinforce the foundation for such a structure. To do this, the drainage layer is covered with roofing felt or other waterproofing material. Next, a concrete solution is poured in a layer of about 15 cm, which, after hardening, will act as a support for the reinforcement frame.
- It is best to pour the foundation under the porch in one step. In this case, the layer thickness must be at least 20 cm. A deep vibrator is used to compact the concrete mass. This will prevent the formation of voids in the solution, leading to the destruction of the base.
- Construction of the main structure begins after the foundation has completely dried. To acquire the required strength, concrete must stand for at least a month.
Columnar base for porch
Another simple and economical option is a columnar base for a porch. It is performed using the following technology:
- The area is cleaned, leveled using a building level and thoroughly compacted.
- Then mark the boundaries of the future foundation using wooden pegs and a cord.
- Next, they dig holes or drill holes for the posts. They should be located on the same line with a distance of 0.4 meters. You need to dig holes to a depth of 0.5-0.8 meters.
- When making a base from wooden posts, it is necessary to treat the material with special solutions that will prevent the base from rotting.
- When installing pillars, it is important to follow the rule: they must rise above the surface by at least 20 cm. During work, the formation of distortions should be avoided.
- For greater strength, the installed columns are filled with thick concrete mortar.
- It is recommended to install poles along the entire perimeter of the marked area. The strength of the future structure can be increased by installing additional supports in the middle of the allocated area.
- Now you need to perform a kind of formwork. To do this, boards are nailed to the inside and outside of the pillars.
- The resulting wooden trench is covered with a 5 cm layer of sand and compacted well. Then a concrete mixture is poured into which small pieces of iron reinforcement are added.
- Further work on the construction of the porch can be carried out after the concrete solution has completely hardened.
- If metal pipes are used as supports, then additional concreting of such a base is carried out inside each element.
Do-it-yourself columnar foundation for a porch step-by-step instructions
Home / Building a house / Foundation / Do-it-yourself columnar foundation for a porch step-by-step instructions
Every owner wants his home to look neat and aesthetically pleasing. To achieve the desired result, you should take care of the correct arrangement and design of each element of the building, including the porch. There are many ways to make the entrance group presentable, but first you need to decide on the type of basis. The foundation for a porch to a house can be built using several methods, each of which is designed for a specific case. The condition of the entrance group can say a lot about the owner of the house. For example, a well-made porch characterizes the owner as a good craftsman with excellent taste, while a sloppy entrance indicates the inattention and dishonesty of the homeowner. Today, the second type of owner of private houses can be found rarely, since the majority tries to take a responsible approach to their work.
If you have decided to start arranging a porch, the first thing you need to do is choose its type. There are several options:
- Standard entrance group, which is a platform with steps;
- Porch with posts installed in a vertical position. A canopy is attached to the racks, which is connected to the load-bearing wall;
- An entrance area with a canopy, placed exclusively on posts and not connected to the wall of the building.
When choosing the type of porch, you should take into account not only its appearance, but also the subtleties of construction. Each option corresponds to a certain type of foundation, which is not always possible to produce on a specific site.
So, what kind of foundation is needed for a porch to a house? Most often, the following is performed for the entrance group:
- Slab base;
- Tape design;
- Columnar base.
The choice of base option is determined by many factors, the main ones being the qualitative characteristics of the soil in the building area, the size and weight of the designed structure.
The slab base is a solid platform made of reinforced concrete that runs under the entire surface of the structure. The base has a number of advantages, including particular stability and durability.
If the site is dominated by weak soil, prone to seasonal heaving, and the territory itself is distinguished by high groundwater, then a reinforced concrete structure is an ideal option. It is not afraid of earth movements, as it moves with the rock without causing damage to the structure. For this property, the basis was called “floating slab”.
The main disadvantage of the foundation is the consumption of materials, so developers are in no hurry to build a concrete foundation for the porch. In fact, this minus can be smoothed out by the depth of the slab. In most cases, the base for the porch does not require significant deepening: it is quite possible to get by with a shallowly deepened option.
The manufacturing technology of this type of base is quite simple. The work is carried out in several stages:
- The territory for construction is marked out: pegs are driven into the corners of the future foundation, and a string is stretched between them;
- According to the markings, a pit with a depth of 0.3-0.5 m is dug. The level of depth is determined by the qualities of the soil: the more prone it is to heaving, the higher the groundwater level, the deeper the pit should be;
- The walls and bottom of the pit are leveled and compacted;
- Waterproofing is laid at the bottom of the recess. The most commonly used roofing material is laid with an overlap of 10 cm;
- A sand cushion 5-10 cm thick is laid on the roofing material. The sand is moistened and compacted;
- After the sand has dried, crushed stone is poured in (layer thickness - 10-15 cm), which is thoroughly compacted;
- When making the foundation for a porch with your own hands, craftsmen often water the backfill with a concrete mixture to increase the waterproofing properties of the structure. In fact, this step is optional;
- If the walls of the pit crumble, formwork is made. The frame is usually made of boards, but other materials (for example, plywood) can be used. The finished formwork is covered with waterproofing;
- The reinforcing mesh is made from metal rods. The rods are connected with binding wire. When the skeleton is ready, it is installed in the foundation pit;
- Concrete is being laid. The solution must be poured at once, otherwise there is a risk of the formation of cold seams, which adversely affect the condition of the finished base;
- To avoid the formation of air gaps in the thickness of the concrete, the poured mixture is pierced in several places with a metal rod.