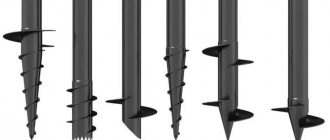
Types of screw piles, types and purpose
Before you screw in the screw piles yourself, you need to choose the right support column design. It depends on the size and direction of the load, the type of soil into which it will be screwed and the depth of soil freezing. The design of the blades and cutting edges is selected according to soil density and screw-in depth. A rough choice can be made based on the technical characteristics of screw piles:
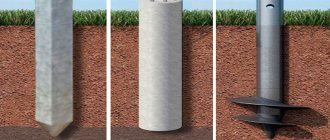
- With an open tip - a hollow pipe with an oblique cut at the end. Due to its similarity to an injection needle, it is called a syringe needle. During screwing, the cut soil rises inside the pipe. Installed on any soil under light structures.
The soil rises up through a hollow pipe. The blade is an additional element that strengthens the fastening of the pile in light and loose soils Source fundament-pro.ru
- For peaty, soft clay and sandy soils, products with a closed tip are suitable. They are characterized by high load-bearing capacity.
- Single-lobed - one helical petal protrudes spirally around the stem. Used on all soils, with the exception of hard rocks. Installed under lightweight structures.
- Two-bladed ones have a symmetrical load when twisted. They are used in construction on unstable soils. Before you screw in screw piles yourself, you must ensure that they are fixed strictly vertically.
- Multi-turn designs are similar to large screws without a head. Geoscrews have increased strength and are able to be screwed into dense soil and permafrost.
Sharp tips and durable blades 4 mm thick will help you quickly screw the support to the desired depth. Source yandex.net
The load on the pile determines its diameter. It is not easy to make calculations yourself, determining how to install screw piles for the foundation with your own hands, what size to use. To do this, it is necessary to carry out complex calculations taking into account the total vertical load on the foundation, wind, lateral influences and the total pressure on each rack. It’s easier to navigate by type of structure:
- Diameter 108 mm – foundation of a cottage up to 2 floors, extensions. Such piles require a lot of effort to install. Usually special equipment is used. If it is not possible to adjust the vehicle to each support installation point, the work is performed using mobile devices.
Particularly strong piles with screw protrusions along the entire length and non-removable heads for easy screwing. Placed under houses and permanent buildings on hard and rocky soils Source stroykarecept.ru
- 89 mm in diameter - bulky fences, light houses, cottages, verandas, service buildings. The loads are large, but with the help of a lever system it is possible to install the piles manually.
- Piles 76 mm thick are placed under fences made of corrugated sheets, wood, temporary buildings, and cabins.
- The chain-link mesh weighs little and screw piles with a diameter of 57 mm are suitable for it. The job can easily be done by one person.
Manufacturers make screw supports in standard sizes and lengths, so it’s easy to know what types of parts you need to purchase and how to tighten the piles. The length of the support is calculated by the sum of the dimensions: the required height of the pile above the ground + depth of immersion in the ground.
Support immersion methods
Screwing in piles with a sharp tip and blades
Before work, ensure the safety of nearby buildings and inspect them. Such research influences the choice of method for driving metal piles, concrete racks, and casing pipes. Sometimes existing foundations are strengthened and the soil is strengthened. The piles are delivered to the site, already prepared for installation.
The following deepening methods are used:
- hitting, hitting;
- concreting casing shells;
- vibration immersion;
- pressing;
- screw way.
The effectiveness of immersion depends on the correct choice of rack material and soil.
Shock
Translational energy is transferred to the pile, while the stand is buried in the ground, and part of the soil is forced out. The work is carried out using self-propelled or rail-mounted impact units. The pile is held in a vertical position by pile drivers with arrows.
The initial dive is slow; the tilt of the rod is controlled. A cap is placed on the top of the element so that the impact force does not destroy the body of the pile. The rack is buried until the design mark is reached. The impact method is used on different types of soil, and the work goes quickly. The rods compact the soil around them at a distance of up to two meters.
Bored
The process of installing bored piles
The shells are concreted with compounds of grade M 100 and higher, and at the same time longitudinal steel rods are installed inside the structure. The pile is ready for loading after 28 days, when the reinforced concrete reaches the specified strength.
Reusable sectional pipes are used. The sections are lowered into the well and removed after filling the next pass. The sections are fastened together by welding or technological connections are made. Wells are drilled using impact, rotation, vibration, and jacks. During concreting, the mixture is continuously compacted.
Vibrating
Vibrating units reduce the force of lateral friction and soil resistance, so less stress is required. Vibration additionally compacts the soil at a distance of 1.5 - 3.0 sections of the pile and increases the load-bearing properties of the soil.
Vibratory drivers transmit automatic vibrations to the stand through the head, and the piles are driven under the influence of weight. Heavy rods are immersed at low frequencies, while for light rods high-frequency exposure is sufficient. The method works when installed in moisture-saturated and sandy soils, dense layers, clay and loamy rocks.
Indentation
A method of pressing piles on very hard soil.
It is used in very hard and dense layers (with the exception of rocky soils). Solid pile elements and non-extended tubular specimens (3 - 3 meters) are buried by pressing. The stand is fixed in a vertical position, the barrel is secured with pneumatic clamps. The head cap is worn to transmit pressure after a 1 meter dive.
If the rod cannot reach the design mark, it is raised with special equipment, lowered again and continued to be pressed into the ground.
Screwing
This is how screw pile rods are deepened, which include a tip with bladed elements in the structure to facilitate entry into the soil. The pile itself is a reinforced concrete or metal shaft. The method is used when diving in loose and flooded soils. Screw elements are used as a base for the installation of power lines, construction of overpasses, bridges and other objects with significant loads.
Screwing is used in regions with dense buildings, for example, in cities, where shock loads will destroy adjacent foundations. Special units fix the pile in the inventory formwork and transmit torque via a transmission to the submersible element. The holders release the post after reaching the required depth.
Self-installation of piles for ancillary building
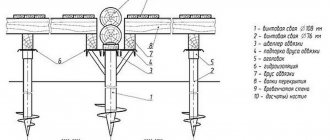
The work of building a foundation begins on paper. Points are marked on the building plan - screw piles for the foundation, and it is determined at what distance the installation should be carried out. Experts recommend gaps between supports of up to 3 m for grillages.
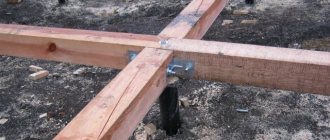
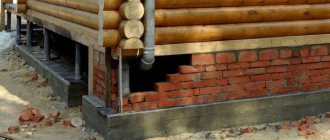
An option for building a foundation without using caps. Metal beams are welded from above directly to the end of the pile Source svainoe-delo.ru
The length of the pile is determined by the level of soil freezing and the location of groundwater. Topographic and geological companies are authorized to draw up appropriate maps of the area. Within populated areas, information can be obtained from architects.
Tool
Before installing screw piles, you should prepare the necessary tools. Everyone has most of it in their garage or shed:
- roulette;
- cord;
- marker and chalk;
- pegs;
- shovel;
- grinder and set of cutting discs;
- welding machine;
- laser level or water level and magnetic level;
- scrap;
- two pipes 1-1.5 inches long 2-3 meters;
- dry concrete mixture or components for mixing it;
- solution container;
- 2-3 assistants, possible without qualifications.
Assistants do not need qualifications, the main thing is physical strength and the ability to work in a team. Source yandex.net
A welding machine is used to “grab” the levers - pipes - to the top of the pile. The screw-in depth is marked with chalk on the pile. The size is taken from the top end.
Preparatory work
The construction site is cleared of debris, grass and plants at a distance of 3 meters from the axis of the piles. Aligns vertically. The site must be clean and level, without obstacles.
See also: Catalog of companies that specialize in installation and repair of foundations of any complexity
Marking
The correctness of the markings determines whether the structure will be smooth and beautiful, or whether the foundation will be skewed and quickly collapse. Marking is performed in several steps:
- Regardless of the configuration of the structure, a rectangle is marked according to the size of the protrusions. The correctness of the figure is checked - the cord is pulled diagonally between the corners.
- The corner pillars are marked first. In their place, in the center, pegs are driven in, and a cord is stretched around the perimeter. He shows how to install screw piles so that they are in the same axis.
- In accordance with the distance indicated on the plan, the remaining pegs are driven in according to the number of piles.
In the case of a complex foundation configuration, mark all protrusions and depressions from the base, first for corner piles, then the rest.
Marking with pegs will last a long time, in any weather they will remain in place. They will not be washed away by water, and they will not be trampled by animals Source metkon100.ru
You can mark places for installing supports using simpler methods, for example, drawing crosses on the ground or digging small holes. But such markings will last until the first bad weather and not a trace will remain of it.
Do-it-yourself pile installation
Installation of screw piles is carried out strictly in a certain order, otherwise the axial displacement will be significant:
- Remove the corner pegs one by one and dig square holes 200-220 mm wide and approximately 300 mm deep. Fill them with water to make the soil softer.
- Mark on the pile shaft the size of the depth for installation in the ground. You can use this mark to determine how much more screwing you need to do.
The crowbar is inserted into the hole at the top of the pile. Pipes 2-3 meters long are put on it Source fundamentaya.ru
- Weld crowbars in the upper part or make holes for them - 2 in opposite directions. The best option is to weld the loops in pairs, placing them horizontally. The loads from the levers will be distributed evenly. The risk of deforming, “twisting” the hollow support will be less.
- Clear the area so that nothing interferes with free walking. The size of the circle is determined by the length of the pipe plus 20 cm.
- Lower the blades into the hole and level them. The laser tool allows you to constantly control the rod in a strictly vertical position. If it is not there, apply 2 magnetic levels on the side, at an angle of approximately 90 degrees, to control the tilt in any direction, and constantly check the position of the pile when twisting it.
- Before screwing in screw piles with your own hands, they should be aligned as accurately as possible and turned deep into the wet soil.
- Long pipes are placed on crowbars attached to the top and used as levers for twisting. Two people move clockwise, turning the pile using levers. The third must monitor its vertical position and correct it if necessary. To do this, you should stop after each revolution.
Drilling the piles manually by three people. One controls the vertical position of the barrel Source legkovmeste.ru
- Screw in the piles until they stop. They must pass the freezing level of the soil, the looser upper layers and screw into hard rocks.
- Remove crowbars and pipes.
- Coat areas with damaged protective coating with an anti-corrosion compound.
- Having completed the installation of the corner supports, stretch 2 threads between them, marking the perimeter along the outer and inner planes. This will help install the intermediate posts in the same axis. The rods must touch the threads and be located exactly in the center between them.
- Alternately dig pits, fill them with water and install the remaining piles around the perimeter.
- Fill the internal cavity with concrete mortar for strength. For light loads, it is enough to fill it with sand or earth.
- Measure corner posts and cut them to size according to height.
- Pull the cord through the upper plane of the corner posts and mark the height of all the piles. Trim with an autogenous machine. If you have a laser level, cut along the markings with its beam.
- Weld the heads, checking their position in the horizontal plane.
- For strength, the remaining holes are filled with gravel and filled with sand-cement mortar.
Water should be poured in advance so that the soil has time to soak and become soft before screwing in the screw piles. 8-10 liters are enough for one pit.
The upper part is cut off according to the markings with an autogen, then leveled with a grinder. Marking with a laser level allows you to immediately cut the pipes of the racks along a horizontal plane with great accuracy Source prom.st
Installing screw piles with your own hands - foundation construction technology
Having decided to build a house on stilts, you should calculate the amount of load that the spiral supports can absorb, and also become familiar with the technology for constructing the foundation.
Prepare everything you need to drive the piles
When constructing a strip foundation, work should be performed in the following order:
- Calculate the load capacity of piles.
- Make markings for the foundation.
- Decide on the method of screwing the supports.
- Prepare everything necessary for driving the piles.
- Purchase pile supports in the required quantity.
- Carry out anti-corrosion surface treatment.
- Drill guide holes for the piles.
- Screw the pile supports into the soil.
- Ensure that the heads are positioned in the same plane.
- Fill the cavities of the metal pipes with concrete mixture.
Let's consider the features of performing the main stages.
Calculation of the load-bearing capacity of screw supports
To calculate the load that a screw pile can bear, it is necessary to determine the magnitude of the forces transmitted by the structure to the supporting elements. First, it is necessary to calculate the total amount of load transmitted by the building to the foundation.
It is necessary to determine the total weight of building structures
Perform the calculation using the following algorithm:
- Determine the total weight of the building structures. The mass is determined by multiplying the volume of the box by the specific gravity of the materials. The weight of the roof and internal equipment is added to the result.
- Calculate the load that the snow cover transfers to the roof surface. The indicator is calculated by multiplying the roof area by the standard snow load coefficient.
In addition to these indicators, dynamic and wind loads are also taken into account. The result of the summation of all types of loads is the magnitude of the force acting on the foundation. To perform calculations, you should draw a construction plan and place piles in corner areas, as well as under main walls.
Perform further calculations using the following algorithm:
- Determine the force per pile by dividing the load by the total number of supports.
- Multiply the resulting value by the load safety factor of 1.2.
- Select a pile of the required design and size, taking into account the load capacity.
The load capacity of the soil should be taken into account when performing calculations.
When performing calculations, the load capacity of the soil should be taken into account. Different types of soil can withstand from 3 to 6 kg per 1 cm2 of spiral tape area.
Carrying out planning for the foundation yourself
The marking is carried out according to the design documentation. For planning you will need:
- wooden pegs or steel reinforcement;
- twine or nylon fishing line.
To determine the coordinates of the supports, a number of operations must be performed:
- Drive in the corner pegs.
- Pull the cord between them.
- Check the markings are correct.
- Transfer the coordinates of the screw supports from the plan.
The piles should be placed at the same pitch, placing them in the corner areas of the building, as well as under load-bearing walls.
Piles should be placed at the same spacing
What method can be used for screwing a screw pipe - equipment and tools
The immersion of screw supports into the ground is carried out in various ways:
- using hand tools. They are attached to the head of the pile and transmit force through a lever. Use purchased mechanization equipment or self-made devices;
- using special equipment on a wheeled base. Industrial technology for screwing spiral supports allows you to perform an increased amount of work in a limited time.
To build the foundation of a private house, it is convenient to use the manual twisting method.
Preparatory activities
Purchased piles for a strip foundation should be prepared for immersion in the soil.
The surface of the piles is covered with bitumen mastic
To achieve this, anti-corrosion treatment is performed using various methods:
- the surface is covered with bitumen mastic. Such protection is not effective enough and is used for outbuildings;
- The working surface is galvanized using galvanic or cold coating methods. Zinc reliably protects the metal from corrosion.
The combination of bitumen protection with zinc coating, as well as the use of film technologies, ensures the durability of the support.
How to install screw piles with your own hands - the process of installing a pile
It’s not difficult to screw in the supports yourself, or, as experts say, drive the piles. Do-it-yourself installation of screw piles is carried out according to the following algorithm:
- Drilling for piles is carried out in accordance with the markings. In this case, the diameter of the formed wells should not exceed the external size of the screw winding.
- Screw piles are tightened manually or mechanized. A mount with a mounted pipe or special equipment is used. When screwing, verticality is controlled.
Having completed the immersion of the supports into the soil, they begin the final activities.
Screw piles are screwed in manually or mechanically
Final work
At the final stage, the following operations are performed:
- The pile heads are marked with a level at one level.
- Use a grinder to cut off the protruding parts of the supports.
- Pile pipes are filled with cement mixture.
Concreting allows you to increase the load capacity of piles and prevent corrosion damage to the support.
Construction of pile fences and other light structures
Lightweight buildings: verandas, bathhouses, sheds and country houses do not require a particularly strong foundation and can be stored on a grillage for a long time. The technology for creating a foundation is similar to the construction of a foundation for a permanent structure. The main difference is in the loads. The buildings are light, the support rods are thinner. There are no problems with how to tighten the piles with your own hands. Much less effort will be required than when creating a foundation for a house or permanent structure.
The technology for constructing a screw foundation for a fence is somewhat different. Thin, lightweight piles are installed under the chain-link mesh; syringe-shaped ones are suitable. Light weight, complete transparency and wind-blown nature make the fence light.
Video description
This video shows the installation of piles by two people on a site with height differences and other obstacles.
Fences made of wood, metal profiles and other solid materials are subject to lateral - wind - loads. It should be taken into account when choosing a model and determining the depth - how to properly screw in screw piles so that they do not turn out. The supports are strengthened by: filling hollow pipes with soil and mortar, screwing them in to a depth of 40 cm below the freezing level of the ground, installing them in holes up to 40-50 cm deep, followed by filling the remaining space with cement mortar. Strengthening massive fences is done by covering the posts with bricks.
Marking the perimeter for the fence
The site plan will allow you to accurately calculate the number of fence posts. Slopes will have to be dealt with on site. The marking begins as standard, with corner posts. Then the cord is pulled if distance allows. The piles are screwed at a distance of up to 3.5 m from each other. Usually the entire length along the side of the fence is divided into equal parts, or one narrow strip between the posts is made near the corner post.
Marking with pegs using a cord, starting from the corners Source yandex.net
On the side where the gate and gate are located, the distance under the piles is measured from the outer posts in both directions. The last spans have a smaller pitch.
Large spaces between the posts and a lightweight design allow for slight movement along the perimeter axis up to 5% of the diameter of the post. The main dimension for marking is the distance between the centers of the supports. During the construction of the base of the fence, the top line will change, repeating the topography of the soil.
Installation of piles
Less effort is required to install the support; you can think about how to tighten the screw piles with your own hands. The work is doable, but requires more time and additional equipment:
- Make a detachable pipe clamp according to the diameter of the pile rod. It should bolt together quickly and allow the rod to slide inside. Weld a tripod with adjustable legs from pipes under the clamp.
- Mark the location of the corner posts. Then everyone else.
- Prepare screw piles and mark them before hand-screwing them yourself. It is necessary to take into account not only the slope of the hills, but also how exactly the fence will go, with a uniform slope, the same height of the posts above the ground, or in steps, over several spans.
The site is cleared of foreign objects and plants. A hole is dug under each pile Source yandex.net
- If the terrain is hilly, use a shovel to prepare platforms for each post, approximately 400 mm in size. They must lie in a horizontal plane.
- It is difficult for one person to position the pile and keep it vertical. Therefore, a manual or mechanical drill should be used. At each site, make small holes with a depth of 50-80 cm, depending on the height of the fence.
- Before installing screw piles with your own hands, in dense and hard soils, fill the holes with water, carefully so that the walls do not collapse.
- The pile is lowered into the pit and additionally secured from above with a clamp. Using a tripod, the axis of the stand is set vertically.
- Before screwing in by hand, screw piles must be screwed in as deeply as possible, pressing from above. From a stepladder or other device, using a crowbar, turn the screw, driving it deeper into the ground. This will allow you to firmly fix the vertical position of the rack.
- Make a lever from a crowbar and a pipe and screw in the screw yourself, clockwise.
Video description
The video shows how to install screw piles yourself.
Fixation in a vertical position is carried out using a tripod with movable “legs”. The work is monotonous and difficult. And although self-installation of piles saves money that would have to be paid for renting equipment, workers, and site preparation, but if there is no practical experience, then it is not a fact that the waste of time will be comparable to this saving.
Final work
Hollow piles are filled with earth or cement-sand mortar. It will make the structure rigid and allow it to withstand significant lateral loads. The head is put on top. The entire structure is checked vertically.
The holes in the ground around the pile are filled and filled with mortar. On dense soils with minor loads, such as a fence, it is enough to sprinkle with earth and compact it.
No. 1. Impact method of driving piles
The impact method involves transferring translational energy to the pile, due to which it sinks into the thickness of the soil, displacing part of it outward or compacting it. For this purpose, complex and heavy mechanisms are used - self-propelled impact or rail units. To move them around the construction site, a flat surface is required, so the area must first be leveled. The pile is held in a vertical position thanks to pile drivers, a kind of arrows.
In the first stages, the dive is carried out slowly so that the correct angle of inclination can be controlled. itself is impacted by a rod or tubular hammer. With the same weight, a tubular hammer has 2-3 times higher impact force than a rod hammer. To prevent the pile driving equipment from destroying the pile, a special cap is used. The immersion continues until the pile reaches the design depth.
The main advantages of the method include:
- the ability to carry out work on any type of soil ;
- high speed and productivity of installation work;
- increasing the load-bearing properties of the foundation, since the piles, plunging into the soil, compact it in a zone of 2-3 diameters around them;
- work can be carried out in almost any weather.
Video description
Step-by-step instructions for creating a pile foundation from a professional builder. In the video you will see the entire process of self-installation using a simple homemade device
Advantages
Pile foundations have clear advantages over other types of foundations for buildings and fences:
- reuse of base support parts in case of fence dismantling;
- rapid construction of the foundation;
- the ability to install on marshy soils and permafrost;
- low cost;
- minimum labor costs.
Having learned how to tighten screw piles by hand, you can easily and quickly put up a fence on rough terrain, build an outbuilding and a bathhouse.
Flaws
There are also several disadvantages to a pile-screw foundation.
- cannot be installed on rocky hard soils;
- open space between the ground surface and the floor;
- You cannot make a basement in houses and outbuildings;
- The service life of the foundation is significantly less than that of the walls.
Over time, when the foundation becomes inoperative, it will have to be replaced in parts without affecting the walls.
Disadvantages of a pile foundation are the ventilated space under the floor and the inability to make a basement Source koffkindom.ru
There is no point in making a screw pile foundation under a permanent house. It doesn't last long. There is a space under the floor into which the cold wind penetrates and water flows along the ground. It is necessary to seal all gaps around the perimeter and construct a complex system for draining rain and melt water.
Important points
For a fence, the pile-screw foundation is strong enough. You can quickly build it, weld a chain-link mesh and the fence from your neighbors will be quickly built, cheap and meets all the requirements of regulations.
Video description
Look at the video to see how simple mechanisms are used to independently install piles under a permanent building.
The use of mechanisms will greatly simplify the work. For example, it is convenient to create holes for racks using a garden drill. Portable installations are available for screwing piles. The equipment is expensive, it is easier to rent it if there is not much work to do. It will be useful for builders and will make their work easier.
Using a laser level greatly simplifies the work of leveling piles in a vertical position and in a horizontal plane.
Experts advise taking racks without a head and tightening them until they stop. Then cut it level using an autogen, put it on top and weld it.
Constant control of the correct vertical position ensures that the pile is positioned correctly and that lateral loads are kept to a minimum Source arenda-yamobura.com
No. 6. Driving piles by screwing
The method is used for screw piles . They consist of two parts: a steel tip with adjacent blades (provides easy entry into the ground) and the pile shaft itself, made of steel or reinforced concrete. Screwing is used in the construction of bridges, power lines and other objects with heavy loads. The method is optimally suited for use on loose or flooded soils and can be used in any climate. Screw piles can be screwed in even in densely built-up areas .
Screwing occurs thanks to special equipment that is installed on the frame of the tractor. On the installation drive, the pile is secured in an inventory casing (not using a head). Thanks to the transmission, the torque from the equipment is transferred to the pile, it begins to rotate and go deeper into the ground. If the soil is too dense, then a slight lifting of the pile and restarting the mechanism is allowed. Once the required depth is reached, the pile is expanded.