Do-it-yourself aerated concrete staircase: experience in construction and operation, photo of the process
In country houses there are stairs of almost any shape and type made of wood, metal and monolith, as well as combinations of these materials. The choice of one design or another is usually determined by the preferences and capabilities of the owners, and the “last word” mainly lies with the capabilities. Thus, one of the participants of our portal, Roman_Buryakov, preferred a monolithic staircase, but the price of the issue forced him to reconsider his position. And the search for a golden mean led to an original solution - to build the staircase, like the house, from aerated concrete blocks. Manufacturers of gas silicate have similar designs in their albums of technical solutions, but have not yet received widespread use. And Roman’s experience in the construction and operation of such a staircase will be interesting and useful.
Content
- Project and visualization
- Construction of stairs
- Operating experience
How to make a staircase in a house from aerated concrete. We build steps in the garden from concrete blocks
One of the important elements of a modern house, around which the entire interior is built, is the interfloor staircase. This engineering structure can be made of various materials: wood, stone, glass, metal, monolith.
One of the revolutionary solutions for houses made of aerated concrete blocks and bricks are staircase structures made of high-strength aerated concrete. Thanks to easy processing, it is possible to produce stairs of various shapes of complexity: with a straight flight, with a turning platform, with winder steps.
Options for manufacturing stairs
To build such a staircase, the following elements are used:
Simple reinforced steps (RS) of standard sizes 1200 mm, 1500 mm, 1800 mm long; width 300mm; height 150 mm (4 longitudinal reinforcement elements 6mm and 5 transverse reinforcement elements 5mm);
Reinforced slabs (LSP) 1800 mm long, 600 mm wide, 150 mm high, which are intended for the manufacture of winder steps, spiral staircases, landings (10 longitudinal reinforcing elements 6 mm and 13 transverse reinforcing elements 5 mm);
Project and visualization
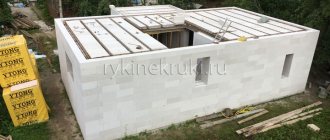
I am building a house from gas silicate blocks, 10x10 m with two full floors, with PB slabs on the first and second floors. For pouring a monolithic staircase with a platform, four craftsmen calculated in the range of 110-130 thousand rubles. I can't handle it now. I don't want a tree either. I decided to “play” with the gas block. Yes, fragile, but soft. But! In the form I planned, taking into account the minimum load, I think it has a right to exist.
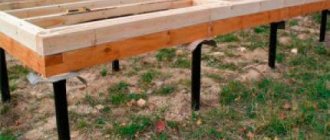
At the base of the stairs are retaining walls, which will also form a storage closet under the flight of stairs. Supports for steps made from blocks of meter-long metal corners 50x50x5 mm - two for each. The balusters are planned to be welded to the corners. Roman got the idea from one of the block manufacturers, but the original version had a hefty price tag, while his adapted version had a rather modest budget.
- Aerated concrete blocks D600 (625×250×150 mm) first category – 12,240 rubles (two pallets of 1.8 m³ each).
- Metal corner (50×50×5 mm) – 6480 rubles (44 meters).
- Glue for thin joint masonry – 700 rubles.
From the very first posts of discussion in the topic, they expressed the opinion that such a design is inferior to a monolith in all respects, and provided that most of the filling work is carried out independently, the difference in price will not be so significant. Nevertheless, the topicstarter considers his choice justified, since he plans to lay the blocks himself, and is not ready to take risks with a monolith.
I read and counted a lot about stairs. Prefabricated, liquid, monolithic. Customized it to fit your budget and hands. As a result, a more or less acceptable price tag turned out to be about 120 thousand. For me this is a lot and it was decided to go for an experiment. And let everyone peck me, I’ll share my experience and continue to lead the topic.
As for the additional costs for finishing the structure itself and the closet, both metal and monolithic stairs need finishing and are practically not used in rough form. With the exception of concrete interiors, but even there, you will still have to spend money on grinding and fixings. In addition to calculations, Roman also made visualizations before construction.
Options for manufacturing stairs
High load-bearing capacity
Ability to adapt to almost any solution
High accuracy of geometric dimensions
High fire resistance
YTONG stairs are easy to install using tools and YTONG adhesive solutions.
Stair elements are mounted on a retaining wall made of YTONG blocks. It is recommended to make a retaining wall under the steps with a thickness of at least 250 mm, and the depth of support of the step on this structure should be at least 150 mm. If there is a load-bearing wall on the sides of the flight, the stair elements can be mounted on a corner anchored into this wall.
Stair elements can be sawed crosswise to reduce the length of the element. The landing can be sawed diagonally to create winder steps.
You can find prices for YTONG stair elements in the price list
Applications can be sent by email:
By registering to participate in the promotion, you are guaranteed to receive a special. conditions for YTONG products!
- — 400 rub. from each m³ of YTONG D400 blocks,
- — 250 rub. from each m³ of YTONG D500 blocks with a width of 250/300/375/400/500 mm,
- 1 bottle of foam glue as a gift when purchasing YTONG D500 blocks 50/75/100/150/200 mm wide,
- — 10% of the YTONG® Price List price for Tools, with the exception of the Hacksaw and YTONG® Aerated Concrete Block Gripper
- — 20% of the YTONG® Price List price for prefabricated monolithic floors, with the exception of “T-Block”
- — 10% of the YTONG® Price List price for Lintels, stair elements
- — 5% of the YTONG® Price List for Solution
Buy YTONG at a discount for winter storage promotion:
- — 200 rub./m 3 with VAT for energy-efficient YTONG D400 units;
- — 100 rub./m 3 with VAT for YTONG D500 blocks;
- — 20% of the YTONG price for prefabricated monolithic floors, except T-Block;
- — 10% of the YTONG price for lintels and stair elements;
- — 5% of the YTONG price for thin joint masonry mortar;
And export the products until April 30, 2021.
Visitors to the YTONG® professional school can use the service for placing an order for YTONG® blocks in the same building, on the 4th floor in office No. 412
Construction of stairs
“Reading and counting” took six months, construction began in April 2021.
- The construction site was cleared and markings were made on the wall.
- Cut roofing felt was used as waterproofing - laid overlapping, glued with mastic along the perimeter and seam. We marked out the supports and laid out the first row on ordinary mortar, the rest on masonry mixture.
The height of the span from the slab to the step is a little more than two meters. By the end of the second day of work, “the blocks became incredibly heavy,” but things were moving forward.
As a result, according to the pros, the result was “a rattle on the corners with the hum of a drum” with the goal of “satisfying curiosity by spending money” and reworking in the future. Roman is satisfied with the design.
I respect the opinion and experience of the craftsmen and do not try to promote or praise my result, and the quality of the aerated block is questionable. But yes, I indulge my curiosity.
- Initially, the idea was not mine, the idea of a gas silicate brand, I replayed it.
- Now the stairs are already standing. Only 6,000 rubles were spent (the unit was free).
- We needed access to the second floor to install windows and create a ceiling. The goal has been achieved.
The staircase was made in three days of work without experience in block and concrete, quickly and cheaply. As money comes in, I still have to fill the floors on the second floor and plaster them. That is, about three years of work. If the staircase shows poor performance, dismantle it and fill it with another one. By that time, the thickness of the floor on the floors will already be known exactly. I didn’t discover anything new with my staircase, I showed that anyone can do this, quickly and inexpensively, and possibly as a temporary structure. As for the first sensations, I screwed sheets of plywood, 15 mm thick, onto the steps, there was no hum or ringing, although I constantly run between floors with the tool.
It is interesting that the staircase also passed the “combat test” with honor - when pouring the screed on the second floor, with an area of 80 m³ (35 mm thick), “they dragged the mixture, sand and the rest with a wheelbarrow.” Such a harsh operating mode did not affect its condition in any way, no play, no cracks. They did not appear even after the winter, during which the house was mothballed.
If the condition of the staircase does not deteriorate even after finishing, the steps will be leveled (self-leveling floor) and lined with wood. At the moment, the design has worked flawlessly for three seasons and will most likely continue to do so in the future. And Roman’s experience was useful to another of our craftsmen.
Welcome to the club. Thanks to Roman Buryakov for the project, photos and comments! If anything, I’m Roman too. My goals were the same as his: to do it inexpensively, to gain experience. There is also a desire to cut off the floors so that only the first floor can be heated. The gas block is ideal for this.
Kirkinroman worked alone, also, without any experience, he completed it in a week. Perhaps it would have been faster, but the block left over from the previous owners turned out to be of different sizes - there was a lot of cutting and adjustment involved.
- A block is free, about two pallets.
- Glue - three bags and a bottle (glue-foam).
- Metal corner - 12 thousand rubles.
I like the result myself. It's not finished yet, a couple of days of work on sanding, fitting, and fastening the plywood. But it’s quiet, there is a feeling of reliability. Nothing is loose, nothing moves - monolithically.
Perhaps over time, aerated concrete stairs will become more widespread, but it is a fact that people who have set certain goals for themselves have already achieved them.
You can monitor the further state of the structures in the author's topic. For lovers of original designs - a “double frame” staircase. If there is very little space, a goose step ladder will help out. The video shows a convenient DIY staircase.
Precautions when constructing stairs
What is important to remember when installing stairs:
This is pure geometry - if you make the steps lower and wider, there will be more torsion, and the height of the upper ones hanging over the lower steps will decrease - we will hit our heads. For a ceiling height of 270 mm, 12 steps are optimal - this is already an axiom. And the width of the step is calculated from the required angle of rotation. That's all.
Think about how you will get down the stairs
You won’t have to look at it, but at least go down normally (when going up, as a rule, everything is fine), perhaps sideways or backwards.
Model the staircase before final installation
Place two finished steps on top of each other, how they will stand on the pole relative to each other, and see how much width is left in the place of movement (where you will go up and down), place your foot especially when descending (when going up, the toe goes under the step, but When descending, the heel, on the contrary, recedes two centimeters from the upper step).
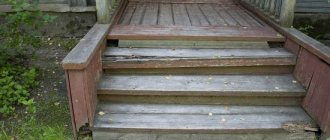
Building a brick porch
In order for the street staircase to be absolutely uniform in color, you need to immediately buy a sufficient amount of brick for its construction.
Important: For the porch of a country house, only red or brown material is suitable. The fact is that apricot and yellow bricks are made with the addition of lime. Therefore, it has a high degree of moisture absorption.
At the first stage, using the “Egyptian” triangle method, markings are made for the foundation of the porch according to the project.
Marking under the porch is carried out using the “Egyptian” triangle method
Construction of the foundation
According to the markings, a pit is dug to the depth of the foundation of the house. Next, formwork is installed into it. After this, a sand “cushion” (10 cm) is poured and crushed stone is laid (in a layer of 5 cm). Then a five-centimeter layer of concrete is poured. A day later, the reinforcement frame is installed. Next, the foundation itself is poured.
Brick porch. Photo of preparing a pit for pouring concrete
How to lay a brick porch at a dacha
So, how to make a porch out of brick? The standard brick size is 25*12*6.5 cm. A more or less acceptable height of the steps will only be achieved if the material is laid on the bed in two rows (6.5+6.5+2=15 cm, where 6.5 cm is the thickness of the brick, 2 cm is thickness of two seams).
Closed porch of a brick house. Photo of the march construction process
If you lay them using the “brick” method, you can get a quite comfortable step depth of 25cm. In the bottom row of each step, the material is placed with a spoon, two at a time. In the top - poke along one at a time.
Now let's see how to lay a brick porch. They begin its construction by laying both parapets. They are usually made as thick as a brick.
Having laid out the first step, the space remaining up to the base of the house is filled with cement mortar or covered with stone. After the concrete pad has hardened, the second step is laid out. The resulting “trough”, fenced with it, the walls of the parapet and the base of the building, is again filled with concrete mortar. Then lay out the third step and so on until the upper platform. The latter is laid out in two rows of solid bricks.
First the parapet is laid out
The laying of a semicircular brick porch is done a little differently. In this case, the elements of both rows of steps are stacked with butts. In this case, the seam thickens from the inside out.
Beautiful porch of a brick house. Photo of a design with semicircular steps
You can also lay out a kind of formwork from bricks, arranging lintels of different heights from parapet to parapet, install reinforcement and fill everything with concrete. In this case, you will get a more comfortable porch with a step width of 32.5 cm (6.5 +25+1 cm per seam).
Brick house porch design. Photo of a staircase with a brick parapet and concrete steps trimmed with tiles
Since the most convenient step depth is still considered to be 30 cm and a height of 17 cm, often only the porch parapets are laid out of brick. The march is made of poured concrete.
Porch made of blocks
Thus, we figured out how to build a brick porch. Sometimes porches are also made of concrete blocks (expanded clay concrete, slag, gas silicate, etc.).
How to choose material
Today, at the entrances of country houses, a structure such as a porch made of foam blocks is often found. Of course, you can build such a staircase with your own hands or lay out the steps from aerated concrete. However, it is still better to build a street march from cinder blocks or, in extreme cases, from expanded clay blocks. Cellular concrete is not particularly suitable for this purpose, since it absorbs moisture very quickly and is destroyed in the process.
Cellular concrete will definitely absorb moisture
How to make a porch from blocks with your own hands
In this case, the foundation is poured in exactly the same way as for a brick porch. Next, a parapet is erected. The lower deck of the span is laid out from blocks according to the size of the porch. The next one is a block shorter and so on until the top of the march. The last stage usually involves finishing the porch with stone or tiles. This is the simplest, but quite expensive method of laying a porch. More often, country houses still have cheaper block porches with backfill. Let's see how to build such a staircase. In this case, the work is performed in the following sequence:
- Parapets are being erected. For them, solid solid blocks are used. The parapet usually consists of a single row of blocks laid in a spoon;
Blocks on the parapet are laid with a spoon with the seams bandaged
- A series of first stage blocks are laid out. For the steps of such a block porch of a house, you can take hollow blocks. Lay them on their sides so that no voids are visible;
Tip: In order for the masonry to be smooth, you need to stretch the cord between the parapets. After the first step is laid out, it is moved under the second, etc.
- How to fold steps correctly? This is done very simply. First, the mortar is applied to the foundation (be sure to make grooves in it with a trowel). Next, concrete is applied to the side surfaces of the block and installed in place;
- A day later, fragments of bricks or stones are poured behind the laid step. The resulting layer must be compacted so that its surface is at the level of the first step;
When laying steps, the blocks are turned sideways
- Next, they begin laying the second step. After its construction, the space behind it is also filled with stone and broken bricks. All steps are laid in this way;
- At the last stage, the upper platform is constructed, also placing the blocks sideways so that the holes are not visible.
Tiled block porch
Laying blocks
When making external stairs from blocks, masonry can be done in two ways.
First : we lay the blocks in a continuous manner, layer by layer, in each subsequent tier we make 1 row of blocks less (the result will be steps).
Second : to save blocks, we lay out only the “frames” of the tiers or “formwork”, and fill the space inside with crushed stone (can be concreted if the staircase is very large).
After the structure is constructed, it can be faced (with tiles, stone, etc.) or plastered.
ON THIS TOPIC:
Staircase lighting: spectacular safety
DIY concrete staircase repair
Ready-made stairs to the second floor: options
The best flooring for stairs
Stone porch
Sometimes the street stairs of a private house are laid out with your own hands and from natural stone - paving stones or rubble.
Photo of a porch made of paving stones, beautifully combined with the facing of the yard
Such a structure is erected according to the same principle as a brick one - first the parapet, then the steps. In this case, you can use ordinary rubble cobblestones from the nearest mountain.
Stone porch of a country house. Photo of a comfortable and at the same time aesthetic march
You can also purchase ready-made, smooth stone blocks. In general, making a porch out of stone with your own hands is no more difficult than making one out of brick. How to lay natural stone, see this video:
DIY block porch
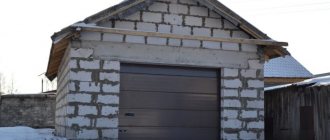
The design of the steps to the house, although important, is not the most complex. Making a porch on your own is not a very difficult and time-consuming job. If you choose a material with which you have sufficient general knowledge and skills in construction, then success will be guaranteed. For example, when using blocks as the main material, it is enough to have the skill of masonry operations and the ability to knead and use mortar. The photo shows an excellent example of a house where foam block was used as the main material.
Benefits of blocks
Why is it worth paying attention to this material when deciding what to make a porch from? The answer may be a list of advantages that blocks have:
- Light weight. This does not carry a functional load, but using a foam block reduces the labor intensity of the process;
- Easy to install. The foam block is larger in size than a brick and, accordingly, less of it is needed individually. This simplifies construction and all the work can be done without much experience;
- Speed. According to this indicator, foam block has few competitors. Pouring concrete formwork or laying a brick porch takes much more time;
- Durability. If the porch is not subjected to destructive loads during use, then it is impossible to accurately determine its service life. Some other elements of a house's structure deteriorate faster than foam blocks naturally. The porch will last as long as the strongest, load-bearing part of the building;
- Price. Construction costs will not place a heavy burden on the owner, since both the block itself and its installation are perhaps the cheapest and most accessible way to build a porch with your own hands;
- Safety. The foam block does not contain harmful substances. By definition, he cannot single them out. A porch made from this material will be environmentally friendly, non-flammable and not fireproof.
Types and features of foam blocks
The following products are classified in this segment of materials, any of which is suitable if you need to build a porch:
- By size. A very wide choice, but when making a porch, preference is given to blocks that have a edge of no more than 200 mm. In this case, each layer will be equal to the height of the standard step. The recommended width of 300 mm will give the optimal angle of inclination of the staircase. A do-it-yourself porch will be convenient and safe to use;
- Material of manufacture. The substances included in the composition play a decisive role in the density of the product. This is not of decisive importance in the construction of the foundation for the porch, but it is much easier to work with lighter blocks. Thus, the density of standard bricks is from 2000 kg/m³. Concrete has an even greater volumetric weight. The density of foam blocks ranges from 400 -1300 kg/m³. An extension made from expanded clay concrete blocks will be 2 times lighter than one made from brick. Sand is not always or to a limited extent used as a filler. The best qualities were noted when using expanded clay and other mineral additives and chemical additives. For example, in aerated concrete blocks a special foaming agent is used, which saturates the solution with air bubbles;
- Form. Foam blocks are offered with both flat and profiled surfaces for reliable fixation. There are also radial products if you plan to build an arched porch. It is better to purchase high-quality blocks with exact dimensions, as in the photo.
Project and construction costs
When planning a porch, you should determine its dimensions and finishing style. Appearance is as important as functionality, so special attention is paid to the combination of materials. The simplest solution is to make a porch from expanded clay concrete or similar blocks the same as the finishing of the house at this height. If the foundation is tiled, then the steps can be made of a similar material, with one caveat. The surface must be safe in wet weather and frost. Special floor, street and facade tiles with appropriate coating are suitable for this. The porch will meet the requirements. Structurally, the following recommendations must be observed:
- It is not advisable to make the width of the stairs less than 1 m. A smaller porch can be made in utility and outbuildings;
- As mentioned above, the optimal dimensions of the steps are determined by the following dimensions - height no more than 200 mm, and width no less than 300 mm. A wide range of sizes is provided for both expanded clay concrete blocks and products with other fillers;
- When planning the installation of handrails and railings on the porch, they think about a system for their fastening. Foam block is a fairly fragile material, and in some cases it is better to install embedded elements into the structure or make cavities for subsequent pouring with concrete. There are also special anchors and dowels on sale that reliably fix the foam block and the fastening element. Some of the models are shown in the photo;
- If the porch has a height of more than 800 mm, then it is recommended to reinforce it. A structure where the block has no more than 4 layers does not need to be strengthened.
A house made of expanded clay concrete blocks, as well as a porch to it from the same material, is made relatively easily, but without finishing it is used exclusively for household needs. Housing requires additional funds and time to achieve the desired appearance. The foam block has excellent heat and sound insulation characteristics, but requires additional finishing operations. The photo shows the house and porch after installation.
To fix the blocks together, you can use either a traditional sand-cement mortar or glue. The last option is preferable. The connecting layer will be thin and the foam block will retain heat better in this case. The porch will be stronger and more reliable. How to work with foam block and glue correctly is shown in the video presented.
A thin layer also reduces glue consumption, and the connection of the elements is guaranteed to be strong. The photo shows how glue is applied and the block is installed.
When choosing a shape, you can abandon traditional balusters. Their function will be performed by columns of foam blocks on which the railings are mounted. The porch will turn out to be massive, but this will also have its own plus. Feeling of reliability and practicality. It is recommended to lay the foam block at a temperature from +5° C to +25° C. If the air is cold, close to zero or below, the solution loses its quality. At temperatures above +25° C, moisture leaves the adhesive composition and enters the block too quickly. In this case, it is advisable to wet the surface with water. Depending on the facade of the house, the porch can be finished with both wood and metal. Technological blanks will help you finish the foam block with your own hands.
Having decided on the form and additional elements, you can begin to count the costs. The price of a foam block is usually indicated per piece. If it is necessary to purchase missing materials, then transportation costs will be added to the estimate. Comparing with similar projects, you can be sure that a porch where foam block is chosen as the main material is cheaper, is made faster and lasts longer than many other options. The process of building a house is recorded in the photo, where construction of a closed porch began on a specially prepared site.
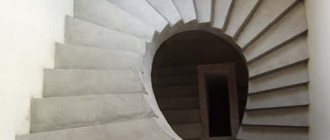
Construction of a rounded staircase
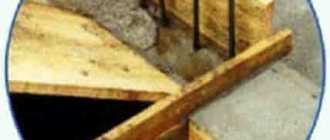
If the radius of the stairs is small (up to 2 m), you need to pre-order or manufacture blocks of the required shape and size. If the staircase has a larger radius, then you can get by with aerated concrete blocks of standard sizes. First we need to make a so-called “compass”. How it's done? A nail is driven into the center of the circle and a cord is tied to it. The free end of the cord is wrapped around the pencil, and the “compass” is ready. The first row of aerated concrete blocks is placed as usual on a standard solution
(don’t forget to lay a waterproofing layer made of roofing felt or waterproofing material).
The next rows are placed on a thin layer of adhesive solution. Don't forget to periodically measure the distance from the center. When the curved walls are erected, it is necessary to draw on their surface the location of the steps of the future staircase. As a rule, the length and height of the steps are always the same. This greatly simplifies further work. For example, if we were building a curving staircase in a corner flight of stairs, then each step would have its own shape and size. Next, we grind out the side support of the staircase in the side wall (to a depth of 7-10 cm). The next stage is the installation of wooden formwork for monolithic work. Wooden beams (4 x 6 cm), which are connected to the wall with dowels, form the base. Next, we begin to nail the planks to the base. Since the distance to both walls of the staircase is the same everywhere, planks of the same length are used. This operation is very simple, for example, with a floor height of about 2.60 m, to the bottom edge of the ceiling you need about 110 roofing strips (section 2.5 x 5.0 cm). Using a power tool, you can literally make the required number of planks in one hour. And after installing all the elements of the lower formwork in a couple of hours, you will immediately understand all the advantages of making a round flight of stairs. Do not forget to strengthen the formwork structure well with supports from below, for example, by making them from remnants of construction wood or pallets from aerated concrete blocks. Then, in accordance with the design documentation, we will reinforce the structure. Parts of the reinforcement are inserted into the slots of the side walls to a sufficient depth to ensure the strength of the reinforced concrete staircase. Tip:
Place plastic film between the formwork and the steel reinforcement.
Later, it will be easier to remove the formwork from below, and you can reuse the undamaged boards to construct the formwork for another staircase. The final stage in the construction of a rounded (curvilinear) staircase is the installation of step boards. And in this case, all the boards have the same dimensions. Be sure to carry out measures to strengthen the rigidity of the structure (see photo gallery)
.
Before concreting the stairs,
it is necessary to wet the formwork.
Next, concrete the steps and compact the concrete thoroughly. The advantage of a rounded staircase design is not only a more rational and less labor-intensive construction process, but also a more elegant and beautiful appearance .
We advise: Make a preliminary calculation of all the necessary concrete mass that you will need for the ring anchor of the floor and the stairs in the room (in our case, this is the basement). It is rational to concrete them at the same time, since in this case you can order an automatic concrete mixer, rather than having to mix concrete with great effort in your own concrete mixer.
The nuances of building a porch from blocks yourself
Following the project exactly and observing the dimensions of the structure, the master faces some inconveniences associated with the large size of the block. It is not always reasonable to change the proportions, which were determined by a harmonious combination with other elements of the facade. The porch will have different dimensions, and the stylistic organicity will be disrupted. The foam block is easy to process, including sawing. Using a hacksaw on wood is impractical. It will not be possible to use it for its intended purpose, and after several cuts across the block, performance will noticeably deteriorate. There are special hacksaws for this type of work. If this cutting method is chosen, then it is better to make circular markings. You can use a square or accurately mark each edge from the base plane. It is also recommended to file in a circular manner to avoid the hacksaw blade being pulled away. The photo shows how the foam block is cut with a special saw.
It is better to do cutting before diluting the adhesive composition on which the block is laid, since its action time is limited, depending on the brand, from 15 minutes to 2 hours. It is easier to make the order of laying individual parts (if the porch is complex in shape and there are many parts) by marking each finished element. The foam block cut into pieces is marked. The layer and serial number are indicated. You can change the project as much as possible if it does not contradict the design idea. The formation of steps can be done by shifting each subsequent layer to the required width. The foam block is perfect for this job and this can be seen in the photo.
In terms of labor intensity, it is difficult to classify a porch as a complex and time-consuming operation, so you can saw off the block with an ordinary grinder. You can use a standard metal cutting disc, but it works slowly. A stone cutting tool with a diamond edge is much more effective at cutting. The disadvantage of this method is a large amount of dust, but the porch is made on the street, so there is nothing scary about it. Grinders with a small disc will not work. The foam block is too large an object for them and there will not be enough cutting depth when working. A disc with a minimum diameter of 250 mm is required. With such a tool, you can make any porch with your own hands using a foam block.
Do-it-yourself aerated concrete staircase: experience in construction and operation, photo of the process
In country houses there are stairs of almost any shape and type made of wood, metal and monolith, as well as combinations of these materials. The choice of one design or another is usually determined by the preferences and capabilities of the owners, and the “last word” mainly lies with the capabilities. Thus, one of the participants of our portal, Roman_Buryakov, preferred a monolithic staircase, but the price of the issue forced him to reconsider his position. And the search for a golden mean led to an original solution - to build the staircase, like the house, from aerated concrete blocks. Manufacturers of gas silicate have similar designs in their albums of technical solutions, but have not yet received widespread use. And Roman’s experience in the construction and operation of such a staircase will be interesting and useful.
Content
- Project and visualization
- Construction of stairs
- Operating experience
Advantages of stairs made from ytong aerated concrete blocks
— Such stairs are more durable and reliable than wooden ones. Their load-bearing capacity is much higher than that of similar wooden structures (150 kg/m2).
- This is an ideal option for rooms with limited space.
— The main advantage of such stairs is ease of installation using an adhesive solution and appropriate tools. If necessary, they can be easily repaired or disassembled.
— These stairs are characterized by increased resistance to fire.
— Low price for staircase structures.
— Wide selection of finishing and decoration.
Project and visualization
I am building a house from gas silicate blocks, 10x10 m with two full floors, with PB slabs on the first and second floors. For pouring a monolithic staircase with a platform, four craftsmen calculated in the range of 110-130 thousand rubles. I can't handle it now. I don't want a tree either. I decided to “play” with the gas block. Yes, fragile, but soft. But! In the form I planned, taking into account the minimum load, I think it has a right to exist.
At the base of the stairs are retaining walls, which will also form a storage closet under the flight of stairs. Supports for steps made from blocks of meter-long metal corners 50x50x5 mm - two for each. The balusters are planned to be welded to the corners. Roman got the idea from one of the block manufacturers, but the original version had a hefty price tag, while his adapted version had a rather modest budget.
- Aerated concrete blocks D600 (625×250×150 mm) first category – 12,240 rubles (two pallets of 1.8 m³ each).
- Metal corner (50×50×5 mm) – 6480 rubles (44 meters).
- Glue for thin joint masonry – 700 rubles.
From the very first posts of discussion in the topic, they expressed the opinion that such a design is inferior to a monolith in all respects, and provided that most of the filling work is carried out independently, the difference in price will not be so significant. Nevertheless, the topicstarter considers his choice justified, since he plans to lay the blocks himself, and is not ready to take risks with a monolith.
I read and counted a lot about stairs. Prefabricated, liquid, monolithic. Customized it to fit your budget and hands. As a result, a more or less acceptable price tag turned out to be about 120 thousand. For me this is a lot and it was decided to go for an experiment. And let everyone peck me, I’ll share my experience and continue to lead the topic.
As for the additional costs for finishing the structure itself and the closet, both metal and monolithic stairs need finishing and are practically not used in rough form. With the exception of concrete interiors, but even there, you will still have to spend money on grinding and fixings. In addition to calculations, Roman also made visualizations before construction.
Options for manufacturing stairs
High load-bearing capacity
Ability to adapt to almost any solution
High accuracy of geometric dimensions
High fire resistance
YTONG stairs are easy to install using tools and YTONG adhesive solutions.
Stair elements are mounted on a retaining wall made of YTONG blocks. It is recommended to make a retaining wall under the steps with a thickness of at least 250 mm, and the depth of support of the step on this structure should be at least 150 mm. If there is a load-bearing wall on the sides of the flight, the stair elements can be mounted on a corner anchored into this wall.
Stair elements can be sawed crosswise to reduce the length of the element. The landing can be sawed diagonally to create winder steps.
You can find prices for YTONG stair elements in the price list
Applications can be sent by email:
By registering to participate in the promotion, you are guaranteed to receive a special. conditions for YTONG products!
- — 400 rub. from each m³ of YTONG D400 blocks,
- — 250 rub. from each m³ of YTONG D500 blocks with a width of 250/300/375/400/500 mm,
- 1 bottle of foam glue as a gift when purchasing YTONG D500 blocks 50/75/100/150/200 mm wide,
- — 10% of the YTONG® Price List price for Tools, with the exception of the Hacksaw and YTONG® Aerated Concrete Block Gripper
- — 20% of the YTONG® Price List price for prefabricated monolithic floors, with the exception of “T-Block”
- — 10% of the YTONG® Price List price for Lintels, stair elements
- — 5% of the YTONG® Price List for Solution
Buy YTONG at a discount for winter storage promotion:
- — 200 rub./m 3 with VAT for energy-efficient YTONG D400 units;
- — 100 rub./m 3 with VAT for YTONG D500 blocks;
- — 20% of the YTONG price for prefabricated monolithic floors, except T-Block;
- — 10% of the YTONG price for lintels and stair elements;
- — 5% of the YTONG price for thin joint masonry mortar;
And export the products until April 30, 2021.
Visitors to the YTONG® professional school can use the service for placing an order for YTONG® blocks in the same building, on the 4th floor in office No. 412