How to paint a ceiling correctly: the whole process from preparing the base to finishing
Doing the work of painting the ceiling with your own hands is not as easy as it seems. It's better to start with theory. You can quickly achieve the desired result only when you know what to do. After studying the theoretical fundamentals, it will only be enough to practice for a few minutes to get the hang of it. It is also important to choose the right composition and application method (manual or mechanical). Coloring compositions differ in the main component, consistency and method of application. Only the most experienced craftsmen can properly dilute the solution, mix colors to obtain the desired shade and select brushes, but this art can also be mastered. Particular attention should be paid to the pre-finishing of the floor slab before starting work. In this article we tell you how to paint a ceiling without streaks and take into account all the steps for a high-quality result.
Installation of tiles on a concrete ceiling
Due to its low cost, quick installation and the ability to quickly repair in case of damage, this finishing method has become very popular. Options with different patterns and textures are sold. Expanded polystyrene tiles are attached with special glue.
Installation of tiles on a concrete ceiling
Before starting work you need to know the following:
- gluing begins from the center of the ceiling;
- immediately assess where large defects are located and calculate the placement of the tiles so that the entire part completely covers the defect;
- Whole tiles will have to be trimmed when the distance to the wall becomes small. Before gluing, markings should be made in advance so that for the most part whole tiles fit. Trimmed options are best placed in places where they are least noticeable (under a curtain, doorway).
Despite the fact that the tiles are glued easily and quickly, one cannot help but note the disadvantages:
- fragility;
- lack of a single canvas, which is not always aesthetically pleasing;
- rarely used in modern interiors;
- not resistant to fungi, mold;
- lags behind at high humidity.
How to prepare the coating before applying the composition
Varnish, water-based or acrylic coatings, as well as regular whitewash, have a small thickness. Even minor irregularities will be clearly visible if they are not corrected. The surface of the base must be light, otherwise dark areas will appear after finishing. And it will take a lot more material to cover them up.
Traces of mold, cracks and unevenness must be removed. Plaster and putty should not crumble. The coating will stick only if it is laid on a clean surface.
Paint finish options
- Plastered and puttied concrete floor.
- Gypsum plaster - it differs from ordinary plaster in its plasticity. This property allows you to obtain a smooth surface.
- Metal frame covered with plasterboard sheets or OSB panels. Drywall does not need to be treated. The seams are coated with a primer and sealed with sealant or putty.
- Wooden beams, beams, logs and boards. More often they are varnished to preserve the natural pattern of wood fibers.
Working with reinforced concrete slab
As a rule, it has irregularities that can be hidden with plaster or a covered metal frame. In the first case, cement and gypsum mortars are used. Cement ones are more versatile. They are suitable for any premises. Gypsum does not tolerate high humidity and is designed only for rooms, kitchens and hallways. Their advantage is that they do not require additional processing. The top is washed away with a sponge. Water releases tiny dust from the massif, filling voids and smoothing out unevenness. The light shade of the base allows you to use paint of any color. The rough texture is designed only for matte compositions. It's too grainy for gloss.
The solution of sand and cement is first covered with coarse-grained putty, then with fine-grained putty. Before applying the top layer, the bottom layer is primed and allowed to dry. The material is reinforced with a thin polymer mesh, which prevents cracking. The top is leveled with fine sandpaper.
Antiseptic impregnations are used to protect against bacteria. Without them, mold may appear.
If you are going to paint over old cladding, you should make sure that it is suitable for this. The crumbling areas are removed. The cracks are being repaired. Weak spots are located in the corners between the ceiling and the wall - interpanel joints are subject to the greatest deformation. Traces of mold are cleaned off. Then they are impregnated with antiseptics and primers. Irregularities are plastered and puttied.
Preparation of drywall sheets
GKL is glued to a concrete floor or mounted on a suspended aluminum frame using self-tapping screws. To understand how to properly paint a ceiling made of movable panels, you need to figure out where the problem areas are. A coating made of oil or acrylic paint may tear when stretched and moved to the side, so the seams between the sheets should be strengthened. The ends should fit tightly. They are carefully puttied using plastic reinforcing mesh. It protects the layer from cracks due to internal deformations.
Source: www.ivd.ru
Interesting interior ideas in Loft style:
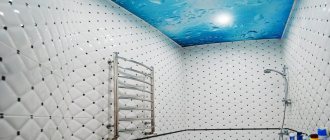
Depending on the room, various design options are possible. For the living room you can use a variety of designs. For a hallway, a lining or slatted beam is well suited, which will visually lengthen the room. For the toilet and bathroom, you can choose stretch fabrics or metal finishes. Try to choose waterproof materials. For the bedroom, you should opt for stretch ceilings with a matte texture or a classic finish made of concrete, brick, or paint.
There are many options, so choose the one that most harmonizes with the overall design of the room. Try not to overdo it with dark shades so as not to weigh down the atmosphere.
Advantages of concrete as a finishing material
In the hands of an experienced designer, concrete turns into a neat and attractive material, not inferior to natural stone. Stylish combinations bring originality and convenience to the room.
Among the advantages of a concrete ceiling in the interior are:
- environmental friendliness;
- availability;
- low price;
- moisture resistance;
- fire safety;
- Mold resistance.
As for aesthetic appeal, everything here is quite versatile and largely depends on the professionalism of the designer and his own perception. To consider a raw ceiling graceful requires being something of an adventurer, regardless of conventional ideas of beauty and comfort.
Concrete ceilings in the interior - photo
Raw concrete is definitely one of the most interesting interior trends that is steadily gaining popularity. Therefore, more and more people are choosing this type of decoration on the ceiling in the living room. Concrete adds both rigor and surprising elegance. This decorative surface looks best in large rooms where the surface will be beautifully presented. But even a small apartment can be decorated in this way.
Application options in interior design
The introduction of advanced technologies in the development of interior decoration makes it possible not only to decorate a building with a concrete consistency, but also to obtain an unusual decorative coating. Thus, the mercilessness of concrete walls is transformed into a prestigious shine, reflecting all the colors of the interior when the material is expertly processed.
Now there is something to cover a concrete ceiling, and the treatment is simple. By conscientiously decorating a concrete surface, you can get an unusual design object. The majority of advanced dwellings have concrete inclusions, and the ceiling is often made from this material.
For modern living spaces, this is one of the best options, especially for the loft style. But thanks to the emergence of new materials in the interior, it is more common to use not concrete itself, but its imitation, which is much cheaper and more convenient. Surfaces in different rooms are covered in this way.
Natural concrete
Concrete is a pre-processed material, but in the last few years it has been used for interior design and finishing. The untreated plane has an unusual appearance. It looks good in urban and industrial style.
Treated concrete
The concrete ceiling in the interior can be processed in different ways, choosing the optimal look for the building.
The process is carried out in this way:
- The seams between the slabs are covered to increase interfloor sound insulation.
- They can prime, cover the surface with impregnations or varnishes to protect it from dust and cracks. These compounds fix the concrete and make it possible to carry out wet cleaning.
- The ceiling is tinted without hiding the texture of the concrete in order to reduce the roughness of the coating. For this purpose, lime or water-based paint is used.
Imitation concrete
If the surface of natural concrete does not arouse interest, but at the same time you want to preserve the special industrial style of the apartment, you can use an imitation of the material.
In this case, use the following surfaces for a concrete ceiling in the interior:
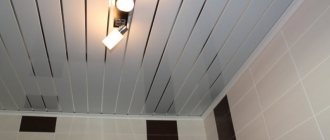
- Modular slabs. They are hung on the ceiling and do not require further decoration. Fastening is carried out using metal fasteners or by gluing. The slabs are suitable for installation on suspended ceilings. Color and texture are presented in a wide range.
- Special textured paints for the home. They contain mineral additives and transformative preparations that help ensure a special distribution of paint pigments throughout the entire surface. The result is unevenness and areas of varying tones, giving the illusion of a wet or dry cement slab. Immediately after application, you can touch the paint layer with a putty knife to create streaks, indentations and other imperfections.
- Decorative plaster allows you to simulate a special plane close to reality. The plaster is applied in a thick layer, including creating an imitation of joints between the slabs on the plane. You can also imitate cracks and prints, if required by the project.
You can treat the damp surface with a sponge using original movements to make the ceiling surface rough. Using different tools, it's easy to achieve any style. After all the steps, a top layer of varnish or wax is applied to the ceiling.
What is the characteristic of finishing the ceiling surface using paints and varnishes?
The quality of finishing of the ceiling surface in residential and public spaces is extremely important. When entering a room, one of the first things that catches your eye is the ceiling. Accordingly, its attractiveness largely determines the overall impression of the room’s decoration.
Ceiling paint for concrete is the simplest, most affordable material, but at the same time allows for a neat and attractive finish. And in industrial and utility buildings, painting concrete ceilings is used even more often than other finishing methods.
Painted concrete ceiling in garage
It is worth noting that this type of cladding of ceiling surfaces has become relevant in modern interiors: loft, industrial, techno, contemporary, minimalism.
The benefits of painting the ceiling
- You can apply the composition yourself without the help of professional teams.
- Using paint to decorate ceilings is one of the most budget-friendly options. Naturally, suspended and tensioned coverings will cost many times more.
- Thanks to the use of paints and primers, the concrete surface is additionally protected from the effects of adverse factors.
- This finishing method is excellent for rooms with low ceilings, since the facing layer has a minimum thickness.
- Applied in accordance with the rules, the composition will delight the eye with its attractive appearance for a long time.
Along with this, it should be understood that the process of painting, especially a surface located at a height, is quite labor-intensive.
Concrete ceiling design
The concrete ceiling in the apartment is a modern interior design in the direction of minimalism. Previously, concrete was used only as a rough finish, requiring plastering and painting, but now the situation has changed dramatically, and this construction feature is used to decorate ceilings in the bathroom, living room, and hallway.
The introduction of concrete as a finishing material helps highlight bright and original textures. Its advantage is considered to be amazing combinations with metal and wood. The design of a concrete ceiling can be very different, it all depends on the wishes of the owner of the room.
Source: 1beton.info
How much does it cost to waterproof a bathroom ceiling?
What does the cost of waterproofing a bathroom ceiling consist of? Of course, from the cost of work and the cost of materials. Let's find out in more detail both.
So.
Total information
To waterproof 1 linear meter of a ceiling seam in a bathroom, we will need:
1.1 kg of repair mortar BASTION PP+
And
0.6 kg of any coating waterproofing. Or two-component coating waterproofing Bastion GO2K, or Bastion TR or rigid coating waterproofing Bastion GO.
It is best to consult with us about what kind of waterproofing to use in each specific case.
For example, now we will make a calculation using the Bastion GO2K material. You can easily replace it with another one yourself. Only the price will change, the consumption will remain the same.
So, having looked at the price list, we recalculate all this into real money:
1.1*48 + 0.6*154 rubles = 145.2 rubles
The cost of waterproofing a seam is 600 rubles/linear. meter.
In other words, the cost of waterproofing 1 linear meter of a seam in a bathroom will be about 750 rubles.
Thus, to get the estimated cost of waterproofing the ceiling in your bathroom, you only have to do very little. Take the length of all the seams in your bathroom and multiply by 750.
Why indicative? Yes, because we will get the exact amount of materials only when we calculate it as a multiple of the packaging.
Container volume:
Bastion GOMbag 25 kg. Bastion RR + Bag 25 kg. Can 6 kg. Can 6 kg. Bastion GO2Kset 9 kg. + 3 kg. Bastion TrBanka 5 kg.
Please pay attention!
The calculated material consumption does not take into account possible losses and errors in determining the volume and area of treatment. It is recommended to purchase 10% more than the estimated quantity.
Please observe the instructions in the current technical description.
Well, now a concrete example
For example, if you have a bathroom measuring 2 * 3.5 meters, and in the middle of the ceiling there is another joint between slabs 2 meters long, then we will get the amount we need by adding 2 +2 +2 +3.5 +3.5 = 13 meters.
Materials for waterproofing the seam in such a bathroom are needed:
Repair mortar BASTION PP+: 13*1.1 = 14.3 kg. Or 1 package of 25 kg for 1200 rubles
and any type of coating waterproofing 13 * 0.6 = 7.8 kg. In this case, the following options are possible:
or 2 packs of Bastion TR, 5 kg each for 2*864 = 1,728 rubles
or 1 package of 25 kg Bastion GO for RUB 1,574
or 1 set 12 kg Bastion GO2K for 1843 RUR
Total materials in the amount from 2774 to 3043 rubles.
If you decide to order the whole range of turnkey works and receive an additional guarantee not only for the materials, but also for the final result, then the work will cost 600 * 13 = 7,800 rubles.
In any case, the choice is yours. After all, now you can do it consciously and skillfully. Well, if you still have questions, just call us and we will be happy to answer them
The question of the need to waterproof the ceiling in the bathroom is increasingly facing apartment owners.
What problems does protection against water penetration help solve and what materials are considered the most effective and reliable? The need to waterproof the ceiling in the bathroom The most common reason why apartment owners think about the need to waterproof the ceiling in the bathroom is leaks from neighbors living above. Such situations often arise due to the use of flexible hoses when connecting the washing machine to the water supply and sewerage system, wear of pipes in old buildings, poor-quality welding of plastic, and simply due to carelessness. Even light leaks in the upper neighbors, if you do not have waterproofing, can lead to the need to update the repairs made.
What materials will really help protect the ceiling from moisture? Express waterproofing Waterproofing products of various compositions can be conveniently divided into categories according to the method of application to the ceiling surface. The most popular and effective are pasting and coating materials, among the latter are the so-called. penetrating waterproofing, which is today a recognized leader in its segment.
The procedure for performing work on leveling the ceiling and preparing it for painting
- The first thing to do is to knock off the nodules that protrude beyond the working area. If there are not very many saggings, then we knock them down with an ordinary hammer. If there are quite a lot of them, then it is better to carry out this work with a hammer drill with a spatula. Otherwise, there is a possibility of losing a lot of time and effort.
- After this, we treat it with a deep penetration primer. If you want to prime carefully and save primer, you need to use a wide brush. If saving this material is not the most important issue for you, and, in addition, you want to do everything faster, you can use a roller to paint the ceiling.
- When the primer has dried, it is necessary to seal the seams between the floor slabs. To do this, we use gypsum putty for painting. Keep in mind that it dries quickly. Therefore, carefully read the manufacturer's instructions on the packaging and knead a little at a time. Without certain skills, you may not have time to develop it, it will dry out, and you will have to throw it away.
- On the putty seam (until it dries), apply a mesh (50 mm serpyanka) along the seam and on top, repeatedly, tighten the seam with gypsum putty until the mesh is hidden under it.
- Next, we measure the differences on the working surface with a long level or rule. If the differences are more than 1 centimeter, then they must be leveled with gypsum putty. We seal these differences and tighten them with a 1.5 meter or 2 meter rule.
- Having finished leveling, wait for the gypsum putty to dry completely.
- After drying, we clean off excess crackers from its surface and prime it again.
- About 1 hour after the primer has dried, mix the usual putty to a creamy mass and apply it to the ceiling surface with a 45-centimeter spatula.
- We wait for it to dry completely and clean the entire working surface with sandpaper No. 100. Rub it lightly so as not to create holes. After grouting, if deep scratches or small holes are found, they should be covered with liquid putty.
- Again, wait for it to dry completely and rub it with sandpaper or abrasive mesh No. 180. If we find something again, we perform the last putty procedure again.
- We visually determine that the surface is smooth and prime it one last time.
The ceiling is ready for painting.
It must be painted when the paintable putty and primer are completely dry. If it does not dry completely while painting with a roller, the last layer of putty may fall off in places. It is best to use water-based paint. Painting the ceiling with a roller begins from the window side. It is preferable to move the roller in the direction opposite to the window. When painting with a roller, streaks of paint remain on the ceiling, so they should be carefully rolled out. Painting is done in at least two layers, and then visually see how many layers you need.
Source: stroysyaneboysya.ru
Important points when creating a concrete ceiling
The technology of pouring concrete into the ceiling is not as complicated as it might seem at first glance, and the practicality of such a ceiling leaves no doubt, because the concrete floor makes the room stronger and more durable. Among the disadvantages are the considerable weight of concrete and the duration of work.
Before work, it is worth cleaning, priming, sealing cracks in the ceiling and carefully calculating the thickness of the concrete, taking into account the load that the surface will have to withstand. If the ceiling is less than 15 cm thick, it will be reinforced with metal reinforcement. The reinforcing material is laid crosswise and its joints are welded. For formwork, moisture-resistant plywood and support boards are used. Pouring is quite simple, especially if it is carried out by two people. The work is carried out from the corners, leveling is done along the way and air bubbles are removed from the mass. For 2 months, the ceiling sheet is left to dry along with the formwork. If you remove the formwork earlier, cracks will appear on the ceiling and the integrity of the surface will be compromised.
Insulation
Many owners of loft-style residential premises are wondering how to insulate a concrete ceiling. Since the ceiling is the floor of the next floor or attic, residents of the top floors or one-story houses can insulate it from the outside. Others have to insulate their ceilings from the inside. This can be done using frame and frameless construction. The choice of scheme depends on the type of insulation and ceiling height.
Frameless insulation
The frameless design provides thermal insulation, while the ceiling practically does not lose height. With this scheme, rigid heat-insulating materials are used, which are firmly mounted on the ceiling, and then finishing is performed. Using a frame structure, comprehensive protection of the concrete ceiling is provided due to the presence of layers of heat, sound, hydro, and vapor barrier, but the frame method of insulation reduces the height of the ceilings by no less than 7 cm.
When choosing thermal insulation, you should pay attention to the following characteristics:
- resistance to mold and fungi;
- light weight;
- moisture resistance;
- heat resistance;
- environmental friendliness.
There are a large number of thermal insulation materials of organic and inorganic origin, and their number is increasing every day. The choice depends on the height of the ceilings, the desires of the buyer and his financial capabilities.
You can choose polystyrene foam or its varieties (polyvinyl chloride, polyurethane foam, polystyrene foam). You should choose a material with low thermal conductivity. When choosing polystyrene, you need to remember that it does not absorb noise.
Before insulating a concrete ceiling from the inside, you need to remove all irregularities from it (level it), then prime the surface and seal all cracks with cement.
The ceiling is waterproofed using deep penetration insulating agents. This can be bitumen or a polymer mixture. When the waterproofing has dried, mark the sheets so that there are no narrow strips or small insulation inserts. Sheets of foam plastic are attached to the markings using sealant, joining the sheets tightly to each other and to the walls.
When the work on leveling the joints is completed, the ceiling is allowed to dry (for 24 hours). After drying, a fiberglass reinforcing mesh is laid on top of the foam on a thin PVA adhesive layer with an allowance of 5 cm for the strips on each other and on the walls. No sagging or bubbles should be allowed. After leveling and securing the reinforcing mesh, proceed to the main fastening of the insulation to the ceiling using fungal snipes. The result is a flat surface, which is then leveled with plaster or cement mixture and painted.
Instead of solid insulation, stone wool is also used, but the insulation process becomes more difficult to complete, since the fibrous insulation is difficult to fix.
Frame thermal insulation with mineral wool
This method of insulating a concrete ceiling is more expensive and more difficult to perform, but it is still the most common.
The ceiling must be cleaned of all peelings and worn parts, then primed with a latex solution. When the primer has dried, seal and putty the cracks, and level the rest of the surface with a cement-based mixture.
After curing, the ceiling is waterproofed using a penetrating waterproofing agent. For vapor barrier, dense polyethylene is mounted on the frame. The frame is made of plasterboard or wooden blocks treated with an antiseptic, which are secured with self-tapping screws. Sheets of insulation are located between the frame and the concrete base. After filling the entire surface of the ceiling with insulation, another layer of film is laid under the frame. Then plasterboard, siding or decorative tiles (depending on the chosen material) are attached to the frame of the insulated ceiling, and finishing is carried out if necessary.
If the loft style is designed, then there is no need to hide communications. Heating radiators, pipes, ventilation, electrical wiring will only complement and emphasize the style of the room.
Preparatory stage
Before you start applying paint, you need to prepare the surface that you have to treat. To do this, you may need:
- A rag and a container of water to remove dirt.
- In case of serious defects in the base, it will be necessary to eliminate all concrete sagging and bumps, for which you may need a hammer drill with a spatula attachment.
- After eliminating defects, seams, cracks and joints between slabs must be treated with a deep penetration primer. It will significantly improve the final result of the work and save materials. It is better to work with a brush.
- Defects in the form of holes and cracks also need to be repaired, so you will need putty and tools to work with it. In addition, to strengthen the applied layer of material, you need to use reinforcing tape or sickle tape.
- After puttying, you will need to level the surface until smooth, which will require a grater or sandpaper.
- When all work on repairing defects is completed, it is necessary to prime the floor again. To do this you will need a paint bath and a roller. In hard-to-reach places, it is better to apply priming with a brush.
After leveling and applying the primer, the surface must dry completely and only after that can you proceed to painting. This will also require tools. Depending on the chosen method of applying paintwork materials, you may need:
- Paint bath and roller.
- Spray.
- A set of large and small brushes.
It is better to have brushes in stock for any painting method, since in corners and hard-to-reach places neither a roller nor a spray gun will be able to do the job accurately.
Advice: it is better to start finishing work from the ceiling, since if the work is done in the reverse order, there is a risk of damaging the walls that were finished first with drops of paint. It is especially important to correctly determine the sequence of work when painting the ceiling using a sprayer.
What you need to know when ordering work on waterproofing a bathroom ceiling from specialists
Several questions are standard for such a case:
- What specific materials will be used? Check the specific type and brand.
- What kind of experience do the craftsmen have in working with this particular material? How many similar objects have been made?
- What guarantee does the company provide for the work?
- And, of course, the cost of the work. Serious companies immediately name the final cost of the work. Of course, at first it may be preliminary, but after examining the object everything becomes clear down to the ruble. You must be given a price BEFORE work begins. And the more clear it is to you about what and how this price consists of, the better!
Having received the answer to these questions, you can easily decide: is it necessary to deal with this company specifically, or is it better to look for another? Or even try to do it on your own.
Coloring
After all the preparatory work has been completed, you can begin to prepare the coloring solution for use. This is not difficult - you just need to mix it thoroughly or dilute it a little according to the recommendations indicated on the package. Best of all, a special attachment for a drill is suitable for mixing. This will allow you to mix the coloring composition evenly. If such a tool is not at hand, you can get by with any other suitable device.
Choosing the right paint is also important. Typically, everyone’s favorite water-based paint is used for concrete surfaces. However, there are other types of paints and varnishes in stores and you can choose the type that best suits your characteristics. The only thing you should avoid is oil paints - they turn yellow over time and create a too fragile coating.
The application of coatings occurs in accordance with a certain scheme. It is better to adhere to the rules below, as they have been developed over many years of work by professionals in their field. Therefore, you should paint it like this:
- Work on creating the first layer should begin from the corner closest to the window opening.
- The direction in which the first layer of paint will lie is determined so that the last of the applied layers is directed away from the window. The minimum requirement is to make two layers, each subsequent layer being rolled perpendicular to the previous one.
- In places where the ceiling meets the walls, you must first go over it with a narrow roller or brush. A brush is also used in joints, recesses of the ceiling structure and corners.
- You should not immediately paint over a large area of the ceiling - it is better to do it gradually, painting small squares.
- Several thin layers of paint are better than one thick one. It will take more time to work, but the result will be much better.
Source: wikipotolok.com
Advantages and disadvantages of suspended ceilings in Loft style
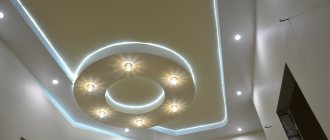
Installing suspended ceilings in the Loft style is one of the simplest and most interesting ideas, which allows you to realize many design ideas. This design is perfect for spacious rooms or studio apartments. Used to distribute space into separate zones. Looks good in rooms with high walls.
To create a ceiling in an industrial style you need extraordinary thinking, a desire to take risks and destroy stereotypes.
Typically, wall-mounted structures are popular in large cities to highlight the urban lifestyle. In combination with other modern materials, metal or glass inserts, a cozy atmosphere and design is created. Some also allow you to simulate the appearance of abandonment - moderately exposed wires, communication lines, peeling plaster and much more are made.
It can be decorated with any building materials and the most non-standard combination of them.
Among the main advantages of such ceilings, the following should be noted:
- visual expansion of the room - allows you to significantly lengthen the walls, but it is not recommended for use in rooms with low ceilings;
- space distribution – allows you to distribute one room into several adjacent zones using various effects;
- modern style - makes the room more attractive and modern, without eliminating the effect of home comfort;
- relaxation – when decorating the ceiling, soft colors are used, which allows you to relax in the evening and take a break from heavy workload;
- accessibility – tensile structures are considered the most affordable on the market.
For a loft-style design project, PVC and fabric stretch fabrics are ideal.
With all the listed advantages, you should pay attention to the disadvantage - tension fabrics are fragile, so installation should be carried out exclusively by professionals. To decorate ceilings in the Loft style with your own hands, you will need certain skills.
The ceiling can be on a matte base in brown, light tone or a color that imitates metal.
You should also pay attention to the following design features:
- with large volumes of the room, the canvas may sag;
- the canvas is easily damaged by sharp objects, so care should be taken;
- when choosing a glossy texture, all seams and irregularities will be visible;
- Some canvases have an unpleasant odor that will disappear over time.
The photo shows a black stretch fabric in the living room.
Note! Before purchasing materials, you should carefully weigh all the parameters in order to choose the right product for your home. To eliminate defects and gaps near the walls, use ceiling plinth.
Recommendations for the use of concrete in residential design
Perhaps the main feature of concrete is its versatility. This material is so malleable and obedient that its scope of application is limited only by the designer’s imagination. Thus, not only the concrete walls, favorably emphasized by the bright colors of paintings and furniture, fit perfectly into the premises, but also the ceiling, combined with lighting that ideally emphasizes its texture and restraint.
Decorative interior elements and furniture made of concrete are becoming increasingly common, and the works of contemporary artists make it possible to select concrete decorations for the interior.
Room design with concrete ceiling
Interior of a large room with a concrete ceiling
Large bright room with concrete ceiling
Bright room with concrete ceiling
Large beautiful room with concrete ceiling
See alsoCeiling design in the hall
Concrete in the interior of the house. Options for use in modern apartments
Concrete in the interior has already become a favorite among connoisseurs of simplicity and comfort, and the fashion for lofts has strengthened the position of this material. Thus, concrete walls in the interior no longer surprise, but on the contrary, delight viewers, and the concrete ceiling fits into the design of a modern city apartment no worse than a floor made of this material. The main thing is the right approach and attention to detail.
So how did the idea for such a non-standard design come about? Perhaps the answer to this question is simple. Industrialism and minimalism are attracting more and more interest, and now, it would seem, such simple concrete surfaces are becoming not an auxiliary material for construction work, but a design discovery. And now the concrete in the interior is naked brutality, emphasizing the individuality of the owner of the apartment.
Bright room with concrete ceiling
Kitchen with concrete ceiling
Bright room with concrete ceiling
Bright room with concrete ceiling
Large spacious room with concrete ceiling
See also: Ceiling design: selection criteria.