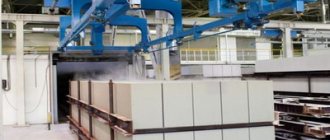
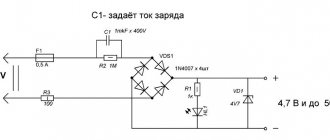
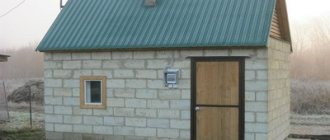
Garage made of aerated concrete blocks
Aerated concrete is one of the leading building materials. When planning a structure such as an aerated concrete garage, the characteristics of the material used at all stages of construction are taken into account. The correct technology for laying walls, making armored belts and features of the exterior finishing of the building are observed.
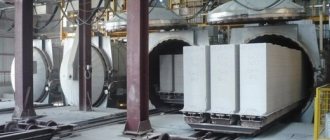
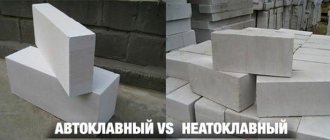
Aerated concrete blocks are used in multi-storey and private construction. It differs from known concrete in the absence of crushed stone and consists of sand, cement, lime and aluminum powder.
Built-in garage
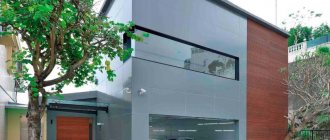
A built-in garage is one that is located on the same foundation as the house and is its structural part. This architectural solution has its advantages and disadvantages. For example, a separate foundation for a garage made of aerated concrete may be less complex and expensive than the foundation of a house. Therefore, the extension is cheaper. On the other hand, the garage as part of the cottage turns out to be warmer, it is easier to connect all communications to it, and it is initially included in the layout of the first floor.
Layout of the first floor of a cottage with a built-in garage Source stroydom-taldom.ru
Benefits worth noting
Construction from aerated concrete blocks is very popular. And this is explained by the fact that this building material has a number of advantages in comparison with other building materials. It is recommended to use branded aerated concrete, which has been tested for years and remains the most popular. These are the advantages.
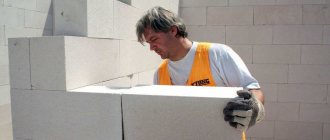
The advantage of aerated concrete is its lightness and ease of installation - special glue is used.
- Ideal geometry from a branded manufacturer.
- Low thermal conductivity.
- Light weight (low load on the foundation).
- Fire resistance.
- Resistance to fungi and mold.
- Wide range of types, sizes.
- Ease of processing.
- Relatively low price.
- Savings on finishing. With the correct geometry, the perfect wall is obtained.
- The use of cement is not required (it is laid with special glue).
- Good vapor permeability.
- Ecologically pure.
- Resistant to pests.
- Speed in construction and ease of work.
- Good thermal insulation.
- Frost resistance.
Disadvantages: how are they displayed?
Like other building materials, aerated concrete has some disadvantages that are easily eliminated with modern technologies used in construction. The disadvantages are:
Fragility and water absorption are disadvantages of the building material, so it is necessary to apply additional finishing.
- Fragility, especially at low density.
- Poor retention of fasteners. Requires the use of special fasteners.
- Water absorption.
Calculations and projects
Depends on the square footage of the building. The project indicates the length, width and height of the walls. Based on these data, the area is calculated. Aerated concrete has different sizes, based on this the number of pieces or cubic meters is calculated. To make an accurate calculation of building materials, you must not take into account openings for windows, doors and gates. If you plan to build a garage from aerated concrete with your own hands, it is advisable to make a design for the future construction in advance.
When implementing a project for a cottage with a garage, the area, supply of necessary communications - electricity, ventilation, water supply, as well as ease of access and the possibility of additional extensions are taken into account. If you plan to build a turnkey garage or with an attic, then it is better to contact companies involved in planning buildings, where they will make accurate calculations of the necessary materials and offer:
- roof plan;
- opening elements;
- gender explication;
- architectural units in structures.
How to build a garage made of aerated concrete with your own hands: foundation, walls, roof.
One of the cheapest options for building a vehicle storage space is a garage made of aerated concrete. The ease of installation and lightness of this building material facilitates the rapid construction of walls with your own hands without the involvement of qualified specialists. Since the weight of aerated concrete is several times less than brick or expanded clay concrete, you will not have to build an overly massive foundation. It is worth mentioning another advantage of aerated concrete when building a garage - high vapor permeability, so that the humidity in the room will always be balanced. This means that the negative impact of moisture on your transport is minimized.
It is always comfortable to work in a garage made of aerated concrete due to the ability of this material to breathe. In winter, such a garage warms up more easily and retains heat for a long time. This feature is associated with the low thermal conductivity of the porous structure of the aerated block. In addition, autoclaved cellular concrete is a fairly strong and durable material. On the market you can find an aerated block with a compressive strength of 2.5 MPa and frost resistance of F100 cycles (for example, aerated concrete Aerok d300)
Stages of work: what do they include?
Planning the construction of any building begins with determining the location of the structure, excavating the soil and pouring the foundation. The correct choice and installation of the base is a guarantee of the strength and durability of the building. Often, to ensure the stability of the garage, a strip foundation using reinforced concrete slabs is used. The slabs serve as both a base and a floor. The next stage is the construction of walls and roof. The roof of the garage is made of a single-pitch or gable roof. Then the necessary communications are provided, insulation and finishing work are carried out.
House foundation
For the construction of a garage or cottage, there are many types of foundations that should not limit entry. The most used options are monolithic and tape. The size depends on the size of the future structure. When using aerated concrete blocks in the construction of a garage, it is necessary to make a reinforced belt in the foundation. To do this, reinforcing bars or mesh are used when pouring.
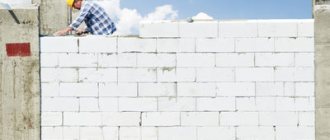
Walls and roof
Work order:
- Before laying the first row, make reinforcement.
- Then aerated concrete adhesive is applied to the surface of the blocks and spread with a comb. The thickness of the seam should not exceed 4 mm.
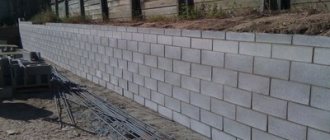
- Laying the walls is done with bandaging. That is, each block is shifted by a distance equal to half the block.
- The evenness of the walls is determined by a building level or a special ruler.
The flat roof of the garage can serve as the basis for an additional building, such as an attic.
The roof for a garage or cottage house can be pitched or flat. The second option is covered with a continuous elastic coating made of polymer-bitumen material; this roof is resistant to temperature changes. The support for it is the walls of the building, the base is screeds or slabs. On such a roof you can make additional buildings, for example, an attic. A pitched roof is formed by bases whose inclination angle ranges from 10 to 60 degrees. The design places emphasis on rafter mechanisms. You can make a pitched roof or a gable roof.
Insulation
One of the advantages of aerated concrete is good thermal insulation. Sometimes additional insulation is done, but it is not always rational. In order not to do unnecessary work, it is enough to choose aerated concrete 375 D-400 for construction. Walls made of this material are durable and do not require insulation. If 250 blocks are selected for construction, then additional work is carried out. Their disadvantage is that when constructing a frame for attaching insulation, the structure of aerated concrete is disrupted. Only basalt insulation is used, polystyrene foam cannot be used.
Wall decoration
Without the use of additional insulation, the aerated concrete wall is quite smooth and durable. To protect the outside of the wall from dust and precipitation, it is enough to stuff a thin mesh, apply plaster to the surface of the wall and paint it with film-forming paint. If insulation is used, then the mesh is filled in the same way and plaster is applied. Walls can be covered with siding, clapboard or decorative panels, or treated with special lightweight plaster mixtures for aerated concrete.
Which foundation is better to choose?
Strip foundation is the most affordable and practical option.
Aerated concrete is a fairly light material that will not put too much pressure on the foundation with its weight . Therefore, there is no point in making a bulky and expensive monolithic foundation, since most of its strength will not be used.
On the other hand, you need to pay attention to the soil under the garage. If the soil is heaving, then it is better to pour a monolithic foundation. The fact is that aerated concrete cracks very easily. Therefore, if the ground begins to move, the walls of the garage will inevitably suffer damage.
In all other cases, a conventional strip foundation is ideal for a garage made of aerated concrete. Next we will look at the process of constructing just such a foundation.
DIY aerated concrete garage
The car requires special care. The garage provides ideal conditions for maintenance and storage of the machine. Any car owner knows this. You can solve the problem of parking a car in different ways. For example, you can buy a ready-made garage, install a shed on the site, or simply leave the car in an open parking lot.
But the simpler the solution, the worse it is for your car. Outdoors, a car is exposed to all the negative influences of the environment: paint fades, rust and corrosion appear, engine components and other mechanical parts become unusable, etc. Therefore, of course, building a permanent garage is much preferable. Especially when you consider that building a garage from aerated concrete with your own hands is quite simple.
DIY sibit garage
Every car owner dreams of his own personal garage. A well-built garage guarantees the safety of your car. There are many technologies for building a garage. One of the simplest and most affordable is building a garage from sibit.
If your financial capabilities allow you, then you can hire a construction team that will build you a garage within a certain period of time. But if you don’t have extra money, then you can build a garage from sibit with your own hands.
Let's consider the phased construction of a garage. Even the simplest construction cannot do without a project. You don't need to order it from professional designers. A schematic drawing will do. The main thing is that it indicates the order of work and an approximate construction estimate. The project must indicate all the priority tasks, why, in fact, you are building it. If the garage is equipped with an inspection pit and a cellar, this should be reflected in the design. In addition, the garage drawing must indicate all the dimensions of the upcoming building. Their numbers should follow from the specific functions that the garage will perform and the area it will occupy.
Options for choosing gas silicate
If you make the right choice of material, the service life of your own aerated garage walls will be 50 years or more. Therefore, beginners do not really delve into the brands of blocks, and, relying on the opinion of sellers, they often buy something that they should not. First of all , you need to concentrate on the brands of aerated concrete (D400, D500 and D600) .
Aerated concrete grades D500 and D600 are more suitable for the construction of one-story houses. Here, the advantage is given to the high density of the material, but the thermal insulation properties are lost. And D300 brand blocks are slightly weaker in strength, but heat loss is low. It is from them that small-sized buildings should be erected, for example, bathhouses and garages. Because gas silicate walls do not need to support a massive roof, unlike large dachas.
Video: Insulating garage doors
We looked at the nuances of choosing and installing insulation for your garage yourself. These technologies are optimal because they do not require large financial costs, but at the same time cope with their tasks. The main thing that is required of you is to follow the instructions and ensure the continuity of the thermal insulation “shell”. This is the only way to eliminate leaks and ensure normal temperature conditions in the box, regardless of the time of year.
- Author: Yaroslava Klochko
My name is Yaroslava. By education he is a pure “technician” - a mechanical engineer of mining machines. You will probably think: “A female mechanic – what a horror!” But, in fact, a “male” specialized education gives me the opportunity to soberly evaluate many things and rely on logic in my judgments. And my curious “female” half is drawn to everything interesting and unusual, which sometimes escapes attention. Rate this article:
- 5
- 4
- 3
- 2
- 1
(4 votes, average: 4 out of 5)
Share with your friends!
Advantages and disadvantages
Aerated concrete blocks are superior to expanded clay blocks in many respects. Therefore, before purchasing, compare the characteristics of some types of porous materials, and then make sure that gas silicate is better than the rest. Undeniable advantages:
- the quality of heat and sound insulation is at the highest level - this is due to the porous structure of the products;
- aerated concrete blocks do not burn at extremely high temperatures, which ensures fire safety at home;
- the material is environmentally friendly, since it is made from natural ingredients: sand, lime and Portland cement, so you can forget about the harm to health;
- although the material is inferior to cinder blocks in strength, it is still able to withstand strong mechanical shocks;
- The weight of the product is very light, which reduces the cost of building a foundation and increases the speed of work.
- When building walls from aerated concrete, you should remember that their vapor permeability is very high, and the material will absorb moisture, a problem that can be solved if you use garage finishing;
- the next drawback is low strength due to porosity; if a car enthusiast decides to hang a shelf and place heavy objects on it, the fasteners may fly off.
Aerated blocks are placed not on cement mortar, but on special glue, therefore, there will be no cold bridges. In addition, the row spacing seams are only 2 - 3 mm, this reduces heat loss. Walls made of gas silicate, unlike bricks and cinder blocks, are laid 4 times faster.
However, this material is not without its disadvantages:
To avoid problems with cracks and deformation of the walls, it is necessary to do the work correctly. Metal anchors are used for hanging garage furniture. As a last resort, you can build a metal stand that does not have to be fixed to the wall.
Start of construction work
Building a garage from aerated concrete begins with choosing a project that meets individual requirements. You can find a suitable development in a ready-made form, using information from the network or a specialized magazine, or order your own version by contacting specialists.
The help of professionals is the best option to resolve the issue, since the projects presented on the Internet or in magazines are developed taking into account a number of factors that may not coincide with the characteristics of the site chosen for construction.
First of all, this is:
- soil type;
- groundwater level;
- features of climatic conditions.
After receiving an individual garage project, you need to stock up on a set of tools and materials that will be needed during construction.
The list includes:
1. Tools
- a hacksaw necessary for cutting an aerated concrete block;
- wall chaser;
- brushes;
- a carriage convenient for distributing the adhesive layer;
- notched spatula;
- trowel;
- plumb line;
- shovels;
- rubber mallet;
- building level;
- container for diluting and storing the solution.
2. Materials
- aerated concrete blocks;
- crushed stone;
- cement;
- sand;
- boards for formwork construction;
- reinforcing mesh;
- fittings (intended for strapping);
- glue for laying aerated concrete blocks.
Evgeniy Filimonov
Ask a Question
It is better to start building a structure made of aerated concrete in the warm season. The estimated time frame for completing the work is also taken into account. It all depends on the level of preparedness of the performer. On average, professionals take about two months to build, excluding the time spent on the interior decoration of the garage.
Construction technology from scratch
Without a project, it is impossible to build a garage from aerated concrete blocks. Therefore, drawings are created, all dimensions are calculated, and the shape of the roof is selected. Simply put, the project must contain all the little things related to the construction of the building. And also do not forget about the estimate containing prices for glue, cement, crushed stone, sand and other materials. This will help avoid overspending.
In order not to buy extra material, the total area of the walls is calculated and the entrance opening and window openings are subtracted. For example: the total area of the walls of a garage with parameters 8*5*3 m will be 78 sq. m. Now the entrance opening (2*3 m) and at least one window (1*1 m) are subtracted. The result will be 71 square meters. material. The resulting number is divided by the side area of the block and you can find out exactly how much you need to buy. However, it is recommended to add a few percent for defects.
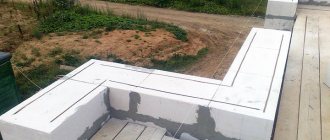
Foundation structure
After drawing up the project and calculating financial costs, the material is purchased. The first step is to build the foundation for the building. If the soil does not contain a high level of groundwater, then, as a rule, a strip type is chosen. Otherwise, the foundation for a garage made of gas silicate blocks is done as follows:
- First, the perimeter of the future structure is marked. Pegs are mounted in the corners and the cord is pulled.
- Take a shovel and dig a ditch 50 cm wide and 70-80 cm deep.
- A cushion of sand and crushed stone is laid at the bottom of the trench, layers of 10 cm each. Then the layer is spilled with water and compacted.
- A reinforcing frame is made from reinforcement with a diameter of 8 mm. Along the entire length of the ditch, closer to the walls, rods are installed parallel to each other in increments of 50 cm. They are connected by jumpers. Then long pieces of reinforcement are taken and laid along the pit, secured to the installed rods. The second and third tier are made in this way. Several elements can be connected using wire and hook or welding.
- Now the formwork is assembled from panels, timber and boards. The structure should protrude 10-15 cm above the ground. This will protect the aerated blocks from water flows during rain. It is preferable to attach plastic film to the inner walls of the formwork.
- Concrete is created from sand, crushed stone of medium fraction M400 and water. The proportions are standard 1 to 4. The solution is brought to a semi-liquid state. If it is thick, it will not be able to penetrate into all the voids, and if it is too liquid, it will seep into the soil. For greater effect, a detergent or plasticizer is added to the mixture to provide viscosity.
The mixture is poured to the edges of the formwork sides and leveled with a trowel. The foundation for a garage made of gas silicate blocks will dry out only after 30 days, and during this time it is periodically spilled with water. If you do not water, the base will stop absorbing moisture and cracks will appear.
Walling
Proper laying of aerated concrete walls will prevent deformation and the formation of cracks. Often, novice builders neglect seemingly unnecessary little things; as a result, defects appear on the garage box. Procedure:
- Two layers of built-up roll waterproofing are laid on the dried surface of the foundation. The first one is glued to the base, and the second one is glued to the insulator itself. This will protect the gas silicate from absorbing moisture.
- Metal rods are installed at the corners to install the control thread. As the walls grow, the cord gradually rises. It is located at the level of the top edge of the block. A 2 cm layer of cement mortar is laid on the surface of the roofing material, and gas silicate is installed on it. Irregularities are corrected by tapping with a rubber mallet. This is how the first row is made, which must be extremely even, because it will form the entire box.
- Next, the gas blocks will be laid in the corners using special glue. One is installed in one direction of the wall, and the second in the other. This will be followed by ligation of the vertical suture. This is how all corners are made.
- Then the 5th row is reinforced with thin metal wire. It is enough to place 3 pieces. along the surface of the wall being built. Its thickness should not exceed 3 mm. Reinforcement will follow after another 5 rows and so on until the box is made.
- Metal guides are installed at the openings. When the masonry reaches the surface of the gate or window opening, a lintel is mounted on top of the blocks. It needs to be strong as there will be some pressure on it. If thin-walled metal is used, the product will bend.
To get around the unpleasant situation when the seams between the rows look like sea waves, it is recommended to control the evenness of each stacked block. The cord will help adjust the gas silicate in a horizontal position and control the height between the materials, and the building level will ensure vertical evenness on the sides. However, with crooked seams, deformation of the box may occur. Therefore, we must try to build the walls evenly.
Attention! After several rows, the inner corners of the box are periodically checked diagonally using a tape measure. From the corner of one wall, the length is measured to the opposite corner. This way you can view the symmetry of the structure.
Reinforced belt
The corners of the box may become deformed over time. In addition, the rafters should not be installed on aerated concrete, since it is not durable and the reliability of fixing the fasteners will become questionable. For these purposes , a reinforced belt is made that will hold the corners of the garage , preventing them from moving, and will serve as the basis for the construction of the roof:
- First of all, the formwork is constructed. It is enough to take plywood sheets and fasten them to the wall. The height of the reinforced belt is 20-25 cm, therefore, the formwork is also constructed according to these parameters. It is important to make the upper edges of the product even and symmetrical to each other - they will form the surface of the concrete structure. To prevent the sides of the formwork from being squeezed out, they are secured with wire every 100 cm closer to the top.
- Now a frame of rods is constructed inside the formwork. The technology is similar to foundation reinforcement. To adhere the entire belt to the wall surface, the reinforcement is driven into blocks at intervals of 60 cm. Jumpers are attached and longitudinal rods are laid. There should be 2 tiers.
- When mixing concrete, expanded clay is added to the mixture. The material is porous and lightweight. The solution is created of medium thickness. It is advisable to pour concrete into the formwork at one time. Then the product will turn out monolithic.
A reinforced expanded clay belt will be lightweight and will not push through aerated concrete blocks. It will be an excellent basis for a rafter system.
Roof structure
Another difficult stage is installing the roof. The car enthusiast must decide on the shape of the structure: single-slope, gable or hip. Typically, garages are equipped with single or double slope options; they are cheaper and quick to construct. Construction process:
How to build a garage from aerated concrete
Before you start building a garage with your own hands from aerated concrete, you need to draw up a garage project, which will reflect all the parameters of the future structure, and determine the type of garage.
You need to decide:
- Will it be a separate building or will house designs with aerated concrete garage be used, which is very important when choosing a building construction technology.
- It is important to consider the size of the future garage.
- Do you need a viewing hole or storage space in the garage?
- The type of foundation is determined.
Tip: Aerated concrete is lightweight, so you can build a simple strip foundation that will cope with all the functions assigned to it.
- Optimal lighting is selected (see How to make lighting in the garage yourself) and room heating. Aerated concrete has good thermal insulation properties, which allows such a garage not to be insulated. However, you can do this if you wish.
- After preparing the project and all the necessary materials for its implementation, you can proceed to the next stages of work.
How to build a foundation
Any projects of aerated concrete cottages with a garage or separately erected buildings begin with the construction of a foundation. If we are building a garage from gas silicate blocks, then the best option would be to make a shallow strip foundation.
Scheme of a shallow foundation for a garage
To make it you need:
- Thorough clearing and leveling of the site.
- Marking the territory. To do this, you can use pieces of reinforcement and ordinary rope. The reinforcement is driven into the ground in the corners of the marked garage and the rope is pulled. Then the width of the walls is retreated and the internal contour of the foundation is marked in the same way.
- Excavation work is being carried out, which consists of digging along the entire perimeter of the strip pit. Its depth depends on the properties of the soil, most often it ranges from 70 to 90 centimeters.
- The bottom of the trench is leveled in a horizontal plane.
- A cushion is poured from sand and gravel.
- The formwork is being installed.
- Waterproofing is being installed.
- A two-layer strapping is made from reinforcement.
- The concrete solution is poured.
- The foundation is left until completely hardened, for about 28 days.
How garage walls are built
Tip: After the foundation has hardened, roofing felt is laid on it, which allows waterproofing of the joints. In the absence of such a layer, groundwater can penetrate the walls and gradually destroy them.
The blocks are laid using a special construction adhesive; the material is cut with a grinder or saw.
The order of work is carried out in the following sequence:
- Glue is applied on top of the roofing felt.
- The corners of the first row are laid out and leveled to the building level.
- The string is stretched between the blocks.
- The first row is laid, while the ends of the bricks are coated and pressed tightly against each other.
- Using a rubber hammer, the blocks are leveled and aligned with the string.
- After the glue has hardened, the silicates are processed with a grater and dust is removed from them.
- Laying the second row begins from the opposite corner.
Advice: Blocks should be installed so that there is an offset of the vertical seams of adjacent rows, which will increase the strength of the wall being built.
- After four laid out rows, reinforcement is made from reinforcement or a special mesh.
- All rows are laid out this way, except where the gate is installed.
- On the wall where the gate is supposed to be, a lintel is made above it. For this:
- a metal frame is being prepared;
- installed inside the garage wall and fixed with mortar;
- a metal or reinforced concrete beam is laid, which extends 20 centimeters into the masonry on both sides.
- Gas silicate blocks are placed on it.
- When laying the last row, it is necessary to leave openings for placing beams under the roof of the building.
After the solution has hardened, the construction of the roof can begin.
Do-it-yourself garage made of aerated concrete - the advantages of the material
Having decided to build a garage with your own hands from aerated concrete, which has a cellular structure, carefully understand the characteristics of the blocks, which are becoming increasingly popular among private developers. Car owners are attracted to aerated concrete not only because of its affordable price.
Your own garage is a reliable guarantee of car protection
Owners of aerated concrete garages are convinced of the large number of advantages that the material has:
- increased thermal insulation properties. Thanks to their porous structure, aerated concrete blocks retain heat well inside the garage. The reduced thermal conductivity of aerated concrete helps maintain a comfortable temperature;
- reduced mass. Garage walls built from lightweight aerated concrete blocks do not create increased loads on the foundation. This allows you to save on the construction of the foundation and build a lightweight version of the foundation;
- increased strength. Cellular blocks are able to maintain integrity under the influence of increased loads. The strength characteristics of the material make it possible to build a two-story garage made of concrete. For a garage with aerated concrete, the roof can be constructed from massive reinforced concrete slabs installed on an armored belt;
- ease of laying blocks. Standard blocks, characterized by increased volume and low weight, are easy to lay on the mortar on your own. It is especially convenient that for construction activities there is no need to use lifting equipment;
- acceptable cost. With a low cost of purchasing blocks, you can build a reliable and durable room designed for storing a vehicle. The construction of an aerated concrete garage will not require increased costs;
- resistance to negative temperatures. Blocks made of gas-filled composite retain their integrity when operating under conditions of sudden temperature changes, while maintaining their performance properties;
- ability to pass steam unhindered. The increased vapor permeability of the cellular array helps maintain comfortable humidity in the room and ensures air exchange. Porous plaster does not reduce the vapor permeability of aerated concrete walls;
- environmental friendliness of the material. In the process of manufacturing aerated blocks, no harmful components are used that have a negative impact on human health. There is no release of toxic substances during operation.
Getting a self-made building while saving money is not the only advantage of a garage made of aerated concrete blocks
Along with these advantages, it is necessary to note the ease of mechanical processing of gas blocks, which do not require the use of special tools. A serious plus is the correct geometry of the block material, characterized by ideal flatness. The only drawback of gas blocks is increased hygroscopicity. To protect the porous surface of the blocks from moisture absorption, various finishing materials are used or a centimeter layer of breathable plaster is applied, which will be quite sufficient.
Advantages and disadvantages of building a garage from aerated concrete
The main advantage of blocks made of gas-filled concrete is their thermal conductivity, which is even more important for an unheated room than for a residential one. With the high resistance of the masonry to heat transfer, the temperature in the garage will be quite acceptable even without organized heating. The main thing is to do everything so that the masonry is not blown by the wind, and its heat loss is reduced to a minimum. What does this depend on?
First of all, it depends on the number of deviations in the geometry of the blocks. According to GOST 21520, three quality categories are provided for products made of cellular concrete:
| Parameter evaluation criterion | 1 category | 2nd category | 3 category |
| By lenght | 3 mm | 4 mm | 6 mm |
| By height | 1 mm | 4 mm | 5 mm |
| Width | 2 mm | 3 mm | 6 mm |
| In the difference between the lengths of the diagonals | 2 mm | 4 mm | 6 mm |
| In the straightness of the ribs | 1 mm | 3 mm | 15 mm |
| In the depths of broken corners and edges | 5 mm | 10 mm | 15 mm |
- The first and second categories include synthetic hardening (autoclave) products, since they are subject to more stringent requirements. They have their own GOST (31360), and the third category is not provided for at all. As can be seen from the table, the difference in permissible deviations is significant, and first of all it affects the thickness of the joints in the masonry.
- Due to the higher ability of the solution to conduct heat, the seams are cold bridges. But this is if blocks of category 2 or 3 are taken for masonry, which can only be mounted on the central substation. Thick seams can also be made using cement adhesive. In this case, heat will not escape through them, but a large overconsumption of the mixture will result in considerable costs.
- If you buy blocks of category 1, their higher cost can be compensated by savings on masonry mortar. They can generally be mounted on foam adhesive. 850 ml of PPU glue can replace a 25 kg bag of dry cement glue, which requires effort and money for delivery, loading and unloading, and mixing with water. The seams are very thin, and besides, adhesives based on polyurethane foam have a thermal insulation coefficient that is several times lower than that of aerated concrete itself.
- With thin seams, the masonry will not only retain heat better, but will also be less exposed to wind. The reason for this, by the way, may be the vertical seams between the blocks, the side edges of which are equipped with grooves. Such products are also on sale, but builders are not very fond of them. According to the technology, tongue-and-groove joints do not need to be filled with mortar, but such a connection does not provide the necessary tightness. So, it’s better to take regular straight blocks.
- Any aerated concrete building also loses heat through monolithic sections of the walls. In the case of a garage, this could be an armored belt along the top edge of the masonry, on which the floor slab will rest, or a reinforced concrete lintel over the gate opening. To fill them, it is better to use not traditional wooden formwork, but aerated concrete blocks with a U-shaped recess, specially designed for such work.
Another condition for the high thermal efficiency of aerated concrete walls is the mandatory finishing of the facade, which will protect the walls from wind and atmospheric moisture. It’s even better if there is an insulating layer under this finish. The less the masonry gets wet and freezes, the warmer your garage will be.
We begin to build a garage from aerated concrete - preparatory activities
Having decided to build a garage from aerated concrete with your own hands, you should prepare for construction activities:
- develop design documentation or select a ready-made option that matches the nature of the soil;
- perform the necessary calculations to accurately determine the need for material;
- prepare tools and construction materials provided for by the project to perform the work.
Let us dwell on the features of performing each type of work.
Designing a garage from aerated blocks
Project documentation is developed taking into account the following points:
- nature of the soil;
- level of location of aquifers;
- climate features.
Building a garage from aerated concrete begins with choosing a project that meets individual requirements
Various design approaches are possible:
- independent development of a project or working sketch;
- use of ready-made design documentation;
- ordering a project on a contractual basis from a design organization.
It’s easy to save money and develop a project yourself. To do this, it’s worth looking at ready-made projects for bathhouses made of aerated concrete or adapting a ready-made garage project to your requirements.
The project contains the following information:
- garage dimensions;
- design features of the structure;
- type of foundation;
- number of floors;
- roof structure;
- type of finishing.
When deciding on the dimensions and design of the garage space, you should take into account the number of cars placed in the garage, as well as determine the need for arranging an inspection pit and basement. After developing the project, proceed to the next stage - determining the amount of building materials.
How is material calculation performed?
The algorithm for determining the need for aerated concrete blocks for building a garage is simple. It is based on the following information:
- the dimensions of aerated blocks are 60x30x20 cm;
- garage dimensions determined by the car owner;
- size of entrance gates;
- wall thickness of 20 or 30 cm depending on the position of the block.
In order to understand the calculation algorithm, it is better to use the option with average indicators
The calculation involves the following operations:
- Determining the number of gas blocks per square meter of masonry.
- Calculation of material requirements by multiplying the number of blocks per square meter by the area of the gas-block box.
Let's calculate the number of standard gas blocks for the construction of a garage with a wall height of 2.3 m and dimensions of 4x6 m. Calculation procedure:
- Calculate the area of the gas block surface for thirty-centimeter walls: 0.2x0.6=0.12 sq. m.
- Determine the number of gas blocks per square of masonry 1: 0.12 = 8.3 pieces.
- Calculate the surface area of the walls: (4+6)x2x2.3=46 sq. m.
- From the total area, subtract the area of the entrance gate 46-2x2.5 = 41 square meters.
Multiplying the actual area of aerated concrete walls by the number of blocks per square meter, we get the need for material: 8.3x41 = 340.3 blocks. It is advisable to slightly round the result up and purchase several more blocks.
Preparation of materials and tools
In addition to aerated concrete blocks, the following materials will be required to build a garage:
- gravel, Portland cement and sand for concreting the foundation;
- reinforcing steel rods to strengthen the foundation;
- wooden panels for constructing formwork for the foundation;
- reinforcing mesh to strengthen gas-block masonry;
- cement mortar or adhesive mixture for laying gas blocks;
- knitting wire for connecting reinforcement when assembling the frame.
After receiving an individual garage project, you need to stock up on a set of tools and materials that will be needed during construction
Options for aerated concrete garage projects
Aerated concrete blocks are a universal building material from which you can build a warm and reliable garage, complemented by a full-fledged utility block. Often, aerated concrete garages are built with terraces, summer kitchens or bathhouses. In addition, this material makes it easy to construct garages attached to the house.
Garage project with utility room
Below is a project for the simplest garage for one car. The building is complemented by a convenient utility room. Such a garage can be built as a separate structure. But it can be attached to the house. The second option involves an internal entrance to the house from the garage itself and from the utility room. When choosing such a project, you should pay attention to the fact that the utility room is designed separately from the garage, with a remote entrance. It can be used as a boiler room, pantry or storage for garden tools. At the same time, the parameters of the car room allow you to install racks along the walls on which you can place all the tools for servicing the car.
Garage with separate utility room Source foamin.ru
Spacious garage project
The next project is the basis for a car room that is as easy to build as possible. There is no separate storage, but there is enough free space to accommodate everything you need. This type of garage is ideal for motorists who spend a lot of time in the garage. Free space can be equipped with comfortable furniture.
Spacious garage for one car Source drevolog.ru
Two car garage project
The following project is designed to accommodate two cars. There is a utility block here, which is connected to the car room by an internal entrance. In addition, the utility room in this development is a walk-through, and if you attach such a garage to the house, you can turn it into an entrance to the house. The drawing shows a carport for one car to the left of the utility room. It can be located to the right of the building or just before entering the garage. In any case, the canopy increases the functionality of the entire structure.
Garage for two cars with utility room Source tr.decorexpro.com
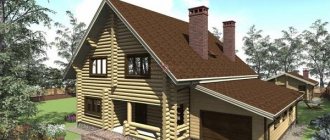
Project of a garage with a bathhouse
Aerated concrete blocks allow the construction of buildings of any complexity. Therefore, some homeowners, having enough space on their site and a little additional funds, build not just garages, but entire multifunctional complexes from aerated concrete. The garage can be combined with a summer kitchen, a terrace for relaxation or, as in this example, with a bathhouse.
In the presented version, the garage room along with the utility unit occupies the right wing of the building. In addition to the bathhouse, the building will include a boiler room. It is worth paying attention to the fact that in this project the exit from the garage leads through the rest room of the bathhouse. For more convenient use and increased safety of the bathhouse part of the building, it is better to consider an exit to the street through the boiler room, and not to create a door from the garage to the recreation room at all.
Garage with bath complex Source medike.ru
Project of a cottage with an attached garage
The following example demonstrates the most common design option for an attached garage with an internal entrance. The house is connected to the car room through a buffer zone, the role of which in this case is played by a compact laundry room. Instead, a boiler room or simply a walk-through pantry can be installed. For maximum protection of the residential part of the house, the exit from the garage is also separated by a hallway. If separating buffer rooms are not designed, then car odors and fumes from flammable substances, which are often stored next to the car, will penetrate into living rooms.
The garage must be reliably isolated from the main room Source tuzhizhijia.com