When carrying out a major overhaul of a long-used home with concrete floors, one very often encounters the need to restore the integrity of these seemingly “indestructible” coatings. Unfortunately, they are also subject to aging and gradual destruction. Over a long period of its service, a screed once poured over a floor slab can, under the influence of deforming forces (associated, for example, with building shrinkage, seismic points, operational static and dynamic loads), become covered with a network of cracks and begin to crumble. Concrete can lose its strength over time, especially if used in unfavorable conditions where there are opportunities for increased erosion.
DIY concrete floor repair
Bringing dilapidated concrete floors into “working” condition can be done in different ways, depending on the degree and nature of the damage. And we must immediately note that this is not such a simple task as it might seem at first glance. There are even situations when it is much easier to completely dismantle the old screed and pour in a new one rather than bother with restoration attempts.
So, let’s figure out how to repair concrete floors with your own hands: from the main reasons for the coating to become unusable to possible technologies for its restoration at home.
The main causes of concrete floor defects
There are many reasons for damage to the screed - these can be external or internal influences.
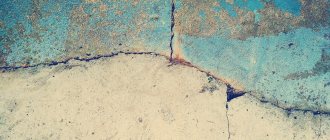
A typical, but even worse, damage to a concrete screed is the appearance of a network of cracks.
- Changes in the soil can have a negative impact on screeds that are poured directly onto the subgrade. Deformations are possible due to poor quality compaction of the base. the cause may be the absence or insufficiency of thermal insulation - with the advent of cold weather, the effect of winter swelling of soils is possible. Another reason is that the screed was poured without regard for the very close location of groundwater.
All these factors can lead to instability of the soil layers, which is reflected in the concrete slab. And this is without taking into account possible seismic shocks.
- Impacts of an internal nature. This item most often includes the use of low-quality screed mortar, as well as pouring carried out in violation of technological requirements. Another factor is the completely natural shrinkage of the structure, which can create very significant internal stresses in the concrete slab, leading to its cracking.
- External influence . This group includes mechanical damage due to the fall of various heavy objects, violation of operating rules (exceeding the permissible load), or from exposure to moisture for a long time.
As you can see, some factors can be foreseen, and try to minimize the likelihood of their negative impact. But there are also reasons of a spontaneous nature, as well as natural aging processes of building structures. So repairing a concrete floor can become an urgent need for any owner of a house or apartment.
Types of concrete floor repairs
Naturally, the first thing to do on the floor is to carry out a thorough inspection of its condition. The resulting picture and the conclusions drawn about the reasons for the “ill health” of the coating will help determine the choice of damage repair technology.
There are several types of repair work on concrete screed. Each of them is suitable for a specific case, that is, depending on the causes and extent of damage.
- Dust removal . They resort to it when the screed shows low surface strength and is very dusty. The dust removal process can be an independent and sufficient measure for floor repair (but not so often). Usually it becomes one of the preparatory stage operations for other, more complex repair cases.
- Local repair is the elimination of small defects that appear in the form of potholes, protrusions, sinkholes, cavities, deep and wide cracks that have arisen in individual areas;
- Major repairs of the floor for the installation of a decorative covering or a “warm floor” system are carried out if more than 30–35% of the area of the entire screed is damaged. There is no point in thinking about “fighting individual shortcomings” - everything needs to be redone, initially with high quality.
Rules for repairing cracks
The process for sealing cracks in a concrete floor varies depending on their size.
- Small cracks expand in depth and width by 2–5 cm. To do this, you can use a chisel or grinder.
- The recess is cleared of pieces of concrete and dust, then treated with a primer.
- To repair cracks in a concrete floor, use a homemade mixture based on PVA. They fill the crack with it and wait for it to shrink.
- A second layer is applied, dried and sanded.
In cases where cutting is accompanied by heavy dusting, which indicates that the concrete is weakened, it is necessary to use only special thixotropic compounds.
Repairing cracks in concrete floors should not be put off for too long. If they are deformable, then they need to be treated with special attention. You can determine their type using strips of paper. Several months before repairs, they are glued to cracks in the concrete floor. With shrinkage cracks, the paper will remain intact; with deformation cracks, the strips will break, which indicates their expansion.
- Such a crack is sawn 5 cm deep and 3 cm wide.
- The edges of the cut get knocked down and a triangular notch is formed.
- After thorough cleaning, the recess is primed.
- Markers are inserted into the crack in 3 m increments.
Markers are thin, smooth metal rods. You can make them yourself from spokes from a bicycle wheel.
- The crack is filled with a thixotropic compound; the use of homemade mixtures in such cases is not recommended
- The concreted area is sanded after drying.
- The marker rods are removed, and a new expansion joint is cut through the holes left behind them.
- Dust is removed from the seam, and a Viloterm cord or its equivalent is placed in it.
- The seam is finally sealed with silicone or polyurethane based sealant.
USEFUL INFORMATION: Floor screed using foam plastic
Some people notice small cobweb-like cracks on the floor, as in the next photo. Over time they may become wider. When the concrete weakens in this part, they are cleaned and covered with soil. To seal, you can prepare your own composition or use a store-bought one.
In order for the furniture to stand level after repairing the concrete floor in the apartment, it is necessary to use a building level throughout the entire process.
Stages of concrete floor repair
Each type of repair has its own technological features of its implementation. But the preparatory cycle will always come first.
Preparing for repairs
Preparatory measures include cleaning the floors from old decorative coverings, if any, and very carefully removing debris and dust from the surface. To reduce dust in the room, the surfaces to be cleaned are sprayed with water.
Cleaning the concrete base: with a broom - this is a last resort, or only for removing large debris. It is best to use a powerful vacuum cleaner.
After large debris has been removed, small cracks and potholes will open, which should be cleaned (try to the full depth) using a vacuum cleaner.
After the surface has been cleaned, it is necessary to inspect it very carefully and try to understand the causes of damage. At the same time, the actions that need to be performed will become clear. Based on the information received, it will be possible to select a technology for repair work and draw up a plan and implementation. Which, of course, includes the materials necessary for its implementation.
The tools usually required are very simple. These are, conditionally, cleaning devices, as has already been said. It is convenient to prime the surface with a roller, and in hard-to-reach places (in corners, narrow niches, behind pipes, etc.) with a brush.
To prepare repair compounds, you will most likely need a drill with a mixing attachment, or a construction mixer. Application and leveling of solutions cannot be done without spatulas, rules.
Some repair operations may require the use of specific tools (a hammer drill, an angle grinder, and others). This will be mentioned as we proceed.
Dust removal
If, after removing the decorative coating, it turns out that the surface of the screed is intact and has no serious damage, but the upper layers are unstable and very dusty, then fixing this is not difficult at all. To remove dust from a concrete floor, you can use one of the special water-soluble primers based on acrylic, polyurethane or epoxy. There are quite a few of them on sale – in a fairly wide range.
Dust removal of a concrete surface is not just removing dust, as it might seem, but creating conditions to stop its mass formation
For floors in outbuildings, as well as subfloors in residential premises, for example, Ashford-Formula, Elakor-PU or Neomer-LP soils are suitable. These compositions will bind dust particles, creating a protective layer about 150 microns thick.
One of the most proven and reliable strengthening and dust-removing impregnations is “Ashford Formula”
If it is necessary to remove dust from finished floors in any room, it is recommended to use Elakor-ED, GruntElast-PU and Retroplate, which are capable of creating a layer of up to 250 microns.
Impregnations for concrete
As mentioned above, dust removal is usually carried out before more complex repair work.
Local repair of cracks, irregularities and other defects
How will we repair the defects?
Many people believe that if cracks appear on the concrete floor or depressions and potholes are identified, then it will be quite enough to simply hammer the defects tightly with cement-sand mortar. We hasten to disappoint you - such a “repair” will not only not give favorable results, but can even seriously damage the decorative coating.
The concrete screed, even having gained the expected strength, still continues to change the structural structure, striving for an unattainable complete stabilization. And for newly laid repair “patches,” the coefficient of thermal expansion, as well as the shrinkage rate and other parameters, differ significantly from those of the old concrete layer.
Therefore, in order for a damaged concrete floor to be successfully repaired, it is necessary to ensure optimal contact of materials, to “harmonize” the characteristics of the old screed and the new applied repair layer. For this purpose, the solution is given special thixotropic properties.
Applying a new solution to damaged old screed that requires repair.
Thixotropy is the ability of a substance, when subjected to repeated mechanical action, to liquefy, that is, reduce its viscosity, and thicken while it is at rest.
These interesting features of some materials are dealt with by a special branch of physics - rheology, which studies the properties of substances in the narrow framework of the aggregate transition from a liquid state (where the canons of hydrodynamics apply) to a solid (in the power of laws for elastic bodies).
When carrying out repair work on concrete floors, thanks to these properties of such a solution, the composition fills the smallest cracks and surface unevenness, and the old coating easily accepts the new “neighborhood”. That is, the repair “patches” and the long-used screed interact optimally with each other.
Thixotropic type repair composition – “Glims CRT-40”
There are special thixotropic compounds on sale, in a fairly wide range, designed specifically for repairing concrete floors. They can be ready-to-use, made on the basis of polyurethane or epoxy resins, or in the form of dry mixtures diluted with water immediately before use.
Glims CRT-40
If it is necessary to repair a concrete base that is not subject to high loads, for example, in an apartment, then a thixotropic mixture can be prepared independently.
To do this, you will need Bustilat glue or PVA, which is diluted with water in a ratio of 1:3 or 1:5. Using the resulting solution, a cement-sand mixture is mixed on it - here the ingredients are taken 1:3.
Making a solution from glue and water
If the damage to the screed is large, it will probably be easier to purchase ready-made PVA-based putty - this is sold in a five-liter package.
If the cracks in the screed are deep enough, then such an adhesive suspension will not be suitable. In this case, it is recommended to purchase special thixotropic compounds for the primer and for the repair mixture.
When preparing repair mortars from dry mixtures, it is necessary to achieve their ideal homogeneity, which is hardly possible to achieve by simple manual stirring. Therefore, an electric drill and a special mixer attachment are used for this purpose.
When making your own repair mortar, the dry mixture is added to the prepared suspension, and not vice versa!
You should not prepare too much of the mixture, because if it is not processed on time, irreversible hardening processes will begin in it, and it will become completely unsuitable for further use. Trying to “reanimate” it by adding water is a completely useless exercise.
Mixing the solution using a mixer
Mixing the solution must be done for at least three to five minutes. After the mixture becomes homogeneous, it must be left for 2-3 minutes, and the house must be stirred vigorously again for a minute.
Spider Crack Repair
Cracks that spread out like a web can occur when the screed that was once poured dries unevenly or too quickly. Just looking at the cleaned floors, sometimes you won’t even notice this defect right away. But when the surface is moistened, small cracks immediately begin to appear.
Such damage does not seem to cause harm to the decorative floor covering, and may not even show a desire to expand over time. However, over time, the cracked layer may begin to peel off from the base.
One example of spider web cracking of a concrete floor screed.
The process of eliminating this defect consists of the following steps:
- The surface is first treated with a primer. During processing, it may become apparent that the edges of the cracks are weakened and crumbling. In this case, additional cleaning of these areas will have to be done.
- After the cracks have been widened, they should be thoroughly cleaned of small fragments of old mortar (with a brush or, better yet, a vacuum cleaner) and additionally primed.
- For sealing, you can use the homemade composition described above, or ready-made mixtures. The mass may differ in its consistency: if it is liquid enough, then it is poured and distributed with a spatula on the damaged area of the screed. A thicker composition is immediately applied with a spatula and gently pressed into the cracks. Due to the fact that the defects have a very small width, a more liquid version of the solution is better suited for sealing them.
Elimination of small irregularities
Sometimes during the process of pouring a concrete screed, when the concrete is distributed and then, when it hardens, minor irregularities form on the surface. This is mainly due to technology violations. For example, if the master, when preparing to pour the screed, neglected to install beacons, relying on his skill, or if inhomogeneities were allowed when preparing the concrete solution. The result of such violations can be a wavy surface of the concrete floor. Intervention is required, otherwise many finishing coatings will not work well on such a base.
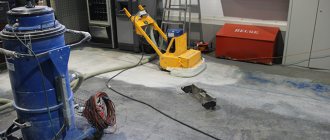
Leveling a concrete surface with a grinding machine
Technology for eliminating irregularities:
- The resulting waves can be removed by using a grinder with a trowel disk (“cup”) installed on it. You need to immediately prepare yourself that with such “weapons” a dusty and rather lengthy process awaits. Therefore, when performing it, it is necessary to protect the respiratory tract and eyes.
- If the area of low-quality screed is large enough, it makes sense to turn to professionals who have special grinding machines. With the help of this equipment, the process will go much faster, and you will also not have to clean all surfaces from cement dust, since it is constantly collected during the work in a bag attached to the machine, or in a connected construction vacuum cleaner.
- After cleaning the surface, the remaining depressions on it are further cleaned. Next, the concrete is treated with a primer.
- In this way, the screed is leveled to the maximum possible level. If the result still does not become outdated for the owners, you can add a “final shine” by pouring a thin-layer self-leveling compound.
Self-leveling self-leveling floors – ease of use and quality of results!
This technology makes it possible to bring the surface of a concrete floor almost to the ideal level in terms of smoothness and compliance with the horizontal plane. What are the types of self-leveling mixtures for leveling the floor , and how to work with them - read in a separate publication on our portal.
Repairing deep cracks in concrete floors
Cracks can appear in the screed or even in the concrete floor due to shrinkage of the structure, sudden temperature changes, absence or insufficient amount of reinforcing elements, as well as due to incorrect proportions of ingredients (including, by the way, water!) when preparing the solution.
The technology for eliminating deep cracks can be as follows:
- After cleaning the damaged concrete screed, the cracks in it must be widened by approximately 10 mm so that the repair solution penetrates to the maximum depth. The expansion of cracks is done manually, using a chisel and a hammer, or you can use an angle grinder (“grinder”) with a stone disc.
Widening narrow cracks using a chisel and hammer.
- When cutting the main cracks, it is necessary to examine the areas adjacent to them, since hidden defects may also be found there. If they are not repaired immediately, then after a while you will have to make repairs again.
- After the crack has widened, it should be very well cleaned, preferably with a vacuum cleaner, to its entire depth from dust and larger particles of construction debris.
- The next step is to treat the extended defects with a primer (for example, polyurethane), which will strengthen the edges of the crack and prevent further crumbling.
When repairing concrete floors, polyurethane primers perform best. True, they are quite expensive.
Krasko PS-Grunt
- When the soil has set, the prepared crack must be tightly filled with a repair mixture, which is leveled flush with the main surface using a spatula.
- If the cracks are large, then the repair mortar used to fill them may crumble over time, so their edges are additionally fastened with pieces of reinforcement, embedding them perpendicular to the gap.
Cutting grooves for laying metal grips
To do this, using a grinder, recesses are cut into the concrete in increments of approximately 150 mm. The depth of the grooves should be such that small pieces of reinforcement (about 50 mm long, 5–6 mm in diameter) are completely deepened into it, and there is a space of about 2–3 mm left on top for the repair mortar.
Laying pieces of reinforcement into prepared “nests” along a wide crack.
- After this, both the crack itself and the transverse grooves with grips are tightly filled with a repair mixture, which is leveled with a spatula flush with the main surface.
Filling potholes in a concrete floor
Potholes in screeds are not as common as cracks. They can form due to heavy objects falling from a great height, or due to unsuccessful installation of heavy equipment. May have such defects and erosive nature
Filling a pothole with epoxy
Pothole repair technology:
- The walls of the pothole must be rid of weakened areas of concrete. For this, the same chisel and hammer are used.
- Next, the resulting pit is cleaned with a vacuum cleaner and thoroughly primed.
- You can fill the pothole with a special epoxy repair compound, or with a thixotropic cement-based adhesive solution - the same one that has been mentioned more than once above.
Grinding the concrete surface
- Then the solution must be evenly distributed in the pothole so that it is flush with the main surface of the floor. Leveling the mass is done with a spatula. After the solution has dried, this area of the floor must be sanded.
If the depth of the pit is more than 50 mm, the repair is carried out in several stages to avoid subsidence of the solution and the formation of air cavities inside the mass. Nothing can be done - the repair period will certainly increase.
Major repairs of concrete floors
Major repairs are carried out in cases where a large (more than 30%) part of the concrete surface is damaged by cracks, chips, etc. In this case, there is no point in repairing individual areas, since the destruction may continue under the decorative coating, which can irreparably harm it.
A heavily damaged concrete screed with delamination from the floor slab - such a “beauty” will be easier to completely replace.
Instead of the damaged layer, after its complete dismantling, you can lay a new screed - classic “wet”, semi-dry or dry.
Any option for a new screed will have to be accurately calculated, taking into account all layers of the floor structure. As a rule, the new screed should not be thicker than the dismantled one. It is especially important to take this into account if floor repairs are carried out in a multi-story building, when the floor slab cannot be overloaded.
In addition, it should be remembered that the height of the floor in the room after installing a new screed and laying the decorative covering should not exceed the height of the floors in the adjacent rooms, and also be higher than the threshold of the doorway. Therefore, the thickness of the structure must be calculated starting from the lower layers, giving them a small margin. If suddenly the floors turn out to be lower, then their height can be easily compensated by increasing the thickness of the plywood, joists or substrate.
As an example, we can take the calculation of the height of the structure from the floor slab to the door threshold, using a wet or semi-dry screed, the total height of which is measured in advance.
- Waterproofing layer - this can be a laying material or in the form of mastic or mortar - 1 mm;
- Fine expanded clay used as insulation and sound insulation - 15 mm;
- Concrete layer (screed itself) - 30 mm. Screeds with a thickness of less than 30 mm, as a rule, are not poured, since they will not have the required strength. (Hidden in the thickness of the screed is a reinforcing mesh to strengthen the structure made of 6 mm rod, but of course they are not included in the total height).
- Adhesive layer for plywood - 1 mm;
- Plywood layer - 8 mm;
- The adhesive layer for the laminate is 2 mm;
- Decorative coating, laminate - 12 mm.
Here the “pie” from numerous layers turned out to be 67 mm thick. If you need to make the thickness greater, you can increase the thermal insulation layer, or, for example, purchase plywood 10 - 15 mm thick.
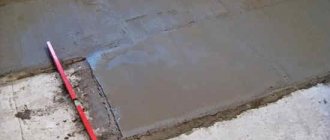
Pouring wet screed
The poured concrete layer is leveled according to the guides of the beacon system
Dry screed consists of three layers - waterproofing, a layer of special expanded clay backfill, and a rigid coating of gypsum fiber boards. A decorative covering is laid on top of this structure. Expanded clay backfill is also leveled over metal profiles used as beacons.
Dry screed – quickly and without unnecessary dirt!
In addition to the speed of installation and readiness, dry screed is superior to classic screed in lightness and thermal properties. Detailed step-by-step instructions for laying dry screed with your own hands , with all the necessary calculations, can be found in a special publication on our portal.
Laying a regular “wet” screed
As mentioned above, instead of a badly damaged old screed, which simply cannot be put in order by some kind of restoration operations, that is, by filling cracks and holes, it can be easier to fill in a new one.
The process of repairing a concrete floor in this case takes place in the following order:
| Illustration | Brief description of the operations performed |
| Work on major repairs of concrete pavement begins with the complete dismantling of the screed that has become unusable. This work is labor-intensive, very noisy, dirty and time-consuming, since you have to work with a hammer drill. All dismantled concrete is removed from the premises, which can also be difficult if you work with a small number of assistants or even on your own. | |
PENTAX DIGITAL CAMERA | The next step is thorough cleaning and dust removal. To do this, first remove small construction debris, then use a vacuum cleaner to collect dust from the surface. And after that, immediately, without pause, it is treated with a primer that will bind the remaining smallest dust particles and fill the surface pores of the floor slab. |
| Now you need to determine the height of the future screed without taking into account the thickness of the decorative coating. The work can be done using a laser or regular water level. Metal profiles will be placed along the marking lines marked on the walls, which will become beacons. The poured screed solution will be leveled along them. With a laser device, everything becomes much simpler and more accurate, so it makes sense to look for an opportunity to rent such a device. | |
| Next comes the installation of waterproofing material - it can be dense polyethylene, roofing felt, or a bitumen-based material specially designed for this use. The waterproofing is applied to the walls to a height of approximately 150 mm. If several waterproofing sheets are installed, they are overlapped by 150 mm and secured together with moisture-resistant tape or bitumen mastic, depending on the material used. | |
| A damper tape is installed on top of the waterproofing material on the walls, which will become a compensation layer for the thermal expansion of the screed, preventing it from cracking. In addition, such a measure becomes a barrier against the spread of impact noise. | |
| The next step is filling in expanded clay, which is a fairly effective insulation and noise absorber. It must be distributed over the surface in an approximately uniform layer. Instead of expanded clay, some owners prefer to use extruded polystyrene foam. When using it, before laying the reinforcing layer, it must be covered with dense polyethylene. | |
| A reinforcing mesh is laid on top of the expanded clay, its individual parts are mounted overlapping one or two cells and fastened together with wire. The mesh is laid so that the distance between it and the walls is approximately 30÷40 mm. | |
| After this, focusing on the marking lines, a system of beacons is installed. After the guide profiles are aligned in a single horizontal plane, they should be finally fixed using slides of quick-drying mortar. A regular cement-sand mixture with the addition of gypsum will also work. | |
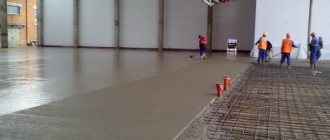
| To fill the prepared site, a viscous solution of sand and cement, taken in a 3:1 ratio, is used. Special plasticizers are often added to the composition; fiber fibers can also be added for internal micro-reinforcement of the screed. In this case, no thixotropic additives are added to the solution, since the new layer will not come into contact with the stabilized concrete. The stores are full of ready-made dry mixtures specifically for sand-cement screed. It’s even easier, although more expensive, than preparing it yourself “from scratch.” The prepared, thoroughly mixed solution is poured between the beacons so that it is slightly above their level. Below, as a bonus, there will be a special calculator that allows you to calculate the amount of ingredients for independently preparing a high-quality solution for floor screed. | |
| The poured solution is leveled using a rule that is installed on adjacent profiles and carefully moves along them with oscillatory (left - right) and translational (toward) movements. This removes excess solution from the surface, moving it to a free space for now. Then the next portion of the solution is poured and leveled again using the rule. This process is repeated until the entire floor is completely filled. | |
| After filling and leveling is completed, the screed is left to dry and gain strength. In the first days, drafts should be excluded, and it is better to cover the floor itself with plastic film. During the first week, it is recommended to thoroughly moisten the surface daily. Waterproofing material, as well as damper tape protruding above the screed, are usually removed only during the installation of the decorative coating. The screed will require at least three weeks before the next stages of work begin. Some dry screed mixtures also have a shorter time to reach operational readiness |
After the screed gains strength, the next stages of work will depend on what kind of decorative coating is intended to be laid. If the coating will be laid directly on concrete, then the surface must be primed, and the primer is applied in two or three layers.
After the soil has dried, the floors are checked for evenness using a rule and a building level. If a gap of more than 3 mm is formed between the floor and the rule, then it should be corrected using a self-leveling solution - we provided the link above.
Laying plywood sheets with glue
If you plan to lay plywood on top of the screed, it is better to fix it with an adhesive layer. Well, on the plywood layer you can install any decorative coating, even ceramic tiles.
* * * * * * *
From all that has been said above, we can conclude that repairing concrete floors can be either quick and relatively simple, or extremely labor-intensive, time-consuming and expensive. Having become familiar with the main methods of putting a screed in order, you can decide which one to choose for a particular case. But this can be done only after removing the decorative coating and dusting the surface, when all the damage to the concrete appears.
It should be noted that relatively minor restoration work can be done independently. But for major repairs, it is recommended to invite a team of craftsmen. Although, if you have good helpers, then you can easily cope with this task on your own.
Repair of concrete and reinforced concrete structures using gunite
We prepare the solution from 3 parts sand and 1 part cement.
Be sure to add PVA glue. The first method is injection. To do this, polymer materials are introduced into the voids using “injections.” This method allows you to do without partial replacement of the concrete structure. The second method is to apply a special mixture to the damaged surface, which consists of a polymer additive and a cement-sand mortar.
The polymer additives are sulfanol and furyl alcohol. When the mixture applied to the concrete dries and hardens, a polyurethane sealant is applied to it. The third method of elimination is the shotcrete method using a concrete mixture, that is, applying an additional layer of the same material to the areas being repaired.
When applying elastic sealant, moisture is also required.
- chisel;
- hammer;
- sand;
- cement;
- PVA glue;
- putty knife;
- brush;
- mittens;
- water;
- paint brush;
- trowel;
- wooden slats;
- pieces of wire;
- metal smoother;
- sander
To protect the concrete floor from destruction and increase its service life, it is equipped with expansion joints. As is known, under the influence of various loads or as a result of changes in temperature, a concrete sheet can expand or contract.
This causes movement of the coating, the energy of which must be directed somewhere, since such an effect leads to the appearance of cracks on the concrete surface and other serious consequences.
It is the expansion joints that bear the main load. To avoid more expensive procedures aimed at restoring concrete floors, it is necessary to monitor their condition and promptly repair expansion joints when defects are detected.
Types of damage to concrete joints
- wear
- destruction
- edge chipping
- loss of tightness
Concrete has been invented and used for quite some time. Despite the increased strength, this material is subject to destruction over time.
All types of damage are repaired with mandatory reconstruction to the size specified by the project.
Before carrying out restoration work, any surface to be repaired is prepared: cleaned of dust, dirt, oils, and foreign inclusions. When weak concrete is present at the repair site, it breaks down to a hard layer without leaving sharp corners and protrusions. If necessary, remove rust from exposed reinforcement.
The choice of restoration method and type of material is directly related to the work conditions and the size of the damaged area.
Injection is the most popular method of repairing damage with an opening size of up to 0.1 mm.
The essence of this method is that restoration is performed without replacing the structure itself. Cracks, chips and voids are filled with “injections” of polymer or water-cement compositions. This method is recommended when performing repairs with a large amount of damage.
Before starting work, all defects are blown out with a strong stream of air.
Next, the entire surface around the crack is treated with a rag moistened with acetone. To prevent the solution from leaking out of the cracks, they are treated with epoxy adhesive from the outside. To speed up the hardening process, it is possible to use heating with a burner, provided that the flame and glue do not come into contact.
The composition of the mixture used must have a viscous consistency.
Filling of defects occurs under a pressure of 100 kgf/cm². Ready-made polymer or water-cement mixtures must be used within the first 3 hours after preparation. Their complete hardening occurs at a temperature of 17-20°C on 8-10 days.
Grouting is a method of applying a special dry mixture to the surface to be repaired when the size of the defects is more than 2 mm, and their number should not be large. This technique is also suitable for restoring vertical surfaces.
The high quality, strength, frost resistance, and high adhesion of these mixtures make it possible to repair and restore roads and runways. The dry mixture contains Portland cement, dried sand and mineral fillers.
To prepare a grouting solution for 1 kg of dry mixture, you need to take about 200 ml of water brought to 200°C.
Add the mixture to the water in small portions with constant stirring. The solution prepared in this way should be kept for about 5 minutes and used within 2 hours.
To repair a surface of 1 m², 1.8 kg of dry mixture will be required with a maximum allowable thickness of 50 mm.
If the cracks are up to 1mm wide, then polymer cement paints are used to repair them. If the size of the defect exceeds 2 mm, polymer dough is used. The applied mixture contains polymer additives (0.02% sulfanol, furyl alcohol) and a cement-sand mortar. After the mixture has dried sufficiently well, the concrete should be coated with a polyurethane-based sealant.
Shotcrete is a method of creating an additional layer of the same material on top of the old one.
The technology of this method consists of throwing concrete mortar with compressed air. The mixture contains: cement, water, organic additives, sand.
Shotcrete can be either “dry” or “wet”. The difference lies in the point at which the mixtures are mixed with water.
With “dry” shotcrete, mixing is carried out at the exit of the mixture from the pipe, with “wet” it is prepared in advance. This method is good because it can not only carry out repairs, but also increase the resistance of the structure to low temperatures and strengthen structures.
But it is considered labor-intensive and always leads to heavier construction and increased load on the foundation.
The solution is applied to the concrete being repaired in 1-2 layers. To complete the work, it is recommended to use cement M - 400 and higher, the fraction of aggregate used is no more than 8 mm.
Restoration and repair work on concrete surfaces should be carried out at an air temperature of at least 5°C in dry weather.
Regardless of the cause and nature of the damage, their elimination should be carried out only after the process of disclosure has stabilized and the cause of its occurrence has been eliminated.
Concrete screeds are classified as hidden types of work; the normal operation of the structural floor elements laid on them depends on their quality.
Defects in concrete screeds appear on the surface of the coating in the form of cracks, irregularities, and dips.
Opening a damaged floor covering on a concrete screed is possible in the following cases:
- the screed was laid with lean concrete (with insufficient amount of cement);
- installation and subsequent care (humidity treatment) were carried out in violation of technology;
- the screed under the coating has been exposed to aggressive liquids (acidic, alkaline);
- the insulation sagged, the leveling screed was deformed and cracked;
- the screed cracked due to shrinkage deformations (lack of expansion joints, expansion joints).
Concrete floors with a cement coating are usually installed in utility rooms - basements, storage rooms and garages.
When repairing floors, it is necessary to find out from drawings or local sounding which structural layers are located under the coating. During operation, the coating wears out, sometimes after 1-2 years it requires repair.
Such coatings must be kept clean and removed regularly so that individual loose grains of sand do not scratch the surface.
When inspecting the floors, various defects may be revealed.
Cracks in the coating can be caused by poor quality of the concrete screed laid under the cement coating; poorly prepared surface of the concrete base.
To avoid the appearance of cracks when applying the front coating, thoroughly clean the base of dirt.
Contamination with gypsum residues, which even in small quantities can gradually destroy a 5-6 cm layer of concrete screed, is unacceptable.
Blisters, cracks in the cement coating, and surface dusting may occur due to the construction of a hard mortar coating; plastic composition of the solution (release of water on the surface); excessive amounts of cement and the appearance of shrinkage deformations, causing cracks in the coating.
Repair depends on the nature of the defect and the extent of damage to the coating.
Limited to repairs:
- for defects on a small surface area;
- if the purpose of the room where the floors are laid is preserved;
- with low labor costs for repairing communications associated with their sealing.
We suggest you familiarize yourself with painting old wooden windows with your own hands.
It is advisable to install a new coating:
- if the cost of repair corresponds to the cost of new coverage;
- when the purpose of the room changes and there is a need to install floors of a different design.
Concrete floor repairs are designed to repair local scuffs and cracks.
At the same time, a layer of cement mortar cannot be applied to the concrete coating in defective areas, since such repairs are short-lived.
If defects are found, you should:
- Inspect the entire building structure to identify problems.
- Determine the nature of the defects (surface, through, microscopic, massive), the width of the opening, the degree of exposure of the reinforcing elements.
- Select the repair composition in accordance with the survey data.
- Open up a crack in concrete by removing loose particles with a brush and vacuum cleaner before repairing the defect.
- If the defect has exposed the reinforcement, then it is necessary to clean it from corrosion products with a metal brush and treat it with an anti-corrosion compound.
- Open small cracks to a state in which they can be filled with a repair compound. Large cracks in concrete with an opening width of more than 4 mm - prepare for strengthening. To do this, grooves are made across the gap in the concrete element for laying reinforcing wire in them.
- Treat the surface to be repaired with a primer, which increases the adhesion of the repair composition to the base.
- Seal the cracks. Most often, cement-sand mixtures with factory-prepared expanding cement are used for this purpose. When deciding how to fill a crack in concrete - in the screed and seams between floor slabs - you can choose a mixture consisting of liquid glass (20% of the total mass), cement (20%), sand (60%).
If the defects are large, they are eliminated step by step. After pouring, the repaired crack in concrete is rubbed down and the surface is leveled. To improve the quality of the repair, a protective coating, such as a plaster layer, is applied to the concrete element.