Inexpensive and high quality
Among the advantages of a concrete floor, not least is its cost. Today this is one of the most budget-friendly coverings; it can be arranged even with the most modest income. Therefore, for this type of flooring, despite the availability of new materials that are super durable and easy to install, such as epoxy or polymer compounds, there is a stable level of demand. Indeed, due to the high cost of modern new products and the peculiarities of laying technology, it is almost impossible to make a screed with a thickness of more than 10 mm from them.
Schemes for creating a floor with your own hands
Today you can get a high-quality floor by using one of the screed organization schemes proposed below.
Dry
Conventional mixtures are replaced by a special cement-bonded particle board produced under production conditions. The low level of thermal conductivity of this building material determines its demand even in the northern regions. Also, the slabs are not afraid of moisture - they do not create a favorable environment for the development of microorganisms.
It is enough to install high-quality waterproofing and a leveling support, on which the slabs will be laid out. Often, a two-layer masonry of slabs is installed with a shift in the seams between them and a centimeter indentation between the walls and the covering.
Semi-dry
This method involves the use of M400 cement with fiber fiber and plasticizers. Water is added to this composition in a minimal amount. The resulting consistency should not release large volumes of liquid. The advantage of this method is that the composition is prepared quickly enough and can be immediately laid out on the prepared site.
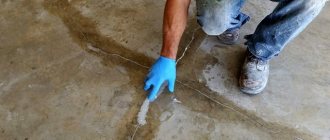
To ensure the evenness of the laid building material, it is worth applying along the beacons with additional checking using a laser level. Under a screed of this format, a waterproofing sheet must be placed (you can use polyethylene film) with an overlap on the wall ceilings. Having leveled the coating along the beacons, it is recommended to sand it to perfect condition.
Wet
Finally, the traditional and also the most popular method is pouring using a mixed composition, where, in addition to cement and sand, various reinforcing fillers are added. Note that in the room (based on its purpose) under such a screed you can place a system of “warm floors”, waterproofing building materials, as well as heat and noise insulation.
The composition is poured at the level of the maximum heights of the relief of the original base (by placing beacons and using a laser device) to obtain a flat floor. Creating segments allows you to break the entire process into a set of works. The cyclic action will be to fill each segment while waiting for the previous one to partially dry.
Additionally, the solution can be reinforced by adding metal, polymer, fiberglass elements (mesh) or fiberglass. This is not relevant for the home, but is in demand at industrial production sites with increased load on the floors.
Features of screeding for different types of coatings
Only after laying the cement floor screed is it possible to create a self-leveling layer of polymers. This symbiosis produces a durable and decorative floor covering that is resistant to most possible influences. It is not afraid of moisture and temperature changes, aggressive chemical environments and various types of loads. Before laying self-leveling polymer or epoxy floors, the concrete surface is sanded until a perfectly flat floor is obtained. This is done to avoid the additional costs of filling cavities in uneven concrete with expensive polymers.
Careful leveling of the surface is practiced not only for the installation of self-leveling floors; such a coating is necessary for laying:
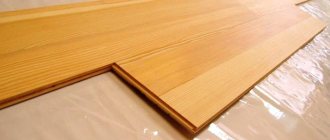
- highly aesthetic laminate;
- elite parquet;
- modern PVC tiles;
- traditional linoleum.
Any materials that require a perfectly level base are laid on the surface of polished concrete. Only after such processing is it possible to perform high-quality work.
Screed as a clean floor is used only in utility rooms, warehouses, garages, and basements. Bearing in mind the properties of the top layer of concrete to deteriorate under the influence of external circumstances, the surface of the screed is painted with special paints or impregnated with reinforcing compounds. A floor whose top layer is protected lasts much longer and does not generate dust or break down.
How to make a cement floor on the ground correctly
Decorating a colorful floor on the ground is constantly associated with a number of questions: what to make the bedding from, and what layer to use, how to waterproof it, and at what step to insulate it, even later. The cement floor on the ground is a “layered cake”, which we will talk about below.
Pouring a cement floor: “pie” diagram
Conditions under which laying a cement floor on the ground is possible
Before moving directly to the technological process of arranging a cement floor, I would like to emphasize that not all soils can be poured with a cement floor. Firstly, the groundwater level should be no higher than four to 5 m in order to prevent flooding of the floor and water suction through the capillaries. Secondly, the soil should not be mobile; otherwise, the cement floor can quickly collapse, damaging the foundation along with it. Thirdly, the house in which such a floor is planned must be residential and heated in winter, since the soil freezes in winter, and with it the floor, which will put additional pressure on the foundation, deforming it. Well, the last limitation is that the soil must be dry.
Marking the level of a finished cement floor: “zero” mark
We begin all work on arranging the floor only after all the walls are completely built and the building is covered with a roof. This way we will be protected from the surprises of nature.
First you need to outline the level of the finished floor , i.e. The mark to which we will fill the floor. Since we are not planning to make a threshold, we will focus on the bottom of the doorway so that the floor is level and the same in all rooms.
We apply the “zero” level as follows: from the lowest point of the doorway we set aside exactly one m. We apply a mark to the wall, then we transfer the mark to all the walls in the room, draw a line, the horizontal of which is constantly controlled by a level.
Once the line is drawn, we lay one meter down from this strip along the entire perimeter of the room. We draw a line. This will be the finished floor level. For convenience, we hammer nails into strips in the corners of the room and tighten the cord. This will make it no more difficult to navigate.
Foundation preparation work
We remove all construction waste from the premises. Then we remove the top layer of soil and take it out for garden or landscape needs. To what depth should the soil be removed? The cement floor on the ground is a multi-layer cake, about 30 - 30 5 cm wide. Focusing on the “zero” mark, we specifically try to remove the soil to a depth of 30 5 cm.
Be sure to compact the soil surface. It is better to do this using a special vibrating plate or vibrating machine, but if such equipment is not in your arsenal, you can make do with the means at hand. We will need a log to which we will attach handles, and we will nail a flat board underneath. Using this log together, we compact the soil to such an extent that no traces of footsteps remain on its surface.
Important! In the case of large strip foundations, such situations occur when the distance from the “zero” mark to the ground is more than 30–5 cm. Under such conditions, we remove the top layer of grass, and instead of it we pour sand and carefully tamp it.
Measures for additional waterproofing of the floor may also include upgrading the clay bedding. Then clay is poured on top of the soil and carefully compacted. In the future, it will prevent water from penetrating into the floor.
Formation of bedding from gravel, sand and crushed stone
Before making a cement floor on the ground, it is imperative to backfill it.
1st layer – gravel (5 – 10 cm). Add water and compact. To make it easier to control the thickness of the layer, we drive pegs of suitable length into the soil, set them level, and after backfilling and compaction are completed, remove them.
2nd layer – sand (10 cm). We control the thickness and level with the same pegs. We spill the layer with water and compact it with a vibrating plate or a log with a board. For this backfill, ravine sand with impurities can be used.
3rd layer – crushed stone (10 cm). Carefully level and compact. Our task is to make sure that there are no sharp edges of crushed stone on the surface. If there are any, they need to be smoothed out by unrolling the stones or removing them. It is recommended to use crushed stone with a fraction of 40 - 50 mm. After compacting is completed, the crushed stone can simply be sprinkled with sand or crushed stone chips and compacted again.
Important! Don't forget to keep the horizontal line under control using a level.
It is important to emphasize that the bedding can only be made from two layers: sand and crushed stone. Also, to simplify control over the width of the layers, their level can be applied to the foundation walls.
Laying waterproofing and thermal insulation
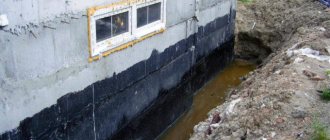
If the crushed stone layer is compacted perfectly and there are no sharp corners, then the waterproofing material can be laid directly on it. To do this, you can use modern roll materials and membranes, roofing felt in a couple of layers, or simply polyethylene film with a density of at least two hundred microns. We spread the material over the entire area of the room, bring the edges to the “zero” mark on the walls and fix it there, for example, with tape. If the canvas is not enough to cover the entire area, then the connections must be made with an overlap of 20 cm and sealed with adhesive tape.
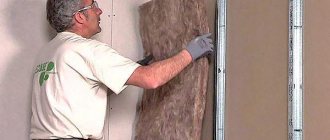
On top of the waterproofing, thermal insulation can be performed using the following materials: expanded clay, perlite, extruded polystyrene foam, expanded polystyrene (foam), stone basalt wool (of appropriate density), polyurethane foam.
Let's consider the option of laying extruded polystyrene foam slabs. They are laid out in a checkerboard pattern, perfectly aligned with each other, and the joints are sealed with a special adhesive tape.
Important! There are times when it is not possible to carry out hydro- and thermal insulation directly on the bedding. Then a layer of so-called “thin” concrete (watery mixture) up to 40 mm wide is poured on top of the bedding. While it hardens, the above procedures can be performed on top. “Thin” concrete firmly binds a layer of crushed stone together and is a stronger base that will not be able to break through or destroy waterproofing materials.
Reinforcement of cement floor
The development of pouring a cement floor necessarily contains reinforcement in order to greatly strengthen the floor. A reinforced floor can withstand heavy loads, which are moderately distributed over the surface.
Steel and plastic meshes with various cells, and a frame made of reinforcement can be used as a reinforcing material . Welded reinforcing mesh with dimensions of 5x100x100 mm is often used. Less commonly, for floors that will bear heavy loads, use a frame welded locally from a reinforcing bar eight to eighteen mm wide. Under such criteria, more thorough vibration compaction of the cement consistency will be necessary.
The reinforcing mesh or frame cannot be laid directly on the base, as it will not perform its functions and will also be redundant. It must be raised by 1/3 of the thickness of the future cement fill. Based on this, we install the mesh or frame on stands two to three cm high, which are called “chairs.”
Installation of “beacons” and formation of “maps”
Installing guides, or “beacons” as they are also called, allows you to fill the cement mixture very evenly, at the same level.
Round pipes or a metal square profile can be used as guides, and wooden blocks, if their surface is quite smooth, can be laid with special “beacons” made of aluminum.
We divide the room into segments 1.5 - two meters wide.
We install the guides on the “buns” made of cement mortar. By pressing them or adding consistency, we control the placement of the “beacons” so that their upper edge is strictly along the “zero” strip. We lubricate the guides with special oil, in the latter case it can be used to make them easier to remove in the future.
Important! We control the strictly horizontal placement of the guides using a level and level. The floor may be poured with concrete after the “buns” have hardened enough so that when you press the “beacon” they do not press through.
The division of the room into “maps” is carried out in this case if its area is large and it is not possible to fill it with concrete in one step. The room is then divided into square or rectangular “cards”, the size of which is dictated by the productivity of the construction team.
We mark the area into sections. We knock down the frame formwork from freshly sawn wood or laminated plywood. Naturally, the height of the formwork must be strictly set to zero.
Making mortar for pouring cement floors
In order for the cement floor to have the best thermal insulation qualities, expanded sand or perlite should be added to the solution. And in order to have time to pour and mix the solution properly, you need to purchase or rent a concrete mixer.
The secret to making the solution is this:
- Pour two buckets of perlite into a concrete mixer. Add 10 liters of water and mix. After adding water, the amount of perlite should decrease noticeably.
- At the time when the sand mixes well with water, add 5 liters. cement and continue kneading.
- Add 5 liters. water and continue kneading.
- When the mixture becomes homogeneous, add 10 liters of sand and two liters of water. Knead until the mixture becomes loose.
- We pause in the kneading for 10 minutes, do not add water at any time.
- In 10 minutes. Continue kneading until the solution becomes plastic.
To fill the floor, it is optimal to use cement M400 and M500.
Pouring a cement floor, leveling the mortar
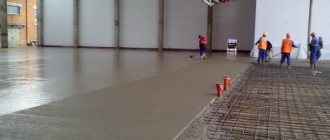
We begin to fill the floor from the corner opposite the door, trying to fill a couple of “cards” in one or two steps.
Because concrete should not fit perfectly against the walls and protruding structures of the building, we isolate them by laying a damper tape along them.
Pour the purchased solution into a “card” in a 10 cm layer and level it with a shovel. We make piercing movements to remove excess air and compact the solution. If possible, you can use a deep vibrator, which is immersed in concrete, and at the time when cement “milk” appears on the surface, it is transferred to another place.
We level the solution using the rule. We install it on the guides and pull it towards ourselves with light movements left and right. This way, excess concrete is removed and distributed into the voids of other “cards”.
After finishing leveling the solution along the guides, remove them and fill the vacant space with the freshest substance.
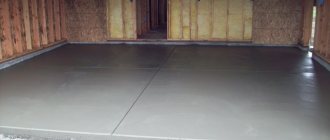
Over the next few days, constantly moisten the surface with water, and maybe additionally cover the concrete with film. We allow the concrete to gain its maximum strength characteristics within four to 5 weeks.
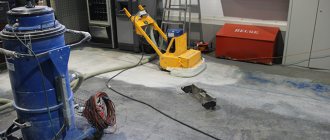
Smoothing screed for cement floors
When pouring a cement floor, it is sometimes possible to make the surface completely even; there are often small flaws and sagging. If you plan to lay clay tiles, then perfect evenness is not needed, so you can start work right away. But if you want to make a floor from laminate or linoleum, then the surface must be completely flat.
Self-leveling consistencies allow you to make the floor surface mirror-even.
In accordance with the instructions on the packaging, prepare a solution of a self-leveling consistency, pour it onto the floor and level it with a special brush. Then we roll it with a needle roller to remove air bubbles from the solution. Leave to dry for at least one week. Once completed, the cement floor is ready for use.
How to make a screed with your own hands
Pouring concrete mixture
To make a concrete floor screed with your own hands, it is not advisable to order a mixer. It is easier and cheaper to prepare the solution yourself in small quantities. To create a screed of sufficient strength, you should mix cement M 400 with sifted river sand in a ratio of 1:3. Thus, 50 kg of cement will require 16.7 kg of sand. To make the mixture easier to level, a plasticizer is added to it. For the indicated amount of cement and sand, 190 g will be required. Water is poured into the container with the materials last, the approximate amount is 1/3 of the mass of cement. Mixture consumption can be calculated using our calculator.
Aligning the screed with beacons
It’s good if you have a concrete mixer on your farm; using this equipment, the solution can be prepared quickly and easily. Another way is to mix the mixture with a hand mixer. The finished mortar is sequentially laid in the sectors formed by the lighthouse slats and smoothed flush with them using the construction rules. The beacons can be left in the floor screed forever, although some craftsmen, after the solution has hardened, remove them and fill the resulting cavities with concrete.
The room is maintained at a constant temperature between 5 and 25°C. To prevent moisture from evaporating and the screed drying out too quickly, its surface is covered with plastic film. Full maturation of concrete occurs after 28 days. Now you can lay the finished floor.
How to correctly calculate the required cubic capacity of concrete
As an example, let's calculate the fuel consumption for a room measuring 42 m². The required thickness of the screed is 7 cm. We multiply these two indicators, and the result is a number of 2.94 m³, which tells us the required amount of BR. Cement and sand should be combined in a ratio of 1:3. That is, we need 2.94*3/4=2.2 m³ of sand. 0.74 m³ of cement is needed.
Now we calculate the ratio of the components:
- 10 liters of sand weighs 14-16 kg. One m³ of substance weighs 1400-1600 kg.
- 10 liters of crushed stone weighs 15-17 kg. 1 m³ will tighten by 1500-1700 kg.
- 10 liters of cement weighs 13-14 kg. Accordingly, we will need 1300-1400 kg of material.
According to our ratio, 2.2x sand is needed.
Now we calculate the volume of additives with binders and sand. In the example we use sand, cement and crushed stone. Rounding up, we reach 1:3:5. The approximate volume determined earlier helps to calculate the amount of sand. 1.75*(3/9), comes out to 0.57 m³.
We calculate the amount of cement: 1.75 – 0.57 – 0.95 = 0.23 m³.
Now we move from volumetric units to mass units. Each mixture (10 l) must be calculated separately. We got the following:
- Crushed stone – 1425 kg.
- Sand – 798 kg.
- Cement – 299 kg.
The above calculation is only approximate, but based on it you can roughly calculate how much materials you need to prepare.
Note! First take into account the possibility of a decrease in the volume of the screed after it has completely dried. From BR you can get an average of 0.59-0.71 m³ per 1 m³ of the entire finishing area. So it’s better to buy all the BR “ingredients” with a small excess.
Popular questions:
Which expanded clay is better for the floor, which fraction to choose? There is an answer from an expert
Which floor is better, concrete or wood? There is an answer from an expert
Which floor is better to make in the garage, which option is cheaper There is an answer from an expert
All questions