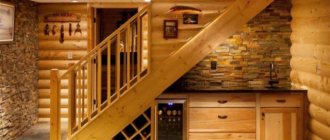
Garage floor: materials
First of all, these are materials with high wear resistance and safety. Not many materials fall into this category.
Classic and inexpensive set of tools:
- gravel and sand for drainage;
- polyethylene as a waterproofing agent;
- concrete pad and cement screed as the base for the floor.
These materials are used to create a finished floor . To finish a finished floor, the following are most often used:
- porcelain stoneware;
- polymer compositions;
- rubber tiles or wooden boards.
But we will consider here the classic option with the arrangement of a concrete pad and cement screed.
Floor in the garage - photo:
Selecting materials for filling the floor
If pouring a garage floor involves installing a concrete screed directly onto the ground, you need to prepare the following materials:
- For backfilling on the ground under the screed - fine crushed stone or expanded clay pebbles.
- To equip beacons and strengthen the base - galvanized steel profiles and reinforcing mesh.
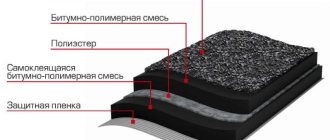
- To create a moisture-proof layer - a dense film of polyethylene, or roofing felt in rolls, or poured waterproofing.
- To mix a special solution for filling the floor in the garage - gravel (crushed stone), sand, cement.
- For finishing, when it is planned, components for self-leveling floors.
- To complete the edge design on the inspection hole, use a metal corner.
- Bricks for laying walls in the basement.
Why is waterproofing needed?
groundwater approaching the surface , which, seeping through the floor, protrudes outside, forming wet areas.
The second significant point is the need for high-quality removal of moisture falling onto the floor from above, for example, when washing a car or from melted snow.
To eliminate the effect of these factors, it is necessary to perform high-quality waterproofing of the floor in the garage.
Quality waterproofing starts with a solid foundation. And the base of the floor in the garage, in turn, begins with gravel. Gravel helps water flow down freely without stopping, under the influence of gravity.
For good water drainage, the bedding layer must be at least 100 mm thick . After cooling, the gravel is compacted well to create a reliable base.
On top of the gravel is a layer of sand . Sand is highly hygroscopic, allowing it to absorb excess moisture from the concrete base of the floor. The sand layer must also be at least 100 mm . Sand is well compacted after filling, as is gravel.
To isolate the concrete base from groundwater, dense polyethylene . The film is cut and laid over the sand, overlapping sheet on sheet, the overlap width is about 200 mm .
200 mm thick is placed on top of the resulting base . It is better to pour concrete along the leveled beacons; in this case, the screed poured later on top of the set concrete will require less material and effort for leveling.
The concrete pad must be poured into a reinforcement grid with a bar thickness of at least 10 mm .
The grid in this case is a mesh with cells 200 x 200 mm .
After pouring and leveling the concrete pad, it must be covered with polyethylene .
This is necessary to reduce the rate of moisture evaporation - this technique will make the concrete base as strong as possible.
The concrete pad covered with polyethylene should be left to dry for at least several weeks .
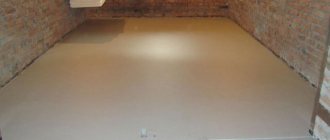
After drying, a cement screed is installed on the concrete pad, forming a subfloor . You can’t do without lighthouses here either. When installing beacons, it is necessary to take into account the future slope of the screed towards the gate within 1.5-2% , this is a height difference of 1.5-2 cm per 1 m of length.
The slope is necessary to drain excess water. The thickness of the screed can be 2-3 cm . The screed is reinforced in the same way as a concrete base, but the cell pitch here is already 100 x 100 mm .
After pouring and leveling the screed, it is also covered with polyethylene and left to dry until it acquires a light shade , indicating that it has completely dried.
Next, to give the floor additional water-repellent properties, it must be covered with a special coating .
- tile;
- rubber floors;
- polymer floor;
- painting;
- impregnation for concrete.
Advantages and disadvantages
- Tile: classic finishing option. The difficulty here is the need to avoid voids under the tiles. To do this, they must be laid on a thin layer of glue (under the comb), specially designed for the street. It is best to use frost-resistant, non-abrasion porcelain stoneware or GRE S.
- Rubber floors: Thick rubber tiles are very durable , not too expensive and a very good option. The coating is easy to install and unpretentious in use.
- Polymer floor: ideal, but very expensive . In our conditions, it is justified in large garages or car washes.
- wears off over time , you will have to repaint it, and this is inconvenient.
- Impregnation for concrete: impregnation is absorbed into concrete to a depth of 2-3 cm and does not wear off for many years, a very effective option.
What can you use to make a garage floor cheaply? Cheap floor coverings include tiles and painting .
And in conclusion: To organize the right floor in the garage, it is better to choose time-tested, high-quality solutions. In this matter, it is better not to chase fashion trends, because the price of a mistake here is extra expenses for reconstruction. A concrete floor , if installed correctly, will serve you for many years, delighting you and not causing any complaints.
Concrete floor
Many who are faced with the question “what is the best material to use for a garage floor” prefer concrete surfaces. This option makes it possible to further refine the surface using other construction and finishing materials or to carry out insulation with subsequent finishing, for example, tiles.
Concrete screed in the garage
Positive aspects of concrete pavement
It's nice to have a solid and level surface under your feet. This option is suitable for permanent buildings.
Concrete floors have the following advantageous features:
- durability for many years;
- are not afraid of high humidity and temperature changes;
- the ability to wash not only the car within the box, but also the floor itself by watering with a hose.
Negative points
Despite the obvious advantages, concrete pouring stops some garage owners from implementing it due to certain reasons:
- labor intensity of work;
- Not only professional skills are needed, but also special equipment to make the preparation of the concrete mixture faster;
- incurs significant financial costs for the purchase of cement and sand.
How to make a concrete floor in a garage
Preparing the floor for concreting
The process requires adherence to pouring technology, in which a number of sequential actions are performed:
- 20-30 cm of soil is removed indoors;
- the area is filled with crushed stone to a thickness of 10 cm, followed by leveling;
- a sand cushion 10 cm thick is arranged, leveled and compacted;
- a screed with a thickness of 2 cm is made from a sand-cement mixture;
- waterproofing is spread in the form of sheets of roofing material;
- a reinforcing mesh based on steel rods is laid (the optimal cell size is 15 by 15 cm);
- The main concrete layer is poured with a thickness of 5-7 cm.
The work doesn't end there. Periodic watering of the concrete surface is required to prevent uneven drying, which means cracks in the floor.
What kind of floor should a garage have - wood or concrete?
Arrangement options for the floor in the garage can be completely different. Which garage floor is best for your car in your case? First of all, the garage floor should have much higher strength and easily withstand mechanical loads. Remember that the car weighs a lot. And when carrying out any work in the garage, mechanical impact on the base of the floor is possible. In addition, garage floors must be resistant to chemicals and increased abrasion. It must be waterproof and most importantly fireproof.
Of course, in many garages the floor is simply well-compacted earth, especially when it comes to a garage in the country. However, a wooden or concrete floor for a garage will have huge advantages over a compacted base, especially since making such a floor with your own hands does not seem difficult.
However, if you have already prepared for construction, then in order for the cheap garage floor to turn out good, safe and of high quality, you must comply with all the above requirements during its design and construction.
Types and characteristics of garage floor coverings
Therefore, owners of garages, especially those combined with a house, use various floor coverings. We offer a selection of the most current, proven options for upgrading a concrete garage floor.
Impregnations for concrete
Materials of this class are completely absorbed into concrete and do not create a film on the surface. Therefore, they are devoid of the main disadvantage of paints - even after several years of use, the surface will not change its appearance, because there is simply nothing to peel off and leave behind.
Impregnations will strengthen the concrete surface Source alpens.ru
Manufacturers offer the following compositions:
- Water-dispersed ones are the most affordable option, although with limited strengthening ability.
- Polyurethane - binds the top layers of concrete and reduces moisture absorption, used to improve waterproofing.
- Epoxy - impregnations that maximize the strength of surface layers and reduce moisture absorption of concrete.
In most cases, impregnations are used as an additional component to increase the strength of the base. But processing only with these means is also allowed. The main effect of the application is the binding of the top layer, which increases strength, resistance to the effects of fuels and lubricants, and prevents dust formation, which is characteristic of a concrete floor.
See also: Catalog of companies that specialize in paints and finishing materials.
Dye
The paint coating for a concrete garage floor is used solely for decorative purposes. Unfortunately, any type of paint is not sufficiently resistant to abrasion; under the wheels of a driving car, any paintwork is destroyed. Therefore, it makes sense for design purposes to paint only certain areas of the surface that are not subject to significant loads. In this case, it is worth choosing a paint that is resistant to abrasion.
Garage floor paint is abrasion resistant Source lkmpolymer.ru
Manufacturers offer the following material options:
- PVC-based paints do an excellent job of removing dust from concrete surfaces.
- Polyurethane-based paints and varnishes are characterized by increased resistance to chemically aggressive substances, including fuels and lubricants.
- Two-component epoxy paints that can withstand significant impact and dynamic loads.
Before you paint your garage floor, it is recommended that you consider using other materials that are more suitable for use in similar conditions.
Self-leveling floors
One of these options is self-leveling floors. It is possible to choose a material based on cement, polymer or epoxy. The advantages of this type of coating are as follows:
- High strength and resistance to mechanical stress.
- Possibility of tinting.
- Resistance to chemically aggressive substances.
- The service life declared by the manufacturer is more than 10 years.
Yes, this option is not cheap, but the performance properties are well worth it. Fans of interesting design solutions can be advised to install 3D self-leveling floors, which will definitely not look trivial.
Self-leveling flooring will not be cheap, but the result is worth it Source pricolisty.ru
How to make a concrete garage floor the cheapest?
In order to pour concrete on a floor, you need a base. To make it, soil is removed from the interior of the garage to a depth of at least 20 centimeters. After which the bed is leveled and compacted tightly. The resulting pit is waterproofed using polyethylene film, which is lined over its entire area. The film sheets are overlapped with a slight overlap, and all joints are glued with tape.
After this, the pit is covered with sand or crushed stone. If your garage is adjacent to the house, as is often the case in private construction, and you want to insulate it, then it would be wise to properly insulate the floor in the garage. It is best to use sheet foam for this, which is lined in one layer or in two thinner layers with the second overlapping the joints of the first.
You can read more about insulating floors on the ground using polystyrene foam and other heat-insulating materials in the corresponding article. After the above work, it is necessary to install guides, which are pre-lubricated with machine oil.
To get the most durable concrete base, you can use a special vibrating machine or bayonet the solution. In addition, reinforcing components and plasticizers can be added to the prepared solution. At the last stage, the surface is leveled along pre-installed guides and the screed is left in place for at least a day. When the floor has hardened, it is sanded. To do this, you can use a corundum mesh or a trowel, if possible.
The main disadvantage of a concrete floor is, perhaps, that during car repairs it will be quite cold on such a base, and therefore not very comfortable to lie on. Excessive dust is the second major drawback of a concrete garage floor. However, you can easily get rid of dust by painting the floor or tiling it with ceramic tiles.
Recommendations from professionals
Experienced experts give some tips on how to fill a garage floor. It is also important when the work is carried out. The best time is spring and autumn. In winter, concreting is not carried out at all, since the concrete will not harden, but will freeze. In summer, moisture will evaporate rapidly and cracks may appear in the base body.
To prepare concrete with your own hands, you should purchase cement grade M400 or M500. To mix the solution, take dry sand and clean water. If imported concrete is used, then delivery should be organized after preparation. Concreting is done with compaction so that there are no air bubbles left in the mass. Only properly laid concrete will ensure the durability of the foundation.
A truly working legal way to save money. Everyone needs to know this!
Laying thermal insulation is necessary if the garage is used in winter and is heated. The best insulation is extruded polystyrene boards. They do not absorb moisture and do not accept mold. Reinforcement of concrete screeds is mandatory, since during repairs shock loads are possible, and the reinforcement must be able to withstand the forces.
We recommend: Heated floor from a radiator in an apartment
The floor is made with a slight slope towards the gate so that the snow stuck to the wheels can melt and drain without creating a puddle. After hardening, the top layer of concreting is treated by rubbing in additives to give hardness to the coating. Such mixtures are sold in hardware stores and are called topping systems. The composition includes plasticizers, pigments and fillers. Solutions are rubbed into the surface of the base using a special device.
The concrete garage floor coating is neutral to petroleum products and solvents and is not destroyed by acids. Therefore, using it in the garage is considered correct.
The cost of turnkey concreting with the involvement of specialists can cost the garage owner approximately 30,000 to 40,000 rubles, depending on the concrete floor laying scheme. Prices increase if excavation, base preparation or mixing is required by hand.
Self-production will not only reduce the cost of work, but will also create a more powerful base. To calculate the amount of building materials you will need to know the area to be poured. The total thickness of the concrete multiplied by the floor area will determine the volume of the solution in cubic meters. The need for the constituent ingredients is calculated based on the proportions. To prepare a concrete cube M350 you will need:
- cement M500 – 220 kg;
- crushed stone, gravel – 0.75 m3;
- sand – 0.75 m3;
- reinforcement – 50 or 100 kg depending on the number of layers of reinforcement.
Transport costs should be taken into account. It is easy to calculate the cost of flooring if you know the consumption. You need to find out the price of the material in the region and multiply it by the required volume.
The cost of the finished mixture with delivery is calculated based on plant prices and transportation costs. Its price is 4 times more expensive than a self-made one. The mortar unit pays rent, labor of workers, managers and must operate at a profit.
Pouring a floor with hiring a crew, receiving ready-made concrete mix with delivery will cost 500 - 2500 rubles per square meter. Work done independently, with the involvement of helpers or specialists at some stages, can be completed, saving half the cost.
Wooden floors in the garage - which are better and cheaper
A wooden floor in a garage has a significant advantage over concrete in terms of its thermal characteristics. It is not cold to lie on a wooden floor while inspecting or repairing a car. I must say that walking on such a floor is much more pleasant. In addition, if we talk about floor insulation, then for the wooden version it is much easier to do it. To insulate it, the space between the floor joists is filled with the material selected for this purpose. However, there is also an article on this site about whether it is better to insulate or simply sheathe a floor in a garage.
If we talk about the disadvantages of wood floors, the first of them is the flammability of wood. It is often necessary to use welding in a garage, and during such work, drops of hot metal or sparks can cause smoldering and subsequent fire. To prevent this kind of trouble, floor boards must be impregnated with special compounds. It must be said that it is necessary to cover the boards with impregnations even before they are nailed into place. In addition, the boards must be processed from all sides. The same spark or drop most often falls between the floor boards. You can also use used oil as impregnation. Such floors will not ignite from a spark, but if a fire does occur, they can support the combustion.
Another drawback of wood can also change the decision about what flooring should be in the garage. The disadvantage of a wooden garage floor is that the wood is susceptible to rotting. Moreover, this happens when suitable conditions are created for the emergence of various types of fungi and mold. These conditions primarily include high humidity. Thus, if your garage is not heated, the floorboards will quickly begin to rot. To eliminate or slow down this process, the boards must be treated with special antiseptics.
As for the boards themselves for arranging the floor in the garage, of course, they should be as durable as possible. The fact is that the load from the car will not be distributed evenly over the entire floor area, but will only fall on a few boards. These boards should easily support the weight of your vehicle.
How to inexpensively make a garage floor
Ecology of consumption. Estate: For intense loads, the floor must not only have a stable load-bearing system, but also have high surface strength. Of course, we must not forget about automotive chemicals, the contact of which with the floor in the garage is highly likely. We will tell you how to arrange the floor correctly and without extra costs.
For intense loads, the floor must not only have a stable load-bearing system, but also have high surface strength. Of course, we must not forget about automotive chemicals, the contact of which with the floor in the garage is highly likely. We will tell you how to arrange the floor correctly and without extra costs.
Choosing a floor installation method
Before installation of the floor base begins, soil studies and assessment of terrain unevenness in the area are carried out. If a high groundwater level is detected, drainage work is carried out. If the garage is located on a slope and there is a large difference in height, the site is first leveled and the top layer of soil is removed.
Pay attention to the location of your garage to choose the best flooring option
Then the optimal method of installing the floor covering is selected.
For the floor in the garage the following can be used:
- wooden flooring;
- monolithic reinforced concrete slab;
- concrete screed.
Requirements for the floor and acceptable types of its installation
In terms of the current operational load, the garage floor occupies an intermediate link between ordinary household and road surfaces. There are three main risk factors affecting garage floors:
- Load from vehicles and garage equipment.
- Impacts, for example from falling tools and spare parts.
- Chemical exposure from automotive process fluids.
As you can see, in comparison with the road surface, the garage floor does not experience atmospheric and weather influences. For this reason, the use of materials such as asphalt concrete is not only impractical, but sometimes even undesirable. Three of the most suitable device systems can be named:
- Concrete screed.
- Wooden flooring.
- Gravel mound or paving stones.
Before you understand the advantages and disadvantages of each system, as well as determine the most profitable one for your garage, focus on the economic aspect. It is foolish to hope that for pennies it will be possible to create a floor of unprecedented reliability, at the same time, today we will not consider such options as polished mosaic or self-leveling polymer floors. Some costs for the purchase of materials cannot be avoided, but ultimately everything depends on the foresight of the master and the correct execution of the work on installing the selected type of floor.
Floor painting
The simplest, most economical option to strengthen your garage floor. Unfortunately, it also has its drawback: the paint layer will wear off over time, so it will have to be renewed regularly. Of course, in each case the frequency is different, since it will depend on the level of paint quality. But on average, the floor will have to be painted at least once every six months.
The paint must be carefully selected so that it is of high quality and has increased abrasion resistance. Now they sell epoxy protective compounds and acrylic paints. There are also more reliable polyurethane compounds. Another good option is to use a special impregnation for concrete that penetrates to great depths. It also helps to ensure increased wear resistance of the concrete base.
Screed and its processing
Pouring the floor with concrete in most cases can be called the best option. Mainly for the reason that most often there is no need to pour any screed: in many garages the floor is made concrete by default and only needs to be eliminated such shortcomings as curvature and dustiness.
If the garage is in the design or construction stages, a concrete floor is in most cases the cheapest solution. Its filling is usually carried out simultaneously with the foundation or flashing of the inspection pit. It is enough just to pre-mount the formwork and use the simplest reinforcement. Since the entire floor slab is located indoors, and therefore does not experience heating from the sun and is not subject to significant temperature deformations, the installation of expansion joints is not necessary. On the other hand, since in the garage it is possible (and sometimes necessary) to backfill to the optimal level, the thickness of the screed itself can be very small - about 5 cm, that is, in fact, only the upper and lower protective layer of concrete. With an average garage area of 30 m2, concrete work will require only 1.5–2 m3 of mixture, that is, you can prepare the entire volume of concrete yourself using a rented concrete mixer.
Concrete flooring in a garage is a classic design option. Even if the existing screed has already been in use for more than 15–20 years, it most likely fully complies with the technical requirements. Investments are needed in two cases:
1. To correct the deviation. To level out large holes in which water can accumulate, it is enough to fill the floor with the cheapest self-leveling screed. This will also further strengthen the surface, but only if the layer thickness is not less than permissible according to the instructions.
2. To eliminate dust. Almost any concrete floor wears off little by little, forming a lot of fine dust, which even wet cleaning cannot save from. This phenomenon can be prevented by grinding the top layer (8–10 mm), or ironing, or priming followed by painting. Please note that if the floor is filled with a leveling screed, there is no need to use epoxy primers and polyurethane paint; impregnation with a universal acrylic emulsion and coating with alkyd enamel in several layers will be sufficient.
Is it permissible to install a wooden floor?
Now let's look at more exotic options for installing floors in the garage and start with plank flooring. This system is often preferred due to its heat-saving properties. Car enthusiasts who spend a long time under the bottom of their iron horse know well the difference in what floor they have to work on - concrete or wood.
At its core, the idea of installing a wooden floor seems to be a winning one in many ways. There is no need for messy concrete work, the process can be divided into several stages so that you can work at a convenient time. But since wood has less durability compared to mineral materials, such a floor has an additional number of harmful effects:
- Organic damage to wood.
- Shrinkage and loosening of the flooring over time.
- Load from transport and equipment.
It is noteworthy that some factors overlap. However, with minor modifications, the standard floor construction on joists can be made quite suitable for garage conditions. The first is high-quality stabilization of wood: mineral impregnation with fire-bioprotection or boiling in waste oil. The logs and the back side of the boards going on the flooring are subjected to this treatment.
The second change is to fill the voids under the floor with dry compacted mixture. To do this, it is necessary to waterproof the garage pit, for example, spread two layers of polyethylene film on a compacted sand embankment, carefully gluing the overlapping joints. After this, a system of logs is installed, they are directed across the entry line, resting on the protrusions of the foundation and the edges of the inspection pit lining. Before laying the boardwalk, the entire space between the joists is densely filled with a mixture of dry sand and fluff in a ratio of 10:1, the filler is compacted in layers of 30–35 mm. It is not necessary to use a tongue and groove board, but the joining must be very careful. To prevent dust from blowing out from under the flooring due to vibrations of the floor, the logs and filler are covered with one layer of film on top.
Construction of an inspection pit
To create conditions in the garage for convenient maintenance and repair of vehicles, you will need to install an inspection pit. This work must be done efficiently.
Stage one . When building a foundation in a garage, in some cases, a pit is simultaneously dug for an inspection hole, since the open space allows the use of earth-moving equipment. A pit dug by an excavator still has to be further refined, but this is easier to do than digging the ground by hand.
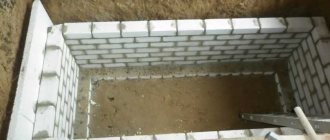
Stage two . The walls of the prepared pit are strengthened by lining them with bricks or using formwork and a mixture containing cement. Before pouring the garage floor, you need to lay a concrete screed at the bottom of the hole (for more details: “How to make a garage floor screed with your own hands”). To do this, the base is leveled and then compacted. Then a gravel cushion 3-4 centimeters high is placed on the bottom and compacted again. In order to avoid mistakes regarding the height of this layer, posts with markings are installed around the perimeter, maintaining a gap of 80–100 centimeters.
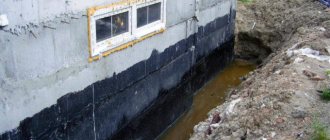
Stage three . Pour a 10-centimeter layer of sand and compact it well. Before you begin to line the basement walls, waterproofing is done to reliably protect them from moisture. Any material with moisture-resistant qualities is suitable for this purpose. This may be a thick film of polyethylene. It is laid on the surface of the walls and base, using construction tape to connect individual pieces.
We recommend: Do-it-yourself installation of heated floors
Stage four . Reinforcing mesh is installed on the walls in two layers. The first row is mounted close to the waterproofing material, the second - at a distance of about 10 centimeters. Then the mesh is fixed to the base.
Stage five . Before filling the bottom of the hole, mix a coarse mixture consisting of cement, gravel and sand. The height of the screed in this case should be 8–10 centimeters. After the solution is poured onto the rough base, it should be leveled, and an absolutely flat surface in the basement is not required (more details: “How to level the floor in a garage - leveling options”).
Stage six . When the floor has hardened, they begin to install the formwork necessary to fill the walls. The structure is fixed around the perimeter at a height of 40-50 centimeters, after which it is filled with liquid solution. To stabilize the formwork, spacer pieces of boards are used. When the space inside is filled, the structure is raised to a similar height without removing the lower part. They continue to do this until the very top point. The formwork should be raised above the surface of the floor of the room that has not yet been filled to a height equal to the thickness of the backfill together with the screed.
Stage seven . To complete the finishing of the top of the basement, after pouring the wall to the top of the soil, install the outer part of the formwork and pour in the mortar. When the concrete mixture has already set on the inside of the pit, they begin to embed a corner of metal, the dimensions of which are 50x50 millimeters. It is fastened at the corners by welding. Next, the basement is left to allow its surfaces to harden, and they begin to prepare the base to pour the floor in the garage with their own hands.
Bulk floor
Obviously, the cost of installing a floor should be comparable to the intensity of its use. So, if the garage is used solely as a place to store vehicles and nothing more, then neither a concrete nor a wooden floor is worth the money and time spent. But an ordinary gravel embankment still justifies it.
There is nothing tricky about such a system, but you need to protect the floor from being replenished with moisture from the soil. For this purpose, soil is excavated throughout the entire area of the garage and a clay castle with a thickness of at least 25 cm is installed. That is, dry crushed clay is poured onto the bottom, which is mixed with water and pounded with feet. Usually the whole process is divided into 2-3 stages: first, it is kneaded and allowed to swell for 1-2 days, then water or dry clay is added to bring the consistency back to normal. At the final stage, the surface is washed out several times with the addition of new portions of more liquid clay, which fills the cracks formed during the drying process.
A carefully compacted embankment of sand and gravel is placed on top of the castle. To prevent pressure between the layers, they are separated with geotextiles. It is important that the embankment is compacted really well, and the upper 8–10 cm are filled with mixed fraction gravel. Otherwise, the floor will have to be frequently repaired, leveling the resulting rut.
Tiled and paved floor
Finally, let's consider a fairly budget-friendly option for installing a floor that provides a more or less acceptable appearance and maintains the ability to work comfortably in the garage. We will talk about laying paving slabs and other materials suitable for paving.
In this flooring system, the greatest attention is paid to the bedding. It should be carried out by sifting out granite chips or blast furnace slag, preferably sifted and of a uniform fraction. Such stringent requirements as for street installation are not imposed, because the structure is not subject to intense leaching. A layer of 10–12 cm, poured in 3 passes with alternating manual tamping, will be sufficient. Each layer must also be leveled according to the rule, simultaneously setting a slope to remove water flowing from the car.
As a finishing coating, you can use anything, from unmarketable bricks to ordinary paving slabs. It is better to give preference to large-format materials, for example, concrete tiles measuring 30x30 cm. This will make the work go faster, and relaying will be easier in the future. And don’t forget about tagging: after laying the floor, you need to pour a mixture of fine sand and grade 300 cement in equal proportions, and then carefully place it, ensuring that all cracks and joints are filled. published econet.ru
If you have any questions on this topic, ask them to the experts and readers of our project here.
Floor based on paving slabs
How to make original garage floors? Pursuing this goal, a certain part of motorists uses paving stones. The material is produced on the basis of a sand-cement mixture. The thickness of the layer of laid paving slabs is adequate to the layer of concrete floor pouring (70 mm).
Paving slab floor
Paving stone: advantages
The material is noted for such beneficial properties as:
- strength (the floor can withstand significant mechanical loads);
- originality and color of the ceiling (material of different colors can be used).
Negative aspects
Paving stone is a good construction and finishing material for transforming the space of a car box, but it also has its disadvantages:
- relative high cost, in comparison with the same wooden board;
- additional costs for the purchase of necessary related building materials (crushed stone, sand);
- strict adherence to installation technology (without professional skills you should not do the work yourself).
In addition, if the standards for laying paving stones are not met, the pavement may, over time, develop depressions where the vehicle is parked.
A set of measures for laying paving stones
Laying paving slabs
The technological process is reduced to the following stages:
- removing the soil layer (thickness 20-30 cm);
- applying a gravel cushion up to 10 cm thick with subsequent leveling;
- sand backfill (thickness 5-7 cm) with mandatory compaction.
After the preparatory process has been completed, a 5 cm layer of sand is poured in and the paving stones are laid directly. When making a mosaic of stones, you should carefully fill the gaps between them with sand.