Garage lighting: types of luminaire placement
Lighting areas in the garage
Like any room, garages use several types of lighting. Which differ:
- By location - general lighting and lighting by zones.
- Fixed and mobile.
The ideal option would be a combination of both types of lighting. When used optimally, placing luminaires in different parts of the room will achieve the desired result.
- Lighting for the entire garage. This category includes devices mounted on the ceiling and walls. Lamps falling into this group provide a general flux of light. For this, energy-saving light bulbs and fluorescent lamps, as well as LED lamps, can be used.
- Spot lighting is the organization of illumination of individual areas of the garage.
Separately, it is worth noting the lighting of the work area and workbench
This is worth paying special attention to. To work on a workbench you need comfortable lighting
For this purpose, you can use lamps with LED elements. To illuminate the desktop itself, choose fluorescent lamps that produce white light. The inspection pit can be illuminated with an LED lamp.
To achieve maximum effective lighting in the garage, you can make it four-level:
- ceiling level;
- eye level – height from the floor covering about 1700 mm;
- useful level – height 800 mm;
- fourth level – 350 mm from the floor covering.
Lighting in the inspection pit
- The lighting system must be treated with all responsibility. Because it is quite obvious that the inspection hole is the most explosive place in the garage. To do this, you will need a transformer to step down the voltage. Lamps with 12 volt LED elements are used here;
- so-called “carries” are often used, powered by a car battery, which are completely safe to use; you can also use a flashlight attached to the car enthusiast’s forehead;
- lamps must be protected by shades;
- To avoid short circuits, installing switches and sockets in the pit is strictly prohibited.
- electrical wiring in the inspection pit must be carried out with gating of the pit wall followed by cementation;
- The lighting fixture, mounted on the wall of the inspection pit, is placed in small recesses-niches. This will protect the lighting device from mechanical damage. For maximum light reflection effect, you can paint the walls of the niche with silver or white acrylic paint;
- All electrical appliances located in the pit must be grounded.
Lighting
Lamps that diffuse light
Today, various lighting devices can be used to illuminate a wide variety of rooms. But remember that lamps for the home are unlikely to be suitable for the garage and inspection pit. It is also worth noting that for car repairs in and outside the pit, there are different technological requirements for the level of illumination. The lighting that you create yourself for the inspection hole should not be blinding. This effect should be completely eliminated by choosing the right lamps for these purposes. An excellent solution for a pit would be to use lamps that provide diffused light.
Lighting fixtures that will be installed in the inspection pit must meet the following requirements:
- possibility of installation in niches;
- hermetic housing protection;
- the presence of protection from mechanical damage, since during repairs heavy tools or parts from the car may fall out of your hands and damage the lamps;
- long service life;
Note! Since the garage is a non-residential premises, it is better to give preference to street-type lighting fixtures. Appliances intended for home use in such conditions will not last their intended service life.
When using multi-level lighting for a garage and pit, experts recommend using stationary lamps on hinges. This way you can change the direction of the light and orient it towards
the required area of work. Lamps should be positioned in such a way that the light coming from them is not higher than the level of the human eye. The optimal lighting option is when the details of the bottom of the machine and the hands of the person working in the pit are illuminated. Also, quite often, portable and portable lamps powered by batteries are used to create lighting in the inspection pit.
In general, you can quite easily make the necessary pit lighting with your own hands, and also use your existing lighting fixtures more efficiently. The right approach will allow you to save enough money.
Lighting in the garage pit
You won’t see anything in the viewing hole without artificial light. However, the pit is a complex object in terms of electricity. The difficulties are as follows:
- high humidity;
- a person in a pit is grounded through the ground or wet concrete;
- it is impossible to quickly leave the pit in case of danger.
Therefore, it is recommended to use low-voltage lighting for the inspection pit: a maximum of 24 V DC and 36 V AC. However, it is easiest to install 12-volt lamps. There are many of them available and they are inexpensive. Low-voltage light sources require an additional power supply. The transformer is mounted strictly in the distribution board. Do not use an autotransformer.
The lamps must be waterproof, the light from them must be directed mainly upward - to the bottom of the car. Protective shades are installed on top of the lamps and grounding is provided. Lamps that are mounted on the walls of the pit should be in a niche at shoulder level. It is better to paint the walls with white paint.
Lamp in a niche
Sockets and switches are mounted outside the pit on the walls or in the panel to avoid short circuits due to liquid leakage.
The wiring must be hidden and protected from moisture with a special cable channel.
An interesting option is to use LED strip. It is sealed and low voltage. The specific power must be at least 4 W/m.
Illumination of the inspection pit with LED strip
Any other waterproof low-voltage lamps will also work well. The main thing is to position them so that the light goes upward.
Options for lighting the inspection pit
The number of lamps for a garage and how to calculate it
According to the building codes specified for industrial premises (they are best suited for a garage), the entire perimeter of the room must receive light equal to at least 1200 lumens for comfortable work. It is very difficult to calculate the exact number and type of lamps to obtain such a value, but experiments have shown that for a garage without windows and with dimensions of 3x5 meters, 4 18 W fluorescent lamps in the corners and two 9 W lamps for the inspection hole are sufficient.
Also keep in mind that you will need another “carrying device”, a portable lamp with which you can inspect hard-to-reach parts of the car. Even if the lighting of the inspection pit is too good, you cannot do without carrying it, especially when repairing the engine and electrical wiring, where local lighting of good quality is needed. Here it is better to use a protected incandescent lamp (it is compact and lightweight).
If the room is large, then you need to provide lamps for the workbench area. Their main difference is the direction of the light beam on the machines. Here you may need DIY LED garage lighting, since such lamps will provide a powerful directed beam to the right place. Two 10 W lighting elements will be enough.
Scheme selection
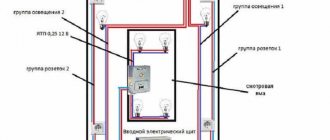
Lighting in the garage is carried out through a connection to a common electricity meter with the house or to a separate electricity meter. In most cases, a three-phase circuit is used so that machine tools can be used.
Before installation, you need to draw up a wiring diagram indicating sockets, switches, lamps and automation. A simple wiring diagram includes:
- introductory machine;
- counter;
- socket group with circuit breaker;
- lighting network with automation.
The garage can accommodate a viewing hole or a cellar. Then the power supply scheme becomes more complicated. Since it is prohibited to use 220 V networks in rooms with high humidity, a 12 V step-down transformer is installed, and all lamps and other devices must be low-voltage.
If you plan to install a refrigerator or other equipment in the garage without an internal voltage stabilizer, it is recommended to connect the equalizer yourself. This will help avoid current surges and rapid failure of devices.
Useful tips from an electrician
- If you have divided all the lighting into certain zones, it is advisable to install the switch directly next to it. For example, near the mechanic’s table, near the hood, etc. If desired, you can install pass-through switches that will allow you to turn the lighting on and off, both from the entrance and from the zone itself.
- In case of a power outage, install emergency lighting in your garage. Halogen lamps or 12 V LED lamps are perfect for this. If the power goes out during repairs, you can always continue by powering the emergency lighting from the battery.
- If you have a spotlight at the entrance, connect it through a motion sensor, this way you will save on street lighting and can create a kind of alarm system.
- For greater efficiency, the luminous flux from stationary lighting in the garage must be diffused, which can be achieved with the help of lampshades and reflectors. But portable local illumination can be done with one beam of light for a specific point.
- Install a grounding loop and lay a third wire in the wiring, this will prevent electrical injury and fire due to a short to the frame.
- When choosing materials and devices, purchase products from well-known manufacturers.
Preparation stages
In both large and small garages, open wiring will require the use of boxes (made of plastic or metal). A corrugated pipe can serve as a replacement for boxes. When choosing an option, it is advisable to rely on the recommendations of professional electricians. In any case, a mandatory component is a general switch located at the entrance or entrance to the garage. It allows you to immediately turn on the overhead light when entering a room, or turn it off when leaving.
For illumination in inspection pits, you need 12 or 36 volt lamps (the choice between them is largely a matter of personal taste). Power supply to light sources must be done using a multi-core cable with a cross-section of 1.5 - 2 square meters. mm. It is recommended to choose lamps with a color temperature from 4000 to 5500 K. Base type - E27 and E40.
LED devices must have the following dimensions:
- SMD 5730;
- SMD 5630;
- SMD 3014;
- COB matrices.
To reduce the cost of purchasing lamps and energy consumption, you can place a mirror in the darkest places. By reflecting the rays, it will increase the illumination in the garage without extra costs.
Selecting a connection diagram
Electrical safety requirements require that inputs to distribution boards be grounded, and the grounding resistance is made to a maximum of 4 ohms. Regardless of the specific organization of power supply, an electric meter is installed in a separate garage, and if the garage is connected to the home electrical network, then it is not needed. The current of the input circuit breaker is determined by the value technically permissible in a given electrical network or permitted by the board of the garage cooperative.
Also, any scheme should have:
- residual current device;
- step-down transformers;
- separate automatic machines for chargers and welding machines.
It is correct to create lighting lines based on VVG 3x1.5 cable. Single-phase power circuits are made from VVG 3x2.5 wire, and three-phase ones are made from VVG 5x2.5 wire. VVGng 3x1.5 cables are used inside PVC pipes and ducts. Open installation on top of a combustible base requires the use of the VVGng LS 3x1.5 solution, which, thanks to complex insulation, makes it possible to do without enhanced protection. You can draw the route both vertically and horizontally. Whenever possible, you should choose the shortest diagonal spacer.
Important: turns are only allowed to be made at an angle of 90 degrees, with a gap of at least 0.1 - 0.15 m from the floors and ceilings. Wires should not be placed closer than 150 mm from heating pipes and other structures that heat up, at least periodically.
Since water and dust are invariably present in garages, all electrical equipment must be protected from both factors. It is prohibited to bring switches close to gates, jambs and windows. The minimum installation height for sockets is 0.6 m.
A budget method of lighting with LED strip
If you don’t want to bother with wiring and installing lamps, you can make safe low-voltage lighting, which can be powered by one switch or socket. First of all, you will need a sufficient quantity of LED strip (you need to know the characteristics of one diode in order to divide the required power by this indicator, the result will be the number of diodes that will be required).
Three rows of LEDs provide excellent luminous flux.
Diodes can be located on the tape at different frequencies; the more of them, the better. Choose options with cool white light. It is better not to take RGB colored tapes, since their light characteristics are an order of magnitude lower than those of plain ones.
Density of LEDs on the strip.
For power supply, you can buy a ready-made module, or you can adapt power supplies from a computer to further reduce the cost of the project. You will also need connection wires, connectors or a soldering iron to connect the contacts.
Step-by-step instruction
Even those with minimal electrical experience can carry out the work. To make a light in the garage using tape, you need to follow a few simple recommendations:
- Select the location of the LED strip. Beams or any flat surfaces work well. If the ceiling or wall is curved, it is worth fixing a flat strip or aluminum profile on it so that there is a basis for the future lighting system. It is easier to secure the tape to a beam or other not very smooth wooden element. If you first glue construction double-sided tape on a foam base, it will ensure reliable installation.
- Cut the LED strip in a suitable place (it is marked on the surface) and carefully glue it, gradually removing the protective film from the back. If double-sided tape was used, remove the protective layer from it; the tape is attached to such a base very firmly.
- If one line of diodes is not enough, you can attach two or even three. This ensures high-quality light without installing lamps. Next you need to solder the wires or connectors. Connect each strip separately; if you connect them in series, the light will be dim. Solder all connections and place them in heat-shrinkable tubing to protect them from moisture.
- Lead the wires to the location of the power supply; they can be secured to the walls with staples or special clamps. If you use power supplies from a computer, then the required amount should be calculated based on their power. It’s easier to install a ready-made version through which the light is connected.
Each tape must be connected separately; they cannot be connected in series.
If you have reflective lights in your garage, you can add some tape there to increase the intensity of the light.
Installing lights in the garage is not difficult if you understand the topic, draw up a detailed diagram and lay out the wiring in accordance with the PUE. It is best to use LED lamps or strips, as they operate on low voltage, consume little electricity and have a long service life.
Calculation of the number and power of lamps
Lighting standards are in SNIP 05.23.95. In order not to understand the documents, it is easier to highlight the main points and, in accordance with them, determine the required number of lamps and their location:
- For simplicity, use the standard for garage lighting in lux (this is an indicator equal to 1 lumen per square meter). If the garage is for repair work, then the minimum norm is 200 lux; when you just park a car in the room, 50-100 lux is enough. When carrying out work for a long time (more than 4 hours a day), illumination should be provided at least 300 lux, and for painting and body work - 500 lux or higher.
- For each type of lamp there is data on the luminous flux, and for LED lamps it is indicated on the packaging. To calculate the level of illumination for a garage, you need to multiply its area in square meters by 200 . For example, if the room is 4x5, then 20x200=4000 lux. On average, a 10-watt LED option produces a luminous flux of 700 lm, so you will need 6 light sources (you need to round up).
- It is better to use two less powerful lamps instead of one - the more uniform the light, the better. Therefore, it is worth considering in advance the location of the equipment, based on the characteristics of the garage and its size.
- If the garage is large, it is better to place the lamps on the ceiling with a distance of at least 50 cm from the wall; the rows should be no less than a meter apart from each other. If the ceiling height is large, additionally fix the lighting elements on the walls at a height of 150 cm from the floor.
By the way! To see what is on the floor and get out of the car safely, you can make the light at a level of 40 cm from the floor.
Ribbon or lamp?
The most popular types. Tapes are optimal for illuminating large spaces, lamps - for specific areas.
It is a board with LEDs. Operates on low voltage direct current. Therefore, to connect to a network with standard 220 V, you need a converter that lowers the voltage to the one required for the tape. It runs on mains power or battery power.
Installation of the tape is simple, since it almost always has double-sided tape. All the work consists of gluing it to the surface. To ensure uniform lighting, stick two longitudinal strips on the walls plus one on the ceiling.
Lamps
They are a collection of lamps in one housing. A significant advantage of many of their types compared to tape is the presence of a built-in voltage converter.
They are similar in design and installation method to incandescent lamps. It is no coincidence that LED lamps compatible with a conventional socket have become the most popular.
Both solutions are good for the garage: lamps and modern lamps instead of outdated ones.
LEDs are a new level of lighting that Ilyich’s bulbs cannot compete with. They are popular due to their very long service life (about ten years), efficiency, and safety. For a garage with its abundance of fuels and lubricants, other flammable substances and objects, this is the best option.
Which ones are better and how to choose?
The design of a garage lamp depends on the type and nature of the work performed in the room. Personal preferences of car enthusiasts play an important role. We can give some recommendations that will help you decide on the choice of lighting devices.
- To calculate the exact number of light sources in the garage, you need to determine for what purposes it will serve.
- One bright lamp in the work area and background lighting around the perimeter of the room may be enough.
- If you need a uniform and powerful light flux in the garage, you should install two central lamps in the ceiling.
- To prevent failure of the entire lighting system at once, it is necessary to be powered by two automatic switches.
When choosing lighting fixtures, the quality of the selected products plays an important role. Cheap options usually use low-quality components. This leads to a reduction in the working life and technical characteristics of the lamp. Safety during operation of such lighting devices leaves much to be desired.
The use of a lamp with an E27 base makes it universal in terms of the use of any light source. You can always change the light source in such a lamp to the one that is most suitable for the work being performed at the moment. You can match any lamp to this base. At the same time, there is always the possibility of choosing a warm or neutral shade of light.
How to choose lamps for the garage
It is necessary to select special lighting devices that are not only affordable, but also have many advantages:
- They are safe and do not explode when there is a large accumulation of gasoline, oil, or metal shavings.
- They provide good daylight, with which you can easily carry out repair work and see everything as in sunny weather.
- They do not break when hit by fragments, shock or other type of physical impact on them.
- They consume little light, because economy is also a very important factor.
- They are easy to install and are not demanding on the characteristics of the electrical network, since in some garage cooperatives stable current strength is rare.
Many people make the mistake of choosing regular incandescent lamps for the garage, since they can be explosive when there is a large amount of fumes from petroleum products and other substances, and also react poorly to high humidity.
If you really don’t want to spend money, you can install an ordinary incandescent lamp for a couple of tens of rubles, just be sure to place it in a protected housing. When an explosion occurs, the fragments will not spread anywhere. It is better to allocate more funds and get a fluorescent lamp. It will provide excellent daylight in the garage and is completely safe.
It is imperative to place the lamp in a metal case, especially if you want to illuminate a pit in the garage. It should be protected from most impacts, falling objects, and friction. It would be even better to move the lighting fixture a little deeper into the side wall so that you can move around unhindered.
It is not recommended to install halogen lamps for the garage . They cannot be used during network outages. Also, it cannot be turned on at temperatures below +5C, which will not satisfy the requirements of most motorists. The main advantage of the product is a large amount of light during prolonged use.
LED lights for the garage are a modern approach to solving the problem. They have all the advantages of the types of lighting partings described above, but have a huge drawback - they are too expensive. If you count on proper garage lighting (bright light evenly throughout the entire room), then the lamps alone will cost about 4,000 rubles.
Installation work
It is recommended to provide illumination in the inspection hole as well.
For the work you will need an electric drill and a hammer drill with a set of drills suitable for the material from which the walls are made, as well as a screwdriver. You also need to purchase a multimeter. The screwdriver and gloves must be electrically insulated. You also need to prepare a level and pliers. The cross-section of the cables used for wiring is selected according to tables that take into account the rated electric current and power.
The places where the devices, distribution box, switches and sockets will be located are marked on the walls. Then they check that the wiring fits comfortably in the path of the planned installation, and put the car in the garage. If the arrangement of the system elements is comfortable, the car is taken out and holes are drilled to install the main components. Then the walls are grooved, a box is attached to them and a cable is threaded into it. When the input panel is installed, the wires are connected to the machines. You need to check that the input devices and RCDs are connected correctly. After installing sockets and lighting fixtures, the performance of the system is tested.
A low-voltage circuit is required for the inspection pit, since high humidity creates corresponding safety requirements. The permissible maximum direct current is 24 V, alternating current is 36. Power is supplied by a system consisting of a transformer, stabilizer and rectifier. The light stream should be directed to the bottom of the vehicle. Car transformers cannot be used.
How to connect the lights in the garage officially
A garage without electricity loses its multifunctionality and can only serve as a parking place for a car. It is impossible to carry out repairs and other work in a dark room. Not so long ago, it was easier to resolve the issue of energy supply: we agreed with an electrician and connected from the nearest pole. But this is illegal and will not last long.
Today the situation has been toughened - serious liability has been introduced for unauthorized connection (Article 7.19 of the Code of Administrative Offenses of the Russian Federation). The legal way of organizing power supply is troublesome, time-consuming, but reliable. You will need to visit many authorities and collect the necessary package of documents.
At the first stage you will need the following.
- Certificate of ownership. It was necessary until 2015. Today, instead of it, an extract from the Unified State Register is issued, which is not an official document, but is necessary.
- Situation plan from the land committee. This document is issued upon verbal request and is a printout of the electronic card.
- A photocopy of an extract from the Unified State Register of Real Estate.
- Photocopy of passport.
- Photocopy of TIN.
Then you need to visit your local power supply organization and request Technical Conditions for connection from the power grid. They have no right to refuse to issue this document; it must be prepared within 15 days. The service is paid. The following package of documents is issued:
- technical specifications;
- standard requirements for organizing commercial metering of electricity consumption;
- the act of delimiting the balance sheet ownership of networks;
- agreement on technological connection to power grids.
Next, they decide on the date and location of the garage connection. By this time you should be ready:
- electrical wiring in the garage;
- a metal box for the meter was installed;
- purchased a meter
Obtaining technical specifications may present a number of difficulties. If the garage is located at a considerable distance from the nearest power line, they may insist on installing intermediate supports at the expense of the owner of the connected facility. However, this requirement is illegal. Such work is carried out by and at the expense of the electricity supply organization.
Internal organization
The LED lamp is designed as follows:
- The light source is a lamp consisting of LEDs. The power is directly affected by the number of lamps and their type.
- The number of LEDs in a light bulb can vary from one to dozens.
- The LEDs are combined into a common chain, which is connected to the control circuit via a power supply.
- The design of the lighting device includes a heat sink, since heat removal is necessary to avoid overheating during operation. The quality of the radiator affects the stability and durability of the entire device.
How to calculate the system
Drawing of electric lighting in the garage.
In the calculations, it is important to know the exact dimensions of the garage - height and area, wall thickness. It is also important to decide on the number of lamps, sockets and know their power. All this data must be recorded on the garage diagram. There is also a formula for the required number of garage lighting devices:
P=Sxp1/p2, where S is the area of the room, p1 is the lighting power per unit area, p2 is the power of one lamp. Voltage norm for garage premises per 1 sq. meter is 20 watts.
Generator
Finally, I moved on to an adequate way to organize autonomous lighting. Typically, motorists buy inexpensive generators with a capacity of up to 1 kW, running on diesel or gasoline.
There are several advantages:
- low price of simple models;
- ease of operation;
- good characteristics;
- power supply to various energy consumers;
- ability to connect power tools;
- efficient fuel consumption;
- autonomy;
- versatility;
- mobility.
But at the same time you will have to endure noise, rattling, and exhaust fumes. Plus, in winter it is often difficult to start a generator.
Grouchy neighbors may express dissatisfaction with the constant noise. The obvious advantages are partially offset by the disadvantages. But still one of the best options.
Useful tips
There are a few additional tips that will be useful to anyone who plans to organize high-quality and complete lighting in their own garage, and is not limited to one incandescent lamp in the ceiling.
- Always try to locate the distribution panel as close to the outlet as possible. It is best to place it on the wall directly at the entrance to the gate. And exactly on the wall where the gate is installed. Turn off the switch every time you leave the garage. In your absence, it must be in a de-energized state.
- Lighting and sockets should be divided into appropriate groups. You can use multi-key switches or a separate single-key switch for each group.
- A separate switch must be installed under the power outlet.
- Considering the positioning of the garage as a room with an increased risk of fire, all wiring is placed in special fire-resistant boxes and is insulated with high quality.
- When organizing lighting, do not forget about grounding. It should always be present in any garage.
If you correctly organize your approach to organizing lighting in your garage, you will get excellent results.
It is important to calculate the power and efficiency of the backlight for each zone
If you lack experience and skills in working with electrical equipment, it is better to seek help or at least consult with specialists. In the first place you need to put your own safety and protection of the contents of the garage from possible fire caused by a short circuit and subsequent ignition.
LED lighting system
To organize portable lighting, it is recommended to use an LED system, which can be purchased at a car dealership.
There is also the possibility of converting a conventional carrier using standard incandescent ramps into an economical model. To do this, you need to purchase an LED spotlight of the required power.
When arranging an inspection pit, it is important to consider that the light should be bright enough, but not interfere with the relevant work. Therefore, two approaches are recommended:
- Fastening the LED strip or tube around the perimeter of the upper part of the inspection hole.
- Installation of spotlights along the perimeter on the walls of the viewing area.
Using LED lamps will save energy while producing a fairly powerful luminous flux. However, such a system also requires appropriate care - it is necessary to wipe the LEDs, lenses and glass, and also ensure good cooling of the devices.
In this case, the most effective way is to use modern LED lamps, which are characterized by high luminous flux parameters and minimal power consumption.
Types of Garage Lamps
There are several main types that are the most popular and effective. There are four of them in total. And we'll look at each one:
- incandescent lamps;
- fluorescent lamps;
- halogen lamps;
- LED lamps and strips.
Incandescent lamps
The very first option is the most common, due to the easiest installation. There won't be any problems with this. It also boasts of being very easy to use. Well, the most important characteristic that most potential buyers of this lighting variation look at is the price. It is significantly lower compared to other options.
Among the disadvantages is a very short service life. Such lighting will “draw” a lot of electricity and also emit light unevenly. The output of lumens per watt ranges from 7 to 17. Such light bulbs fail very quickly and can easily break. Experts do not recommend installing this option, but, nevertheless, it is the most popular according to social survey statistics among garage owners. The reason is their low cost and prevalence; they can be purchased at any market.
Fluorescent lamps
Garage lighting with fluorescent lamps is the most functional. The design of such lamps consists of a glass tube, which is filled with phosphor, inert gas and mercury vapor. The estimated amount of lumens per watt is about 45, which is significantly higher than conventional lamps. High levels of energy efficiency significantly improve your performance level.
But this option also has its drawbacks, for example, poor resistance to low temperatures. Without heating, the garage instantly cools down; if the temperature drops below five degrees, the lamps may not light up. You should also beware of voltage surges; the emitted light can become very dim. To avoid this problem, you need to use stabilizers.
Despite the performance and ergonomics of this type of lamp, they contain mercury vapor inside them. If it breaks, they will get into the air, which means they will poison the owner of the room.
Halogen lamps
They have a very high degree of heating, so they rarely break. The glass is made of quartz, inside the lamp is a mixture of bromine and iodine. Also, do not forget about the light produced, which is very bright and is not yellow, like conventional incandescent lamps, but white. Even one halogen light source can illuminate almost the entire room. The approximate lifespan of such a light bulb is 4000 hours.
The indicator is excellent, but there are options that are more dedicated. Again, it all comes down to price, because halogen lamps are not expensive, and you can find them almost everywhere. Typically, halogen lamps are used for spot lighting of the work area. There are two varieties for this - capsule and linear. They operate at low voltage, approximately 12 volts.
An excellent lighting option would be a car inspection pit or a cellar. Also various work areas in the garage. Among the disadvantages is too much heating; it is better not to touch them with your hands. Halogen lamps do not tolerate dirt and dust, are quite gentle to use and require proper operation. Otherwise, they will not serve you even half of the intended period. The best option to get rid of such troubles would be to buy a special lampshade that will protect you from burns, and the lamp from dust and dirt.
LED bulbs
LED lamps are the most effective and profitable option. Such lighting will cost you a pretty penny, but will pay off in the end. This type of lamp is a modern and best way to illuminate any room. It does not contain any dangerous conjugations of chemicals, does not overheat, and is not prone to changes and constant breakdowns. The light produced by such lamps is white and therefore does not irritate the human eye. Such lamps almost never blink and can work even at low temperatures. The service life is about 50,000 hours, that is, approximately six years.
Amazing performance and a huge number of advantages are offset by one single disadvantage - cost. But it’s better to spend money once than to change the lighting every couple of months. It is also worth mentioning that LEDs are not afraid of moisture and shock. They are quite difficult to break or disable.
Which lamps are better to choose?
The choice of lamps suitable for organizing garage lighting is small and standard for any other room:
- incandescent lamps;
- halogen;
- luminescent;
- LEDs.
Before you make your choice, you need to understand the concept of “energy-saving lamp”. Any other lamp that consumes less electricity than the “Ilyich light bulb” is considered as such. “Housekeepers” can be halogen, LED, or linear fluorescent. A distinctive feature of such lamps is their different color temperatures on the Kelvin scale:
- soft white light – 2700K;
- daytime – 4200 K;
- cool white – 6400 K.
Incandescent lamps
They are called “Ilyich’s bulbs.” They are traditionally used for carrying and hanging from ceilings in unfurnished spaces. It is undesirable to use such lamps in a garage for a number of reasons:
- They provide more warmth than light.
- Low efficiency.
- They burn out quickly.
- The lighting is predominantly in the yellow-red spectrum, “cold” and uncomfortable.
- They consume a significant amount of electricity.
The only “advantages” are accessibility and low cost.
Halogen
The design and principle of operation are largely similar to incandescent lamps. The flask contains boron vapor, which provides more powerful heating of tungsten. Operating life – at least 4000 hours. Ideal for organizing local (spot) lighting, illuminating the work area and inspection pit.
Disadvantages of halogen lamps:
- sensitive to temperature changes (they will not last long in an unheated garage);
- dust and dirt on the bulb significantly reduce the light intensity;
- Voltage stabilization is necessary, otherwise the working life is significantly reduced;
- It is not recommended to touch the flask with your fingers.
Luminescent
They have a long service life: up to 10,000 hours. Affordable and provide high-quality lighting. They are a glass flask with an inert gas inside it. The inner surface of the lamp is coated with a special compound: phosphor. The peculiarity of fluorescent lamps is that at low air temperatures they glow more dimly.
However, most garage owners consider these lamps to be the best choice. It is recommended to install lamps of class IP-65, which provide protection from dust and moisture.
LEDs
Along with fluorescent, LEDs are the best choice for garage lighting . They have an undeniable advantage over all other types of lamps: they are not afraid of temperature changes. In addition, they are 2 times more economical than fluorescent ones. They work ideally under any conditions and provide uniform illumination.