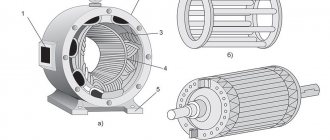
Photo - video intercom wire connection diagram
An intercom is a device that allows someone to enter a room, or vice versa, to deny entry, without direct contact with him. The device has gained particular popularity literally in the last decade; previously, combination locks were most often used to protect front doors.
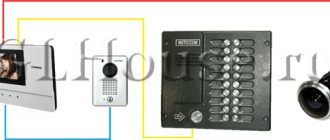
Photo - system design
An intercom in an apartment or private house consists of a handset, a calling panel, video equipment (if additional connection for monitoring a door or gate is required), a lock and a switch. Let's look at the functions of each part :
As an additional security feature, the call can also be supplemented with the ability to connect a video intercom (Kenwei KW-4HPTN, Kocom KCV-A374SD). In this case, all data is transmitted using the camera to a special TV or computer. Unlike an audio intercom, a video system is more reliable in use, because in addition to making a call, visitors are also visually monitored.
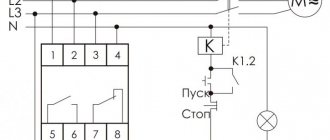
Photo - video intercom wire connection diagram
A connection to a mobile phone occurs if, after a certain period of time, the handset in the apartment has not been picked up. If sensors are installed at a protected facility, when they are triggered, a call or SMS message will be sent to your mobile phone.
To carry out the function of transmitting a signal to a mobile phone, the intercom must be equipped with a special GSM module. The set of such equipment includes:
- calling panel;
- switch;
- uninterruptible power supply;
- GSM module.
A connection to a mobile phone occurs if, after a certain period of time, the handset in the apartment has not been picked up. If sensors are installed at a protected facility, when they are triggered, a call or SMS message will be sent to your mobile phone.
The most important advantage of such devices is the possibility of constant monitoring, which allows owners to know about possible visitors even when they were not at home.
Installing an intercom requires certain knowledge and is carried out only by specialists. After setting up the device's SIM card, the system starts working.
If a video intercom is installed at the entrance, then not only an audio signal, but also a video image will be sent to the mobile phone.
Advantages of a GSM intercom
Various sensors, magnetic door locks, and lighting devices can be connected to the GSM intercom. This allows you to open the entrance door using a mobile phone if the child has forgotten the keys. You can turn on and off the lights in the apartment while outside it to create the illusion of presence.
If you already have a regular intercom installed, its functions can be expanded by connecting a GSM set-top box. It has the same capabilities as a GSM intercom with a built-in module and shares power with the intercom. The consoles are very reliable and allow you not to worry about the safety of your home or apartment.
New capabilities of the intercom system make home security even more reliable, convenient, and expand the scope of its application.
Intercoms with a video viewing function allow you not only to hear, but also to see the person who wants to get into the entrance, but they cost much more than usual. Perhaps, due to the price component, ordinary intercoms are more popular. An ordinary, or audio intercom, is essentially a simple intercom. The kit includes an intercom with a call panel mounted in the door and a special handset on the resident's side.
How the intercom works
To connect the call panel to the handset, just two wires going to each apartment or location of the intercom are enough. The principle of operation of the intercom is that after pressing the button on the panel, a short circuit occurs between these wires, and the handset inside the apartment emits a sound signal. Using the intercom handset, you can talk with anyone who wants to enter the room, as well as open the lock of the front door.
The decision about which intercom model to choose depends, first of all, on the financial capabilities of customers.
- absence of mechanical contacts, which eliminates problems with their oxidation and blocking of buttons;
- entrance doors open only if the user knows the digital code;
- ease of installation and maintenance of the system, as well as the ability to reprogram it.
Repair cost
If you need to adjust the closer, you need to pay for the service in the amount of 700 rubles. If the handset installed in the subscriber's apartment breaks down, it will need to be replaced. This service costs about 900 rubles. If you replace the system or its elements, the total cost of repairs can be about 1200 rubles. If necessary, replace buttons, locks or other elements, the price will be about 1,500 rubles. At the same time, trusted companies provide an appropriate guarantee for the work performed.
Connecting a video intercom to an entrance intercom and setting it up
To connect to the intercom in the entrances yourself, you will need to dismantle (disconnect) the audio transmission line and install a video cable instead. There are several known methods for such replacement, but the best is considered to be the use of a special socket box. You can install it yourself, after which all you have to do is connect the ends of the video cable according to the diagram supplied with the adapter.
When making connections, the ends of the cable are ringed and then stripped, after which connectors are connected to them for connection to the intercom. Next, the conductors laid from the apartment and doors are connected to the terminals on the board. In conclusion, all that remains is to connect all the elements of the video intercom with the receiving panel, assemblies of the electromagnetic lock and controller.
By using our intercom installation services, you will save not only money, but also time. Our specialists will develop the most suitable project for an intercom system and carry out installation and commissioning in the shortest possible time; in addition, we provide warranty and post-warranty service.
Another factor influencing the cost is the brand of the intercom, on which the quality of work directly depends. Our company offers for installation only time-tested brands of intercoms:
By using our intercom installation services, you will save not only money, but also time. Our specialists will develop the most suitable project for an intercom system and carry out installation and commissioning in the shortest possible time; in addition, we provide warranty and post-warranty service.
Installation of security systems
Opening hours: weekdays from 9:00 to 22:00 Weekends and holidays from 9:00 to 20:00
- home
- Gallery of works
- Catalog
- Price list
- Useful articles
- Contacts
The information on the site is for reference only and is not a public offer. Please check with the operator for exact prices and product availability.
Our specialists can upgrade your intercom system to a video intercom within 3 days from the date of receipt of your application.
The cost of installing, restoring and upgrading an intercom at the entrance:
| No. | System composition | Driveway part | Apartment part (tube) | Apartment part (video monitor) |
| 1 | Laskomex AO-3000 with video camera | from 0 rub.* | 1950 rub. | from 6500 rub. |
| 2 | Visit + camera | from 0 rub.* | 1790 rub. | from 6500 rub. |
| 3 | xVoice with v/camera | from 0 rub.* | from 1790 rub. | from 6500 rub. |
| 4 | Upgrade to video intercom | for free** | no replacement required | from 6500 rub. |
| 5 | ROM recovery | for free*** | no replacement required | |
* - subject to the conclusion of a service agreement and installation of at least 50% of the total number of apartments in the entrance, subscriber devices. The ROM model is discussed separately. In entrances with less than 64 apartments, installation conditions are discussed separately.
** - if there are 10 people willing to connect to the video trunk and they agree to pay an additional subscription fee.
*** — subject to the conclusion of a service agreement.
All prices include installation work, subject to the conclusion of a service agreement.
You don’t think about the operation of the intercom in the entrance while it is working, but, like any other equipment, the intercom requires periodic maintenance - adjustment and cleaning, and if this is not done, the intercom will not work for very long.
The intercom equipment at the entrance can be divided into three parts: apartment, entrance and audio highway (read more in the technical information section).
Malfunctions of the entrance intercom make up 45% of all repair requests. That is why residents of apartment buildings sometimes do not even notice the accidents occurring and the technicians who eliminate them. After-sales service allows you to forget about repairs forever. Entrust this task to our specialists.
A standard intercom for an apartment building consists of the following parts:
Coordinate matrix. Apartment intercom devices are connected to the main unit each with their own cable. With 10 subscribers there will be 10 wires, with 20 - 20, etc. This type of connection is the most economical, but is not designed for more than 30 subscribers.
Digital intercoms have a higher price than coordinate matrix ones. Intercom units, regardless of quantity, are connected using two cables. But such schemes often fail.
Wireless intercoms belong to the elite category. They do not require an additional cable, but use existing ones. For example, telephone or Internet, or IP. Communication takes place via an Internet connection, including wi-fi. Such intercoms are more expensive, but they are more technologically advanced. They send a signal to TV, smartphone, tablet, and you can open the lock from mobile devices. It is possible to connect to a video camera and display a color image on the screen.
The difference in the operation of different types of intercom is caused by the use of different communication algorithms. At the same time, both intercom technologies provide residents with good communication quality, and installers with the opportunity for easy maintenance.
Users of an entrance intercom, if they need to replace the handset, will have a question about which system - coordinate or digital - is used in the structure of the intercom.
This information is necessary to know because these technologies have large differences in the design of intercom handsets. Coordinate and digital intercom technologies also differ in connection method, which must be taken into account when installing devices.
In a digital intercom system, all apartment subscriber handsets are connected to one line, which is stretched along the riser of the entire entrance of the house and has taps for each apartment.
This line is laid with a low-current two-core wire from the entrance intercom to the receiving tube of each apartment. All tubes are connected in parallel, observing the polarity of connection to the tube terminals.
The apartment number is set on the circuit board of each subscriber device by installing jumpers.
For digital access devices, the most commonly used subscriber panels are Lascomex LC-8D or Laskomex LM-8D. If you open the cover on the tube body, you can see the location of all the elements on the circuit board.
At the top right there are jumpers that are used to set the subscriber number. The apartment number is dialed as follows: the sum of the numbers that are connected by jumpers must correspond to the apartment number.
For example, for apartment No. 73, you need to connect terminals with values 64.8 and 1 with jumpers. The remaining unnecessary elements (jumpers) are removed from the circuit board.
When replacing the intercom receiving panel yourself, you need to install jumpers on the new handset as they were installed on the previous panel.
The circuit board also contains:
- power switch (left),
- microphone and speaker volume control (top)
- terminals for connecting to the line leading to the entrance intercom (bottom).
If an intercom of a combined model is installed at the entrance, then the coding is carried out on the rear panel of the intercom, or in the interface module. Intercoms are very sensitive to the quality of the signal received from the entrance.
Therefore, it is recommended to use conventional intercoms, which work better and are also more stable. In this case, the true rule is: “the simpler the system, the more reliably it works.”
An intercom operating using a coordinate system has a different operating principle. The switch installed on the entrance coordinate intercom is connected by a multi-core cable laid along the riser of the entrance to each individual apartment.
All wires in the wire have a color assigned to them: “0” is blue, “1” is red, etc. Inside the cable there are several cores, each with ten wires. The wire is selected based on the number of apartments that are planned to be connected to the calling unit. So for a five-story building you will need a cable with two cores of 10 wires, and for a nine-story building - 4 cores.
Each subscriber panel of the coordinate intercom is connected to its own pair of wires, which determines the apartment number. Therefore, such receiving units do not require coding, unlike digital systems. When connecting, it is important to observe the polarity of the wires.
Panels used for coordinate systems are simpler in design and more reliable in operation. They contain fewer elements, and therefore have less weight and size. For example, the UKP-12 coordinate panel is even visually different from the Lascomex LC-8D or Laskomex LM-8D tubes. Below is a typical connection diagram for a multi-apartment intercom system of this type.
For the coordinated entrance intercom, the following receiving units are used: UKP-7, Laskomex LM-UKT, UKP-12M, UKP-12. The most common and well-known intercoms operating using a coordinate system are Vizit, Cyfral, Eltis.
The difference in the operation of different types of intercom is caused by the use of different communication algorithms. At the same time, both intercom technologies provide residents with good communication quality, and installers with the opportunity for easy maintenance.
All systems are serviced by specialized companies with qualified specialists and extensive experience. Therefore, each company chooses its own intercom technology, based on its accumulated experience in operating different systems and its specialization.
Head of the development department, deputy director Vladislav Kirichenko.
Intercom systems are used on entrance doors and gates. They allow the owner of the home to personally control the access of persons to his home. Typically, such devices can most often be found on entrance doors. They install intercoms that work with multiple subscribers.
Installation
You can install the outdoor unit in a private house at the gate or next to a support pole. It is not practical to install the device in a gate; constantly moving doors can quickly break the cables:
- For the block you need to create a niche , wall up the installation box into it, attach the block to it, but first lay the cables.
- Installing a security camera and electronic lock is a little more complicated. You need to fit extra wires into the niche. The video camera is connected to the unit inside the intercom.
- Mounting the unit inside is even easier. No need to install hidden settings. Choose a place indoors, hang the device on nails, you can additionally attach a battery if necessary. A thin 12 V cable will be sufficient when installing the unit inside.
Description of the installation process:
- Decide on the height of the device; in terms of height, it should be comfortable and accessible for all residents of the entrance, in particular children.
- Measure the distance from the floor, the gap should be 20 - 25 cm.
- Using a marker, draw a line horizontally and vertically draw a rectangle measuring a couple cm larger than the internal dimensions of the door.
- Check the evenness of the markings using a level.
- Draw a rectangle around the perimeter; you will need to hollow out the outer tier of the recess.
- Make sure that the electrical wiring is located next to the niche of the device being inserted so that its outer panel can be connected to the cable.
- Look at what material the walls of the house are made of. There will be no problems with brickwork; other materials or a thin wall may burst or crack when hollowed out.
- Hollow out a rectangle inside using a hammer drill; a depth of half a brick will be sufficient.
- Cut out the tier from the outside around the perimeter by approximately 12 - 14 mm.
- For wiring, use the gating method, making a channel.
- Bring the resulting channel to the niche inside, and hollow out a small square for the socket from the back.
- Cut a channel for the electrical wiring; this can be done without any problems with an electric wall chaser.
- Connect the power supply to the outlet niche and insulate the exposed wires.
- Mount a box for the outlet, which will then need to be plastered.
- Bring the ends of the cables out and seal the channels.
- After drying, you can go over it with putty, leaving uneven areas on the top tier.
- After the putty has dried, prime the entire surface from the inside and paint it in two layers.
- Install the outlet after the paint has dried, connect it to the wiring, and do not touch the cables that come out of the wall.
- Cut a piece of drywall to the size of the outer tier of the niche. Place it on the glue, having first screwed a couple of pieces of aluminum profiles to the niche.
- Mount the profiles vertically, keeping the distance between them the width of your palm.
- Coat the niche tier well with glue from the outside, attach a sheet of plaster, press firmly.
- At the level of the center of the profiles vertically, make cuts, having previously marked their axes, bring the cuts to the edges of the niche at the top and bottom, connect the cuts lengthwise, you should get a hatch.
- Screw the intercom clamp to a separate fragment and cut a small hole for the cable in the center of the mounting frame.
- Place the hatch on the profiles using screws, and also secure the shield.
- The shield glued to the niche can be puttied.
- For external finishing, unscrew the device lock.
- Sand the surface after it has dried, put the fastener in place, unscrew the hatch, after which it can be installed in its original place.
- Conduct a test installation of the intercom, hang it on the mount, and check its positioning along the horizons.
- Remove the intercom, cover the area with wallpaper, or finish it at your discretion.
- Open the slots around the hatch to install the lock.
Read also: Which coaxial cable for TV to choose?
Schematic diagram of connecting an intercom in an apartment building for the VIZIT-ML-400 intercom
How to use this device
Intercoms appeared in the homes of residents of our country a long time ago. Someone deals with this device every day, so they know all its flaws and quality. And those who have not had to work with this device may be stumped, not knowing how to use the intercom.
First of all, the simplest question: how can a visitor contact the owner of the apartment?
Voice contact can be made between the external panel and the handset
If a guest visited a friend living in an apartment building, then he needs to know the apartment number, dial his number on a special numeric keypad of the external calling panel and press the call button. Further actions are the same as in the first case.
No less interesting information about Types of intercoms
How can a tenant of the house gain access to the entrance?
Everything is clear with guests: you warn them in advance about the apartment number, they come, call the apartment using the intercom system and gain access to the house.
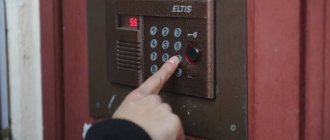
How can I get into the entrance without going through the electronic lock? Intercom systems are equipped with a tablet-shaped reader for special keys. The key is applied to this niche, the microcontroller reads the code from the key, checks it with the database in its system and, if there is a match, gives access to the house.
The electromagnetic lock can be opened with a key reader or by entering a PIN code
An intercom is a modern intercom device that allows you to answer a visitor’s call and, if necessary, remotely open the front door. Today, these devices are ubiquitous and it is difficult to imagine how users previously managed without them. Such devices are used in offices, industrial premises, private homes, but the most common installation of an intercom in the entrance
.
How the intercom works
The intercom consists of several basic elements necessary for the full operation of the intercom system:
subscriber device - can be presented either in the form of a regular audio tube with a button to open the front door lock, or in the form of a small monitor that allows you to see the visitor. It is advisable to use a subscriber unit with a screen only if there is a video camera built into the calling panel;
connecting wires – necessary for transmitting a signal between the calling panel and the subscriber device;
power cable – ensures the operation of the intercom, converting the electrical voltage from 220 V to 12 V.
The operating principle of the intercom system is simple. When you dial the apartment number on the calling panel, the subscriber device rings. To answer a call, you must lift the handset or press the appropriate button. A separate key is responsible for opening the electromechanical or electromagnetic lock of the entrance door.
The intercom module operates in standby mode and periodically sends signals to the key. When contacting the lock, the key fob waits for such a signal and generates a pulse that allows the main unit to establish communication. The intercom module then begins reading the key's memory, identifies its serial number and unlocks the corresponding door. Therefore, even if the entire house is serviced by one company, residents cannot enter other people's entrances.
Connection diagram
You can connect an intercom in different ways, there are three in total:
- The diagram represents a network of devices connected to one network , the scheme is complex and expensive, the installation of an intercom is carried out by collecting money from all residents, that is, by contribution.
- The option of connecting the device with a lock is suitable for private homes. The peculiarity of this connection is that the gate is unlocked together with the door. If you think about it, it’s enough to understand a little about electrical wiring; you can install such a system yourself, without the help of professionals. First, a receiver is installed in the house, two wires with three and four cores are taken from it, or you can use one multi-core cable at once. According to the diagram, connect all the wires one by one, insulate the exposed wires. Don't forget to supply power to the call panel and receiver; to do this, purchase a step-down power supply.
The intercom will prevent thefts, break-ins, and entry of people with malicious intent. If you have a video camera, you will be able to see everything that is happening outside the door and even on the street. Devices have become a part of our lives, making them convenient, calm and comfortable.
Seasoned residents know very well how to use such a device, but beginners ask many questions about the operation of the intercom. This article will help owners understand their new device. In it you can find answers to several of the most frequently asked questions by users about the operation of this device.
If something went wrong
The operation of the system, that is, the speed of reading information and the activation of the lock opening signal, is influenced by weather conditions and the technical condition of the “tablet” (level of contamination or damage to the surface). Therefore, you need to treat the keychain with care.
If you find that one of the strangers has picked up the key to the intercom at your entrance, then you need to recode the lists of numbers. To do this, contact the servicing company. The same thing needs to be done if you have lost the key to the intercom - you will be given a duplicate.
This type of entrance access control system is widely used because it is inexpensive and reliable. Most likely, the intercom keychain will remain a familiar attribute of our everyday life for a long time.
Sources
Source - https://www.asutpp.ru/podklyuchenie-domofona.html Source - https://domofon-ks.dp.ua/vs-pro-domofon/gsm-domofon-printsip-raboty Source - https:// www.klaster-plus.ua/stati-i-obzory/audio-ili-video-domofon-sostav-i-vozmozhnosti-princip/ Source - https://strojdvor.ru/umnyj-dom/podklyuchenie-videodomofona-k- podyezdnomu-domofonu/ Source - https://video-grup.ru/domofony/podezdnye-domofony/ Source - https://mdsec.ru/domofony_podezdnye Source - https://starnew.ru/blog/printsippodklyucheniyadomofonaselektromagnitnymzamkom Source - https: //www.domofons.info/news/cifrovoi-ili-koordinatniy-domofon.html Source - https://mezhdveri.ru/18273-polzovaniya-domofonom.html Source - https://sb-msk.ru/uslugi/ ustanovka-domofonov/v-podezd/ Source - https://aqua-rmnt.com/interesnoe/ustroystvo-i-printsip-raboty-klyucha-ot-domofona.html