Design and principle of operation
An intercom is an electromagnetic locking device with the ability to remotely control the opening and closing process from remote controls (handsets) located in apartments or offices. The system is installed on the entrance door and protects the building from unwanted entry.
Depending on the system for connecting apartments to the intercom device, a distinction is made between digital and coordinate devices.
With a coordinate switching system, a separate cable goes from the intercom to each apartment, but with a digital system, there is only one connecting cable. It would seem that digital intercom devices should be cheaper, however, in fact, everything is exactly the opposite - their cost is almost 3 times higher than that of coordinate ones. But it is believed that this pays off with the higher reliability and security of such a communication system.
Based on the type of communication, intercoms are divided into audio and video devices. From the name it is clear that video intercoms have a screen that displays the identity of the calling visitor, while audio devices provide only voice communication. Naturally, devices that transmit video images provide a higher level of protection, but do not forget about the price aspect - they are much more expensive than voice intercoms and, as a result, much less common. Typically, video devices are installed on the gates of large private properties.
Situation three, no handset.
That is, we need to determine what type of system we have. As we already know, this can be done in the following ways: - by the presence of a constant voltage of 6 - 7 Volts - this is definitely a DIGITAL system, - by the type of handset from a neighbor (presence/absence of an apartment number block).
Buying a handset : I recommend handsets from Laskomex, which is a leading Polish manufacturer of intercom systems, their products are compatible with most devices from other manufacturers (not an advertisement!).
Connecting to digital intercoms
How to properly connect a digital intercom handset in an apartment? This is not at all difficult, provided you follow a few rules. The subscriber node of the intercom system consists of a panel and a handset. The panel is usually installed on the side of the front door; the installation location of the tube can be anywhere, if desired, the only thing is that you will need to run the cable from the panel there. The internal structure of an intercom handset is almost no different from a telephone handset - it also has a microphone with a speaker and a microcircuit. The access door unlock button can be located either on the handset or on the wall panel.
On the rear side of the panel part of the device there are two terminals with polarity symbols (“+” and “-”). You need to connect a two-wire line to them. It is important not to reverse the polarity of the wires during installation - otherwise the system will not function.
To facilitate this process, wires of the same polarity are usually the same color.
The initial installation of an intercom system is always carried out by professionals; independent replacement comes down to purchasing a new intercom, actually replacing and connecting the wires. Before purchasing a handset, check the type of intercom you have. There are different models for digital and coordinate systems. The connection diagram of the handset to a digital intercom has its own characteristics. During the installation process, you must dial the apartment number. It's done like this.
- Carefully open the intercom housing. You will see that there are paired pins on the chip with numbers 1-2-4-8
- Using special jumpers, connect the pairs in parallel so that the sum of their numbers equals the number of your apartment. For apartment No. 15, for example, you need to short-circuit the first four pairs.
Please note that problems with one apartment intercom can affect the functioning of the entire system; this is the main disadvantage of such systems. To localize a fault within one floor, floor controllers can be additionally integrated into the system.
- How to ensure uninterrupted operation of an access control system: choosing a quality handset for an intercom
Instructions for installing the external panel
To be able to use an intercom in an apartment, you need to install an external panel on the street. To do this, you need to observe some points:
- the device must be at a certain distance, not lower than 160 cm from the ground;
- for a built-in housing, it is necessary to draw lines for the grooves, determine where the built-in box will be located;
- for the overhead panel, you need to mark the location of the fasteners, carefully make a hole for the dowels on which the device will be fixed;
- before making grooves, you should pay attention to the size of the corrugated pipe, measure its size and the size of the apparatus that will be built in;
- after installation, the built-in box must be fixed with a cement mixture;
- the corrugated pipe is placed in grooves and, if necessary, secured with nails;
- the nails are pulled out during puttying of the grooves with the pipe;
- then the wires are connected to the external panel, the excess is cut off;
- the street panel is installed on a built-in box.
At first glance, it may seem that the scheme is overly complicated. In this case, you can contact an intercom company that services intercom systems in the area.
Specially trained people connect the external panel, but they will not make grooves and place the cable in corrugated pipes.
Installation on a coordinate matrix type device
Connecting a handset to an analog (coordinate matrix) device differs from the same operation with a digital device. An analog intercom system operates on the principle of a telephone exchange - reception, analysis and connection with the desired subscriber is carried out by a switch. Subscribers are most often connected to the system in parallel.
There are 2 special buses for connecting the intercom with the switch. On the first bus, the contacts (D0-D9) are responsible for tens in apartment numbers, on the second (E0-E9) - for units. Connect the wire from the terminal with a plus sign to the contact responsible for the ten in your room (for apartment No. 87 - 8), the wire from the negative terminal is connected to a single contact (7 in our example).
If there are more than 100 apartments in your entrance, the intercom model must correspond to this number (there must also be a third bus, responsible for hundreds in apartment numbers). The principle is the same.
In some cases, when installing an intercom system, installers reprogram the panel, shifting the numbers by a certain amount. This action is performed, for example, if it is impossible to connect hundredth numbers. In such a situation, you will not be able to connect the handset yourself; you will have to call the specialist who set up your system. Switches are usually installed on each floor in distribution panels and connected to each other in a parallel circuit.
It is also possible to install one switching device for the entire entrance, but in such a situation additional tens of meters of cable will be required in order to sequentially connect the apartments on the upper floors. If, when connecting at least one subscriber intercom to the entrance analogue system, the polarity of the wire connection is violated, this may affect the functioning of all system devices, as is the case with digital intercom communication.
How can you connect an intercom yourself if it was disconnected for non-payment?
Many have encountered this problem when you come home after a working day, put the key from the intercom to the door lock, and in response an error is displayed on the screen and the door does not open. This means that your intercom has been turned off for non-payment, and now the question arises: how to connect this device yourself?
For what reasons is it disabled?
Finding out the reasons why your apartment was disconnected from the intercom system takes time and patience. Even the fact that you have all the paid receipts in your hands will not guarantee that you will defend your rights. All paid receipts should be kept, as with them you have a greater chance of asserting your rights.
The intercom may be faulty for several reasons, among the most common:
- disconnecting your apartment from the intercom system;
- your key would be deleted from the device memory;
- technical breakdowns, malfunctions, incorrect operation of the system.
Let us consider in more detail how and for what reasons services disconnect residents from the intercom system.
The first and most common method is to disconnect the calling panel from the apartment. In this case, it will not be possible to rent an apartment and open the entrance door from it.
This method is the simplest and most common, as it is performed by typing a special combination on the digital panel.
It is almost impossible to find specific codes for such combinations on the Internet, because then anyone can engage in arbitrariness and connect and disconnect intercoms to anyone they want.
In order to connect a disconnected handset with your own hands, you need to do preparatory work, namely, find the switchboard. It may be closed, so you will have to open it with improvised means. As a rule, they are closed with a regular latch, so there will be no need to break into the box.
Having opened the shield, we look for the board. To do this, unscrew the screws and remove the protective cover on the board. We are looking for the “PRG WORK” lever (it is responsible for access to programming the calling panel). Switch the toggle switch to “PRG”. After the preparatory work is completed, you can go to the entrance door and work on the intercom.
On the intercom display you will need to enter a series of combinations in sequence:
- We enter a hash and three nines, after which a signal will sound from the device and “1_2” will be displayed.
- You must click on the unit, thereby you will enter the service installation mode.
- “P_SE” will appear on the monitor.
- After this, we enter the “on/off” mode, to do this you need to press the number 8. “SE_8” will appear on the monitor, it will beep and “A_” will appear on the screen.
- Then enter the number of the required apartment.
- Press # if the apartment number is one or two digits.
- 1 activates the apartment call, the intercom will beep twice, and “ON” will appear on the monitor.
- Press * to save the settings.
After all the manipulations performed, check the correctness of the work performed. Dial the number of the required apartment. If the call went through and the lock was able to be opened normally from the inside, then you need to return to the panel and switch the toggle switch to the previous position.
As a result of your work, you should get the following combination #9991800#1*.
Source: https://zhkhinfo.ru/tarify/kak-mozhno-samomu-podklyuchit-domofon-esli-ego-otklyuchili-za-neuplatu.html
Possible faults
During operation of the intercom system, various malfunctions :
- mechanical damage to the tube;
- When you pick up the handset, the signal continues to sound;
- failure of the lock release button;
- the voice of the caller is hard to hear;
- if you press the door open button, the call is dropped.
In the first case, it is easier to replace the damaged part (pipe), because they are not so expensive. The main thing is to choose the right intercom for your intercom system model. In situations where the call signal does not turn off when the handset is picked up, there is no connection with the calling visitor and there is no reaction to pressing the lock control button - look for a breakdown in the handset switch. You can repair or replace it yourself, however, it is still recommended to entrust this to professionals, especially if you have never done anything like this before. This procedure requires some experience and appropriate tools.
If you have to press the electric button several times to open the lock, the microswitch is to blame. It is not difficult to change this part yourself, even if it is located on the intercom handset. It is enough to carefully unsolder the contacts of the faulty part, remove it and solder a new one. If the visitor is hard to hear, the problem is in the speaker or microphone. In some models, such a malfunction may be caused by a clogged “Balance” resistor installed on the intercom handset board .
- What is an intercom audio tube - classic design diagram
In the latter case, you can try to twist the resistor lever yourself; in most cases, audibility is restored.
Unauthorized disconnection of a call when the lock is unlocked may be caused by an interruption in the electrical circuit coming from the speaker. In this case, carefully inspect all cable connections - both on the panel and on the intercom. Of course, turn off the device first. If there is a break somewhere, you need to replace the wire or solder the contacts of the wire and terminals. To summarize, we can say the following: in many cases, you can replace a damaged tube of both a digital and a coordinate matrix intercom yourself; this is a fairly simple action. Only in some cases is it worth calling the adjusters of your intercom system.
To learn how to connect different intercom handsets, see the following video.
Today, it is important to ensure the safety of your home. The old, difficult-to-open locks have been replaced by a new modern device - an intercom, which not only ensures the security of your home, but also allows you to remotely control the lock on your doors or gate. This device is widely used in apartment buildings, private homes, cottages, large offices and warehouses. In most cases, intercoms are installed by special companies that sell them. But since this equipment is simple in structure, you can easily install it yourself. In this case, the problem arises in the solution - how to connect the intercom handset. As practice shows, everything is very simple.
Types of intercom code keys and the principle of their operation
Intercom code keys can be divided into two types: contact and contactless. The first intercoms used simple analog keys with two contacts. A resistor of a certain value was soldered inside such a key. When such a key was applied to the reader, a fixed current was passed through it, and the microprocessor system measured the voltage drop across the resistor.
If the fall fell within the specified parameters, the door opened. Such a key could be made not only by an intercom service company, but also by any person with basic knowledge of electrical engineering. Therefore, analog keys were quickly replaced by chips that transmit serial binary code. For such keys, the number of possible combinations is determined by the number of transmitted binary digits.
Contact-type digital keys can be made based on chips from different companies. One of the most common are Dallas Touch Memory chips from the same manufacturer. Depending on the microchip model, the keys have different amounts of memory and allow you to obtain a different number of numerical combinations.
Recently, many intercoms have been equipped with contactless reading devices. In this case, the exchange between the access key and the intercom is carried out over a radio channel. The devices communicate with each other at frequencies of several tens or hundreds of kilohertz. The range of such “radio equipment” does not exceed several centimeters. Therefore, the possibility of intercepting radio traffic is unlikely.
What is an intercom handset?
The intercom handset is one of the components of the intercom system of the security system, which provides communication between the owner and those wishing to enter the premises. If the external communication element is a calling panel located outside, then the handset is a home appliance that is installed inside the protected premises. Such a tube can be installed either independently or by calling a special team.
In most cases, the handset provides communication immediately upon picking it up, without the need to press any combinations. Installation of the tube usually falls on the shoulders of professionals.
In the photo you see an image of an audio intercom tube
Each type of protective equipment requires a specific tube, since different devices require a certain number of wires to be laid.
If you are using a digital intercom, then in this case you will need one cable that is laid from the digital panel. Using its individual branches, it connects to each individual apartment. If a coordinate matrix type intercom is installed in the house, then the installation involves laying wires equal to the number of apartments in the entrance.
- Diagram of an intercom handset - tips on design and repair for beginners
Types of intercom
And first of all, it’s worth considering the existing types, of which there are only two:
- audio intercom;
- video intercom.
The difference between them is significant, because installing a video intercom will allow you to see and hear the person who is ringing the doorbell. In the case of an audio solution, this is impossible and visitor identification is possible only by voice. The advantage of a video intercom is also that it can act as a recorder, since the video recording function is often available. The location where it is saved can also be configured - local or cloud server.
If we touch on the issue of connection, then the difference between them is not so great that it becomes a decisive factor in the choice. The video transmission function adds a maximum of two wires to the overall circuit, which during the initial installation cannot cause any complications.
It is worth highlighting separately those devices that can work remotely. The connection between the entrance or gate to the apartment is carried out via a radio channel or the Internet. And, given the fact that any wires are excluded, this will eliminate the usual approach to installing a video intercom. However, this functionality is compensated by a price that is several times higher than the cost of a standard installation of an intercom in a private house, especially with your own hands.
How to connect all device components?
Sooner or later, each of us will face the problem of connecting the tube. There may be a number of reasons for this:
- Installation of equipment independently in connection with the installation of a protection system;
- Connection of the handset due to a breakdown of the previously installed intercom device.
If you still have to do this work yourself, then first of all you should purchase completely new equipment. In this case, you should take into account the fact that the handset must fully comply with the installed intercom system.
You can learn more about installing an intercom after watching this video:
Today, buying a handset for an intercom is not difficult, and you can safely purchase it yourself. Thanks to the many modern companies engaged in this production, there is a wide range of products that are publicly available and suitable for any type of intercom. It is strongly recommended to purchase goods only from authorized dealers, who guarantee the quality of the goods and provide a guarantee for a long service life.
The device must meet all the specified quality conditions, since only high-quality intercom handsets can ensure uninterrupted and reliable operation of the security system. Otherwise, re-installation will not take long.
Installation of handsets for digital intercoms
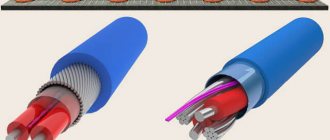
Digital intercom systems are mainly used in apartment buildings. Installing a handset of this type has its own specifics, namely: this addressing scheme requires a two-core cable to which the subscriber handset is attached. Here you should pay attention to the polarity.
Tube connection plan
The installation of the intercom handset in this case has its own microcircuit, which is programmed with jumpers or jumpers for each apartment number. In this regard, in order to find out your apartment number, you will have to carefully disassemble the handset and carefully examine the existing microcircuit. Near each jumper there is a special digital panel on which the numbers are in ascending order. Here the apartment code is made up of numbers related to closed jumpers.
A disassembled old handset can serve as an example from which you can transfer the code to a new device. Thus, installing a new tube will not be difficult.
Installation of the device on a coordinate matrix type intercom
Connecting the intercom handset to this type yourself is not difficult. Here, all the work consists of transmitting a signal to a special switch, which, when a call is received, processes it and, due to the presence of special keys, sends the call signal to the required subscriber device.
Installing a handset for such an intercom will force the owner not only to work hard, but also to develop quick ingenuity. During installation, the whole problem lies in the cable, which is divided into many wires related to each individual apartment in the entrance. It should also be taken into account here that tens keys generally do not exceed seven, including zero. Thus, the total number of users can be more than eighty.
Intercom installation diagram
Do-it-yourself installation of an intercom handset consists of finding the required bus of tens, as well as units. It is very easy to deal with dozens - they are located on the panel of the required floor. All that is required is to find the wire to which the wires related to each apartment in the entrance are connected. This way you will select the cable you need.
To select the correct unit bus, you need to go up to the floor with the apartment number that matches the last digit of your apartment, and again find the cable on the panel. A plus is connected to the tens bus, and a minus to the units bus. This is where all the difficulties end. Installing the device is not difficult.
Then we just connect the handset. To do this, we carry out the entire procedure described, paying attention to the polarity. If all existing rules are followed, we can say that the installation is complete.
You can find out interesting information about intercoms by watching this video:
When connecting an intercom, people often wonder: what to do if you connected the device yourself, but it doesn’t work? The answer is simple: you should reconsider the device assembly diagram, and also pay attention to the polarity, since it is with polarity that the most problems arise.
If you doubt the correctness of the work done, call a special specialist to your home. Such masters usually provide their services to all companies involved in the sale and installation of intercoms.
2015-01-20
A handset or apartment intercom device is an integral part of the intercom system. It is installed in each apartment of a residential building and allows you to conduct a dialogue with the visitor and control the electronic lock to open the door. Connecting the intercom handset yourself, if necessary, is not at all difficult. You just need to know a few simple rules.
Connecting an intercom with your own hands
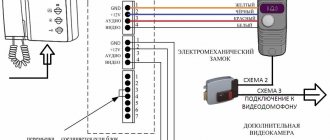
Intercom connection diagram
Today you can find three types of intercom connection. Do-it-yourself installation of an intercom can be done using any scheme. A complex scheme is used in apartment buildings. A simpler intercom connection scheme is used in a private house where there is only one connection network. Thanks to these schemes, you can install an intercom yourself.
Intercom connection diagram for an apartment building
This method is considered complex as you need to connect multiple users to one device. Installing this system is considered an expensive process. That is why you need to collect money from all residents. It is almost impossible to carry out this process yourself as it is expensive.
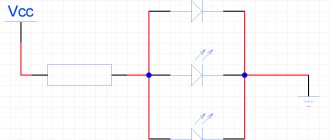
Connection diagram for intercom with lock
This system is considered standard. Thanks to this diagram, you can connect the intercom and the lock in one circuit. Many people might think that doing this process on your own would be difficult, but it is not. Using the diagram, you can install the intercom yourself.
From the receiver, which is located in the house, you just need to run a few wires. If the installation is normal, then it is necessary to lay a three-core wire. If you plan to connect a video camera to the intercom, then you should use a four-wire wire.
You also need to remember that both parts of the intercom must be powered using a step-down power supply.
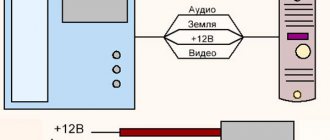
Intercom connection diagram without a lock
This scheme is considered the simplest. Here the connection between the indoor and outdoor units occurs using four wires. Two wires are responsible for power supply, and the remaining two are for audio and video signals. As a result of this, you will see and hear your interlocutor behind the gate.
As you can see, thanks to these diagrams you now know how to connect the intercom yourself. If you decide to install an intercom, then it is better to do everything together.
Connecting an intercom
It doesn't matter which connection scheme you choose. The intercom installation process will have the same sequence of work. When connecting, you should follow the following sequence:
- Wire routing. This is the easiest step as you just need to connect the inside and outside of the wire using a wire. The wire must be carried out using cable channels. Its internal part can be connected both underground and by air. It is best to lay the wire underground. Typically, a stranded wire is used for connection.
- Installation of an external intercom unit. The outdoor intercom unit can be installed in any convenient place. Inserting an intercom into the gate is quite problematic. It is best to install the intercom on a pole. To protect your device, installation should be carried out in a protective block. If you plan to connect the lock opening to the intercom, then the job will become more complicated. In this case, it is necessary to lay a wire to the lock.
- Installation of the internal intercom unit. The indoor unit is much easier to install than the outdoor unit. This unit usually resembles a video phone. Typically, the installation of this block can be done using self-tapping screws or dowels. If necessary, you can supplement your equipment with a special battery. Thanks to this, you do not need to supply power to the device. To connect it you will need a thin wire.
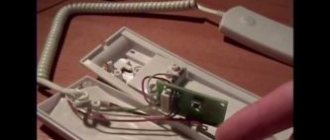
- Switching wires. If this is your first time connecting an intercom, then you may have a question about what to connect and where. Before you connect the intercom correctly, you definitely need to understand its wires. When connecting, try not to mix up the wires. Below we have placed a photo that shows the stage of connecting the wires. After connecting, be sure to check the functionality of your device.
As you can see, the technologies for connecting an intercom yourself are quite simple. Now we decided to give you some installation tips. In order for you to no longer have to run to the other end of the house, you need to place the device in the room in which you are most often found. If you are interested, then read about instrument transformers.
Typically this will be the kitchen or living room. If you are a lazy person, then you can install it in every room of your house. Thanks to this, you will always hear the signal. These were all the recommendations we wanted to tell you.
Recommended reading: installing an exhaust fan.
Source: https://vse-elektrichestvo.ru/bytovaya-texnika/podklyuchenie-elektrooborudovaniya/podklyuchenie-domofona.html
Handset design
The residential subscriber device consists of two parts. This is a handset and panel that is usually mounted on the wall next to the front door. The handset can be installed anywhere, you just need to lay the wire around the apartment. Inside the handset there is a microphone, a speaker and a small board with discrete elements. The panel has a handset release lever, and the handset itself has a door open button.
The electronic lock button can also be located on the wall panel. In modern models, the lever is replaced by a reed switch, and there is a small magnet on the tube itself. Some models may have a handset switch. On the back of the panel there are two screws marked “+” and “–”. A two-wire line is connected to them.
All access intercoms installed in the entrances of apartment buildings are divided into two groups:
- Coordinates
- Digital
Based on the types of intercoms, apartment handsets also have slight differences. In coordinate intercoms, a switch installed in the entrance is responsible for the apartment number, and in digital devices, a special chip, which is located on a board inside the handset.
Intercom, how to connect a handset in an apartment. How to connect an intercom
All components are usually included with the intercom:
- External block.
- Electromagnetic lock.
- Entrance exit button.
The type of installation of an intercom system can be in two ways. Usually a coordinate connection diagram is used. There is also a digital connection system. Let's take a closer look at each of the schemes.
Connection diagram
This scheme is implemented as follows. A switch is connected to the mounted external block of the intercom system, where all handsets from the apartments are then connected. Due to parallel connections, they are independent of each other, but there are too many wires (two-core wires are used).
On the external unit, the visitor dials the apartment number. The signal goes to the main controller, is processed and connects the required branch leading to the handset for communication. This scheme is the most common and popular.
Analog connection diagram
Digital circuit
Another, more expensive and less common scheme is based on a digital signal. With this scheme, the devices are not connected to the switch in parallel, and the cable connected to them is arranged like a garland. When connecting, polarity must be observed. If at least one device fails or they decide to replace it without observing the polarity, then the entire system will stop. This causes some inconvenience.
With this scheme, there is a limit on the number of subscribers. The maximum number is 255. The jumper system allows you to generate a digital signal and always connect the right tube.
Possible malfunctions of apartment pipes
An apartment communication device (AUD) is a completely reliable device that can last for many years, but some defects may arise during operation.
The most common defects include the following:
- Mechanical damage to the tube
- The ringing tone does not go off when you go off-hook
- The lock control button does not work
- Pressing the lock button drops the call
- Poor audibility
If the electronic lock only works after a few presses, then the microswitch is faulty. The door open button may be located directly on the handset. In this case, the microswitch is soldered on the printed circuit board. You can replace it yourself. You need to warm up the four contacts one by one with a soldering iron, while squeezing the body with a flat-head screwdriver. It is quite simple to change the button located on the main panel.
The reason the call is dropped when you press the electronic lock button may be a broken wire coming from the speaker. If any malfunctions occur, you should first check the reliability of all solders in the tube, and the connection of the line to the lamella on the back of the wall unit. Poor audibility may be due to a defect in the microphone or speaker, as well as contamination of the “Balance” tuning resistor on the handset board. This potentiometer is not available in all models, but if it is installed, you can, remembering the position of the slider, rotate it left and right. In many cases, normal hearing is restored.
Intercom handset connection diagram Visit: description of possible difficulties
Today, the issue of protecting one’s own home from unwanted entry of strangers is of high relevance.
For this purpose, many different electronic and mechanical devices have been developed that protect the entrance to the building from uninvited guests.
One of the most effective access systems to objects are intercoms. Visit intercoms have gained wide popularity among users as devices that are easy to use, highly reliable and durable.
In most cases, intercom systems are installed by special companies specializing in the sale and installation of access systems to residential or industrial facilities.
But there are times when you can service the intercom yourself. For example, when you need to connect an intercom handset, this procedure is not complicated and can be implemented by an ordinary user. How to connect the intercom handset Visit and will be described below.
Replacing the intercom handset
When installing an intercom on the entrance door of an apartment building, all work is carried out by specialists from the relevant organization. They also install apartment intercoms.
Therefore, replacing the intercom handset yourself comes down to a few simple steps:
- Purchasing a new handset
- Installing it to replace the old one
- Connecting two wires
Before buying a new handset, you should find out the type of intercom. Models designed for coordinate and digital intercoms have a design difference. The sales consultant will always tell you which handset is suitable for a specific intercom model.
How to choose a handset
Having moved into a new apartment with an existing intercom system, you may find that there is no handset in the apartment, either the old owners dismantled the device, or they did not pay for the service and their intercom was turned off.
A tube
Despite the root causes, you can reinstall a new tube yourself. The market is rich in all types of goods, including these devices. They can be purchased both at service companies and at regular electronics and equipment stores. The design of the models is of a standard, not unique type.
Before purchasing, you should find out what connection scheme is used in the house: analog (coordinate) or digital. You can get an answer to this question from your neighbors or from the company that installed the intercom.
Analogue and digital intercom tubes differ in the connection diagram, and, consequently, in the internal board. Their prices, depending on the quality and appearance, will vary from 500 to 1500 rubles.