Intercom design
An intercom is a device that allows someone to enter a room, or vice versa, to deny entry, without direct contact with him. The device has gained particular popularity literally in the last decade; previously, combination locks were most often used to protect front doors.
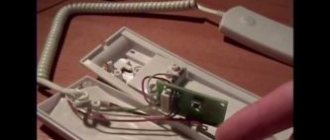
Photo - system design
An intercom in an apartment or private house consists of a handset, a calling panel, video equipment (if additional connection for monitoring a door or gate is required), a lock and a switch. Let's look at the functions of each part :
- The digital intercom handset is installed indoors so that the owner of the apartment or house can accept the call and, if necessary, open the door. As a standard, the subscriber device must be connected to the locking system;
- The calling panel is required to dial the required code. It can be of several types: with dial buttons, a special code reader from keys or cards, backlighting, or even a visual identifier. The latter is the rarest type, it is used to protect industrial or government facilities;
- A lock or intercom locking device is used to control the position of the entrance door of an apartment building or the gate of a private house. Nowadays, the most common connection is a digital intercom with an electromagnetic lock. A magnetic lock can be easily opened from the outside, but is considered more reliable than the outdated version with a metal bolt connected to an electric motor;
Photo - lock diagram - Using a switch module (for example, Panasonic TDA TDE or PBX), signals are transmitted from the calling panel to a specific subscriber. This practice is more common in an apartment building, since in a private building there is only one subscriber.
Photo - connecting the Commax intercom
As an additional security feature, the call can also be supplemented with the ability to connect a video intercom (Kenwei KW-4HPTN, Kocom KCV-A374SD). In this case, all data is transmitted using the camera to a special TV or computer. Unlike an audio intercom, a video system is more reliable in use, because in addition to making a call, visitors are also visually monitored.
Photo - video intercom wire connection diagram
What is the difference between an apartment intercom and a device in the house?
For the entrance:
Intercoms designed for a large number of subscribers are installed in apartment buildings. For one entrance, you need to connect one device, which will send a signal to all subscribers.
- The new apartment is connected to the general signal network.
- When dialing an apartment number, the switch transmits a signal to the microprocessor, which determines the presence of the number in the database.
- If the number is found, the visitor connects to the receiving device in the apartment.
For a private house:
- Intercoms for a small number of subscribers are installed in private homes or other small objects.
- The device's keyboard is one button for calling. When pressed, the visitor is connected to the concierge, security, watchman or owner of the house and introduces himself with an announcement of the purpose of the visit.
Apartment and house devices
Apartment with intercom
An entrance intercom is an analogue or digital mini-PBX:
- An analog coordinate matrix device provides communication and control of the electronic (electromechanical) lock, and also allows residents to enter the entrance. When working, the same type of key is used. Connects to the apartment with a pair of wires. The first finds the tens register in the number (second number), the second determines the units register (first number). A multi-core cable is pulled along the entrance, which connects the required wire from the call panel with intercoms to the switch. After the button with the apartment number is activated, the switch connects the device to the desired room.
- The operation of a digital device is similar to the operation of an analog device and differs only in that apartment numbers are encoded in a binary number system. Its use allows you to communicate with apartments in the house using a two-core cable. This solution makes installation, maintenance and repair easier and faster. The switch connects an apartment with a specific number with an intercom having the same number. The functionality allows you to enable additional options: internal communication between apartments and residents and the dispatcher.
Intercom switching diagram on the floor
Intercom in the cottage
A communication device installed in a private home uses an electromagnetic relay circuit. The communication cable and power circuits of the actuators are switched. They use an intercom designed for a small number of subscribers, as follows:
- The visitor presses the signal button on the communication panel.
- The contacts are closed and the signal is sent to the intercom.
- The owner presses the communication button or picks up the intercom handset, at which time the electromagnetic relay switches the circuits for alternate or simultaneous dialogue (depending on the model).
- After recognizing the visitor’s identity, the owner opens the front door himself or remotely.
Connecting an intercom at a dacha or cottage
Types of intercoms
There are several types of intercoms that are used to protect against uninvited guests in an apartment or private building. Their connection varies depending on the type:
- Digital (Eplutus EP-2297C, Gardi GRD, Hyundai HA-201);
- Coordinate matrix (AVC-305, Commax CDV-DPV-43 MTN, Laskomex).
Digital ones work on the following principle: when making a call, they transmit a signal over a two-wire line, in which the number of the connected apartment is recognized. In this case, so-called jumpers are used for pairing, which transmit signals through a twisted grid to a specific handset. Each tube, in turn, is equipped with microcircuits. It is very convenient that you can connect all apartments not only in the entrance to such a controller, but also on a specific floor.
The connection diagram for a coordinate matrix type is simpler and more reliable, therefore it is more popular. A switch is connected to the coordinate communication device, which switches the signal to a specific handset when calling. The connection is made using wires of tens and ones, i.e., each apartment is designated by two cables, the numbers of which are not repeated. To establish communication, the signal is sent through the DAT1 line to the switch. After this, the modulator transforms and processes the received information and connects to one specific “Unit” and one “Ten”. Afterwards, thanks to an electromagnetic relay, a connection is made to a specific apartment via a LIN telephone line.
Photo - digital model connection diagram
Most often, such a connection is parallel, which greatly facilitates independent installation. The only thing you need to remember is the polarity of the intercom calling panel, electric lock and apartment handset. If the electrical connection is made incorrectly, then the operation of not only a specific subscriber, but also the entire security system is disrupted.
Photo - intercom control unit
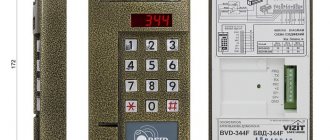
Rules for installing VIZIT intercoms
How to connect a video intercom?
Before you begin installing a video intercom yourself, carefully study all available documentation for this equipment. Unfortunately, incorrect actions can completely damage the components of the intercom system. In the instructions for the equipment, the manufacturer often indicates all the necessary installation information for its optimal operation:
- cable section,
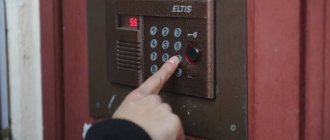
- installation height of the call panel,
- camera viewing angle and much more.
Sometimes all the materials needed for self-installation are included with the system .
- All electrical connections of the wires should be checked, possibly soldered and carefully insulated, to be sure of their reliable contact . This is especially true for outdoor installation. Contact oxidation not only degrades the quality of the audio and video signal, but can lead to complete inoperability of the video intercom system.
- the television camera must be protected from direct sunlight;
- the audio-video panel should not be exposed to rain, hail, snow, etc.;
- the viewing angle of the panel should be optimal, with a recommended installation height of 150–160 centimeters from the ground surface;
- The installation location should not expose the calling panel to strong vibrations.
The main parts of any video intercom: calling panel and monitor
The calling panel or audio-video module is installed outside near the entrance door or at the gate gate. It has a call button, by clicking on which the visitor informs about his desire to go inside. That is why this panel is called a calling panel. In addition, this device has a built-in miniature video camera, a microphone, an infrared light bulb, and a speaker.
The installation location of the calling panel must meet the following criteria:
We also recommend comparing them with Digital intercoms, a review of which can be found here. Comparison will help you in your choice.
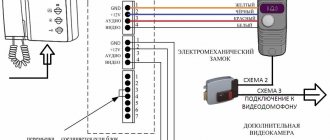
Connection
Step-by-step instructions on how to independently connect the Eltis, Cyfral (Digital) video intercom with the z 5r controller:
- You can connect a key reader (touch memory) or a buzzer, a button that will be used to open an electromechanical lock, a backlight, the lock itself and a power supply to this controller;
- The buzzer and door sensor are optional parts, while the operation of the entire system depends on the door open button and power supply. If necessary, a screen can also be installed; optical control can be carried out through the monitor;
- To connect the board, a terminal block is most often used, the contacts of which will connect the necessary network wires;
- Afterwards, simply connect all the necessary wires to the apartment tube and check the correct polarity.
Domestic intercom models are also very popular, in particular the KS-2006. To connect them, schemes with two switches, one connection module, for several subscribers, etc. can be used.
What to do if the Factorial or Eltis intercom is disconnected from the power supply:
- Twisted pair wires are most often installed in the apartment panel. To find it, you need to open the panel where the Urmet, Digital, Factorial, etc. intercom cable was connected to the entrance or door lock;
Photo - marking of wires when connecting - Then determine which wires are responsible for tens and which are responsible for units. This can be done by looking at similar cables on adjacent connections;
- Be sure to pay attention to the polarity;
- When connecting a cottage intercom, it will be enough to simply connect the cables of the switch and the unlocking lock in polarity.
Prices for repairs or installation of intercom systems may vary depending on the city and the specific company. On average, the price of connecting an intercom varies between 200–500 rubles (the price is indicated only for the work, without the price list for the wires used). For example, connecting the MVK-325 UKP calling panel in Moscow and St. Petersburg will cost 500 rubles.
Step-by-step connection
Installation of any type of intercom and accompanying equipment begins with determining the connection points of individual components and equipment elements.
- The cable length is calculated and tolerances are added for convenient connection.
- Ditches are dug or cut into the walls for laying signal and power cables.
- It is recommended to install it in a corrugated pipe if the wall thickness allows. When laying through metal structures, plastic tubes or hoses are used. It is allowed to lay the wire in a plastic cable channel.
Next, he installs a set of communication equipment. First, an electromechanical lock is installed into the door. Depending on the material (metal or wood), carpentry tools or welding are used.
The next step is installing power supplies. For an apartment, a ready-made separate unit is connected to the nearest electrical outlet. To do this, a separate transformer is mounted to the external video cameras and the call panel, which is installed in the electrical distribution panel of the entrance. In your home, it is mounted in a place protected from moisture, preferably in a separate box with a door.
If the components of the communication kit require surface mounting, they are secured with screws, self-tapping screws or dowels. If necessary, first drill holes for hardware. The connection of all devices into a working circuit occurs at the last stage of installation.
Installation and connection of communication equipment
To connect all the equipment into one network, each intercom element of the video and audio system is switched, the wires are connected, and the device housings are secured in areas of the room prepared and marked for hardware. Then the final finishing is carried out - the grooves are covered, the surfaces of the walls are finished with decorative materials.
Equipment installed in niches or in pre-hollowed or cut-out recesses is firmly attached, uneven areas are covered with mortar, the devices are covered with decorative overlays or sealed in another suitable way.
The last step is commissioning. All equipment is turned on, the correct dialing switching, volume and quality of audio and video communication are checked.
Key points and procedure for connecting a video intercom
Currently, various video intercoms ensure the safety of children and adults and the integrity of their property.
An intercom is a device with which you can maintain communication over a short distance. At the same time, using a video intercom, you can also see the visitor who is at the call panel on which a video surveillance camera is installed.
Video intercoms have different technical characteristics and designs. They have many different functions.
In particular, these devices:
- save video files;
- save photos when called;
- open 2 or more doors at the same time;
- work on 2 or more cameras at once.
Video intercoms have both color and black and white displays, each of which has its own characteristics.
When connecting an audio panel to a video intercom, you must use a communication system that consists of 4 wires. Electrical power is supplied directly from the monitor to the call panel, except for equipment that has a video camera.
The main condition for connecting the video intercom call panel is strict adherence to the instructions.
Connecting the calling panel to the video intercom is as follows:
- checking the device for functionality. To do this, you need to connect a call button to one side of the panel on the wire coil, and a monitor to the other, following the instructions for installing the equipment;
- after laying the wires, it is necessary to install the monitor, call remote control and other elements of the video intercom;
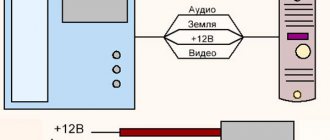
- The call panel is connected to the monitor with 4 wires (the common cable is black, the audio channel is yellow, the video channel is white, +12V is red). If the package includes a remotely controlled magnetic lock, a separate cable must be routed to it from the call panel;
- Next, you need to turn on the monitor and see if the device indicator lights up. If you have an electronic lock, you need to plug in the power supply;
- then you need to test the equipment put into operation - press the call panel button, as a result of which sound will be heard on the monitor and an image will appear on the video camera;
- Upon completion, you need to check the presence of voice communication in the video intercom.
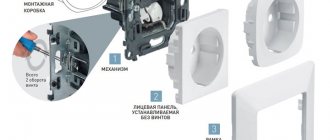
Selection of equipment and installation of the call panel
The call panel is one of the elements of a video intercom. Any user can purchase such simple equipment, which contains 1 button, several speakers and a display. A more modern type of video intercom is a panel that has a numeric keypad for dialing codes and an electronic or electromagnetic key on the reader.
The intercom calling panel is also equipped with a camera. Almost all Russian models have increased resistance to sudden changes in weather conditions.
The photo shows the intercom calling panel
When installing an intercom yourself, you need to perform the following steps:
- calculate a certain cross-section of wires;
- stretch the wire (distance from the electrical cable - 0.50 m at least);
- configure the module;
- install the calling panel.
The connection of the intercom calling panel must be done at a height of 1.5 m from the ground. Before installing the equipment on a door leaf or wall, you should check it in working order.
Commax video intercom connection diagram
General connection diagram:
Pin number
| Wire color | Purpose | |
| 1 | red | audio A |
| 2 | blue | minus GND |
| 3 | yellow | +12V |
| 4 | white> | video V |
Connection diagram Commax DPV-4HP
Connection diagram for video intercom Commax DPV-4PF2
Don't like the video quality? Here you will find out which cameras are best to use for online video surveillance.
Audio and video devices are installed in apartment buildings and private buildings, offices, and enterprises. They have almost completely replaced ordinary calls. You can use the help of specialists to install and connect the intercom. However, you can connect the device yourself. A detailed connection diagram for the calling panel will help with this.
What may be required to complete the work
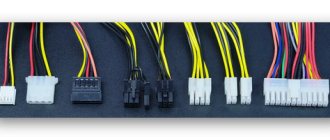
Before connecting the intercom, you need to prepare everything you need. First of all, these are the immediate components of the system:
- power unit
- Lock
- Monitor
- Connecting wires
- Video intercom calling panel
It is very difficult to name the requirements for a power supply. They largely depend on the number of components that it will supply with energy (cameras, lock, etc.) and operating conditions. If it is not included with the purchased system, you should calculate the consumption of all connected elements and purchase additionally.
When connecting a video intercom, you need to think about the lock with which it will interact.
It comes in one of the following types:
The difference between them is simple and clear. The electromechanical model is based on a conventional mechanical lock, which is closed and opened using an electric drive.
What to give preference to when installing a video intercom with your own hands - everyone decides for themselves, depending on the requirements and operating conditions. When the power in the system drops, the device continues to reliably protect the door and can be opened/closed with a regular key.
The electromagnetic model consists of a pair of magnets that prevent the door from opening. The disadvantage is obvious - when its voltage drops, it turns off and does not provide adequate reliability.
Electromechanical locks are an excellent solution for fire-hazardous premises, on common entrance doors, when a video intercom is connected to an entrance intercom, or when all doors need to be quickly and one-time unlocked. When choosing a video intercom for a private house or apartment, preference is given to the second type.
The monitor is in direct contact with the calling panel of the video intercom and is designed to display a picture of what is happening outside behind the gate or door. It is also used for communication and remote control of locks. You can install it in any convenient place.
To connect the intercom, it is necessary to lay connecting wires - the quality and reliability of the entire system will directly depend on them. Be sure to pay attention to insulation so that it protects the transmitted signal from external influences.
To connect the monitor and the calling panel of the video intercom, they recommend the ShSM wire model, which consists of three cores:
- Yellow (for video streaming)
- Blue (for sound)
- Orange (power, 12 V)
This cable for connecting a video intercom is only suitable in cases where the distance between devices does not exceed 30-40 m.
If it is more than 50 m, a coaxial cable should be laid (resistance - 750 Ohms). If there are other cameras located throughout the territory, the same wire is used from them.
When connected, the lock is connected with a wire with a cross-section of at least 0.75 mm. sq., for example, SHVVP.
Call panel for video intercom – system head
One of the main devices of the system is the video intercom calling panel: the subsequent organizational scheme depends on its quality and capabilities. It is a kind of barrier through which the operator or owner himself makes the decision to let the guest in or not.
Thus, the video intercom calling panel is a device through which visitors are indicated and communication between the parties occurs. More often, it is directly connected to the monitor and receives power from it.
Depending on the model and layout of the intercom calling panel, the housing may contain the following elements:
- Relay designed to control the lock
- IR illumination, providing the ability to shoot in the dark
- Microphone and speaker making up an intercom for two-way communication
- Small video camera
Read also: Stretch ceilings with a chandelier and spotlights
When choosing a video intercom calling panel, you should proceed from the operating conditions. If all parts of the system are purchased separately from each other, you will have to take into account that the video signal transmitted by the camera matches that received on the monitor.
Let's look at the calling panel:
If the video intercom calling panel is mounted directly on the street, more expensive but safe anti-vandal devices are offered. They are resistant to mechanical stress and protected from the vagaries of nature.
To connect an intercom to an entrance intercom, multi-subscriber models are sold.
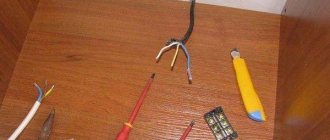
In addition to the main components, to connect a video intercom you will need:
- Nippers and pliers
- Screwdriver Set
- Soldering iron and solder
- Hammer, drill, set of drills and bits
- Tester or multimeter
Connection options
Despite the fact that the purpose of the wires for all video intercoms is the same, the connection method for devices from different manufacturers differs. Basically, video intercom models on the market have a four-wire connection scheme, where each signal corresponds to a separate core, but sometimes two-wire samples are also found.
Read also: What is the name of a carpenter's table?
Intercoms from most manufacturers with a circuit similar to systems from Commax have four connectors on the reverse side for connecting four video modules with a set of contacts (audio, video, general and “+12V”).
Video intercom circuits similar to the InfiniteX models have only four contacts on the reverse side, but they can also work simultaneously with four calling units. From 1 to 4 audio/video modules can be connected in parallel to these contacts. Using switches, their serial number is set on each audio/video block.
The main brands that have proven themselves in the video intercom market are Commax, Kocom, Slinex, Kenwei, and Gardi. Every year, new, additional functions are added to the main functions of intercoms, namely: identification of visitors and the ability to remotely control entrance locks: