9e3377222f69609b
Connecting the kitchen hood to ventilation and electricity yourself
Do-it-yourself construction, repair and landscaping
Menu
Building a house Ventilation Engineering systems
The cooking process is accompanied by many different smells and soot. To ensure that the air in the room is always clean and fresh, a special exhaust structure is needed. You can connect the hood yourself. You need to choose the right system and installation method. If installed correctly, you will not need to worry about the air quality in the kitchen.
What types of hoods are there?
Units in household stores are presented in a wide range. The price range is huge: from 3 to 100 thousand rubles per unit of goods. Products from domestic and foreign manufacturers are available. They are produced by branded and little-known companies. Which system should you choose?
Important: if your budget is limited, do not be afraid to purchase an inexpensive Russian model. These work no worse than their well-promoted foreign counterparts. Although in terms of appearance and additional options (ventilation speed, lighting) they are inferior to expensive designs.
According to the mounting method, the system can be:
- insular. Mounted on the ceiling in the center of the room;
- angular. Mounted in the corner;
- wall-mounted Installed on the wall above the stove;
- built-in The set is mounted inside the cabinet above the tiles.
Built-in hood mounted inside a kitchen cabinet
Based on the type of work, structures are divided into:
- ordinary. These remove polluted air from the room into the ventilation shaft;
- recirculating. They take in polluted air, purify it and return it back;
- combined. They have the functions of classic and recirculation units.
A combined hood combines the functions of two devices - exhaust and recirculation
Basic mistakes when installing a hood
Often, incorrect operation of the exhaust system is caused by installation errors.
On the forums you can find descriptions and photos of the most common ones:
- an air duct that is too narrow is connected through an adapter to a very powerful system with a large flange;
- remove the air duct through a homemade hole in the wall of the house (such actions are prohibited by GOST requirements);
- the geometry of the air duct is too complex, impeding the outflow of air;
- incorrectly selected installation height of the hood, exceeding the minimum or maximum values;
- lack of high-quality sealing or joining using superglue;
- lack of a separate electrical outlet, connection via several extension cords.
To avoid mistakes, it is important to follow the installation instructions or invite specialists to install. They will correctly calculate at what height above the stove the hood should be hung and assemble the system correctly.
Selection of power and other device parameters
Each kitchen has its own appliance. It is important that the power of the unit matches the area of the room.
The power is indicated in the product data sheet. Different devices vary from 200 cubic meters of air per hour of operation to 1000.
The performance should be such that in 60 minutes the device can refresh the air in the room 12 times. These are the standards established by the sanitary standards of our country.
How to calculate the parameter? The volume of the room must be multiplied by 12. The resulting figure must be increased by 30 percent.
Example: room width – 4 meters, length – 5 meters, distance from floor to ceiling – 2 meters. The volume of the room (we multiply the width by the length and height) is 40 cubic meters. Multiply by 12, we get 480. Plus 30 percent of this number we get 624 cubic meters. This is the minimum power for such a kitchen.
Recommendations for use
Proper care of the exhaust system can extend its service life. Manufacturers recommend:
- Clean the grease filter regularly. It is removed by releasing the spring lock. Can be washed in the dishwasher or under running water and soap.
- Change carbon filters every 2-3 months. Checking their status is only allowed when the system is turned off.
- Use the hood with caution in rooms where a gas stove and fireplace are operating simultaneously. The ventilation system removes the air needed to support combustion. At this time, additional ventilation of the room is required.
- To avoid burns, it is not recommended to touch the lamp after finishing work.
Disconnect the device from the electrical network only with dry hands. Do not pull on the cord.
Let's get started
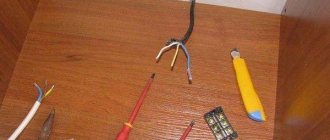
In order to connect the hood to the ventilation, you will need the following tools:
- wrench;
- perforator;
- level;
- roulette;
- screwdriver;
- hammer.
Features of connection to ventilation:
- The diameter of the air duct must be the same as the diameter of the outlet pipe on the hood. If the indicator is less, then the motor of the structure will work for wear. If it is more, the system will make a lot of noise.
- The length of the air duct should be no more than 3 meters.
- Bends less than 90 degrees are not permitted. Air masses will not be able to move freely, and the system will quickly fail.
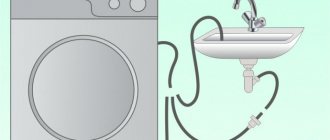
- Place an outlet close to the system. It must be installed by a professional. Make sure that the socket is not located next to the sink, stove or unit body. The distance from the ventilation shaft to the outlet is 20 centimeters or more. It is important to provide a grounding device (built into modern sockets, but it is better to inquire about availability additionally).
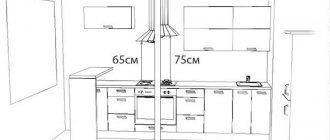
Important: the device is placed at a distance of 75-90 centimeters from the surface of an electric or gas stove. You can’t lower it - the unit will overheat and quickly break down. If placed higher, the device will not adequately clean the air in the food preparation area. The width of the hood should be equal to the surface of the stove.
The hood should be located at least 75 and no more than 90 centimeters above the stove
If you choose recirculation, then you do not need to connect it to the air duct. The system will absorb soot and unpleasant odors, clean the air using filters and return it back to the apartment in seconds.
If the system works with an air duct, then you can start it:
- into a special hole in the wall;
- into the ventilation shaft;
- out the window. The pipe is brought out through specially designed holes in the window, not through the window.
Hood connection rules
Hood connection height for gas and electric stoves.
Following the general rules that apply to any type of these appliances will help you install the hood correctly. The first of these is maintaining the height of the hood above the hob. If the device is fixed too low, it will simply melt. If it is too high, it will negatively affect the amount of air absorbed.
To avoid this effect, the device must be mounted at a height of at least 75 cm from the surface of a gas stove and 65 cm from the surface of other types of stoves.
The upper level of the hood location is not regulated, but for the sake of convenience, it is chosen so that it is convenient for the housewife to use the control panel keys. And one more thing: the hood must be grounded.
If the device is planned to be connected to the outlet channel, then a large number of kinks in the supply air hose should be avoided. It should be taken into account that each bend of the sleeve at a right angle reduces the beneficial effect of the device by 10%.
By following the tips above, you can ensure that your kitchen hood is connected correctly so that it works at its best.
Let's move on to installation
Install the system in stages:
- if the hood is built into a cabinet, then circles are cut out in the lower and upper parts. They match the diameter of the air duct. They work with a jigsaw, removing the cabinet from the wall while cutting;
- plastic or corrugation is connected to the hood vent. The attachment point is tightened with a clamp and treated with silicone-based sealant;
- the other end of the pipeline must be led into a mine or outside. To do this, the air duct is bent slightly, but without forming kinks. The place where the pipe enters the shaft, wall or window is treated with silicone sealant;
- To prevent the pipes from sagging, they are attached to the wall with dowels or self-tapping screws. In order not to damage the air duct, there are special fastenings on the pipeline;
- the system is connected to electricity.
Important: Connection to electricity in the kitchen is made only when the entire system is installed, the seams and joints are sealed.
The hood is connected to the network when the system is already fully installed
How to measure distance correctly?
Do you know what the distance between should be measured?
You need to measure:
- for an inclined model: from the very bottom to the burners (hob);
- for a “regular” one (built-in, dome, T-shaped, flat): from the filter to the burners (hob).
Be sure to measure not only the distance from the hood to the stove - you also need to estimate how convenient it will be for you to use the device. To do this, stand in front of the countertop and imagine where the hood will be placed. At the same time, take into account not only the height, but also the depth of the body - how many centimeters it will protrude from the wall. Think about it: won’t the body interfere with your head while cooking?
Hood height above gas stove: standard
Recommended (minimum and maximum) height for exhaust devices above a gas stove:
- 55-65 cm - for inclined models;
- 75-85 cm - for other products (built-in, dome, flat, T-shaped).
Hood height above electric stove (induction or classic): standard
The standard height at which exhaust devices are installed above an electric stove (it does not matter whether induction or classic):
- 35-45 cm - inclined models can be placed (measured from the bottom);
- 65-75 cm - to accommodate other models.
We noticed that the distance for electric stoves can be smaller than for gas stoves.
Hoods can be hung lower over an electric stove than over a gas stove - because they are less fire hazardous (there is no open flame).
Installation height for inclined models
Inclined models are a convenient option for:
- users with tall stature: since this way the body will not interfere with the head when cooking;
- small kitchens: the inclined body visually takes up less space, without protruding far from the wall.
In this case, it is necessary to measure the distance from the bottom edge of the body to the burners of the food being prepared.
Let's repeat again - the inclined model is hung at this height:
- 35-45 cm if an electric stove is used;
- 55-65 cm if a gas stove is installed.
Installation features of other types of models (built-in, dome, island)
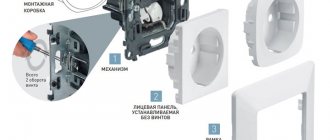
In addition to inclined models, there are the following types of models:
- Built-in (built-in). They are installed in a kitchen cabinet, have a shallow depth, and have a retractable part.
- T-shaped and dome. They are visually different. Can be hidden behind a kitchen cabinet.
- Flat. Can be mounted under a kitchen cabinet, saving space to the maximum. The lowest power category.
- Island. Such a device is attached to the ceiling - if the stove is not next to the wall, but at a distance.
The height of their location must comply with the rules described above, regardless of the type.
What else should you pay attention to when choosing a location for installation?
In order not to make a mistake when choosing a place for installation, in addition to the height, pay attention to the following parameters:
- The location of the outlet (which already exists, or a place where one can be made).
- Distance from the ventilation shaft.
- Power.
- Depth and width. For maximum efficiency, the hood body must cover the entire “working” surface of the stove.
Selecting the distance and installation steps yourself (video)
Review of Italian Falmec hoods: list of lines and models with parameters
About island hoods - description, installation, pros and cons
Related Posts
The hood in the kitchen does not work, what should I do?
The structure is mounted and connected to electricity, but does not work, then:
- Check if there is current in the outlet. Use an indicator screwdriver. The metal part is inserted into the socket hole. If the indicator light is on, there is current;
- make sure the wires are intact;
- see if the pipeline is securely fastened and all joints are sealed;
- check if the hood is on. Trendy models have a complex system, read the rules for inclusion in the instructions;
- If the hood grille with a check valve does not function, replacement or reinstallation is required.
Choosing an exhaust duct
There are several types of air ducts:
- corrugated pipe;
- rigid metal structure;
- smooth PVC pipe.
The corrugated pipe is flexible, which is considered its advantage. This is the most inexpensive option, but a little noisy. It also requires additional maintenance during operation. When installing corrugation, it is allowed to use only special fasteners that require replacement after some time.
Metal construction is the most expensive. The middle position is occupied by PVC pipe. This type of air duct does not make noise and is easier to clean. But it can be installed only if the ventilation hole is located strictly above the hood. Otherwise, the ventilation system will be unusable.
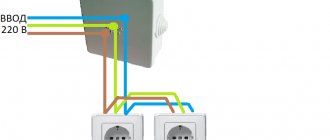
Electrical connection
Like the installation of the hood itself, connecting it to the electrical network is not a complicated process, but it requires compliance with some rules. If the exhaust device is being installed for the first time, then there may not be a suitable outlet nearby for it. Therefore, you will have to do it. In some cases, you can use an extension cord, but this is not very convenient or reliable.
First of all, you should choose a location for the outlet. It can be mounted on the wall or on the side of a wall cabinet. The socket should not be located near the sink or hob. It may be dangerous! The ideal place is above the upper kitchen modules near the hood. This way she won't be conspicuous.
You can entrust the installation of the socket to a professional or do it yourself according to the diagram if you have experience in this matter. During work, safety precautions should be observed.
The hood is an important detail of any modern kitchen. It has many useful functions and allows you to carry out the daily cooking process in comfortable conditions, without foreign odors, keeping the environment clean. You can entrust the kitchen hood connection to a specialist or do it yourself, using the diagram and instructions included with the product.
Criteria and rules for choosing a hood
When choosing a hood, be sure to pay attention not only to the appearance of the device, but also to such significant characteristics as its size, power, and noise level. The type of control is also important, additional “bonuses” from the manufacturer - added useful functions
Size
The size of the hood must correspond to the dimensions of the hob and in no case should the device be smaller. The suction plane must cover the entire surface of the plate. Only in this case can the device operate efficiently. If you hang a hood 50 cm above a stove with a width of 60 cm or more, you should not expect a good result. The device will not cope with the removal of odors and grease, and the money will be wasted.
Power
The performance of the hood, its power, depends on the power of the fans built into it. More often, systems are equipped with one or two air exhaust devices. Fans can operate at different speeds. Typically, hoods are equipped with two or four modes. Productivity is determined by the amount of air purified per hour. In different models, this figure varies between 200 -700 m3/h. There are expensive hoods, the power of which reaches 1300 m3/h. According to GOST 26813-99, the capacity of the ventilation unit above the hob should not be less than 200 m3/h.
High power makes it possible to quickly and effectively remove grease and unpleasant odors. In emergency situations - food has burned, milk has run out - this ability will be very useful. But there is no point in forcing the hood to constantly work in this mode. At maximum speed, the device makes a lot of noise, which only gets in the way. Therefore, fans with medium power are quite sufficient for normal cooking or heating of food.
You should also focus on the dimensions of the room. The amount of air that needs to be renewed 10 to 12 times per hour depends on them. To calculate this indicator, you need to calculate the volume of the kitchen, subtract from it the volume of the furniture present and multiply by 10. The resulting value will correspond to the optimal power level of the hood.
Control type
Manufacturers offer a choice of equipment with three control panel options.
Exist:
- touch panels – the device is incredibly comfortable to use. Simply touch your finger to the intended area and the device will begin performing the task. The LED indicates that work has started;
- panels with slider-type controls - in order to turn on the hood and adjust the power level, you need to move the slider;
- panels equipped with buttons - each button is responsible for a particular task.
Additional functions
The functionality of the hood can be expanded. Additional features make it easier to manage the equipment and make it more comfortable for the user. Of course, expanding the “arsenal” of capabilities cannot but affect the final price of the device.
There are several types of additional functions:
- Responsible for the convenient use of the device are a remote control, multi-stage power regulators, a touch panel, and a display showing the operating mode. All these features make operating the hood simple and enjoyable.
- Additional “bonuses” not involved in air removal - built-in TV, integrated recipe book, computer, Internet access. The built-in timer will allow you not to think about the need to turn off the hood yourself after a certain time. Faber Imago even provides the ability to keep an eye on children in another room using video telephony.
- Parts for automating the operation of the device - the presence of sensors that detect the presence of smoke and odors, a programming function - to set a shutdown delay or automatically stop operation after intensive removal of fumes and odors.
- Illuminate countertops and stoves with built-in halogen or LED lamps. Access to lighting control makes it possible to use it as a decorative component of the interior.
- Continuous operation mode according to a given program - allows you to constantly maintain a comfortable microclimate in the room.
Decorating the hood
To create a beautiful appearance in the room, after the performance of the equipment has been checked, you must:
- install a decorative box covering the joints;
- hide the corrugation going from the hood to the ventilation duct.
To create a stylish look in the kitchen, the hood with ventilation outlet is designed in the same direction as the room.
A properly installed hood effectively absorbs fumes and kitchen odors, preventing them from spreading throughout the apartment. You can increase the effect of using the equipment if you leave it turned on at minimum speed for a few minutes after finishing cooking.