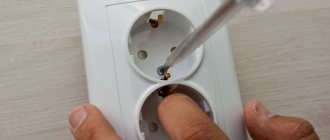
As a rule, the power of a kitchen hood does not exceed 500 W, so if there is no outlet nearby, it is best to connect with a cable. This is quite simple to do - install a new socket near the device and remove jumpers from the nearest one, as shown in the diagram:
For the cable, you can use copper wire with a cross section of 1.5 mm 2. If you don’t want to ditch the walls to lay the cable yourself, we recommend running open electrical wiring in a cable channel. Today, there are neat cable boxes that will not spoil the interior of the kitchen and at the same time help solve the problem.
For residents of old apartments, there is an easier way to run a cable from one outlet to another, without significantly disturbing the wall decoration. You can familiarize yourself with this method by watching two visual examples below:
Please note that you cannot connect any powerful devices to the socket connected by a cable, only the hood itself. Otherwise, an overload may occur, and if the line is not protected by a circuit breaker, the socket housing may melt, causing a short circuit. Be extremely careful if you decide to connect the hood to electricity in this way.
Design features
If we talk about design differences, hoods are divided into wall-mounted, tabletop, island, and built-in units.
Wall-mounted models are often made in round and rectangular shapes, which allows you to cover the entire surface of the hob. Built-in ones are practically invisible to the eye because they fit into the furniture profile. Compact tabletop hoods are installed near hobs - today this is in demand in small kitchens. Island ones are a popular option for spacious rooms. Models are suspended in the ceiling area above free-standing slabs.
Modern exhaust technology is presented in three types:
- recirculation;
- exhaust;
- combined.
When recirculating, the air passes through the filters and returns back to the room.
At the outlet, air masses are discharged into the ventilation hole. Combined ones can operate in any of the indicated modes.
The connection principle directly depends on the type of hood, so I advise you to think through all the details in advance and purchase the best option.
Connecting the hood to the electrical network
In fact, this stage can be implemented in several ways. But, only a specialist can install and connect the device to the electrical network. Almost all hoods operate from a power supply of 220-230 V, 50 Hz. This allows them to be powered from a regular outlet.
To avoid electric shock, the outlet must be equipped with a ground connection. This will also help maintain all warranty obligations. If the apartment has old wiring and you have good skills, you can install the grounding wire yourself. Please note that it cannot be attached to heating or water pipes.
This is done as follows:
- On the shield you should find a busbar with wires attached. You can also find a pipe with screwed or welded stranded wire;
- these devices are connected to their own stranded wire, without discarding those that are already there;
- For grounding to work properly, the wire cross-section must be 2.5 mm. The conductor is stranded copper, with a non-flammable sheath.
To provide protection against voltage surges, the connection is made through an additional circuit breaker (surge filter). To protect all equipment, I recommend investing in a stabilizer. A good electrician will install it in a matter of hours.
If the hood is without a plug
Some devices are supplied without a plug at the end. Their cords end in wires. This is done so that the user can decide for himself how to optimally connect the equipment. There are several options here. The first is connecting the plug to the wires and then powering it from the outlet.
The second is through terminal blocks (Wago). Their number is taken according to the number of wires. Identical wires from the hood and the panel are connected in one terminal block. For example, ground to ground (yellow-green wire), phase to phase (there may be a different color), zero to zero (blue or light blue wire). The third option is connection via a terminal block.
Connecting via terminal blocks is considered unsafe and is not recommended. Plus, it's inconvenient. If you need to turn off the device, it will be more difficult to disconnect all the wires.
What kind of socket should there be for the hood?
The main parameter for choosing a socket for a hood is the degree of its protection. According to electrical safety standards, products marked IP62 and higher are suitable for the kitchen (protection from strong jets of water is provided).
In addition, I advise you to pay attention to the material. Do not take cheap plastic, it melts more easily and will quickly fail
Last but not least, the quality of the assembly is important - there should be no backlash, otherwise grease, dust, and soot will quickly accumulate inside. And the last thing is the mandatory presence of “curtains”. This way nothing but the fork will get inside.
To choose the location of the outlet, be guided by the following rules:
- the most important thing is to decide at what height and where the device will be placed. We need to build on this;
- the minimum distance from furniture (tables, cabinets, etc.) to the power supply point is 20 cm;
- The socket should not be installed close to the hood body. It is necessary to step back about 30 cm to the side;
- The total power of kitchen appliances should not exceed 4 kW. Otherwise, you will have to draw a separate line for the hood, which will eliminate overloads;
- The recommended installation height is 1.8-2.0 m from the floor.
Please note that in the case of built-in hoods, the socket can be installed in the cabinet after the furniture installation is completely completed. In this case, the socket must be installed on a fireproof base (these are the rules of the PUE)
With island models it is more difficult - here the power is provided by a direct connection to the wiring, but it is better to arrange a power point under the ceiling. Direct connection is not as secure.
General requirements for connecting the hood to electricity
The instructions for the hood contain the requirements that must be observed when organizing the supply of electricity.
If you power the device in violation of these rules, the right to warranty service will be lost, and there is a high probability that the device will not work, ensuring quality ventilation.
Most exhaust hood companies require the following:
- Providing power up to 1 kW. The household power supply can cope with the needs of most hood models. The wires must be 2.5 mm or more, made of copper, made according to a multi-core circuit.
- Organization of a separate connection point (socket or direct connection to a junction box). The connection point should be located at the level of the hood. This height will protect the electrical contact from water droplets.
- Availability of grounding. It is impossible to connect the ventilation device without grounding.
Important ! To ensure the safety of people and prevent them from electric shock, it is strictly prohibited to connect the ground to a gas pipe or heating pipe. It must be connected to the corresponding bus in the distribution board.
Exhaust devices are equipped with a plug. But sometimes the manufacturer leaves the power supply cable with exposed cores to give the consumer the opportunity to decide for himself how to connect the system. The open end of the cable can be connected to a plug, terminal block or special Wago standard terminal contacts (one for each of the three cores).
This method is the most acceptable and safe. It is very popular when connecting a suspended (island) hood. The disadvantage of this method lies in the need to lay an electrical cable from the nearest junction box during renovations in the kitchen, because... work is coming on gating and plastering a section of the wall and ceiling. The new electrical wire for a suspended hood can be hidden behind a suspended ceiling. Undoubtedly, a socket on the ceiling looks unaesthetic, so a connection option via a terminal block or separate terminal blocks is suitable here. Make sure the cables are connected correctly: phase to phase, zero to zero and ground to ground.
Recommendations for installing an exhaust system
There are certain rules when installing a hood that ensure the safety and stable operation of the device. First of all, before installing the exhaust system, you should determine the correct distance of the hood above the stove. If you have a gas stove, then the height should be approximately 70-75 cm, and if the surface is electric, then the optimal height is about 80-85 cm.
If the distance from the hood to the gas surface is incorrect, there is a possibility of a fire - this is if the unit is too low, and vice versa - if it is too high, its performance will decrease
In addition to the height, you should also pay attention to the width of the hood; it should be no less than the gas surface itself
Operation of a recirculation hood that does not require connection to a veterinary duct
Installation of the exhaust system
Classic hoods require connection to ventilation; it is worth considering the distance from the location of the hood to the ventilation duct. If the air duct is too long, it can reduce the efficiency of work and will not look very aesthetically pleasing. If the exhaust device is located far from the vent, but there is a window nearby, you can try connecting the exhaust air channel to a pre-made hole in the main wall.
How to connect a hood to a ventilation duct
- Before connecting the hood to the ventilation duct, you must first buy corrugation with a cross-sectional diameter that fits this model, clamps, and sealant.
- The corrugation is inserted into pre-made holes in the wall cabinet.
- A cabinet with a threaded air duct is fixed to the wall.
- The exhaust air duct is connected to the ventilation duct.
- To connect the hood to the ventilation, it is necessary to bend the corrugation at the exit from the wall cabinet of the kitchen unit. You can also use plastic connecting elements for pipes.
- To seal, the joints are treated with silicone. Sealing the ventilation system allows the hood to operate without additional costs.
Important! The corrugated or PVC pipe is secured to the pipe using adapters or clamps. There is no need to seal this area. The main thing is that the adapter matches the size of the hood.
The socket must be publicly accessible.
Connecting a kitchen hood to ventilation is made taking into account certain parameters, namely, the distance between the gas stove and the exhaust device must be 90 cm. If an electric stove is used, then 70 cm. These standards should not be neglected. The minimum distance from a gas stove should be 75 cm, and for electric stoves a minimum of 65 cm.
When installing a ventilation pipe in a ventilation shaft, it is important to make sure that the ventilation hole is not completely blocked, so you need to install a special grille. It has a special valve, as well as a place for attaching the air duct. When the exhaust device is operating, the valve will close, and when the hood is turned off, the valve will open, facilitating natural ventilation. If it is impossible to install such a grille, then a check valve is installed in the air duct.
How to connect a kitchen hood to ventilation so as not to spoil the interior? All ventilation should be hidden under a protective cover, which can be made to match the color of the kitchen unit. Thin plastic is often used for these purposes. The final stage is to check the functionality of the equipment. During installation, all elements must be securely fastened so that the hood does not rattle during operation.
How to connect the hood to the ventilation system
Installation features depend on the method of connecting the equipment to the ventilation. You can arrange an exit to a common house shaft or immediately outside the premises. The latter option makes installation significantly easier.
However, the main part of the hoods is supplied to the common shaft. But there are pitfalls here. When soot accumulates in the ventilation pipe, air exchange in other apartments may be disrupted or an air lock may form, blocking the outflow of air. In addition, most of the grille is covered with an air duct, which leaves minimal conditions for normal air exchange in the kitchen.
To prevent the hood from interfering with natural ventilation, you can proceed as follows:
- we take a special grille for hoods, a tee and a check valve;
- We attach a tee to the grille;
- We attach an air duct to the lower entrance of the grille;
- We install a check valve on the free outlet so that its bars are locked when the air flow passes from the pipe;
- The point is that when the hood is operating, the valve petals are bent. Air from the kitchen enters the ventilation duct through the open outlet of the tee and the grille. When the device rests, the valve plates unfold and air flows into the ventilation system.
If you are not sure that you are ready to regularly clean the entire system, choose a direct outlet outside the premises. You will need to drill a hole in the outside wall using a diamond drill bit. A safety grille with a check valve is installed outside, and an air duct inside. The cracks are sealed with mortar. An exhaust hood is connected to the system. In special cases, the connection is made to a separate ventilation duct.
I note that the anti-return or check valve is a lightweight metal or plastic plate. It is movably fixed on two sections of the pipe (bottom and top). The valve petals are supported by a spring. While the air purifier is not operating, the plates block the access of outside air. When the device is in operation, the air flow bends the plates forward by depressing the spring.
How to connect the hood to electricity and ventilation?
Before you take up the tools yourself, you need to know how to connect the kitchen hood to electricity. The kitchen hood design is extremely simple. The fan draws air currents and directs them into the ventilation pipe, removing them from the kitchen. In order for the hood to work well, good draft is necessary, and a standard fan does not always cope with this task. If you don't care much about aesthetics, you can use a flexible connection. But not everyone will like a corrugated pipe across the entire kitchen. It not only spoils the appearance, but also makes noise during operation of the hood.
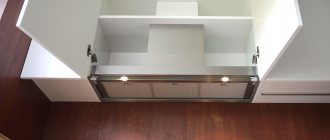
Example of the appearance of a hood box
Sometimes the design of the hood box itself is subject to changes, but ideally the hood should not need modifications.
The next aspect is installation of the cone and its connection. You should calculate its location based on the height of the ceilings and the location of the kitchen shelves above the countertop, because everything should look harmonious. Do not forget to take into account the intensity of air exchange in the room and its height; if you miss these points, the hood may not cope well with its duties.
These points are also important when choosing the hood itself. After all, how difficult it can be to choose a functional and at the same time beautiful thing. We advise you to pay attention to the line of the Elicor manufacturer, a large enterprise that specializes specifically in household goods and kitchen appliances; any consumer will be able to find a suitable model that will fit perfectly into the interior of your kitchen and will last for many years.
Stages of installing a kitchen hood and some important nuances
Installation and connection of any hood consists of the following steps:
- installation of an outlet;
- installation of the hood itself, connection.
Mounting the hood to the wall
Dome, fireplace models, and wall-mounted (flat) hoods are attached to the wall. If we talk about the fireplace type, air purifiers can consist of two parts. This is the dome and the unit itself with the engine and filters. Both parts are fixed independently of each other, but with complete coincidence of outputs. Island varieties are placed on the ceiling using the suspension systems included in the kit. Built-in – in a furniture profile.
Before installation, I advise you to check the serviceability of the device - any instructions indicate this. Do not rush to remove all protective films and stickers until you are sure that the air purifier is working properly. To do this, place it on a flat surface, connect it to the power supply and test it in all operating modes.
If no faults are identified, you can proceed with installation, which is best done together. If you notice extraneous noise or lack of functions, feel free to contact the warranty workshop or the store where you purchased the device.
Most manufacturers equip the kit with a mounting template that marks the mounting locations. You can lean it against the wall and transfer all the marks.
If there is no template, proceed as follows:
- On the wall we mark the distance between the mounting holes. To do this, the device is applied to the surface;
- we apply markings, taking into account the height of the device in relation to the hob;
- drill holes. Their diameter must match the diameter of the dowels;
- insert dowel plugs into the holes;
- We hang the body on the dowel and nails. I advise you to check the horizontal installation of the equipment;
- Next, a connection is made to the ventilation duct and electricity;
- After completing work with the main system, the installation is completed by installing the air ducts.
Known nuances
The described installation method is good if the house has smooth walls and nothing interferes with the work. If there is a gas pipe running near your stove, it will not allow the appliance to be placed close to the wall. In such a situation, craftsmen advise attaching wooden blocks to the wall, and the air purifier itself to them. However, I advise you to refrain from such actions. During operation, problems with cleaning will arise; in general, the design itself is unreliable.
An alternative and more rational option is to install equipment behind the pipes. To do this, take a screw-stud (plumbing). The stud has a thread for screwing into the wall, a pin for moving the hood away from the wall, and a thread with nuts for fixing the housing.
These items come in different sizes and are available for purchase at every hardware store. You can take any most suitable option, I will only note that all the nuts are designed for an octagonal wrench. This is a universal solution, more reliable than wood, moreover, metal does not rust and is easy to clean.
If the hood is built-in, proceed as follows:
- The location of the air duct is marked on the cabinet shelves and a hole is cut. This can be conveniently done using a jigsaw with a fine-toothed file. You can take a file for laminate flooring, it practically does not leave chips;
- if desired, the cut area can be covered with a C-shaped plastic furniture profile. It can be tough and flexible. The second option is very easy to use. This profile can be bent at any angle. Hard ones are heated using a hair dryer. The profile is fixed with glue or liquid nails. The excess can be cut off with a fine-tooth file;
- then the process is repeated on all shelves, the cabinet is hung in place;
- The built-in hood is secured with screws. After this, you can begin work with the air duct.
Features of connecting a kitchen hood to the electrical network
Read about how to connect a kitchen hood to the electrical network: what tools are needed to connect it to electricity and what connection methods exist. Review connection requirements and safety guidelines.
Mistakes when installing a kitchen hood
1
A blind connection of the air duct to natural ventilation is the most common mistake.
Some people, of course, leave a grille for natural air movement, but still manage to block it with the air duct itself.
2
Connecting an air duct of too small a diameter through an adapter to a powerful hood with a large outlet flange.
Recommended dimensions for round air ducts are d=125mm. For rectangular ones - 204*60mm.
3
Exit the air duct to the street through a homemade hole in the wall.
In most cases, this is prohibited by the rules. Specific points will be given below in the text.
You can, of course, lay a separate box along the facade straight to the roof. But is it worth it? Although in restaurants and cafes located on the ground floors of high-rise buildings, this solution is widely used.
By the way, the ban on venting air to the street through a wall does not apply to private houses, but only to high-rise buildings.
4
Complex track geometry with a large number of transitions and curvatures.
First of all, this will affect the noise. Although, of course, the turns themselves are not the greatest evil. And sometimes you can’t do without them.
It is the turns that follow one after another, without acceleration sections, that are dangerous.
5
Connecting an overly powerful hood (for example, 1000 m3/h) to a standard ventilation duct, which is capable of passing about 300 m3/h.
Remember that a productivity of 200-300 m3/h is quite enough to effectively remove all odors, with minimal load on the ventilation of the house.
6
Installing the hood at the wrong height.
The installation height directly depends on what kind of stove you have - gas or induction hob.
7
Assembling a plastic ventilation duct without a good seal, or joining parts with superglue.
Believe me, sometimes this structure has to be disassembled.
8
The upper, rather than the lower, location of the slots in the decorative grille in the same frame as the air duct.
Why this is a mistake, and when it is still possible to do this, is discussed below.
9
Lack of a separate outlet at the top of the wall for the hood.
As a result, connecting it haphazardly, through carriers and extension cords. Do not forget that in the end this is not a portable device, such as a fan, heater or mobile air conditioner.
This means that the wiring for it needs to be done stationary and wisely.
10
Incorrect installation of check valve.
It must be embedded and installed in compliance with the appropriate angles and inclinations. Otherwise it will work every other time.
In general, installation of a hood can be divided into two main stages. The first is its connection to electricity. The second is the air duct structure and everything connected with it.
Let's look at each of them separately.
How to choose a kitchen hood
For many small kitchens, built-in hoods are best suited; they take up little space, but despite their compactness, they do their job perfectly.
If you are on a limited budget, pay attention to hanging hoods that are mounted under a cabinet or on the wall, and they are also very compact.
Dome hoods have very interesting designs for every taste and color, but they are usually expensive.
They are divided into several subtypes: wall-mounted, mounted on the wall horizontally or at an angle; island ones are fixed to the ceiling, they can be placed anywhere in the kitchen, suitable for large rooms; corner ones have a special design and are fixed, as you probably guessed, in the corner of the room. This is also a very convenient solution for a small kitchen. Such hoods are not very common and have a high cost.
Incorrect connection of the exhaust duct to the ventilation
The main problem during installation is to correctly connect the air duct without disturbing the natural ventilation in the apartment.
Some of the craftsmen generally advise taking the whole thing out into the street, through the nearest wall. However, according to SNiP it is prohibited to do this.
It clearly states that such a hole cannot be placed closer than 8m from the adjacent window. Since this window is considered a device for supplying outside air.
Here, read the paragraphs of the set of rules SP54 and SP60.
That is, drill a healthy hole in the wall, spend a lot of nerves and money, and the neighbor will complain about you, and you will be obligated to repair it all.
How do most consumers connect? An ordinary corrugation is taken, placed on the outlet, stretched and attached to a flange, which is screwed to the ventilation hole.
That's all. Simple, cheap and wrong. What are the disadvantages of this method? First of all, the noise.
When air passes through such a ribbed corrugation, it makes extremely unpleasant sounds.
But most importantly, when your device is turned off and not working, natural ventilation is forced to draw air from the apartment through the hood. Not only can your box be clogged, but in the summer there is sometimes no traction at all (due to the same temperature at home and outside).
Moreover, you are actually putting an oily mesh, motor, turbine, etc. in the path of the air. Also, air suction will not occur at the ceiling level, but at the level of the middle of the kitchen.
Although the collection of all odors of waste products should be carried out from the maximum height.
It is quite clear that in this case there will be no traction. That is, with your own hands you are depriving yourself of natural ventilation.
This threatens the occurrence of fungus and increased humidity. In the off-season, your doors will simply begin to swell and close poorly.
There will also be a lack of oxygen and constant poor health. At the same time, someone falls into mysticism and begins to think that they have been damaged or the apartment has bad energy, but in fact, there it is - improper ventilation!
Initially, in Soviet times, when designing our multi-story buildings, engineers expected that air would flow into the apartment due to leaks in wooden windows.
However, with the installation of plastic windows and sealed doors, we thereby blocked this channel of fresh air in the house. You will also close the ventilation and you will live like in a submarine.
To correct the situation in such cases, it is recommended to install a supply valve on a plastic window.
Instead of clogging, you can do everything more intelligently. What alternative options are used for this?
Necessary tools for installing the hood
Connecting hoods in the kitchen involves the need for preliminary preparation, purchasing tools and materials. Some components are provided with the equipment, others will have to be purchased independently. For installation you will need:
- A flexible corrugation or plastic box, which is designed to remove dirty air directly into the air duct, is necessary at the stage when the kitchen hood is connected to the ventilation.
- Grille installed on the ventilation shaft.
- Clamps for fixing corrugations.
Replacing the socket
If there is an outlet next to the hood, but is constantly occupied by other equipment, replacing the existing single outlet with an outlet with two sockets will solve the problem. This is not difficult to do, the main thing to remember is that the cable also experiences double load, which means it must be designed for it.
Drawing a new line
This method is the most acceptable and safe. It is very popular when connecting a suspended (island) hood. The disadvantage of this method lies in the need to lay an electrical cable from the nearest junction box during renovations in the kitchen, because...
work is coming on gating and plastering a section of the wall and ceiling. The new electrical wire for a suspended hood can be hidden behind a suspended ceiling. Undoubtedly, a socket on the ceiling looks unaesthetic, so a connection option via a terminal block or separate terminal blocks is suitable here.
Make sure the cables are connected correctly: phase to phase, zero to zero and ground to ground.
Connecting the hood to the air duct
Test run, functionality check Do not forget to follow the instructions and requirements of the equipment manufacturer, and room ventilation standards. Ideally, it is better to hire a qualified technician with good recommendations, but if this is not possible, at least consult with a specialist before installing the equipment, then the hood will serve you for many years!
A few words about air ducts
The hood kit does not include an air duct. It will have to be purchased separately. It is believed that a metal box with a rectangular cross-section looks more aesthetically pleasing than aluminum corrugation, but it also has its advantages.
Anyone who thinks that corrugation does not look very attractive may be mistaken: under certain conditions, it can even decorate the interior of a room
The corrugation should be selected with a diameter that corresponds to the inlet hole in the upper part of the hood. If the length of this pipe is less than 1.5 meters, then the aerodynamic resistance of this material is practically negligible in comparison with the random losses resulting from turbulence in ventilation. The corrugation is easy to cut with ordinary scissors.
The corrugation can be given a square shape to connect it with the clapperboard. It completely lacks the resonant properties that sometimes occur with rigid boxes. If you still choose to purchase a corrugated stove, then cooking in your home will never be accompanied by a monotonous hum.
Installing a hood in the kitchen
Installing a kitchen hood with your own hands depends on the type and location of the ventilation duct. You can install ventilation inside a kitchen cabinet or make a separate model in the form of a fireplace hood or an inclined panel.
Installation diagram
often disrupts the ventilation installed in the apartment. If you make another hole for air exhaust to install the hood, the quality of air exchange will not improve, since the cross-section of the ventilation shaft will not change after such manipulations.
This hood installation scheme prevents the occurrence of reverse draft and natural ventilation when the exhaust equipment is turned off.
To properly connect the hood in the kitchen, it is necessary to correctly install the check valve: in the horizontal channel, the axis of the damper attachment must take a horizontal position, and the heavier section should be inclined downward. Without air pressure, the valve will be closed.
Fan installation
A homemade kitchen hood can be made from a fan mounted into the wall. To do this you need:
- Mark on the wall the location for installing the fan, then make a hole of the required diameter.
- A fan is inserted into the hole, and the free space between the wall and the equipment is filled with foam.
- A grille is installed on the outside.
- After these manipulations, the fan can be connected to the power supply.
DIY kitchen hood
You can make a hood in the kitchen with your own hands, by building it into a cabinet or without it. Built-in ventilation looks organically with the kitchen set. The stages of its installation are as follows:
- An aluminum or metal box with a check valve is made. For convenience, it can be purchased ready-made.
- A hole is marked on the top board of the cabinet in accordance with the lower clapper window. For final installation, you need to outline the sides of the firecracker.
- A hole is cut in the bottom of the cabinet along the edge of the bottom of the hood.
- Next, remove the cabinet shelves and cut out holes for the air duct with a jigsaw to mount the hood.
- A square hole is cut out on top of the cabinet board for the clapper window with an allowance of 3-5 mm at the edges.
- The corrugation is installed: a corrugation is threaded into the round holes, the upper end of which is formed by hand in the shape of a square and pushed into the upper hole.
- The cabinet with corrugation is installed in place.
- The kitchen hood is inserted into the cut-out hole in the cabinet with your own hands. All joints of the corrugation, “cracker” and holes must be treated with silicone sealant and then with polyurethane foam. A do-it-yourself kitchen hood is attached to the cabinet using self-tapping screws.
- A corrugation is put on the exhaust pipe and secured with a clamp. There is no need to seal this connection, as this will complicate disassembly for cleaning the ventilation, and will also create pressure drops in the area where the pipe passes into the corrugation.
When using not corrugated, but plastic pipes for air ducts, installation is carried out by connecting them with component corners and further wiring to the ventilation duct.
If installing a hood in the kitchen with your own hands is carried out in the form of installing a separate structure, a metal frame is made from a 20–25 mm angle according to the dimensions of the hob. It is attached to the wall under the hood socket. The air duct itself is installed under a plasterboard box. The firecracker is placed on the top edge of the box, just like on a cabinet.
To know how to make a hood in the kitchen yourself, you need to take into account practical recommendations and advice from specialists in this field. To summarize these recommendations, the following can be noted:
- Do-it-yourself ventilation in the kitchen should be not only exhaust, but also supply.
- When installing the air duct, it is necessary to avoid a large number of bends in order to ensure good draft.
- To ensure good traction, it is necessary to clear the building shaft of blockages.
- Installing a check valve will help prevent the supply of exhaust air.
A correctly selected one does not have a drive or spring, but it does have a damper with an offset axis relative to the center.
What type of ventilation to choose for the kitchen in a house or apartment ↑
Those who are building a solid country house or furnishing an elite apartment, or constructing an energy-saving building using “passive house” technology, should pay attention to an expensive, but comfortable and economical system of forced supply and exhaust ventilation with heat recovery. In the kitchen you should install a powerful hood with outlet to the wall; it is better (and healthier) to use an electric stove
If the house has a gas boiler, the room where it is installed must be equipped with natural exhaust and independent air flow.
For those who are building their own house on a more modest scale and have a limited budget, we advise that you definitely provide vertical channels for natural ventilation in the kitchen, bathrooms, furnace room, bathhouse, utility room and hallway if clothes are dried there.
Ventilation in a private house in the kitchen should be supplemented by a hood above the stove with a separate air duct. It is best to route the duct for removing air from the hood not to the roof, but through the outer wall to the street. A check valve should be installed outside to prevent cold air from entering inside. A fan on the natural ventilation channel should be installed in the toilet and bathroom; in the kitchen, if there is a hood, this is not particularly necessary.
It is best to route the air duct from the hood outside through the outer wall
For an apartment, we recommend a similar option: natural ventilation (available by default), a good exhaust hood above the stove, a fan in the bathroom. It is advisable to vent the hood through the wall; if this does not work, use the scheme described above with a check valve. In our opinion, an additional kitchen fan is not needed.
Finally, we would like to remind you once again that a properly selected and installed kitchen hood and fan will add comfort, but will not replace the natural ventilation system. And incorrect connection of the hood can not only not improve, but also significantly worsen the performance of ventilation
We recommend that you pay special attention to the issue of room ventilation, entrust its design and installation, and the connection of the hood only to competent craftsmen
Choosing a location for a future outlet
The initial question, which you should approach with all seriousness and responsibility, is where to make the socket for the hood and how to provide it with the necessary protection? The selection of the socket and its installation is carried out before the start of the main work with the exhaust system. You can decide on the type of fan, but wait to install it.
For convenience, it is recommended to “by eye” determine the center where you plan to place the device (take a closer look before connecting), then step back twenty centimeters along a horizontal line from the conditional point, fix the approximate location of the future independent outlet. The optimal height for connecting the hood is two full meters, if the size of the kitchen and the location of the ceilings allow it. By bringing the two parameters together, you will get an approximate range within which the installation of the outlet is most successful and correct in accordance with building codes.
Conventional diagram of the location of sockets in the kitchen
Errors in such a matter are not so terrible; after all installation work, the shortcomings are covered up with decorative panels or elements made to look like natural materials (wood, ceramics, marble). The outlet for the hood is equipped with all kinds of protection, since the fan will be connected to the electrical network around the clock. The new connector should remain open and freely accessible, so it is not advisable to clutter it with furniture or kitchen cabinets.
How to connect a kitchen hood to electricity?
How effectively the hood will cope with the removal of smoke directly depends on the power of its suction fan. But be that as it may, home hoods are not characterized by high power consumption; they are powered by an ordinary general house network with a voltage of 220 V, and therefore there is no point in pulling a separate cable line from the electrical panel for the hood.
Proper connection of the hood begins with finding the connection point to the electrical network. Of course, lucky are the owners of new apartments and housing with an improved layout, where all aspects of kitchen electrical consumption have already been planned and implemented. In such houses there are enough sockets for all household appliances that can be placed in the kitchen; the wiring is made with a three-core cable, including a ground loop. Here, as they say, no questions asked. You simply plug your hood into a power outlet and you're done.
What should the rest of us do? First, get acquainted with the basic rules for installing a socket for a hood. Here they are:
- such an outlet is mounted at a height of 2 meters from the floor and no closer than 60 centimeters to the stove or sink;
- it should be placed above the hood so as not to be subject to contamination;
- The outlet must be easily accessible.
Connecting a hood in the kitchen
Do you need an outlet for the hood?
Buying a kitchen hood is an excellent gift not only for any housewife, but also for everyone at home. The statistical majority of families eat in the kitchen every day. Often it is a favorite corner of households and staying guests, a place of intimate conversations and culinary feats.
The kitchen room, due to its purpose, needs reliable ventilation.
Connecting an exhaust hood in the kitchen perfectly solves the problem of cleaning the air from odors and fumes, but it should be remembered that the exhaust unit is, first of all, an electrical appliance that requires proper connection and maintenance.
Why does a hood need electricity?
You can understand the operation of an exhaust system using the example of a conventional vacuum cleaner. Here's how it works:
- There is an exhaust hood or hood above the kitchen stove, where combustion products enter;
- air intake occurs due to the operation of a fan, which is located inside the air intake and creates a vacuum;
- the movement of the fan blades is provided by a motor, which is powered by electricity from the general network;
- contaminated air is removed from the stove through the exhaust duct into the atmosphere or, after being cleaned with filters, returned to the kitchen space.
As you can see, connecting the hood means the indispensable use of electricity to operate the electric motor. But that's not all.
Modern exhaust units are equipped with lighting and, sometimes, an intelligent control system for changing the performance mode.
Light bulbs and the microprocessor are also power consumers, and this means that care must be taken to ensure that the hood is safely and uninterruptedly supplied with electricity.
A little about the types of hoods
Modern hoods work in two ways:
- the air flow in them constantly circulates through filters (grease and carbon) and returns back to the kitchen - circulation hoods;
- the air above the stove is sucked into the air duct and discharged into the ventilation duct of the house - exhaust ventilation;
- New generation hoods combine both the first and second methods of air purification.
Connecting hoods of the second and third types is more labor-intensive, because installation of an air duct will be required.
Even more varieties of hoods can be distinguished by considering the method of their installation. In total there are about five of them, but from the point of view of connecting to the electrical network, fundamental differences arise between built-in and island (ceiling) hoods. The first ones are adjacent to the kitchen wall, or built into hanging cabinets, the second ones are attached to the ceiling above the hob, which is located in the center of the room.
How to connect a kitchen hood to electricity?
How effectively the hood will cope with the removal of smoke directly depends on the power of its suction fan. But be that as it may, home hoods are not characterized by high power consumption; they are powered by an ordinary general house network with a voltage of 220 V, and therefore there is no point in pulling a separate cable line from the electrical panel for the hood.
Proper connection of the hood begins with finding the connection point to the electrical network. Of course, lucky are the owners of new apartments and housing with an improved layout, where all aspects of kitchen electrical consumption have already been planned and implemented.
In such houses there are enough sockets for all household appliances that can be placed in the kitchen; the wiring is made with a three-core cable, including a ground loop. Here, as they say, no questions asked.
You simply plug your hood into a power outlet and you're done.
What should the rest of us do? First, get acquainted with the basic rules for installing a socket for a hood. Here they are:
- such an outlet is mounted at a height of 2 meters from the floor and no closer than 60 centimeters to the stove or sink;
- it should be placed above the hood so as not to be subject to contamination;
- The outlet must be easily accessible.
Connecting a hood in the kitchen
Daisy chain connection
Installing a new outlet will require laying a wire from the nearest source of electricity. You can connect to a nearby outlet by making jumpers. To connect with a cable, it is enough to use a copper wire with a cross-section of 1.5 - 2 mm.
It is not necessary to trench the walls to lay a new cable. New wiring can be hidden in a neat cable duct.
When connecting a built-in hood, the wiring along with the new outlet can be easily hidden inside the structure of the kitchen furniture or along its top line.
Remember! When laying a new cable, avoid multiple contact connections; let the cable be fully tensioned. Surely you are already familiar with how twists negatively affect wiring: poor contact, overheating, sparking.
Hood grounding
The exhaust device must be grounded, like any other household appliance. This is not a problem if the house is equipped with grounding and a three-channel cable with ground is installed.
But in reality, such houses are in the minority, and often, hoods are operated without grounding.
In such circumstances, the owner of the hood must be aware of the potential dangers of its use, and that such use violates and thereby voids the manufacturer's warranty.
Is it possible to connect the hood directly without a socket? — Electro Help
Installing electrical wiring in the kitchen is not an easy task, because if electrical outlets are placed incorrectly, they can interfere with the installation of equipment and furniture, spoil the interior and even pose a threat to the safety of the apartment. The outlet for the hood deserves special attention. An air purifier provides comfort for apartment residents, so its installation must be taken with the utmost responsibility.
What determines the location of the electrical outlet under the hood?
The question of where to make a socket for an air purifier can be easily resolved if you have already selected a kitchen set and an extractor hood. The location where the electrical point will be installed is determined by the location of the furniture and equipment. The instructions for each air purifier indicate the optimal method of placing an electrical outlet for the corresponding equipment model.
Difficulties arise if you need to determine where to make an outlet for the air purifier, but the hood itself has not yet been selected. Each type of air purifier differs from others both structurally and in the installation method:
- Wall-mounted. They are located above the hob, on the adjacent wall.
- Built-in. Installed inside the kitchen unit.
- Hanging. Suspended above the stove, under a wall cabinet, they are distinguished by their flat shape.
- Angular. Mounted on the wall in the corner, suitable for small kitchens.
- Island. Installed in large rooms in which the cutting table and stove are located in the middle of the kitchen.
Surface preparation
The hood helps eliminate unpleasant problems that usually arise during the cooking process: fat settling, evaporation, unpleasant persistent odors. She draws all the dirt into herself and removes it. But the full functioning of the device depends on its correct installation.
Before installing the hood, it is worth considering its location in advance. Of course, it should be installed above a gas stove, but you should also not forget to pay attention to the quality of the wall surface. For this reason, in order to choose the right area for installing this product, it is worth studying the important features:
- First of all, it is recommended to check the quality of the walls. To install this system, you should choose a strong and durable wall that is made of a high-quality base;
- the most suitable option for installing a hood is a wall surface made of concrete or brick;
- It is imperative to prepare fasteners; they must fully fit the selected base;
- When installing a hood, it is worth considering that it must be located above the stove at the correct height.
A wall made of concrete or brick is suitable for installation.
Particular importance is given to height; the correct functioning of this device depends on it. So, in order to correctly determine the required height level, you should follow the following recommendations:
- the permissible height above the surface of the electric stove is 65 cm;
- the maximum height above the surface of the gas height should be 75 cm;
- It is imperative that the lower limits be strictly observed, otherwise the device may fail during heating and melt;
- the upper boundaries of the product must be adjusted to the growth of the owner;
- You definitely need to know the correct width parameters, they should be the same as for a gas stove - 50-60 centimeters.
Once the surface for installation has been selected and a suitable hood model has been purchased, you can begin installation. The structure, which will be installed and connected in accordance with all rules and recommendations, will be able to last for a long time.
Choosing a socket for the hood
It would seem, how does a socket for a hood differ from a simple universal power connector? In hardware and construction stores, you can easily find a variety of sockets, varying in price and function. So, what should you be guided by in your own choice?
An indicator of the reliability of an outlet can be safely considered:
- manufacturer's reputation;
- the material from which the socket body is made;
- connection of parts without gaps and cracks;
- block connecting parts;
- internal arrangement of contacts.
When choosing an outlet, you need to pay attention to its manufacturer.
First of all, pay your attention to the manufacturer; popular models of outlets meet the standard specified in the advertisement.
Companies that produce low-quality goods quickly disappear from such a market. The second thing you should be interested in is the material from which the product is made. Cheap plastic sparks, melts during use and can lead to a fire within the kitchen. It would be useful to put pressure on the design of the socket; all its elements must maintain a solid structure. The presence of a ceramic block, inside of which the contact group is located, indicates the reliability of the socket even after a long service life. For spacer petals, the latches of the main structure, there is only one condition - a rigid elongated shape.
Finally, test the contact group; the deeper it is located (hidden under the housing), the greater the guarantee of correct operation of the socket. An open group may show good work, but pose a danger to the structure and the kitchen as a whole.
Such insignificant little things as ordinary sockets for any hood, in fact, can provide fans and other household appliances with uninterrupted long-term operation. The appearance of the connector is important for those home owners who are accustomed to maintaining a single kitchen style, even in detail. After selecting an outlet, the hood power indicator is combined with the cable endurance, the connecting part between the cleaning system and the power source, otherwise network overload is inevitable and has dangerous consequences (fire, short circuit).
Sometimes, for reasons of economy (there is no desire to spoil the repair), a new outlet is not made, but is connected to the old one with a cable. In such cases, it is best to do without branches in the system and make one single connector for exhaust devices that will not be accessible to other devices. Cable channels are selected to match the appearance of the kitchen; if desired, it can be disguised as artificial wood or marble (the box will be an excellent addition to the furniture).
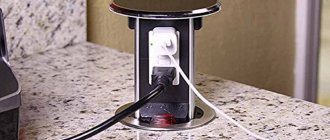
Connecting to an outlet
It seems that the question of connecting the device to electricity is incredibly simple: you just need to plug the plug into the socket. This is partly true. But there are also nuances that will have to be taken into account. For example, the location of the outlet. Not everything always matches so harmoniously that the socket is located next to the installation location of the device. What to do?
You can go the simple route: purchase a surge protector and install it in the right place. This will allow you not to bother with installing a new outlet, and will also protect the device from voltage surges.
If the option with a new outlet is more suitable, then you must first determine the optimal location for its placement. It is clear that installation close to the stove or sink is a prohibited option. You can install a socket above wall cabinets. If you cannot choose such a location, it is recommended to install an outlet with a box. Do not forget about grounding, which can save the device in case of electrical problems.
All work must be carried out with an indicator and only after a power outage at the entrance to the apartment.
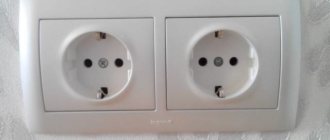
Replacing the socket
The second idea that will solve the problem is to replace the single socket with a double one. If you cannot connect the hood in the kitchen only because the nearest connection point is always busy, we recommend changing it to a double one, as shown in the photo below. This connection method will be a compromise, but keep in mind that the electrical wiring in the kitchen must be designed for the new load (instead of one electrical appliance, two will be connected to one point).
How can you organize an inspection?
During the inspection of supply and exhaust systems, the compliance of air exchange in rooms of different purposes with the requirements of the project and sanitary standards is revealed. When in good condition, properly designed ventilation shafts are visually hidden and their operation is inaudible. There are several ways to check the ventilation in an apartment.
Match
Bring a match, lighter or candle to the ventilation duct
The effect of a lit candle (match). Bringing a burning flame to a ventilation grille in a bathroom or kitchen to a duct closed by the grille will show the operation of the ventilation. If the vertical column of flame, when the vent (window) is open, deviates into the room or remains in the same position, then the system is not working properly. But this method is dangerous and is not recommended by employees of the gas supply organization. If there is a gas leak in the house, an open candle flame can cause an explosion.
Paper
A safe, but no less effective “paper” option. When the window is open, a sheet of newspaper or other thin paper placed against the grille should adhere tightly to it and be held in place by the rod.
Working ventilation will attract a sheet of paper
These methods are justified only in the cold season. In the heat, at almost the same temperatures outside and inside the room, the laws of physics regarding the displacement of warm light masses by colder air do not apply. Therefore, regular ventilation is organized. If malfunctions in the ventilation operation are detected, measures are taken to eliminate them.
Devices
A professional ventilation inspection provides an assessment of the degree of blockage in floor and building ventilation ducts. The power of air draft and the degree of “suction” that occurs due to the formation of low pressure are checked.
Electrical connection
When the installation of the hood in the kitchen is completed, the last step remains - connect the power supply. The connection can be made in several ways: using a cable, replacing the socket or drawing a new line.
When the installation of the hood in the kitchen is completed, the last step remains - connect the power supply.
The easiest way is to use a cable. It comes in handy if the hood is installed in a finished kitchen unit and there is no socket nearby. A separate socket can be installed next to the hood, and a piece of wire should be run to the nearest outlet. The train can be hidden, for example, under a baseboard.
The easiest way is to use a cable
Note! The wire must be copper and have a cross-section of no less than 2.5 mm2. If there is a socket next to the hood, but it is already used for some equipment, then you can make it double
But first you should make sure that the line has enough power for double load
If there is an outlet next to the hood, but it is already used for some equipment, then you can make it double. But first you should make sure that the line has enough power to handle double the load.
If there is an outlet next to the hood, but it is already used for some equipment, then you can make it double.
If it is not possible to use the above methods, you can draw a separate line from the electrical panel to the ventilation device. This is a costly process that causes a lot of inconvenience, for example, a large distance appears between the panel and the kitchen, or you need to figure out where to hide the wire.
If it is not possible to use the above methods, you can draw a separate line from the electrical panel to the ventilation device.
Now, after installing the hood, the kitchen will turn into a safe place with fresh air.
Kitchen hood: types and principle of operation
The method of connection and operation of the hood depends on its type and operating principle. There are exhaust systems that are not even connected to ventilation, operating autonomously.
The corner hood design is designed for slabs located in the corner
There are three main types of hoods:
- Classic or dome devices. This exhaust system is connected to the ventilation riser and purifies polluted air by directly sucking it into the ventilation system.
- Recirculating (flat) hoods operate autonomously, having nothing to do with the ventilation system. Flat hoods are equipped with a filter system that purifies the air and returns it to the kitchen area already purified.
- Combi hoods are combined type hoods. The principle of their operation is unique in that air purification can be carried out either through the ventilation hole or autonomously.
Many consider the classic or combi option to be more acceptable, since flat hoods require frequent replacement of these same filters, however, this option is most optimal for a small kitchen space and do not forget that any hood requires regular maintenance.
Flat and dome hoods have completely different operating principles
According to the method of installation and installation, kitchen hoods have more varieties:
- Built-in. Installed directly into kitchen furniture or other structures. Basically, the built-in type includes recirculation and dome type.
- Hanging. This type is attached to the bottom of the kitchen cabinet above the hob. Recirculation type hoods can be suspended.
- Wall-mounted. This type of hood is fixed on the wall above the stove; this design can be of a classic or combined type.
- Island. Island hoods mainly include combined and classic types of designs. This type is attached directly to the ceiling above the stove, if it is located in the center of the kitchen.
- Angular. If the slab is in a corner, a corner structure is attached above it. The exhaust system in it can work according to the classic or combined type.
New generation hoods, as a rule, have a combined type of device
When purchasing a hood, you need to take into account its dimensions: the working surface area of the exhaust system should not be less than the area of the stove.
In addition to the operating principle and external design, exhaust systems also differ in power type
To correctly determine what power a hood is needed for a particular room, it is important to take into account many factors.
The type of hood power is determined using a specific algorithm:
The location of the ventilation hole is taken into account (in the case of a recirculating hood, this factor does not matter). The type of stove or hob is determined. The diameter of the exhaust adapter connecting the exhaust system to the ventilation duct is taken into account.
Before installing the hood, you can draw up a detailed diagram for ease of use.
The required extraction power is selected according to the width of the exhaust adapter. The smaller it is, the more power the device needs.
A little about the types of hoods
Modern hoods work in two ways:
- the air flow in them constantly circulates through filters (grease and carbon) and returns back to the kitchen - circulation hoods;
- the air above the stove is sucked into the air duct and discharged into the ventilation duct of the house - exhaust ventilation;
- New generation hoods combine both the first and second methods of air purification.
You may be interested in the article Connecting a single-key switch
Connecting hoods of the second and third types is more labor-intensive, because installation of an air duct will be required.
Even more varieties of hoods can be distinguished by considering the method of their installation. In total there are about five of them, but from the point of view of connecting to the electrical network, fundamental differences arise between built-in and island (ceiling) hoods. The first ones are adjacent to the kitchen wall, or built into hanging cabinets, the second ones are attached to the ceiling above the hob, which is located in the center of the room.
Kitchen hoods with ventilation outlet: advantages, disadvantages
Cooking in a clean kitchen with fresh air is always pleasant
There are 2 ways to clean polluted indoor air - “drive” it through a filter system or remove it outside, replacing it with clean air. Systems made according to the first principle operate in a closed circle: intake - cleaning with filters - output. For the second case, kitchen hoods with a ventilation outlet are used, removing air masses to the outside space, to the street.
A kitchen hood with ventilation outlet is preferable to a device with similar functionality, but without an air duct. The main advantage of the installations under consideration is that contaminated air masses are quickly and effectively removed from the room, which allows for 100% renewal. For large rooms there are powerful units with 2 motors.
A kitchen hood with ventilation outlet is economical in terms of operation, because... it does not require regular filter replacement. The devices under consideration are equipped with 2 types of solutions - metal grease traps (mesh) or acrylic cleaners. The latter require periodic replacement.
Movement of air flows with filtration and exhaust ventilation
As for the disadvantages:
- the operation of the installation is accompanied by loud noise;
- Only a specialist can perform competent installation of the air duct;
- Difficulty in installing/replacing the device yourself.
Kitchen hoods without an air vent are much easier to install; even an inexperienced owner can easily handle the installation. But these devices are not very powerful, and the high cost of replacement filters reduces the economic benefit of purchasing them to zero.
Types of kitchen hoods
Modern manufacturers produce many different models of kitchen hoods. To navigate this diversity, you need to familiarize yourself with the classification given below.
Household models differ in the way they work and in the features of location and installation in the kitchen. The nuances of their installation and connection to the network depend on this.
Hoods may differ in operating principle:
- flow or exhaust. Polluted air is removed from the kitchen through a special air duct that connects the air purifier and the general house exhaust ventilation shaft;
- recirculation Heated air from the surface of the stove, containing contaminants, is forced through a filter system, where it is cleaned of impurities. Next he returns to the kitchen;
- mixed or combined. This system assumes that the device can operate in both modes described above. Most currently produced models support this operating scheme.
Based on the features of location and installation, 5 large groups can be distinguished among the devices under consideration:
- wall-mounted Attached to the wall above the kitchen stove. The variety of models allows you to choose the appropriate design option for any kitchen furniture set;
- hanging. They usually have a flat body. Hoods of this type are installed under a wall cabinet above the hob;
- built-in Mounted inside a hanging kitchen cabinet. The working panel of the hood replaces the bottom of the cabinet and is located above the surface of the stove, which allows the device to clean the exhaust air without any problems. From the outside, such air purifiers are practically invisible;
- corner. Indispensable in small spaces. Installed in the corner of the kitchen, saving usable space;
- island. These models are used in large rooms that are equipped with a kitchen island. Hence their name. The hood is suspended from the ceiling above the cooking area located in the middle of the kitchen.
Organization of air circulation in the apartment
Let's consider how air circulates in a single apartment without installing additional air exchange devices.
As mentioned above, fresh air enters through all sorts of window cracks and gaps, as well as through doorways - ajar doors and cracks under them.
The diagram clearly shows the direction of air movement. It enters through windows or doors of living spaces and moves towards ventilation openings
Comfortable living in apartments is characterized by a number of factors, including the frequency of air exchange and the volume of regularly changing air.
There are standards regulating the flow of air flows.
Air exchange rate table suitable for an apartment building. Air change should occur more actively where there is high humidity, that is, in the kitchen and bathrooms
In older buildings, ventilation shafts do not always function 100%, and this can be checked in a simple way. You need to take a sheet of paper and attach it to the technical ventilation hole. If the piece of paper is not held by the force of traction and falls, natural ventilation is disrupted.
Instead of a sheet, you can use a burning candle or match. By the movement of the flame, it becomes clear whether there is a draft from the room to the outside.
We discussed in more detail the rules for checking ventilation in an apartment and ways to find the problem in another article.
Ventilation problems negatively affect the well-being of people living in apartments. The lack of fresh air causes unhealthy drowsiness, fatigue, and headaches.
People with diseases of the heart and respiratory system react especially sensitively to this. They constantly want to keep the vents and windows open, and this leads to a sharp cooling of the premises and, as a result, an increase in the number of colds.
We also recommend that you read the information on how to restore ventilation and air duct functionality.
You can increase the efficiency of a natural exhaust system using a simple device - a fan installed in the ventilation outlet in the bathroom
If a regularly switched-on hood with air exhaust into the ventilation shaft is installed above the kitchen stove, this will also contribute to a rapid change of air masses in the kitchen and in adjacent rooms.
If desired, residents can independently organize the air flow. For this purpose, both ordinary ventilation and special mechanical and technical devices are used, for example, a supply valve for a window.
Valves are installed not only on double-glazed windows, but also in walls, most often under windows, near heating devices. Air from the street enters the room through a small hole with a diameter of 5 to 10 cm and is heated by the heat of a radiator or convector.
There are automatic models that are sensitive to changes in temperature and humidity: as soon as the parameters exceed the norm, ventilation occurs.
But a centralized channel-type supply system is recognized as more advanced. You can install it yourself only in a private house, because in high-rise buildings special services deal with systems of this scale.
Air ducts and air supply/heating devices are located above the rooms, in the ceilings, and pass through the walls, so they are installed during the construction process.
Supply duct ventilation is installed in new buildings of the so-called elite class. One of the installation conditions is high ceilings, allowing installation without damaging the interior
As you can see, the lack of a well-established natural ventilation system can be partially compensated for by installing additional devices. There is only one minus - additional one-time expenses for the purchase of devices and regular expenses for paying for electricity.
Electrical wiring in the kitchen - general tips
Whatever specialists you plan to invite for electrical installation work in the kitchen, you need to have a basic understanding of how the kitchen load is calculated, and as a result, how the wire cross-sections and ratings of circuit breakers are calculated.
The total power consumption of the kitchen consists of the power of each household appliance that you plan to install in the kitchen.
The power of the devices is indicated on their body. Thus, the average power of an electric kettle is 2000 W, a microwave oven is 1500 - 2500 W, a dishwasher is 2000 - 2500 W, and a washing machine is 2000 W.
The most energy-intensive household appliance is the stove.
An oven consumes 2000-3000 W, an electric stove with glass ceramics will consume 6000-8000 W. If we sum up this set and add a reserve of 3000 W, we find that the total power consumption of the kitchen will be: 10,000 W for a gas stove and 18,000 W for an electric stove.
Table of cable core cross-sections
Based on the calculated power consumption, you can determine the cross-section of the cable cores that will be used for new electrical wiring.
Note: Cables with aluminum conductors and aluminum wires have not been used for a long time in electrical wiring of apartments and houses. The conductors must be copper.
Using the table, you can determine the cross-section of the electrical cable cores depending on the circuit load.
Related article: How to choose a hood for the kitchen: 11 different hoods in the kitchen
| Laid open | ||||||
| S | Copper conductors | Aluminum conductors | ||||
| mm2 | Current | Power kW | Current | Power kW | ||
| A | 220 V | 380 V | A | 220 V | 380 V | |
| 0,5 | 11 | 2,4 | ||||
| 0,75 | 15 | 3,3 | ||||
| 1 | 17 | 3,7 | 6,4 | |||
| 1,5 | 23 | 5 | 8,7 | |||
| 2 | 26 | 5,7 | 9,8 | 21 | 4,6 | 7,9 |
| 2,5 | 30 | 6,6 | 11 | 24 | 5,2 | 9,1 |
| 4 | 41 | 9 | 15 | 32 | 7 | 12 |
| 5 | 50 | 11 | 19 | 39 | 8,5 | 14 |
| 10 | 80 | 17 | 30 | 60 | 13 | 22 |
| 16 | 100 | 22 | 38 | 75 | 16 | 28 |
| 25 | 140 | 30 | 53 | 105 | 23 | 39 |
| 35 | 170 | 37 | 64 | 130 | 28 | 49 |
| Installed in a pipe | ||||||
| S | Copper conductors | Aluminum conductors | ||||
| mm2 | Current | Power kW | Current | Power kW | ||
| A | 220 V | 380 V | A | 220 V | 380 V | |
| 0,5 | ||||||
| 0,75 | ||||||
| 1 | 14 | 3 | 5,3 | |||
| 1,5 | 15 | 3,3 | 5,7 | |||
| 2 | 19 | 4,1 | 7,2 | 14 | 3 | 5,3 |
| 2,5 | 21 | 4,6 | 7,9 | 16 | 3,5 | 6 |
| 4 | 27 | 5,9 | 10 | 21 | 4,6 | 7,9 |
| 5 | 34 | 7,4 | 12 | 26 | 5,7 | 9,8 |
| 10 | 50 | 11 | 19 | 38 | 8,3 | 14 |
| 16 | 80 | 17 | 30 | 55 | 12 | 20 |
| 25 | 100 | 22 | 38 | 65 | 14 | 24 |
| 35 | 135 | 29 | 51 | 75 | 16 | 28 |
Nuances of preparation
To make the connection less hassle, you should decide on the location of the equipment. Take the time to check the quality of the walls - the surface should be strong and durable. Ideally, the hood should hang on concrete or brick; the reliability of the fasteners plays an important role.
A properly placed air purifier should be installed at a certain level from the hob:
- above gas - for straight hoods it is 75-85 cm, for inclined hoods - 55-65 cm;
- above electric (traditional, induction) - for inclined - 35-45 cm, for straight - 65-75 cm.
Carefully observe the lower limits, otherwise the equipment will fail and melt as a result of heating. It is better to adjust the top ones to the height of the owner or hostess. The width should correspond to the width of the slab (50-60 cm).
In general, the installation of the structure can be divided into three stages:
- mounting the device to a wall or ceiling, or in a cabinet;
- connection to power supply;
- connection of the air duct and its outlet into the ventilation duct (for hoods operating on an outlet).
If the hood is recirculating
There is no need for a connection to the ventilation shaft, since such hoods do not move polluted air outside the room. The effectiveness of operation depends entirely on the quality of the filters and well-chosen performance.
Installing the system is easy. The device is mounted and connected to electricity. Fixation points on the wall or other surface are pre-marked and drilled with a drill.
If the hood operates on an outlet
Here things are a little more complicated, since it is extremely important to install the air duct correctly. It can be made on a semi-rigid basis, made of aluminum, plastic
The most problematic installation will be the plastic version.
To lay PVC air ducts, adapters, vertical and horizontal elbows (letter “G” configuration), ventilation grilles, and reducers are required. The latter will be needed when joining round diameter and rectangular shapes.
Most of the parts are included in the kit, but some will have to be purchased separately. Carry out installation with the help of specialists. Then the system will last a long time and make minimal noise.
If the hood is built-in
Such models are almost completely hidden in the furniture profile. Holes are cut in the shelves for the air duct. This is done after purchasing the device, since the placement of the recesses depends on the model of the hood. The structure itself is attached with screws to the walls of the furniture.
Choosing a place for an outlet for a hood: rules and standards
When the outlet has already been selected and purchased, you need to choose where to place it.
The main rules for choosing a place for sockets for the hood:
- You need to decide exactly where and at what height the hood will hang (probably the most important rule). This is necessary so that when choosing a place for an outlet, you can comply with other rules and restrictions (distances to pieces of furniture).
- The minimum distance from the power supply point to the kitchen furniture (countertops, cabinets, shelves) is 5 cm.
- The minimum distance from the power supply point to the ventilation shaft opening is 20 cm.
- It is recommended to make the socket not close to the hood body, but to move away from it about 30 cm to the side. In this case, the heat will not reach the power point, and possible drops of water and fat from the stove will not reach.
- There must be grounding, current strength - from 15A.
- The total power of kitchen appliances should not exceed 4 kW. If the sum of the power of the kitchen equipment is already or exceeds 4 kW, a separate line must be installed for the hood to avoid overloading the electrical network when all devices are operating simultaneously.
- Access to the outlet should not be blocked by furniture or appliances, at least massive and heavy ones (placement inside a closet is allowed). Firstly, you need to see what condition the power point is in. Secondly, in case of problems with it or with the wiring, you will have to move furniture and appliances (and in the kitchen it is often impossible to move a separate piece of furniture).
It is also recommended to find out exactly what the cord length is for the selected model (if you have already chosen it). Usually it is about 80 cm (not a generally accepted option, but the most common).
Rules for laying wiring in the kitchen (video)
The height of the outlet for the hood: which one should I use?
The recommended installation height is 180-200 centimeters from the floor, or 100-110 centimeters above the table (slab).
The optimal height from the stove (countertop) can be calculated using the following formula:
H vp
+ H v + 5
, where:
- HVP: height from the hood to the stove;
- Hv: the height of the hood itself (body);
- 5 - half the height of the socket.
Where to make a socket for a “regular” hood (not built-in)?
Another important point: it is initially recommended to decide on the model (or at least the type of hood), and only then select where it will be connected to electricity.
The reason is that different types of devices have their own connection characteristics:
- Built-in (built-in). It is installed in a cabinet, and the socket is usually located there.
- Hanging (installation is carried out under the kitchen cabinet, or without it). If you install a hanging hood under a cabinet, then the power supply point can be made inside it.
- Island (ceiling). The most difficult option in terms of installation: attached to the ceiling, away from the wall. Electrical power in this case can be provided by direct connection to the wiring (more on this below). Or, as an option, the power supply point is placed under the ceiling.
- Corner, inclined, fireplace, T-shaped. Such devices are connected in the same way, into an outlet near the installation site.
Where and how to make a socket for a built-in hood?
It was already mentioned above that for a hood built into a cabinet, you need to install the socket there (in the cabinet). Therefore, initially you need to have at least a design for future furniture, and only then choose a place for an outlet.
You need to start working after the furniture has been installed. In this case, there are a couple of important rules of the PUE that must be followed:
- The socket must be installed on a fireproof base.
- “Hidden” wiring that will run inside the kitchen furniture must be laid in a corrugated steel casing for protection.
Connecting the built-in hood to the network (video)
Do all hoods have a plug?
Most models are sold with a plug. However, some devices are sold without it - just a cord with wires at the ends. They are rarely on sale, but they are still found, so just in case, when purchasing, it is worth checking whether the model has a fork.
How to connect it in this case? The options are:
- Attach the plug to the wires and connect to the outlet in the usual way.
- Connect via Wago terminal blocks.
- Connect via terminal block.
Connecting a hood without an outlet to electricity (directly): is it worth doing this?
Do I need an outlet to connect the hood? Necessary, but not mandatory: if necessary, the device can be connected directly to the wiring, without a plug and socket - using terminal blocks.
This scheme is considered unsafe and is not recommended. In addition, this is also inconvenient: if you need to remove the hood, then disconnecting such a connection will be more difficult and longer.
About Hansa hood models: which ones are there and why are they good?
Review of hoods from Maunfeld
Related Posts
Secrets of installing a hood (video)
How to connect a kitchen hood to ventilation
For dome or combined type exhaust systems, a mandatory step is the installation of a ventilation duct or corrugated pipe. No matter what distance the exhaust hole is from the hob and the intended installation location of the exhaust module, their connection is mandatory.
To connect the hood to ventilation you can use:
- Corrugated pipe (it is used only in cases where it is possible to hide it behind furniture facades or under a decorative box).
- A plastic pipe (it itself has a decorative appearance and is assembled from complete modules; it can have a round, square or rectangular cross-section).
To connect the adapter pipe, you need a grille the size of the ventilation duct with a hole for the adapter of the appropriate shape (depending on the pipe).
The pipe is attached to the ventilation hole and to the exhaust module using clamps and sealant. The diameter of the connecting pipe is selected according to the diameter of the exhaust outlet and the ventilation duct.
During further operation of the exhaust system, it is important to remember to care for the ventilation adapter. The pipe should be cleaned at least once every six months to avoid reducing the functionality of the device due to the accumulation of plaque on the walls
How to connect a kitchen hood to electricity
At first glance, connecting the hood to the power supply is a fairly simple process, but there are certain nuances in everything.
You can use a carrier, but this is usually an unreliable and temporary option. The socket can be attached either to the wall or to the surface of the cabinet. First, you need to accurately determine the location of the outlet, keeping in mind that it should not be located near the sink or stove.
Any novice home craftsman can handle the selection, installation and connection of the hood. Follow the algorithm and follow the instructions and you will succeed.
Happy installation!
Connecting the hood to the mains supply
Now let's move on to the question of how to connect the hood in the kitchen to electricity. Since the hood itself is a low-power device, only a fan is connected to it, that is, there is no need to do any special installation measures. A regular Euro socket with a grounding contact is installed. Of course, for ease of connection, you need to move the socket as close as possible to the hood itself. Therefore, even at the stage of the repair, it is necessary to accurately indicate the connection point.
It is best if this is a place hidden by a vertical air duct, if the hood itself is dome (wall-mounted). If this is a built-in model, then the location of the outlet is in the cabinet above the hob, where the appliance itself is hidden. The same applies to the hanging structure, which is attached to the cabinet located above the hood itself. By the way, it is attached to it, and a vertical air duct passes through it. In general, you need to install the outlet so that it is not visible, but is easy to reach. And since the hood is almost never unplugged from the outlet, the convenience of its location can be relegated to the background. The main thing is invisibility.
By the way, one of the frequently used places to install a socket for a kitchen hood is above the kitchen unit. The socket will not be visible from below. You can pass the power cable through wall cabinets by making small holes in them.
The hood connection diagram is not the most complicated. There is no need to pull a wire from the distribution board and install a separate circuit breaker on it, as is usually done when connecting a hob or dishwasher. The nearby junction box can become the connection point for the electrical cable for the hood outlet. The main thing is to follow the rules for laying electrical wires: only horizontally or vertically, from the ceiling or floor at a distance of 10-15 cm. Of course, the optimal way is to make grooves for laying the cable. Hidden wiring will provide a presentable appearance to the walls in the kitchen.
But if this is not possible, then you can lay the wire to the outlet in an open way. True, you will have to drill a seat for it using a hammer drill with a crown. As for the cross-section of the power cable, a wire of 1.0-1.5 mm² is suitable for exhaust. But it must be three-wire copper: phase-zero-ground.
As you can see, connecting the hood to the electrical network is not the most difficult process. The main thing is to understand the connection diagram itself and choose the right location for the outlet.
But there are several types of hoods, and one of them is island hoods. That is, it is suspended from the ceiling above the furniture island into which the hob is inserted.
- Firstly, the installation of the hood itself requires special efforts, because it will have to be suspended. And this will require special fasteners, plus safety requirements for placing the device above people’s heads. That is, the hood must be attached to the ceiling surface very securely. Typically, collets with pins or steel cables are used for this.
- Secondly, you will have to install the air duct correctly. It is clear that its vertical section will be visible. But it is better to hide the rest of the wiring under the finished ceiling (suspended or suspended). Although some may like the placement of pipes under the ceiling as a unique design in an industrial style.
- Thirdly, you will have to connect to the electric current in a completely different way. That is, in this case there is no need to use an outlet. You can turn the kitchen hood on and off using a regular switch, which is installed on the wall at hand level, like all other switches in the room. Therefore, the power cable itself will have to be laid from the device to the ceiling along a vertical air duct or along one of the fasteners, then laid under the ceiling structure. And at the end, there are grooves inside the wall to the place where the switch is installed.