Composition and features of gypsum plaster
The basis of gypsum plaster is ordinary gypsum. In addition, fillers and modifiers are added to the mixture. Their quantity and composition depend on the manufacturer and type of plaster. Modifiers and fillers can perform different roles: reducing the consumption of plaster during application, improving adhesion to walls, and other important functions. Let’s not lose sight of the fact that various additives can be added to the solution, whose main purpose is to improve certain characteristics of the plaster:
• Whiteness level;
• resistance to irritants;
• period before setting begins;
• hardening time.
The main feature of gypsum plaster is its versatility. With its help you can level walls with different bases. Both dense materials (brick or reinforced concrete) and loose ones can easily respond to the composition; and synthetic substances (foam plastic), and aerated concrete with sand-lime brick. In addition, gypsum is also used in conjunction with thin elements. This is very useful when you do not need to finish the walls with putty.
Another feature is the drying speed. As already mentioned, it may vary depending on the additives added.
Advantages of gypsum plaster
•Gypsum plaster has many advantages over its analogues:
• Environmentally friendly material, since the fundamental basis of the composition is a natural adhesive element;
• By using a gypsum mixture when leveling the walls, you can better isolate the house from noise;
• The material has the ability to retain heat, which will save on heating costs in the cold season;
Fire resistance;
• Maintaining the internal microclimate in a room is determined by the ability to absorb excess moisture in humid air, as well as return it in dry air;
• The porous structure of the gypsum mixture allows the walls not to be afraid of damage from fungi and mold;
• The unique composition is impervious to water, and therefore stains from flooding by neighbors will disappear on their own in a few days;
• Absence of cobwebs (cracks from the plaster layer);
• High adhesion;
• Possibility of applying a decorative layer immediately after the plaster layer has hardened.
This list makes it possible to fully appreciate all the positive aspects of using gypsum plaster for leveling walls. However, although gypsum plaster is a fairly high-quality product, it has a small number of shortcomings, which should be remembered by anyone who has started a renovation.
Disadvantages when using gypsum plaster
The low strength of the material causes minor inconvenience. This is the main drawback noted by many wall decorators. Unfortunately, gypsum material is more easily subject to mechanical damage.
It was previously mentioned that gypsum plaster can restore the microclimate in a room with high humidity. But prolonged exposure to humid air can have a detrimental effect on the gypsum layer. For this reason, plastering the walls in the bathroom is not recommended. Gypsum is also a poor choice for leveling the walls of building facades.
Another disadvantage is the increased likelihood of rust on metal surfaces. This can be combated by covering metal products with paint or using special alloys.
Features of using gypsum plaster for facade work
Gypsum has a high water absorption coefficient. Therefore, first read the instructions for the material, and also study the composition of the mixture. Thanks to the presence of polymer additives and mineral plasticizers, a high level of stability can be achieved. But sometimes this is not enough to fully finish the facade using gypsum composition. To use the presented materials, you should initially cover the wall surface with an additional protective layer. It is needed to protect the walls from moisture.
Gypsum material is used not only for covering internal walls, but also for external plastering. The solution serves as an intermediate layer, taking into account certain requirements that the facing material “breathes” well. For this reason, despite some technical features, asbestos mixtures are very rarely used for facade finishing.
Manufacturer's choice
Each manufacturer strives to advertise its product to as wide a mass of people as possible, while declaring its uniqueness and the best quality. To make the right choice, you should know both the advantages and disadvantages, and therefore we will consider several of the most popular manufacturers of gypsum plaster on the repair materials market. Volma is the first to appear on the podium. Its gypsum product called “Canvas” is distinguished by the fact that in addition to the fundamental component, the composition contains a large number of chemical additives and mineral modifiers. When choosing this product, we must not forget about the amount of layer applied to the wall. It should not exceed 60 mm. It will take about a week for the composition to dry completely.
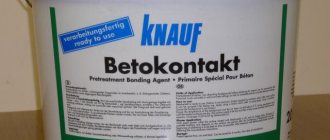
Next in line is KNAUF. Name of the gypsum composition: “Rotband”. The quarries where the main component is extracted belong to the company itself. In addition to gypsum, the composition includes high quality polymer additives. The purpose of such additives is to extend the service life of the composition. The thickness of the KNAUF composition layer should not exceed 50 mm. Another advantage is the presence of additives that increase moisture resistance, and therefore those who completely refuse to use non-gypsum plasters use Rotband in bathrooms.
The main thing you should always pay attention to is the composition. A mixture with certain additives can be used in different situations and for different purposes.
Plastering on beacons
The leveling method using beacons is suitable for large surfaces and provides high quality coverage. Metal profiles sold specifically for these purposes, strings, wire or thin cables can be used as beacons.
Installation of beacons
The beacons need to be leveled, trying to do this in such a way that the finishing layer ends up being as thin as possible. Let's consider the installation of standard beacons made of perforated profiles, secured with mortar. If you choose this installation method, follow these steps:
- Determine the position of the beacons using a level and make markings on the walls. The outermost beacons should be 20 cm from adjacent walls, the distance between intermediate beacons should be less than the length of the rule.
- Mix a small amount of mortar and throw it in heaps along the outer marking line at a distance of 30–50 cm from each other.
- Submerge the bar in the solution, adjusting its position according to the level. Do the same with the second outermost beacon.
- For convenience, when placing intermediate beacons, you can use a long strip or thread stretched between the outer beacons.
It is advisable not to leave the profiles under a layer of plaster, but to remove them after the finished surface has completely dried, covering the formed grooves with fresh mortar. If the beacons are not removed, they may rust over time. Rust can come to the surface and ruin the finish. You don't have to worry about this unless tiles are laid on top of the plaster.
Application of the solution
Gypsum mortar is convenient because it can not only be thrown on, but also spread. When using beacons, it is most convenient to apply it with a trowel so that the mortar cakes can provide the required layer thickness. You can apply the plaster mixture to the wall using spatulas.
Important! The layer of gypsum plaster should not exceed 1 cm. If greater thickness is required, additional layers will have to be made.
There are different methods of applying gypsum plaster, let's look at one of them.
- Wet the wall with water.
- When throwing or laying plaster on the wall, fill with it the plane bounded by two beacons, the ceiling and the floor.
- Using the rule, distribute the solution over the area between the beacons. Move the rule from bottom to top, resting it on the beacons and moving it a little from side to side.
USEFUL INFORMATION: Do-it-yourself alignment of walls without beacons (video)
- Remove excess mortar from the rule with a narrow spatula and apply it to the places where voids have formed.
- After the mortar has set, walk over the surface with a rule to cut off excess plaster. It is necessary to wait the right time so that only the top layer is cut off and the entire mass does not follow the rule. You can’t wait too long either; the approximate waiting time is half an hour.
- If there are recesses or small flaws left on the surface, you need to wait for the layer to dry, mix a new solution, apply the plaster with a spatula to problem areas and level it using the rule.
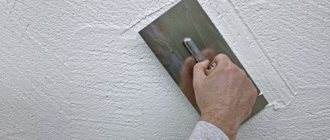
- After the applied mixture has dried, the surface is moistened and rubbed with a grater in a circular motion.
- Additional smoothing can be done using a smoothing iron, a sponge grater or a wide spatula. You can achieve a glossy surface by moistening the surface with water a day after the plaster has dried and smoothing it with a spatula until the desired result is obtained.
High-quality plaster does not require puttying before wallpapering. Before painting, the wall must be prepared more thoroughly: sanded, coated with primer and applied finishing putty.
Tools for working with gypsum plaster
Gypsum plaster is a unique product to some extent, and therefore special tools are needed to use it correctly. Their choice must be approached with particular care, since unevenness in the final result is possible.
The first thing to remember is the need for a hammer drill. Without it, you will not be able to mix the solution. The nozzles on the hammer drill depend on the composition of the plaster.
Various beacons and metal corners are needed to improve the surface of the wall. To cut them you will need special scissors for metal objects. You can’t do without dowels to insert ready-made beacons.
To level out unevenness, a special aluminum profile is used. Don’t forget about the spatula, because you can’t do it without it. We also can’t do without a trowel to give the plaster a greater level of smoothness, and also without a hammer, because not a single repair can be done without it.
Preparation for plastering walls with gypsum plaster
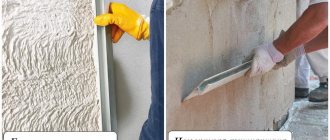
Under no circumstances should you immediately apply a layer of plaster to the base of the wall. Any home renovation specialist will tell you this. Before the puttying process itself, it is necessary to perform a number of procedures in order to properly prepare the wall for applying a layer of gypsum composition. First you need to clean the wall of dirt, old plaster and other deposits. Then you should remove all metal objects from the wall, namely nails, hooks, and staples. There may also be items that cannot be removed. We recommend covering them with a special material that will prevent corrosion.
To improve the adhesion of the solution, we suggest priming the wall. To do this you will need a roller and a special solution. After soaking the roller in it, remove excess liquid from it, as it will drain. Then apply the solution evenly to the wall. In the corners use a small brush instead of a roller. It is worth paying attention to bases that are highly susceptible to moisture. These include:
• foam concrete;
• aerated concrete;
• brickwork;
The primer layer on such walls should be larger.
Preparing the walls
Surface preparation before applying gypsum plaster solution is carried out in several stages.
- Cleaning the wall of old coating. It is especially important to remove oil paint, which will not adhere to gypsum plaster. The paint is cleaned off using a metal brush or a special attachment on a drill. If there is old plaster with defects, problem areas are cleaned to a hard base.
- Removing dirt and dust. When cleaning walls from dust and small debris, it is convenient to use a wide brush.
- Treating walls with primer. This is done to improve adhesion - the adhesion of the solution to the surface and reduce the hygroscopicity of the walls. For concrete surfaces, the “Concrete-Contact” composition is suitable. For brick or block walls with increased absorbent properties, you need to select a deep penetration soil. There are also specialized primer compositions for wooden or painted substrates.
USEFUL INFORMATION: Fashionable kitchen: choosing ceramic tiles for the backsplash
Important! To obtain a high-quality result, you need to prime not only the original surface, but also each layer of the solution after it has been applied and dried.
Putty process
Conventionally, the process of finishing walls can be divided into several points:
Preparation of the solution
The contents of the bag should be poured into a previously prepared bucket of water. We recommend calculating 0.5 liters per 1 kilogram of mixture. A detailed recipe will be written on the packaging. After mixing everything thoroughly, you should let the solution sit for about half an hour, and then mix again. It is important not to add foreign components to the container;
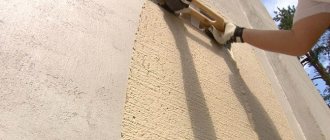
Applying plaster
Applying plaster is almost the most important point. It should be applied in one layer, the thickness of which should vary from 5 to 8 mm. It is recommended to apply from bottom to top for walls, and for ceilings - on yourself. After applying the layer, the wall needs to be leveled. Movements similar to the letter h will help you with this. After 60 minutes have passed, the excess plaster is removed and a spatula is used to smooth the walls after removing the excess.
Wetting with water
Some time after filling, the plastered surface must be moistened with water. Then, when the surface acquires a matte tint, rub it in using circular movements. Then, to smooth the surface and give it a perfect look, you need to treat it with a wide spatula.
Drying plaster
The last point does not require much effort, but does not lose its importance. The plaster should be allowed to dry and gain strength. To do this, we recommend minimizing the number of drafts in the room and not exposing it to intense sunlight. The temperature during this period should not be below 5 and above 25 degrees Celsius.
Step-by-step instruction
Before you begin applying plaster to the walls, their surface must be moistened generously with water using a spray bottle or brush. The technology for applying this finishing material involves step-by-step implementation of the following actions:
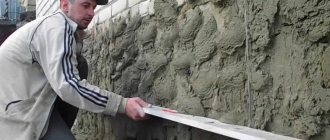
- Between the slats installed at the preparation stage, a thick layer of the mixture is thrown onto the wall so that it hangs slightly from the surface. It shouldn't collapse;
- Excess solution is removed as a rule. The hand with the rule should go smoothly and zigzag so as not to form irregularities;
- the resulting voids are filled with plaster, and its excess is removed as a rule.
The steps must be repeated until the wall becomes smooth and even. After this, the beacons are removed, and the resulting grooves are carefully filled with gypsum plaster. Lighthouses do not need to be removed if tiles are laid on top of the finish.
If the base is very uneven, spreading and smoothing the mixture is done in several passes. Each layer must dry well. After drying, the final surface of the walls is sanded and prepared for the final finishing: painting, wallpapering, tiling, etc.
Related article: How to drill concrete: tools, devices, tips
How to properly apply gypsum plaster can be seen in the training video.
Video “Working with gypsum plaster”
All stages of working with gypsum plaster. Secrets of mastery.
conclusions
Gypsum plaster has both its pros and cons. It is easy to use, but requires careful care. Each manufacturer has its own ideas about how to make a product, and therefore you should carefully study the composition before purchasing. In this case, you can apply gypsum plaster in the right place. Don’t forget about the necessary set of tools and all the rules during the preparation and application process, otherwise time, money and effort will be wasted. And don't forget that there are no bad materials. To achieve good results you need to use them correctly.
Types of plaster gypsum mixtures
Plaster compositions with gypsum are varied. They are divided according to several parameters.
All of them are divided by area of application into:
- universal gypsum plasters;
- gypsum plasters for exterior use (new mixtures with special additives used outdoors);
- gypsum plasters for interior work.
According to operating conditions:
- for dry and normal rooms;
- for rooms where the humidity level periodically increases, but not higher than 75% (subject to a waterproofing coating).
By place of use:
- universal (wall and ceiling);
- high-strength (for floor screeds);
- only for walls (vertical surfaces).
By purpose of use:
- Rough for the base layer. The base compositions contain coarse sand, so they can be applied in a thicker layer. This coating can also be used under decorative plaster for interior decoration, for example, Venetian or Moroccan plaster, facing work.
- Finishing or finishing. Filler grain up to 0.63 mm allows you to obtain a smooth (glossy) surface with a minimum layer of 2 mm.
There are also:
- hand applied gypsum plaster;
- SGShS for mechanized plastering of walls.
According to composition (content of main components) they are distinguished:
- dry gypsum plaster mixtures (SGSHS);
- gypsum-polymer SS (dry mixtures), for example, GYPSOPOLIMERtm, (with polymer additives that ensure good adhesion of gypsum to any base);
- gypsum polymer putties;
- gypsum self-leveling SS for screeds;
- lime-gypsum plaster mixtures;
- gypsum putty.
They all have their own areas of application, pros and cons, as well as characteristics.