A common option for floors of buildings, structures and coatings in industrial premises with intense mechanical stress is a concrete floor. The material from which these structural elements are made is subject to shrinkage and has low resistance to deformation, as a result of which cracks occur. To avoid repeated repairs, artificial cuts are created in monolithic structures. For example, expansion joints in concrete floors, building walls, roofs, bridges.
What are they needed for?
The concrete floor appears to be a strong and durable base. However, under the influence of temperature fluctuations, shrinkage processes, air humidity, operational loads, and soil settlement, its integrity is lost - it begins to crack.
To impart some degree of elasticity to this building structure, expansion joints are created in the concrete floors. SNiP2.03.13-88 and its Manual contain information on the requirements for the design and installation of floors, indicating the need to create a gap in the screed, underlying layer or coating, which ensures the relative displacement of isolated sections.
Main functions:
- Minimizing sudden deformations by dividing a monolithic slab into a certain number of cards.
- The ability to avoid expensive repairs with the replacement of rough and base coatings.
- Increased resistance to dynamic loads.
- Ensuring the durability of the structural basis.
Main types: insulating seam
Expansion joints in concrete floors, depending on their purpose, are divided into three types: insulating, structural and shrinkage.
Insulation cuts are made at the junctions of structural elements of the room. That is, they are an intermediate seam between walls, foundations for equipment, columns and floors. This makes it possible to avoid cracks during shrinkage of concrete in the contact areas of the horizontal and vertical elements of the room. If you neglect their arrangement, then when the screed dries and decreases in volume with a rigid adhesion to the wall, for example, it will most likely crack.
An insulation joint is created along walls, columns and in places where the concrete floor borders other types of foundations. Moreover, near the columns the seam is cut not parallel to the edges of the column-shaped element, but in such a way that a straight cut falls on the corner of the column.
The considered type of seam is filled with insulating materials that can allow horizontal and vertical movement of the screed relative to the foundation, columns and walls. The thickness of the seam depends on the linear expansion of the screed and is about 13 mm.
Depending on the specific purpose, joints in industrial floors are divided into:
- Shrinkage (compensation). Help prevent the formation of cracks throughout the concrete base as a result of shrinkage of the material.
- Insulating. They protect the base from the deformation effects of other structural elements: walls, columns, foundations for equipment.
- Structural. They are located in places where concreting maps join.
Let's take a closer look at how each type is performed and why you need to cut them.
Shrinkage
Shrinkage is performed on a concrete base 2-3 days after laying the material. They are cut to a depth of 1/3 of the layer thickness using a special machine in the form of cards 3 by 3 or 6 by 6 meters. A rectangular shape is also allowed, but the ratio of length to width should not exceed 2:1.
An important rule to consider when cutting: the maximum length of the card is equal to the thickness of the slab multiplied by 30!
Why are shrink joints needed in the floors of industrial buildings? They prevent widespread cracks in the material. The fact is that concrete dries unevenly. Initially, moisture evaporates from its upper layers, the lower ones harden much more slowly. The difference in drying speed creates tension. To prevent cracks from spreading over the entire area, cutting is carried out. During the hardening process, the joints move apart, as a result, the stress is compensated.
Insulating
This type is performed along the structural elements of the building: walls, columns, foundation for equipment. The concrete is cut through its entire thickness. Insulating expansion joints are especially important on objects subject to temperature fluctuations and mechanical loads. Another factor is ground movement. If there are expansion joints, the deforming effects from the walls will not be transferred to the concrete screed.
Structural
The next type is structural. They are cut at the boundaries of concreting maps. In another way they are called “cold”. It is almost impossible to lay a concrete screed over a large area without structural joints. Once the card area is covered, the material on the surface begins to set. If you lay a fresh screed end-to-end the next day, cracks may appear. Therefore, after stopping work, structural expansion joints should be made in the floors of industrial buildings. The position of all joints on the site must be agreed upon in advance.
Main types: shrink seam
If insulation joints prevent deformation of a monolithic concrete floor at the points of contact with the walls, then shrinkage cuts are necessary to prevent chaotic cracking of concrete over the entire surface. That is, preventing damage caused by shrinkage of the material. As the concrete dries from top to bottom, tension appears inside it, created by the hardening of the top layer.
The construction of expansion joints in concrete floors of this type occurs along the axes of the columns, where the cuts meet the corners of the perimeter joints. Cards, that is, parts of a monolithic floor bounded on all sides by shrinkage joints, should be square; L-shaped and elongated rectangular shapes should be avoided. The work is carried out both during laying of concrete using forming slats, and by cutting the seams after the screed has dried.
The likelihood of cracking is directly proportional to the size of the cards. The smaller the floor area limited by shrinkage joints, the less likely it is to crack. The sharp corners of the screed are also susceptible to deformation, therefore, in order to avoid concrete ruptures in such places, it is also necessary to cut shrink-type seams.
Are expansion joints necessary for self-leveling floors?
When installing a polymer coating - polyurethane or epoxy - the question arises: is it necessary to cut expansion joints? In fact, self-leveling floors are less susceptible to deformation. But if the work is carried out over a large area, it is worth cutting. The technology as a whole is no different. Cutting is done to a depth of 1/3 of the thickness of the material. It is convenient to place joints with 6 by 6 meter cards. After cutting, the cavity must be sealed. When seams are cut in industrial floors based on polyurethane or epoxy resin, the temperature in the room is maintained between 0 and 30 degrees. When installing a self-leveling floor, a damper (or edge) tape is used. It is made from materials that are not subject to rotting. The tape is pasted along the walls around the perimeter of the room. In fact, it serves as an insulating seam, as it protects the material from the deformation effects of structural elements.
Main types: construction seam
Such protection of monolithic floors is created in the event of technological interruptions in work. The exceptions are rooms with a small pouring area and continuous supply of concrete. Expansion joints in structural concrete floors are cut at the junction of screeds made at different times. The shape of the end of such a connection is created according to the “tongue and groove” type. Features of structural protection:
- The seam is placed at a distance of 1.5 m parallel to other types of deformation boundaries.
- It is created only if concrete is laid at different times of the day.
- The shape of the ends should be of the tongue-and-groove type.
- For a screed thickness of up to 20 cm, a 30-degree cone is made on the wooden side protrusions. Metal cones may be used.
- Tapered seams protect the monolithic floor from minor horizontal movements.
Expansion joints in concrete floors of industrial buildings
Increased wear resistance requirements are imposed on floors laid in factories, warehouses and other industrial facilities. This is due to the appearance of the influence of different intensities of mechanical impact (movement of vehicles, pedestrians, impacts from falling solid objects) and the possible ingress of liquid onto the floor.
As a rule, the design feature of the floor consists of a screed and a covering. But under the screed there is an underlying layer, which in a rigid version is laid from concrete. In it, a seam is cut in mutually perpendicular directions every 6-12 m, with a depth of 40 mm, with at least 1/3 of the thickness of the underlying layer (SNiP 2.03.13-88). A prerequisite is that the expansion joint of the floor coincides with similar protective gaps in the building.
A distinctive feature of the floor structure in industrial buildings is the creation of a top layer of concrete. Depending on the intensity of the mechanical impact, coatings of different thicknesses are designed. With a thickness of 50 mm or more, an expansion joint in concrete floors (SNiP “Floors” clause 8.2.7) is created in the transverse and longitudinal direction, repeating the elements every 3-6 m. The cut is sawed 3-5 mm wide, its depth is not less than 40 mm or a third of the coating thickness.
Method for constructing and repairing expansion joints
Depending on the technology provided for by the project, expansion joints can be installed both during the pouring process and after its completion. In addition, during the operation of the floor, it may be necessary to repair the old seam.
Table. One of the methods that can be used to create a seam in a finished slab.
| Steps, photo | Brief description of the process |
| Since the locations and parameters of the seams (depth and width) are determined by the project, marking is carried out according to the drawing data. On the finished base it can be done with a simple pencil. |
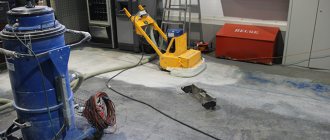
| An electric wall chaser with a vacuum cleaner attached to it is launched along the drawn lines. The width of the seam will be indicated by two parallel grooves along the contour, but if it is wide, to facilitate the subsequent excavation of concrete, several more slots can be made in the gap. |
| After cutting the strips, the concrete between them is destroyed using a hammer drill with a “shovel” attachment. |
| In this case, the bottom of the recess cannot be flat, therefore, in order to be able to install the profile, the surface of the groove has to be modified. For this purpose, an angle grinder (popularly “grinder”), equipped with a special casing and a diamond cup, is used. |
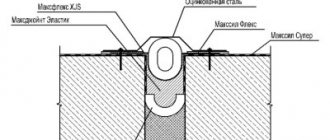
| When the seam cavity has been given a geometrically correct shape, a set of two profiles, fastened together with temporary jumpers, is placed into it. Its position must be verified using geodetic instruments. |
| Drilling for fastening is carried out through the mounting holes in the profiles, with the obligatory removal of the resulting dust. |
| The profiles are fastened with HRD 8*80 anchors. First, a plastic dowel is inserted into which the bolt is driven halfway with a hammer. |
| Then it is tightened with an impact wrench |
| When all the anchors are in their regular places, the jumpers that temporarily fix the profiles can be dismantled. |
| Now you need to install a sealing gasket made of rubber or other elastic material. First, it is unwound from the bay without cutting it off, and left to rest for a day to straighten out. After this, it can already be cut and placed in the installation channel between the profiles. |
| To fix the gasket, decorative strips are mounted on top of it. They have oval grooves that fit onto threaded rods protruding from the profile. |
| Spring washers are placed on the studs, then nuts, which are first tightened by hand... |
| ... and then, without excessive enthusiasm, they tighten it with a screwdriver with adjustable force. |
| To prevent the solution from getting on the decorative part of the seam when embedding the profile, it is covered with an overlay in the form of a galvanized metal casing. Its elements simply fit together with a slight overlap, and are pressed well against the base. |
| To caulk the profile, you can use any version of thixotropic mixtures in ready-made or dry factory form, intended for concrete repair. |
| After the repair compound with which the profile was filled is polymerized, the protective casing is removed and the seam is sealed. In this case, it is performed with elastic mastic applied using a mounting gun. The sealant should not protrude beyond the floor surface, so its excess should be carefully removed immediately. |
thixotropic mixture for concrete repair
Requirements for creating deformation protection for floors
Concrete cutting must be done with a milling cutter after two days of hardening. The cutting depth according to the standards is 1/3 of the concrete thickness. In the underlying layer, in places where there are supposed gaps, before pouring concrete, it is allowed to use slats treated with anti-adhesion compounds, which are removed after hardening of the material and as a result, protective seams are obtained.
The lower parts of columns and walls to the height of the future coating thickness should be covered with rolled waterproofing materials or foamed polyethylene sheets. In those places where the design provides for expansion joints in concrete floors. The cutting technology begins with marking the places of artificial breaks with chalk and a ruler.
A test seam serves as an indicator of timely cutting: if the aggregate grains do not fall out of the concrete, but are cut by the cutter’s blade, then the correct time for creating expansion joints has been chosen.
How to lay tiles on a screed with an expansion joint
If floor tiles or porcelain stoneware are laid on top of a screed with expansion joints, it is necessary to ensure that this material can also move. Other coatings can independently compensate for small deformations that occur. The tile, due to its rigidity, can crack. When planning your layout, try to ensure that the tile/porcelain joints are where the expansion joints in concrete floors are. The maximum displacement is 2 cm.
Ready-made solutions for laying tiles and porcelain stoneware on heated floors
In order for the coating of tiles and porcelain stoneware to be able to some extent compensate for heat, moisture and other deformations, the tiles must be laid with elastic adhesive. One of the recommended ones is Ceresit CM 16 Flex. It can be used for heated floors and unstable substrates. Suitable for exterior and interior use. The grout for the seams is also elastic. There is also an option - Keracolor Flex + Fugalastic, which gives the same results. The seams can also be filled with the same polyurethane sealants. They are available in several colors.
You can also use special profiles and overlays for tiles and porcelain stoneware. For indoor use, aluminum ones with a layer of thermoplastic rubber are more acceptable. They can be installed in the seams of floor tiles, porcelain stoneware, and marble. Suitable for grinding, the rubber retains its plasticity but does not allow dirt to get into the seam. There are options with different widths of the compensator, for different heights of tiles/porcelain tiles. There are also expansion joint expansion joints made of aluminum, which consist of two movably connected profiles. This design allows the tile to move within a few millimeters.
Seam processing
Normal functioning of the seam is achieved by sealing it. Sealing expansion joints in concrete floors is carried out using the following materials:
- A waterstop is a profiled tape made of rubber, polyethylene or PVC, laid when pouring a concrete screed;
- A sealing cord made of foamed polyester is placed in the slot and retains its elasticity during temperature changes, ensuring safe movement of the concrete covering;
- Acrylic, polyurethane, latex mastic;
- Deformation profile consisting of rubber and metal guides. It can be built-in or overhead.
Before sealing, the working surface of the gaps must be cleaned and blown with compressed air (compressor). Also, to increase the service life of concrete floors, it is advisable to strengthen the top layer with topping or polyurethane material.
Expansion joints in concrete floors: standards
In conclusion, the requirements for constructing protective gaps in concrete floors according to the standards are given.
The underlying layer should have deformation cuts perpendicular to each other in increments of 6 to 12 meters. The seam is 4 cm deep and makes up a third of the thickness of the concrete coating or underlying layer.
When the thickness of the concrete coating is 50 mm or more, an expansion joint is created in the transverse and longitudinal direction, repeated every 3-6 m. These cuts must coincide with the seams of the floor slabs, the axes of the columns, and expansion gaps in the underlying layer. The cutting width is 3-5 mm.
The cut is carried out two days after laying the concrete. Sealing of protective cuts is carried out with special cords and sealants.