The need to build on problematic soils dictates our own approaches and solutions.
One of them is a pile foundation, which provides support on deep, dense layers of soil.
Weak, waterlogged or loose surface layers do not participate in the operation of the support system, being, in fact, only an intermediate link between the upper above-ground structural elements and dense soils.
Individual piles, being vertical elements, take on a certain part of the load from the weight of the house, evenly distributed along all the trunks.
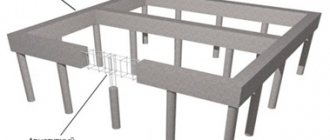
The grillage or strapping belt is responsible for taking the weight of the building and transferring it to the pile system, which should be discussed in more detail.
Pile foundation tying
The pile system is a complex of vertical shafts immersed in the ground.
For further construction, a horizontal element is required that connects the supports to each other and serves as a reference line for the walls of the house.
This element is called a trim or grillage. It performs the most important function - it unites a group of individual trunks into a complex, making the pile field a single support system.
After immersion in the ground, the outer parts of the piles are cut, controlling their height to obtain an even horizontal plane at all reference points. Then special caps are installed on the upper parts - heads, equipped with horizontal platforms and shelves for mounting the harness .
The grillage usually follows the plan of the first floor of the house, i.e. load-bearing wall configuration.
However, for greater uniformity of load distribution and pile stability, additional transverse or diagonal beams are installed, increasing the rigidity of the bundle of individual supports and providing additional reinforcement to the load-bearing lines.
As a result, a design is achieved in which there are no separate supports; all of them are included in the integrated complex of the pile field.
Is strapping required during construction?
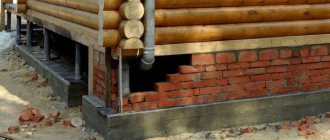
Quite often, future owners of their own home begin to think about whether tying screw piles is required or not. A foundation on piles is a structure made up of supports that are sunk into the ground. The installation of these supports is carried out extremely carefully, but even such supports do not always meet all the strength requirements and are not fully reliable. The floors may become distorted during the further use of the house, and the piping will definitely not allow the foundation of the building to lose strength, which will make it strong, and the house will serve for many years.
Important! The strongest building materials should be used. The timber will make it possible to make a fairly strong foundation that can withstand heavy loads.
Types of strapping
The piping belt for a pile foundation can be implemented in different design options. They have their own capabilities and are designed to work with different loads and conditions.
There are the following types:
Wooden
Use a beam with a cross section of 200:200 mm, or a pack of edged boards 50:200 . The beams are installed around the perimeter of the house (under the external load-bearing walls), along the lines of the internal load-bearing walls, and also connect the remaining supports in order to equalize the loads and tie all the trunks to the common system.
Corner joints are made into the wood floor, fastening to the ends is done through a double layer of roofing material for waterproofing.
The advantages of this solution are:
- Ease of processing, availability of material.
- The wood has sufficient strength and relatively low weight, which does not load the foundation.
- Installation is possible in the field, without the use of construction equipment or even without power tools.
The disadvantages of wooden types of strapping can be considered:
- Features of wood, tendency to warp or crack, need for high-quality waterproofing, etc.
- Fire hazard of wood.
- Possibility of material damage by insects or rodents.
Despite the obvious disadvantages of wood, a timber grillage is a common and popular option.
Metal grillage
Metal binding requires the use of welding.
From an installation point of view, it has noticeable advantages:
- High connection speed.
- Durability, resistance to all possible loads.
- A wide selection of types of rolled metal, allowing you to obtain various strapping options.
Along with advantages, metal strapping has disadvantages:
- The metal's tendency to corrode.
- The need for periodic maintenance of the structure (painting with waterproof polymer materials).
- Welded joints require the participation of a professional welder who is able to correctly select the operating mode and amperage. Otherwise, the seams will be brittle and brittle, which will create a significant danger to the building.
The main argument in favor of creating a metal frame is the high maintainability and speed of assembly of the grillage.
The cost of rolled metal and welding work is noticeably higher than that of wooden beams.
However, there are about the same number of supporters of this type of binding as there are fans of wooden parts.
The strength and stability of the metal are highly valued by users and increase the competitiveness of the material.
IMPORTANT!
To increase the strength of the metal frame, it is recommended to use additional bolted connections.
Concrete
Concrete lining is almost a full-fledged analogue of a pile-strip foundation.
The fundamental difference is the distribution of loads - on pile-strip foundations, both elements share the loads equally, and the concrete grillage of a pile foundation only transfers the load to the supports, without performing load-bearing functions as such.
At the same time, being only an intermediate element, concrete piping allows you to get the maximum effect.
It has high strength, durability, load resistance.
In addition, the concrete grillage is able to compensate for changes in loads or load-bearing capacities of individual supports, redistributing or partially assuming new working conditions.
The advantages of this design are:
- Ensuring maximum load-bearing capacity of the system.
- Independence from climatic or weather conditions.
- Relatively low need for periodic maintenance.
- Durability, reliability of the material.
The disadvantages of concrete elements are:
- The complexity of creation, the need to perform various successive stages of work.
- Large volumes of materials (concrete, reinforcement, wood for formwork, waterproofing materials, etc.).
- It takes a long period of time for the lining to harden (28 days from the moment of pouring), during which further construction is impossible.
The construction of concrete piping is usually chosen during the construction of large and massive buildings, where it is especially important to ensure the strength and reliability of the belt despite the high consumption of materials and labor costs.
NOTE!
For some types of piles, a combined version of the piping is often used, in which the grillage itself performs the main load-bearing functions, and the shafts are additionally connected by metal jumpers. This type of dressing is used, in particular, for screw piles . It strengthens the system and reduces the possibility of loosening or loss of traction.
How to attach the harness
Before you begin tying the pile foundation, you should choose the method of assembling and fastening the grillage, as well as select the appropriate building materials.
The standard foundation piping with timber is connected to each other in two ways: a straight joint or an oblique cut. The joints are protected with an overlay of boards or a Gerber hinge. The external piping of the pile foundation is made double.
A wooden, metal and reinforced concrete grillage is attached to the piles as follows:
- For threaded hardware – bolts, screws, studs;
- For welding;
- On clamps or staples.
Material for grillage
The following materials are often used for grillage of screw piles during the construction of low-rise buildings (list in increasing strength):
- Wooden beam (cross section 20x20, 15x20 cm)
- A package of edged boards placed perpendicular to the head (section 5x20 cm, the package can be made of 3 or 4 boards)
- Steel U-shaped channel (sheet thickness 15, 20 mm)
- Steel I-beam (thickness similar to channel)
The choice depends on the structure - the more massive it is, the more durable the material should be used.
Self-tapping installation
The method of attaching a beam or a package of boards to the head of a pile has become widespread. The reason is manufacturability and availability of consumables. The fastening is based on a plumbing bolt, a self-tapping screw with a hex head.
The general view of the hardware is presented in one of the illustrations given here. The average length is about 8-10 cm. The head is hexagonal for a wrench. You can screw it with a screwdriver or wrench. Using manual keys is impractical. To attach to one head you need 4 plumbing bolts.
Using brackets, clamps
The grillage method is combined with the classic self-tapping method. The difference is that pieces of timber 50-60 cm long are attached to the pile heads, and a beam, a package of boards located on the edge, is mounted on them. In corner and cross joints, the fasteners are supplemented with metal staples driven in in the shape of a diamond (at the crosshairs of the strapping), inclined to the right (“/”), left (“”) side of the line.
Welded joint
For I-beams and channels, the best joining method is welding. For the latter, you can use anchors, but this option requires special metalworking skills.
For this installation method, waterproofing is not provided due to the similar composition of the materials. The I-beam flange is laid on the pile heads and welded. At the corners, the beams are brought close to each other or cut at an angle, after which a seam is applied.
Fitting on a threaded connection
It is more rational to use the presented method in the case of placing U-shaped screw piles. To install the foundation piping with your own hands, you must perform the following steps:
- Install the grillage beam into the opening between the pile posts. Before laying the beam element in the U-shaped flange, we lay an insulating layer of roofing material treated with drying oil.
- We fix the connecting elements. From the sides we fasten the beam to the head using self-tapping screws, and directly to the pile - with anchors or through pins.
We recommend watching a video of how timber is fastened using fasteners.
Watch this video on YouTube
Additional fasteners
In order to increase the level of reliability at the joints, such areas are additionally fixed with metal brackets, the diameter of which is 8 mm. This measure is used when the length of the screws is insufficient for a strong connection of the beams.
The brackets are installed in the upper parts of the beam, opposite the connection points. The pointed ends are driven into the solid surface of the timber, which has no recesses.
It is sometimes difficult to completely drive in an eight-millimeter staple, and it is recommended to perform this procedure as follows:
- marking is carried out, for which the fastening element is applied to the surface of the beam and outlined with a marker;
- along the marked line, a groove is arranged at 1 and 0.8 cm in depth and width, respectively;
- The places where the legs of the bracket are to be immersed are drilled. Pre-prepared holes of 5 - 6 mm in diameter will prevent the formation of cracks;
- each groove and hole is treated with antiseptic compounds;
- the driving of steel staples begins, which must be immersed flush with the wood surface;
- At the points of intersection of beams, the “half-tree” joining option is used. Screws are screwed in from below, and four staples are hammered in so that they form a square.
Related Posts
- Do-it-yourself installation of screw piles
- Pile-screw foundation: pros and cons, tips for choosing
- Pros and cons of a pile foundation. how not to make a mistake when choosing
- How to calculate a pile foundation using an online calculator + calculation of the number of piles and load-bearing capacity
- Foundation on reinforced concrete piles
- Construction of a frame house on screw piles
- Do-it-yourself construction of houses from profiled timber
- Drilling wells under a pile foundation
- Pile failure
- Advantages and disadvantages of pile-strip foundation
- Ways to strengthen the foundation
- Types of screw piles: how to choose the right ones?
- Various technologies for constructing bored piles
- Pile heads: characteristics and subtleties of use
- Leading wells
- A step-by-step guide to making a pile-strip foundation for a house made of aerated concrete with your own hands
- Pile pressing method
- Houses made of kiln-dried profiled timber
- Grillage on screw piles
- Lvl beams, use of veneer beams for floors
- Repair and replacement of the old foundation of a wooden house
- Foundation construction on bored piles
- Do-it-yourself house made of laminated veneer lumber: we build together with professionals! instructions for building a house + 100 photos
- Which wooden house is better: choosing the ideal building material
- Pouring the foundation in winter
Read with this
- Do-it-yourself installation of screw piles
- Pile-screw foundation: pros and cons, tips for choosing
- Pros and cons of a pile foundation. how not to make a mistake when choosing
- How to calculate a pile foundation using an online calculator + calculation of the number of piles and load-bearing capacity
- Foundation on reinforced concrete piles
- Construction of a frame house on screw piles
- Do-it-yourself construction of houses from profiled timber
- Drilling wells under a pile foundation
- Pile failure
- Advantages and disadvantages of pile-strip foundation
Timber strapping technology
Most cases of using timber frames relate to the construction of frame houses on bored or screw piles.
Procedure:
- Cutting beams to length 200x200. Since a half-timber connection is usually used, the length of each span is measured in full, without taking into account the thickness of the adjacent beams.
- Laying the perimeter, connecting at the corners. A double layer of roofing material is laid on each head. The connections are sealed with jute strands .
- The timber is fixed to the heads using “wood grouse” - special wood screws with hexagonal heads.
- After laying the external beams, they begin to install the internal spans located under the load-bearing walls. Above the corresponding piles, recesses are made to the width of the beam (200 mm) and to half the depth (100 mm) . Suitably prepared connecting elements of the internal spans are placed in these recesses.
- All parallel spans are connected with additional beams or boards installed on the edge. Self-tapping screws and galvanized corners with stiffeners are used for connections.
- The surface of all wooden parts is coated with an antiseptic and fire retardant composition . After drying, apply a layer of waterproofing (hot bitumen or bitumen mastic).
Advantages of a pile foundation
Pile foundations with a grillage have many advantages:
- the possibility of construction in areas with unstable, water-logged soil, with relief that has significant differences in height;
- small amount of land work;
- the ability to carry out construction in areas where earthquakes are possible;
- in areas with permafrost, the construction of a pile foundation is the best option;
- for private housing construction, piles are buried within one day, tying is done within several days;
- when using high piles, a garage or utility room can be equipped under the house;
- Possibility of use in areas where many houses have already been built, where it is not possible to fit construction equipment.
At first, hollow screw piles were used for the rapid construction of military projects. Then they began to be used for the construction of frame houses and buildings made of lightweight materials. With the development of this direction, they began to produce supports that can withstand significant loads and have a long service life.
It is difficult to understand how pile and column foundations will behave if heterogeneous soil with different characteristics is found under the supports.
Method of bundling with a profiled pipe
A profiled pipe has a structure similar to a channel, but in terms of strength it is much inferior to it.
This is due to the less durable metal used to make the profile pipe, thinner walls and other features of the material . To achieve maximum strength, corner joints are made overlapping or overlaying.
As an option, the ends are trimmed at 45°, welded, followed by strengthening the joint with an oblique angle for bolted joints.
Procedure:
- Trimming piles, installing caps.
- Laying beams along the outer perimeter, connecting corners.
- Laying internal beams, welding with external elements.
- Tying the remaining supports to obtain maximum rigidity.
- Applying a layer of protective anti-corrosion coating.
IMPORTANT!
If possible, all connections are reinforced with metal gussets installed on bolted connections.
Step-by-step DIY installation instructions
Let's consider the procedure for creating a pile-screw foundation.
The work is carried out in stages, the sequence of actions has a strictly defined order:
Preparation
A pile-screw foundation has an important feature - it can be created on uneven terrain that does not require preliminary leveling (planning).
It is possible to build on slopes or in folds, which makes it possible to effectively use areas that are inconvenient from the point of view of traditional construction. Therefore, preparatory work can be reduced to clearing the area of plants and foreign interfering objects.
Make markings and mark all pile installation points with pegs. Then, small (up to 30 cm) recesses are made at the installation sites, which facilitate the entry of the blades into the ground.
The fertile layer of soil creates noticeable resistance due to the abundance of roots, plant stems and other obstacles, so it is better to remove it.
Driving piles
Installation of screw piles is done either manually or mechanically. Manual installation is possible in the presence of relatively soft soil without man-made inclusions or rock debris.
The diameter of the barrels available for manual immersion is limited to 87 mm.
The most common 108mm diameter piles are often too difficult to construct due to the high soil resistance.
The machine method allows you to obtain high-quality installation of screw piles, observing a certain angle, screwing force and depth.
The power of construction equipment allows you to freely work with piles up to 159 mm in diameter, which is quite enough for the construction of a fairly large private house.
The piles are driven to a predetermined depth. Usually it is determined by the level of occurrence of dense layers, or the soil resistance force exceeds the force permissible for a given shaft, which breaks off the technological hole.
A pile that has reached the required level of adhesion to the ground rotates with great effort or stops doing so altogether.
You cannot try to continue rotating - the welding may not hold up, the blades will come off and the pile will become unable to perform its functions.
NOTE! When installing screw piles, it is forbidden to reverse - try to unscrew the trunk back. This weakens the adhesion of the blades to the ground and eliminates the possibility of repeated immersion in this place.
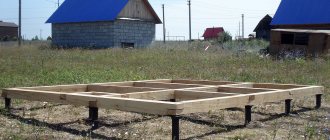
Harness
After installing all the piles, trimming is performed. This is a procedure that allows you to adjust the height of trunks protruding from the ground to a single level and form them into an even horizontal plane.
Install a laser level with the function of constructing planes at the required height and cut off excess sections of pipes.
After trimming, the internal cavities of the piles are filled with concrete, increasing their strength.
Then they install the strapping (grillage) - a belt that connects all the piles into a single system and at the same time serves as a supporting element for the walls of the house. The cut tops are covered with caps with horizontal platforms on which metal or wooden beams are installed.
For fixation on the platforms there are technological holes for bolted connections.
IMPORTANT! Sometimes the trim and grillage are different elements. The piping is performed below the level of installation of the grillage and connects all the piles together, forming a system like a lattice
Metal sections of a channel or I-beam are used, welded to the walls of the trunks.
Channel bandage method
The difference between the channel piping technology and the method of installing a profiled pipe is the absence of standard ends.
The channel is installed with the wide side up, forming a horizontal platform along all the beams.
Otherwise, the procedure is similar to the technique for installing a profile pipe.
The usual channel sizes are m for piles with a diameter of up to 108 mm (a 160 mm channel is used for them).
Welded joints are additionally secured with bolted joints using gussets.
Welding must be carried out by a professional qualified specialist who has permission to work with critical structures . Waterproofing of the trim is carried out using traditional coating materials or protective polymer coatings.
Technology and methods of tying piles with profile pipes
Piles are tied using profile pipes, a channel or an I-beam. The most common technology and the least expensive in terms of investment is tying pipes to piles. With strict adherence to the work technology and proper placement of profile pipes of the appropriate diameter, the strength of the foundation increases several times.
Tying a pile with a profile pipe can be done in two ways:
- pipes with a cross section of 60x30 mm are installed between the piles in parallel in two rows;
- jibs - pipes are mounted diagonally, crosswise between the piles.
The resulting foundation is significantly strengthened and is able to withstand external loads (elevation differences, soil mobility, changes in the weight of the building), since the pile-screw structure turns into a single whole.
Tying the piles with a pipe with a section of 40 by 20 mm
used not only to strengthen the foundation, but also to improve the design of the structure. Pipes welded between the piles serve as the basis for arranging a beautiful base, designed in the same style as the exterior of the house. Decorative panels and other finishing materials are mounted on pipe logs.
In order to prevent the house on screw piles from swaying during operation, if you are planning to repair or reconstruct a building on a pile-screw foundation, contact the specialists of our company! The craftsmen will make competent calculations at the design stage, install piles in accordance with the technology, and, if necessary, strengthen the foundation of the finished house.
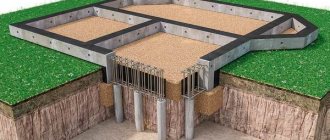
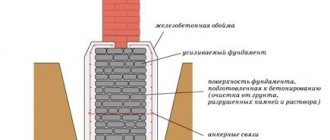
Using reinforced concrete
The creation of reinforced concrete piping is carried out in stages.
Procedure:
- Formwork assembly. Horizontal panels (bottom) are laid on the surface of the heads, the side walls are attached to them and are firmly connected at the top by crossbars . The internal dimensions must correspond to the parameters of the grillage.
- Laying waterproofing. The bottom and inner walls of the formwork are tightly covered with a film or layer of roofing felt. The joints of the material are overlapped by 10 cm and the joint is sealed with tape . The canvas must completely cover the entire surface of the bottom and walls of the formwork and fit tightly to the surface, keeping pace with it.
- Assembly of the reinforcing belt. Reinforcement with a diameter of 10 mm and smooth rods of 6 mm for vertical elements are used. The arm belt is knitted using soft wire, after which it is installed inside the formwork in the desired position . It is necessary to ensure that the horizontal rods are buried 2-5 cm inside the concrete.
- Pouring concrete. It is performed in one step, without long breaks (more than a day). Concrete should be poured from several points so as not to wait for the material to spread throughout the formwork . After pouring, the surface is covered with polyethylene or burlap and left for 28 days to gain structural strength.
- The formwork is removed 10 days after pouring.
- After the end of the exposure time, waterproof the surface and proceed to further work..
NOTE!
To pour concrete lining, it is necessary to use dense grades of concrete from M200 and higher.
Frame house on screw piles
A popular type of support is screw piles for a frame house. Unlike driven ones, they are easier to install and are suitable for any type of soil. The working section of the pile is made in the form of a screw, and its tip has a pointed shape.
Screw piles for a frame house.
These foundation solutions are vaguely reminiscent of ice drills for winter fishing. Screw piles for a frame house vary in length (and therefore in maximum immersion depth) and diameter. The pitch between the helical blades also varies. In the upper part of the support there is a platform for attaching to the elements of the grillage - the cap.
Advantages of screw piles
- Fast installation of foundations on screw piles.
- The possibility of reusing the supports of a frame house, therefore screw products are suitable for the construction of temporary or seasonal buildings.
- The foundation is convenient to install at any time of the year and in any climate zone.
- The ability to retrofit the foundation with additional screw piles if it becomes necessary to build a frame extension to the house.
On a note
The advantages of screw piles result in the low cost of foundation work, approximately 1.5 times that of erecting classic strip load-bearing structures.
Disadvantages of screw piles
In addition, a frame house on screw piles has a number of disadvantages in terms of foundation design.
- Long and difficult installation in areas with rocky soil.
- The need for additional arrangement of the building's base due to the height of the supports above the ground level.
- Mandatory anti-corrosion treatment before immersion in the ground.
- Some piles may burst near the weld.
The foundation is made of screw supports. However, the strengths outweigh the disadvantages of screw piles due to the fact that the construction of frame houses does not require preliminary preparation of wells for supports - the design of the piles allows them to maintain a strict vertical position even under maximum load.
Using a board
Tying with a 50x200 board is done when high-quality timber is unavailable.
The technology is somewhat more labor-intensive, since each beam has to be assembled separately, but there are also advantages:
- No warping or screw turning.
- Possibility of more precise corner joints.
- Each board can be pre-treated with an antiseptic and fire retardant, which can significantly increase the resistance of the beams to biological manifestations or fire.
The work consists of making a kind of prefabricated timber from a pack of boards.
The boards are cut to length, trimmed in the right places for corner joints and collected in a tight package.
For fixation, pins are used, which are passed through through holes and pulled tightly together .
The formed beams are assembled using a technology similar to the method of installing timber frames.
The beams must be positioned so that the boards are installed on edge and not horizontally.
Installation of foundations using screw type piles
The work involves several stages:
- In the first step, builders must calculate the load that the house will exert on the foundation. Natural loads are also taken into account.
- The house is designed based on geological data. These include: soil properties, soil freezing level, groundwater level. In the process of studying the topography of the surrounding area, markings of the future foundation are made.
- According to the markings, special holes are dug into which the piles will later be screwed.
- The piles are mounted at the corners of the foundation . They are also installed in places where external and internal walls connect.
- Then they begin screwing in the piles. The heads are fixed with special fastening devices. Screwing is performed using steel rods. The pile must be screwed below the soil freezing mark. In this case, it is undesirable to cross the hard soil layer.
- After screwing in, the heads are cut off with a grinder. This is necessary for subsequent filling of the internal space with concrete. After pouring, the concrete mixture is thoroughly compacted and left to dry. This procedure serves as additional protection against corrosion and prevents water from entering the cavity .
- Having filled the piles with concrete, weld the heads into place and cover them with an anti-corrosion mixture. It is also advisable to paint the piles or treat them with a waterproof solution.
- The next stage involves preparing the timber. Well-dried wood is coated with antiseptic solutions and dried.
- Next comes the time for grillage - attaching steel or wooden beams to the bases of the piles. Roofing material is covered in two layers in the space between the rods and the beam.
Useful: Slab foundation for a frame house