Here you will learn:
- Types of screeds for warm water floors
- Screed thickness
- Sequence of installation of concrete screed
- Semi-dry screed on a warm water floor
- Screed care rules
- What floor coverings require a screed?
- How to prepare for a heated floor in a wooden house
- Warm water floor without screed
To figure out how to make a screed for a heated floor, let’s define its tasks more precisely. First of all, remember that ties are fundamentally divided into tied and floating. The floating screed is not connected either to the base of the floor or to the walls of the room. If, relatively speaking, you look at a floating screed, then it is a separate, often concrete slab in the room that performs its tasks.
It is worth noting that a floating screed is the priority type of screed in the construction of a concrete heated floor.
The tasks of a floating heated floor screed include:
- Holding pipes or underfloor heating cables;
- Be a heat exchanger between the floor heating system and the room, ensuring uniform heating of the floor surface;
- Take on the power load of operating the premises.
It is to solve these problems that specific requirements for installing heated floor screed are aimed.
Types of screeds for warm water floors
To create a base for the floor covering, heating pipes are filled with cement mortar - screed. The latter happens:
- dry;
- semi-dry;
- wet.
Water heated floor.
A wet screed is filled with cement mortar with the addition of sand. This is the simplest and easiest way to close heating pipes, which does not require specific skills from the performer or special equipment. The solution can be mixed in a large container with a hammer drill, without resorting to a concrete mixer.
If you have financial wealth, you can buy not the components of the mixture, but a ready-to-use dry mortar, where the proportion between additives, sand and cement has already been observed - just pour water and stir. Another advantage of such a screed is that it is the thinnest and, therefore, steals less volume from the room.
The composition of the solid components of a semi-dry screed is similar to a wet screed (cement, quarry sand, fiber and plasticizer). The difference is in the amount of water - only 1/3 of the volume of the mixture.
Laying a semi-dry screed yourself is quite difficult. A concrete mixer is required (it is difficult, if not impossible, to mix it manually) and a vibrating plate. Problems with equipment can be solved by renting, but without experience working with a vibrator, you can ruin the work done.
The mixture will have to be purchased ready-made - it is difficult to guess the amount of plasticizer.
Conclusion: it is better to refuse semi-dry floor screed if you plan to do the work yourself.
Dry screed is made from bulk materials (expanded clay). After leveling the backfill, sheets of plywood, gypsum fiber boards or chipboard are laid on it to finish the floor. All materials are affordable. They can be found at any large hardware store. Simple technology allows you to do the work yourself.
This method of screeding has two significant disadvantages:
- A thick layer of screed reaches 8-12 cm. Therefore, in rooms with low ceilings, it is not recommended to fill the heating with expanded clay;
- Poor heat conduction from pipes to floor.
Difference in material of manufacture
Various mixtures and materials can be used to make screeds. You can prepare the solution yourself, buy a dry mixture and mix it using the manufacturer’s recommendations, or order ready-made material, which will be delivered at a specified time.
The most commonly used options are:
- concrete - it can be ordered or made;
- a solution of sand, cement and additional additives to improve the properties of the future coating;
- ready-mixed cement with mineral fillers such as Ceresit CN 85 and others.
When choosing ready-made materials for screeds, you should carefully ensure that they are intended for heated floors and strictly follow the manufacturers' recommendations.
Particular attention should be paid to the thickness of the coating being installed - as a rule, this figure should not exceed 10 mm. This mixture dries quickly, but it cannot be used in damp areas or outside the building.
For installing a screed over floor heating in a bathroom, concrete or a sand-cement composition made in appropriate proportions is more suitable. Moreover, its recipe can be improved by creating a more plastic mixture, which is most suitable for arranging a floating screed.
To do this, you will need to buy a special liquid - a plasticizer for concrete. This substance is added in the proportions specified by the manufacturer on the label. It allows you to obtain a plastic solution that is resistant to damage after drying.
You will also need polypropylene fiber - this is a filler used to reinforce the mixture. With its help, it is possible to create a composition that is as resistant to cracking as possible.
To prepare the solution, it is better to take cement grade M300 or M400. In a pinch, the M200 will do, but no less. Sand should be chosen clean, not containing large fractions
It is important to remember that any mixture other than dry must be used immediately. Its storage is unacceptable - the hardening process will begin. And this can happen within 2-4 hours, unless otherwise specified in the manufacturer’s recommendations.
Screed thickness
According to SNiP standards, the coating layer above the tubes must be at least 20 mm. This is true if a cement-sand mixture or screed mortar composition with similar characteristics is used. For cement-based self-leveling floors, it is recommended to increase the covering layer by 5-10 mm to compensate for shrinkage.
Since the standard diameter of the tubes is 20-25 mm, it becomes clear what the minimum thickness of the screed for a warm water floor is. This is 45 mm without taking into account hydro, thermal insulation, as well as the substrate for laying the system. This figure corresponds to the recommended thickness for cement-sand mixtures and mixtures with similar characteristics, so screeding a warm water floor can be done independently using standard methods.
In practice, when calculating repair work, it is assumed that when installing a heating system, the horizon of the floor covering will rise by 70-100 mm. This thickness indicator includes:
- waterproofing;
- insulation layer;
- thermal insulator necessary in the heating structure;
- substrate for convenient laying of the contour route;
- the main floor screed with the system pipes located in it.
If the base for laying the entire floor structure (for example, a concrete slab) is level, a total covering thickness of 70 mm is optimal. Laying a water heated floor using cement group compounds will allow you not to exceed the weight of the coating recommended for most buildings.
In houses where the quality of the foundation is not optimal, it may be necessary to rough level the surface. To do this, pour the lower rough layer separately. At the same time, the total thickness of the floor covering increases, as does its mass. Houses with reinforced concrete floors rarely have weight problems. However, when making a screed over a water-heated floor, it is recommended to use lightweight technologies or self-leveling self-leveling compounds.
Is it necessary to reinforce the screed?
The technology for installing heated floors involves the use of a reinforcing layer. Laying the mesh allows you to increase the strength of the concrete slab several times.
Leveling screed from ready-made compounds, according to the manufacturer’s instructions, can be poured without reinforcement. However, practice shows that the use of mesh is necessary, since the fittings help facilitate the installation of the pipeline. The water circuit is fixed directly to the mesh using clamps.
You can increase the strength of concrete by adding fiberglass screed filler. The reinforcing fiber is mixed during the preparation of the solution. Fiber fiber allows you to do without the use of reinforcing mesh.
When using traditional mortar compositions in large rooms, double reinforcement of the screed is allowed. The reinforcement is laid in such a way that there is 3-4 cm between the grids. This is especially important if the maximum thickness of the screed is used over a water-heated floor. To make the structure lighter, a special polystyrene system can be laid.
Since the screed layer must be at least 5 cm in order to ensure tensile strength for the drying mortar, it is imperative to use a reinforcing mesh.
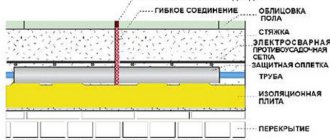
Sequence of installation of concrete screed
The main task of all types of screeds is reliable protection of the water heating system. The general algorithm for forming the basis includes the following steps:
- Preparatory activities.
- Performing filling.
- Cleaning work.
Important points to pay attention to:
- ensuring increased wear resistance of the base, which should not crack under load;
- uniformity of the formed mass, which is achieved by pouring the working mixture in one step;
- creation of a protective layer 30–50 mm high, which reliably protects heating lines;
- the quality of the formed surface, allowing for quick installation of the finishing coating.
As an example, consider the algorithm for pouring a concrete mixture.
Determination of height difference
You can determine the curvature of the floor using a regular level, or use a water or laser level for this.
To determine the height difference using a rack level, the procedure will be as follows:
- All debris and anything that will interfere with the work is removed from the floor;
- mark the height of the base level on the walls along the entire perimeter, this line should be parallel to the floor;
- determine the highest floor height from the base level;
- now we draw a new line, which should pass exactly 1 m above the highest line;
- All that remains is to draw a line for the future finished floor, which is marked from the previous one at a distance of 100 cm minus the height of the screed.
It is much easier to carry out this entire process using a laser level, but you need to know how to work with it and it must be configured correctly. It is convenient to work with self-adjusting devices; in this case, the order of work will be as follows:
- all garbage is removed;
- the device is installed at the highest point;
- the laser beam is directed at the wall, and lines are marked on all walls;
- the height of this line does not matter much, since from it you can move to the desired height using a tape measure;
- after determining the highest point, fix the painting cord there and pull it to the opposite and adjacent walls;
- if there are no bumps, then this point can be taken as the starting point;
- We measure the height of the screed, mark its level and proceed to installing the beacons.
When working with a laser level, you must wear glasses (usually they come with the device), since its beam is dangerous for your eyesight.
Installation of beacons
After marking the zero level, beacons are installed, usually metal profiles are used for this. The beacons are fixed to the solution and set to the required level. You can use alabaster for fixation, as it hardens quickly, and you can immediately begin pouring the solution.
The distance between beacons will depend on the size of the rule, usually within 1 meter. The beacons must be securely fixed so that they do not sag during the process of pouring the solution.
While pouring the solution, it is necessary to protect door jambs and other wooden elements from contact with it; to do this, they can be sealed with tape.
If there are drain holes, then they are closed with plugs so that the solution does not get inside; if necessary, hide them in a cable tie; they must be fixed in a semi-movable state.
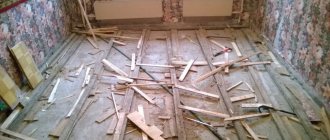
Preparatory stage
The performance properties and service life of the base depend on high-quality preparation. List of preparatory activities:
- Power outage.
The main difference between screeding a heated water floor system and a simple screed is that in this case expansion joints are created
- Dismantling of plumbing equipment.
- Clearing the room of furniture.
- Removing old coating.
- Clearing the premises of debris.
- Sealing cracks.
- Foundation layout.
- Impregnation of the base with sealant to increase adhesion.
- Laying and fixing water system pipes.
- Marking the height of the poured layer on the walls.
- Strengthening the base with reinforcing mesh.
- Mixing ingredients to prepare a concrete mixture.
After completing the preparatory activities, start pouring.
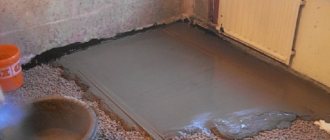
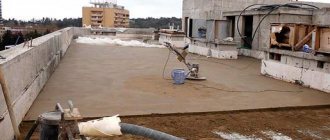
Pouring over a heated water floor
Sequence of concreting operation:
- Secure the beacons at intervals of 140–160 cm.
- Check the tightness of the pipes by applying operating pressure.
- Pour the concrete mixture, distributing it between the guides.
- Compact the concrete and level the surface.
When performing work, maintain constant pressure in the heating pipes. Concreting should be done carefully so as not to compromise the tightness of the highways.
Final stage
The correct execution of operations at the final stage of work affects the performance properties of concrete. It is important to create favorable conditions for the hydration of cement in the concrete solution.
To do this you should:
- protect the surface of the concrete mass from moisture evaporation by covering it with plastic film;
- regularly moisten the concrete surface to prevent cracking when drying;
- ensure the immobility of concrete, and also prevent drafts for normal hardening.
The concrete base can be used a month after pouring. The finishing coating is laid on a dry and leveled surface.
Functions of a floor screed
Underfloor heating screed makes it possible to simultaneously level, if necessary, subfloors and create a protective coating for heating elements.
Concrete transfers heat well from the heating element
In addition, concrete serves as a mediator of heat transfer from the heating structure to the internal volume of the room.
Concreting of floor heating systems should be done if an electric cable or metal pipes are used as a heating element.
When installing infrared heating systems, floor screed is allowed only as a leveling base.
Leveling the base
It often happens that interfloor ceilings or subfloors have some slopes in the horizontal plane. The reasons for this can be very different - from the negligence of builders to the subsidence of the foundation of the house.
A concrete screed for a heated floor is necessary if the base has a vertical difference of more than 1 cm per 1 meter of length. A leveling screed is especially relevant for a warm water floor, since a difference in height can negatively affect the circulation of coolant through the pipes of the system.
For electric heated floors, a level base, although not so critical, is still desirable. Otherwise, when pouring the top layer located directly under the finishing, the depth of the heating elements may be different, and this will not have the best effect on the uniform heating of the room.
Heating element protection
Concrete protects the heating circuit from mechanical damage
The concrete layer poured over the heating elements performs a protective function for them. Particularly vulnerable places in this case are the insulating braid of electrical cables and plastic pipes through which the coolant circulates.
Under the weight of furniture, household appliances and people moving around the room, the insulation of the wires gradually wears out, and the cables themselves can be broken by an accidental blow through a soft floor covering (linoleum, carpet).
Polymer pipes of water heating systems are even more susceptible to external influences.
Under external pressure, the pipe can be easily pinched, which will create problems for the circulation of the coolant, and, consequently, for heating the room. Concrete for heated floors in this case is a kind of protective armor.
Related article: Toilet brush
Heat transfer function
Concrete screed for heated floors also plays the role of a “mediator”, a conductor of heat from the heating elements to the entire volume of the room.
Electrical wiring or pipes embedded in a concrete screed work much more efficiently for heating than if they were located under a plank or polymer flooring.
This is due to the high thermal conductivity of concrete, which far exceeds that of all other flooring materials.
For this reason, it is not recommended to lay heat-insulating materials on top of concrete floors: insulated linoleum, carpeting, laminate underlay, etc. This can minimize the efficiency of underfloor heating systems. The best option for finishing coating over a concrete layer is tiles, porcelain stoneware, clinker.
That is, such materials whose heat transfer coefficient is comparable to that of concrete.
Semi-dry screed on a warm water floor
A feature of semi-dry screed is the reduced water content in the composition, which promotes rapid hardening and increased strength properties.
The process of pouring screed for a water heated floor system begins with preliminary work, the essence of which is to clean the surface
The mixture, intended for the accelerated formation of a semi-dry base, includes the following components:
- cement marked M400;
- coarse sand, free of impurities;
- fiber filler.
Fiber fiber reinforces the mass and is added at the rate of 0.6–0.8 kg per 1 cubic meter of composition. Operational strength is also ensured thanks to the correctly selected proportion of Portland cement and sand mixed in a ratio of 1:3. Saturation of the mixture with water is carried out gradually until a moist and, at the same time, crumbly consistency of the composition is obtained.
To check that the components have been introduced correctly, squeeze the solution in your fist. If the massif does not crumble and there is no moisture, the proportion is met.
Screed for heated floors based on a semi-dry composition has a number of advantages:
- reduced curing time compared to concrete;
- increased strength characteristics;
- slight shrinkage during strength gain;
- absence of cracks in the massif;
- resistance to temperature changes.
Main disadvantages:
- the need to apply significant effort when mixing components;
- increased hygroscopicity of the semi-dry composition;
- the formation of voids after compaction, caused by problematic compaction.
Semi-dry technology has proven itself positively when performing screeds.
The required volume of screed is calculated in advance
Laying semi-dry screed
Now there are dry mixtures for screed, which are used with the addition of a small amount of water. “Semi-dry” screed has better properties than conventional cement screed.
The advantages of screed made from ready-mixes include:
- porous screed structure with high heat and sound insulation properties;
- no shrinkage, no peeling or cracks form when drying,
- greater strength;
- less drying time.
Screed with semi-dry mixture
“Semi-dry” screeds with modifiers and a reinforcing layer are used.
The base is prepared as follows.
- The base is cleared of debris and loose fragments. Dust is removed with special care using a vacuum cleaner.
- The cracks are sealed with cement mortar.
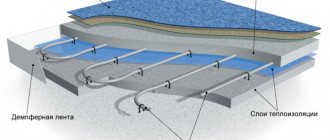
- A layer of waterproofing (thick polyethylene film) is laid on the floor, which will protect the screed from moisture. In addition, waterproofing improves sound insulation and thermal insulation properties.
- The bottom of the walls is covered with damping film. The edges of the waterproofing should extend 15 cm onto the walls.
- The height difference is measured.
- The solution is prepared and laid according to the instructions.
Mixture for semi-dry screed with polypropylene fiber
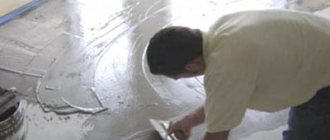
It is not difficult to prepare a solution from a dry mixture. The manufacturer encloses with its products precise instructions explaining how to prepare a solution for “semi-dry screed”. The degree of readiness is checked as follows: take a handful in your hand and squeeze tightly; if water seeps out, it means there is excess moisture in the solution. A properly prepared mixture, after compression, turns into a dense lump.
Semi-dry screed with fiber fibre. Laying process
Before laying the “semi-dry” screed, the floor is divided into zones. The semi-dry solution is placed in parts in these zones and is equal to the rule. The thickness of the screed made from semi-dry mortar should not exceed 40 mm. After the mortar is laid, the screed is allowed to dry for 20 minutes and they begin to grout and sand it using a trowel. This technique not only makes the surface of the screed even, but also compacts the mixture. The coating is of high quality and durable.
Selection of filling material
When choosing a material for filling, there are two options:
- Use a ready-made dry mixture for screeding heated floors, sold in construction stores.
- Prepare the concrete mixture for the heated floor yourself.
Both of these options are equally popular today, and, like any other construction technology, they have their pros and cons.
Ready mixes
The modern market for finishing materials offers a wide range of various ready-made concrete mixtures, including those specially designed for pouring cement screed.
The advantage of this option is the ready-to-use composition, the proportions of which have already been precisely calculated.
As a rule, the solution already contains coarse sand, Portland cement and various additives that improve the quality of concrete. To prepare concrete, you just need to add water to the dry mixture in the amount specified in the instructions for use.
When describing ready-made dry compositions, I would especially like to mention such a high-tech material as self-leveling floors. These mixtures contain a large number of special polymer additives-plasticizers, which give the finished solution the property of increased fluidity.
Ready-made mixtures are usually more expensive
When pouring the base, this mixture self-levels, spreading over the entire floor area. Typically self-leveling floors are used to create a perfectly flat surface and are poured in a small layer of 0.5 - 1 cm.
Among the disadvantages of this option is the higher cost of concrete prepared from ready-mixes compared to self-prepared concrete.
Self-mixed concrete
Preparing a concrete mixture for heated floors with your own hands is a budget alternative to ready-made dry mixtures. Pouring a heated floor under a concrete screed in this case can cost you several times less than when using factory-made dry compounds. For more information on how to make a heated floor screed, watch this video:
The financial benefit will be especially noticeable with large volumes of pouring, and also if you have the opportunity to get free concrete fillers - sand and crushed stone.
The last factor is decisive in choosing one option or another: if it is quite easy for residents of rural areas or small towns to get fillers, then in large cities it will be very difficult to purchase 300 - 400 kg of sand or crushed stone.
Firstly, delivery of such materials is usually carried out in much larger volumes; secondly, problems may arise with storing purchased sand or crushed stone in the local area.
Making your own cement mortar
For thin screeds, sand is suitable as a filler.
Related article: Luxurious do-it-yourself plywood pleasure boat
When making concrete for floor screed, special attention should be paid to the composition and ratio of its ingredients. If the thickness of the concreting layer does not exceed 4–5 cm, you can get by using coarse sand of 3–5 mm, the so-called sand concrete, as a filler for concrete.
With a thicker concreting layer, you will have to add crushed stone to the solution. It serves as an additional connecting link that increases the strength of concrete. In addition, additional plasticizer additives can be used as an additional component.
With a large layer of fill, in order to avoid excessive pressure on supporting structures and ceilings, it is recommended to add porous fillers to the solution - perlite or expanded clay, which reduce its density.
To better connect the components together, you can use micro-reinforcing fibers, which reduce the likelihood of the screed cracking when it dries.
To obtain the highest quality cement mortar, it is necessary to strictly adhere to the proportions of components recommended by building regulations.
The approximate ratio of components in the manufacture of various types of cement mortars is given in the table presented.
Screed care rules
Due to improper care, defects often form on the screed soon after pouring. During the first decade, the screed must be watered 2-3 times a day. The cement solution can only reach its basic strength after a month, and water is used to slightly speed up its hardening. You can allow the screed to dry naturally only after the cement has become strong enough. After three days, you can remove the remaining beacons, and the recesses left from them can be rubbed with freshly diluted solution.
It will be possible to turn on the heating system no earlier than in a month: during this time the screed should be completely dry and the solution should completely harden. To prevent the screed from cracking, it is recommended to increase the temperature in the system gradually.
After turning on the system, you can begin laying the tiles directly. It is very important to wait until the concrete is completely dry before you begin laying tiles. On average, complete drying of the concrete screed can be achieved within a month after pouring. To attach tiles to a finished heated floor, it is enough to apply a special adhesive to it.
Do-it-yourself water floor in the bathroom, preparation for screeding
Screed installation work
For high-quality arrangement of concrete pouring, it is recommended to carry out all work in strict accordance with construction technologies. Let's take a step-by-step look at how to make a screed for a heated floor with your own hands.
Preparing the base
Old cracks can be repaired with putty or special compounds
The first stage of work consists of preparing the load-bearing base for pouring concrete. Preparation consists of the following work:
- puttying cracks;
- arrangement of waterproofing;
- reinforcement.
First of all, you should clean the base from the old coating right down to the floor slab. Then you need to examine the entire surface for cracks in the concrete pouring. Most often they are located at the junction of floor slabs, as well as along the walls.
To seal them, depending on the size of the gap, you should use either putty or plaster solutions.
Putty
After all cracks have been sealed, it will be necessary to waterproof the subfloors. Waterproofing the base is necessary, firstly, to protect your home from possible penetration of dampness from the basement or ground floor.
If you live in an apartment building, then the water-repellent layer will prevent flooding of neighbors below in the event of an accident in the water heating systems or water supply system.
Waterproofing
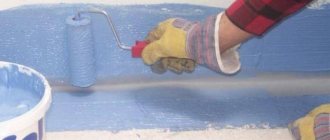
Waterproofing can be done using roll materials (roofing felt and its analogues) or coating materials (bitumen or polymer mastic). In the first case, the waterproofing is laid on the floor and attached to adhesive solutions made on a bitumen base.
For greater reliability, the moisture-proof material is laid in 2–3 layers, and the joints of the lower layers should not coincide with the joints of the upper ones.
Water-repellent mastics are applied to the concrete surface like paint - using brushes or paint rollers.
Related article: Technology of laying walls from expanded clay concrete blocks
What floor coverings require a screed?
For a heated floor system, use any floor coverings that have good thermal conductivity. The ideal option is porcelain stoneware or ceramic tiles, which have the highest heat transfer. In addition, this material has high performance characteristics, wear resistance and durability. With all these undeniable advantages, ceramic and porcelain tile flooring will be comfortable for feet only during the heating season. In summer the floor will be cold. It is not recommended to lay plastic tiles on the screed, as they will crack when heated.
Most often, in residential premises, laminate flooring is laid on the screed. Now many manufacturers, for example, Parador, Wineo, Tarkett, produce laminate categories designed specifically for heated floors.
Warm floor under laminate
Linoleum can be laid on a heated floor if it is made from natural raw materials. If the floor covering has a non-woven base, when heated, such linoleum will release carcinogens.
Natural coverings such as cork and parquet can be combined with water-based floors if these are certified products and the manufacturer allows the installation of these coverings on a heated floor screed.
Features of concrete mortars for screed
The installation of heated floors must be done correctly. The strength of floors depends on the quality of concrete preparation. To ensure normal warmth in the home, the temperature inside the screed should remain around 50 °C, and on the floor covering should drop to 30-35 °C.
Such frequent changes in temperature conditions lead to the destruction of the heated floor:
- microcracks begin to appear in the flooring system, the size of which gradually increases;
- air in cracks causes a decrease in the thermal conductivity of the floor and heating efficiency, since heat is lost through the cracks;
- an increase in cracks leads to distortion and deformation of the cement layer, as a result of which the heating elements begin to be damaged;
- the use of high-voltage wiring can lead to electric shock, and if a water pipeline is laid, then deformation of the pipes can cause flooding of the lower floors.
To prevent such undesirable consequences from a warm water floor, the concrete solution for screeding a heated floor must be prepared so that it differs:
- minimal porosity. The density of the structure increases thermal conductivity, resulting in improved heating efficiency;
- low tendency to form cracks in concrete. In addition to increasing heating efficiency, the absence of cracks eliminates deformation and damage to pipes;
- increased strength so that when residents move across the floor or install furniture, the concrete surface remains intact and does not crack.
We recommend: How to install a heated floor in a bathhouse?
Therefore, the solution for concrete screed must be prepared in the correct proportion of cement, water and sand.
It must be remembered that a short setting time of the solution leads to uneven hardening, since residual stresses arise while the concrete surface is wet in one part and dry in the other.
The result is a low-quality screed, which will not only reduce the efficiency of heating, but can lead to emergency consequences and unexpected material costs.
Warm water floor without screed
This type of heated floor is installed in rooms where delivery of concrete is difficult, irrational or impossible. This option is also advantageous in that during installation the so-called “step” is not formed, since the floor is raised to a fairly low height.
The metal, in this case, is used as a battery and also distributes the generated heat evenly over the entire surface of the field.
A layer of waterproofing is laid on the hose system. It will protect the system itself from external influences, and will also prevent damage to the final coating, which can be used for almost anything. From carpet to laminate.
There are several types of pipes that are used when laying heated floors. They can differ both in thickness and material. Metal tubes are the least popular. They are quite problematic not only to transport and install, but also to adjust to the size of the room.
Plastic tubes made of dense polyethylene or polypropylene are most often used. They are not as durable as metal ones, but they are highly mobile. In addition, heated floors based on polymer tubes are less susceptible to aggressive environments, which, for example, include hard chlorinated water. Moreover, a plastic tube can be filled with almost any liquid heat-conducting material, including refrigerant.
| Photo | Design and features of the material |
| Expanded polystyrene boards. The material of such a substrate is essentially a foam board with grooves for the cable. Such a slab performs several functions at once: noise insulation, frame and marking functions, and is also a heat insulator. If the layer of foam backing is too thin, then the surface underneath it is additionally insulated. | |
| Wooden backing. It is a reinforced tray with channels for tubes. Under them there are metal plates to redistribute heat. A layer of moisture insulation is also placed on top of this system. The finished heated floor is covered with flat wooden plates on which the final coating can be placed. |