↑ Advantages of concrete floor
It's no secret that concrete floors are the undisputed leaders in popularity. This is explained by the numerous advantages of such designs:
Concrete flooring has many advantages
- durability and reliability. You can rest assured that concrete floors will serve faithfully for many years;
- high physical strength. Concrete is a unique material that can withstand enormous loads;
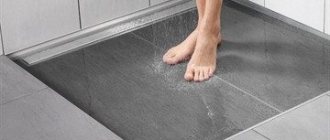
- Smooth surface. A smooth, perfectly level floor contains not only aesthetic qualities, but also provides endless possibilities for decoration;
- The concrete floor is not afraid of fire, moisture, chemical reagents, and is impervious to microorganisms.
How to lay wooden floors on a concrete base in a private house - laying technology
Laying a wooden floor on a concrete base is a fairly popular technology for arranging the foundation of private and apartment buildings today, which has certain advantages. This option is suitable in cases where it is impractical to remove the old screed, but you need to create a smooth and warm base for decorative finishing or there is a desire to make a wooden finishing layer.
You can install a wooden floor on a concrete base using different materials and technologies, which are chosen in accordance with operating conditions, the condition of the concrete screed, and personal preferences. Regardless of the technology, all work is performed relatively easily and can be carried out independently, taking into account the availability of knowledge and the necessary tools.
↑ Construction of a concrete floor
Installation of a concrete floor can be carried out in different ways. The most common method is to lay concrete on a soil base.
Laying a concrete floor on the ground
It is important! Laying a concrete floor on the ground is justified if the ground is dry, otherwise problems with waterproofing cannot be avoided.
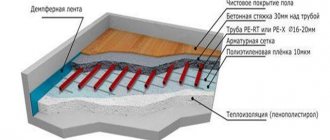
A reliable concrete floor consists of several layers; the layout options may vary slightly, but ideally it should look something like this:
- compacted soil base;
- river sand bedding;
- backfill made of crushed stone or expanded clay;
- waterproofing agent;
- rough concrete screed;
- vapor barrier;
- insulation;
- finishing reinforced screed;
- flooring.
The final stage of installation
After the final stage of laying the concrete floor, you should definitely try to cover each individual strip with a special film and then leave it to harden for about three or four weeks, while it is worth periodically moistening the entire surface of the concrete from time to time.
To complete all work performed, it is necessary to apply a certain layer of screed in an even layer to a high-quality and densely laid concrete floor base. This excellent process begins directly with the application of a certain special cement mortar, liquid in consistency, to the concrete, into which the necessary high-quality and durable special concrete binders are added immediately before laying. After everything is ready, it is worth installing small wooden slats directly on the cement surface itself, the height of which should correspond to the immediate height of the entire completed future floor.
The screed is laid in stages, as in the case of concrete. After directly laying a high-quality and reliable screed, which will be slightly higher than a certain level of the laid slats, it must be carefully leveled, and then immediately remove the laid slats themselves. After completing all the work, the surface of the screed is very carefully and well smoothed with a special trowel. After the entire screed is completely ready, it should be left to dry overnight, and then periodically sprayed with water over the course of several days.
Before proceeding with further work, it is recommended to let the screed stand for exactly two weeks.
↑ Installation of concrete floor: stages
By and large, installing a concrete floor does not present any difficulties; the main thing is to adhere to the correct sequence of work.
↑ Preparing the base
1. Installation work begins with leveling using a laser or optical level. In the process, it is necessary to determine the relief, zero mark and surface level of the future concrete floor. Among other things, leveling makes it possible to correctly calculate the volume of excavation work. 2. The soil on which the concrete floor will be laid must be thoroughly compacted, which will avoid subsidence in the future, and therefore reduce the risk of cracks. Tamping is carried out using special tamping devices.
Compacting machine
3. A “cushion” of sand is laid on the soil base. To ensure the required density of the bedding, the sand is laid 25% thicker than necessary, then moistened and compacted again. Vibratory ramming machines or rollers are used for compaction. 4. A layer of expanded clay or gravel is poured on top of the sand.
↑ Waterproofing a concrete floor
After completing the sand-expanded clay or sand-gravel backfill, you can begin waterproofing measures that prevent the absorption of liquid by the base of the concrete screed floor and prevent capillary suction of moisture from the soil. Waterproofing is carried out using polymer membranes or rolled bitumen materials.
It is important! Thick polyethylene can be used as a waterproofing material.
Waterproofing materials must be laid out overlapping on the base, connecting the strips with construction tape.
Waterproofing strips are connected with tape
- make sure that there is no damage to the waterproofing layer;
- The waterproofing material should be laid on the walls to a height of 20 cm (after laying the finishing screed, the excess can be cut off);
- if for some reason it is not possible to carry out waterproofing at this stage, then it is carried out using the coating method when arranging the subfloor.
↑ Laying the subfloor
This layer, intended for technological needs, received its name because of the “lean concrete”. The subfloor is used as a basis for steam and waterproofing materials. The rough screed is made from concrete class B7.5-B10 and crushed stone of fraction 5-20. If a waterproofing bedding was used during compaction, then the use of concrete M50-M75 is allowed. The subfloor is laid simply and easily, because... the requirements for it are low. The thickness of the rough screed should be about 50 mm, the horizontal difference should be no more than 4 mm.
↑ Laying vapor barrier
The vapor barrier is laid on the finished subfloor. Polymer-bitumen membranes are optimal in this case. In addition, membranes made of polyester or fiberglass are practical and inexpensive. Polyvinyl chloride membranes are a little more expensive, but the cost is more than offset by important advantages - PVC membranes are durable and not at all susceptible to rotting. You can, of course, make a vapor barrier from polyethylene, but monitoring its integrity under the insulation and screed is quite problematic.
↑ Floor insulation
Laying a layer of insulation will save up to 20% on heating the room. The following are most often used as insulation materials: 1. Polystyrene foam PSB35. To give the material additional strength, it is covered from below and above with polyethylene film, laid overlapping. 2. Extruded polystyrene foam is one of the best types of insulation for floors on the ground. Due to slight deformation during compression, this material can be used in rooms where the floor experiences significant loads. 3. Mineral wool with a density of at least 120 kg/m3. Due to the fact that mineral wool tends to accumulate moisture, it should be insulated with plastic film.
Insulation with mineral wool
↑ Laying the final screed
Screed is the final layer of a concrete floor on the ground, which performs important functions. For example, it is necessary for leveling, improving thermal absorption, and creating a slope on floors. The screed can be performed in several ways:
Monolithic screed
Horizontal guides—“beacons”—are installed. The first strip is placed along the wall, taking into account the minimum thickness. The rest are parallel to each other with a step convenient for subsequent leveling.
It is important! Place the profiles on plaster - this will make the work go twice as fast. Check the correct installation with a bubble level.
Let's get started with the main part of the work. You can choose a concrete screed, when the fillers are large crushed stone, stones, small pebbles, or the more popular variety - cement-sand. To do this, prepare a mixture of cement and pure quartz sand in a ratio of 1:4. The consistency should be doughy. If you mix the components in a concrete mixer, the solution will be much better than if mixed by hand.
It is important! The prepared solution should be used within 2 hours, when the technological qualities are maximum.
Concrete is leveled using the rule
Filling begins from the far end of the room. The solution is leveled by the rule between the rows of installed beacons. After filling and leveling the first strip, move on to the second and so on until the end. Complete hardening occurs within 30 days; this process cannot be forcibly accelerated.
Semi-dry screed
Western technology has taken root in our country just fine - semi-dry screed is becoming more and more relevant due to its numerous advantages. The addition of polypropylene fiber not only improves the quality of the coating several times, but also avoids deformations and cracks of the floor. Reinforced fiber added to a concrete mixer is distributed evenly throughout the mass, and when liquid is added, it forms a very strong mixture.
It is important! The use of fiberglass also reduces the curing time of the concrete floor.
The installation technology is similar to the method described above.
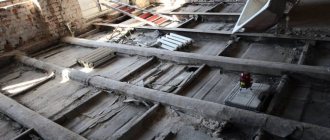
Materials for ceilings on beams
We choose wood for beams that is well-dried with even fibers and corresponds to the first quality category.
Pine is suitable for covering beams, but if there are mostly deciduous forests around, oak or beech may be more economical. Poplar, ash, maple, acacia and fruit trees are unsuitable.
The tree must not have:
- multiple or large (on the order of several millimeters) longitudinal cracks;
- the slightest transverse cracks;
- fallen knots;
- damage by fungus or mold;
- attack by wood-boring insects
Knots, cracks and twisted fibers are visible to the naked eye. Gray or bluish-gray spots will indicate damage by fungus or mold.
Insects will be identified by tiny round holes and fancy grooves visible on the cut or surface of the material.
Such a tree cannot be used. Tiny “saboteurs” are capable of turning a beam into dust in a matter of months. It is worth considering that the most insignificant part with insects can “infect” the entire structure.
Recommend: Beam or slab
At the same time, treating with pesticides when insects are infested does not always give a reliable effect.
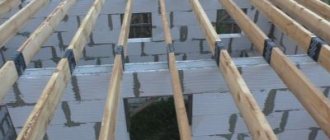
Insulation from other materials will be required. One of the best is mineral wool. And since when moistened it noticeably reduces the heat-protective properties, vapor and waterproofing will be required.
Expanded clay crushed stone is worse as insulation, but good for sound insulation. It is not afraid of moisture, and its weight is noticeably heavier than mineral wool.
Floor structure in a wooden house
Despite the existence of various materials for creating metal, reinforced concrete or wooden floors, experts prefer the latter option. In this case, beams from coniferous and deciduous trees are used as raw materials for the beam floor. At the same time, the ceiling of one level is at the same time the floor of another (the ceiling of the second floor), which significantly reduces the cost of materials and the complexity of the work. There are several types of roofing for a wooden house:
- Attics are the floors that bear the least load. It is necessary to ensure good waterproofing and insulation of this layer for the comfortable functioning of the lower floors of the building.
- Interfloor and attic, as the name implies, are designed to separate the tiers of the house, including the attic floor. When calculating loads, you should take into account all the details, such as heavy household appliances, massive furniture, sports equipment, belongings and the weight of people living in the house.
- Basement rooms - they share a cold basement room with a warm first floor. Their main task is to create an effective thermal insulation layer.
- Basement - created in order to separate the space between the basement and the first floor.
In addition, depending on the design features, floors are divided into beam and beamless. In the first case, they are based on beams and the filling material between them, and in the second, they are monolithic slabs or panels.
Wooden floors
Floors of this type have long been popular in private construction. This is an affordable, environmentally friendly material that is lightweight and has a pleasant appearance. The load-bearing element in such a floor is beams in the form of logs or beams. They must meet all the necessary characteristics, including deflection indicators (it is better to have a reserve).
Also, the reliability and characteristics of the finished floor depend on its type. For example, they can be made of solid wood, have a composite section, or even be a two-level structure.
Since the beams bear the main load, it is important to take into account their cross-section. It is selected based on the distances between load-bearing walls. The structure can contain either just beams or logs, on which boards are subsequently laid. If you decide to install only beams, then this design will be less expensive, but will not provide protection from impact noise. That is, any movement of people on the floors can be clearly heard. If logs are first laid on the beams, then soundproofing material is installed between them. Therefore there will be no noise.
The ceiling itself is made of the so-called roll. It is a wooden flooring made of panels or boards, which is placed between the beams. Ceiling decoration can be very diverse. Some people do the usual plastering, but a more progressive solution would be to cover its surface with plasterboard slabs.
Pros and cons of wooden floors
If we talk about the advantages of this type of construction, it is worth highlighting that they:
- They are distinguished by the low cost of both the material itself and delivery and installation work.
- Excellent for lightweight substrates.
- Used in “difficult” soil conditions.
- Can be installed manually, without specialized equipment or builders.
- Easy and quick to install.
- Environmentally friendly. The wood does not contain any aggressive drugs, there is no reinforcement.
Healthy! When purchasing material, you need to carefully inspect all beams. There should be no cracks or signs of parasite infestation.
On the other hand, such designs have a lot of disadvantages. For example,:
- The tree can be chewed by rodents or insects. It is susceptible to mold and mildew.
- Treatment with special preservative compounds is required. Otherwise, the wood will rot. Periodically it is necessary to impregnate the wood with antiseptics. However, even if you perform high-quality wood processing, you will not receive 100% protection from rot. Also, to prevent the process of rotting, you will need to organize a high-quality ventilation system.
- The beams will have to be sheathed on both sides, and the space between them must be filled with insulation and sound insulation.
- Laying wooden elements requires a lot of effort and time.
- The service life of such structures is much shorter than that of concrete ones. In addition, over time, the wood will begin to sag a little, and creaking may appear.
- Wooden floors are not recommended for use in the construction of multi-storey buildings, as well as if the building is located in a seismic zone, where the indicators reach up to 7 points.
- Since wood is easily flammable, the beams will also have to be treated with fire retardants. Or you can use special fire-retardant varnishes or paints.
- If the span is quite large (more than 6 meters), then in this case the structure will require reinforcement, and therefore additional materials. It will be necessary to buy beams with a large cross section. This means that the thickness of the entire overlap will be increased.
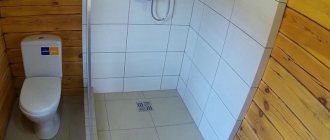
- Such products cannot be used in damp areas. This means that reinforced concrete structures must be used for showers, toilets, laundry rooms and bathrooms.
- In those places where the ceilings are adjacent to the chimney, you will have to make thermal insulation joints.
Therefore, if finances allow, and especially if we are talking about building several floors, then it is worth considering the option of reinforced concrete structures.