As for the "Stalin" rifles...
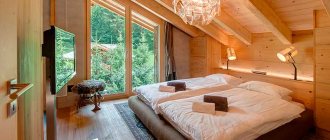
Stalinka buildings are quite old houses that were actively erected during the USSR period until approximately the beginning of the 60s. The apartments have very high ceilings, spacious rooms, and large windows. And there is another interesting feature - wooden floors. And this aspect greatly complicates the possibility of repairing the floor. While the floor covering itself is easy to replace, problems may arise with the floors. By the way, at one time some Stalin buildings were restored, and therefore they may have reinforced concrete floors. But there are still those in which they can be made of wood. If we talk specifically about Stalinist buildings, then before imagining all the horrors of replacing wooden floors, it’s worth finding the house’s passport and seeing if it states that the floors have not been changed. Much depends on the year of construction - houses from the 30s may have wooden floors, and houses from the 50s may have reinforced concrete.
Wooden floors
It is also important to understand that not all ceilings could fail even after so many years of operation. Much depends on how the house was built
It is important to take into account that when repairing a floor in a Stalin building with wooden floors, you cannot make a heavy new foundation. It should be as strong as possible, but light so as not to create unnecessary stress.
Repairing a wooden floor - photo
Features of floor repair
Major floor repairs are not an easy task, but it is quite doable if you have the time, desire and some skills. If there is no “fighting spirit”, then it is better to immediately look for a team of good craftsmen who can be entrusted with this task, and it is better to refuse to carry out the work yourself. Floor repair will involve the following work:
- thorough inspection of the base;
- identifying problem areas;
- dismantling the finishing coating;
- inspection of logs;
- removal of old insulation, if any;
- complete or partial dismantling of logs;
- complete cleaning of the surface of the floors and their inspection, assessment of their condition;
- installation of a new lag system or installation of a dry light screed;
- installation of finished floor covering.
Replacing the floor in a Stalin building
It is important to remember that, in addition to materials for the floor construction, you will also need to purchase waterproofing material and insulation, especially if the apartment is on the ground floor. If the logs will not be completely removed, then it is important to evaluate the distance between them - in old houses it can be very large, and then it is recommended to make intermediate logs between the main ones
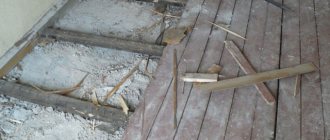
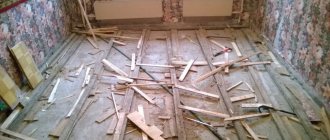
To carry out a major overhaul of floors, dismantling must be carried out completely, that is, not only remove decorative coverings such as linoleum or parquet, but also remove old floorboards and, in many cases, even logs. The dismantling procedure is quite difficult and difficult; you have to make a lot of effort to dismantle the old floors. You will need to remove a lot of debris that is generated during the dismantling process, and you also need to be prepared for this.
Parquet dismantling
Repairing a wooden floor - tips
https://www.youtube.com/watch?v=oAKHSzgwPXQ
Wooden floors are most damaged by high or variable humidity. Microorganisms cause wood to rot. With a cyclic increase and decrease in the size of wooden elements, the fastenings become loosened, creaking and cracks appear.
Reasons why wooden floors are repaired:
- creaking floorboards and the presence of cracks between them;
- the need for insulation;
- uneven wooden floors;
- increased vibration or subsidence of the wooden floor;
- the smell of rot, failure of the joist system and floorboards due to rotting, destruction of wood;
- updating the paintwork.
And others. Let's consider in order how you can repair a wooden floor in case of various damages.
Characteristics and requirements for house floor insulation
Before starting work on floor insulation, it is necessary to study the characteristics of the material in order to subsequently select high-quality insulation:
Environmentally friendly components. During operation, the insulation should not emit toxic, harmful, noxious substances that can harm not only the environment, but mainly human health.
The service life, which for internal insulation can be from 20 years, and for higher quality ones from 50 years.
Thermal conductivity. The indicator for this criterion should be low.
Vapor permeability shows the ability of the insulation to remove vapors outside and not trap them inside.
This is important so that the material lasts a long time.
Sound insulation is a criterion that is not paramount for insulation, in particular for floor insulation. Typically, this indicator is important for walls.
Moisture resistance determines the ability of floor insulation not to retain moisture, which can greatly affect the properties
Condensation can greatly compromise the integrity of this building material.
Fire resistance and fire safety show how susceptible the insulation is to fire and how long the combustion can last.
Resistance to maintaining original shape. This indicator indicates how much the material is not subject to deformation under various circumstances and over time.
The flammability of floor insulation is of particular importance, as it directly indicates safety. There are certain classes, depending on which you should choose a building material to preserve heat in the house:
- Non-combustible insulation materials, which are designated NG.
- Low-flammable with the symbol G1 - flue gas temperature ˂135 degrees Celsius. Burn duration is 0.
- Moderately flammable or G2 - flue gas temperature ˂ 235 degrees Celsius. Burning duration ˂ 30 s.
- Normally flammable or G3 - flue gas temperature ˂ 450 degrees Celsius. Burning duration ˂ 300 s.
- Highly flammable or G4 - flue gas temperature ˃ 450 degrees Celsius. Burning duration ˃ 300 s.
Floor insulation should be used in the following situations:
- There is an unheated underground floor.
- The floor has direct contact with the ground.
- Location of residential premises on the first floors of multi-storey or private houses, dachas, etc.
- In other cases, when the floor is quite cold at any time of the year.
Preparatory work
Regardless of whether a structure is being erected on a foundation, earth, screw piles, or simply on brick pillars, the arrangement of the floor begins with preparatory work.
First, prepare the walls by installing ventilation holes in them. Lack of air access to the underground will lead to rapid destruction of the wooden components of the structure.
The materials necessary for arranging the ceiling must be correctly calculated. A wood supply of 10-15 percent would also be useful.
Installation can begin when the bars and boards are sufficiently dry. When the humidity becomes normal, the material is inspected, sorted and treated with anti-rot and fungal agents.
There are several ways to lay a floor on the ground. If you lower the floor to the minimum, you can compact the earth, lay out a bed of sand, gravel or expanded clay, and then fill it with concrete. True, this option is more suitable for a garage, and not for places intended for permanent residence of people.
In a light country house used for seasonal stays, the floor needs to be done differently. First you need to place brick pillars around the entire perimeter
It is very important to ensure that the surfaces of the supports have a uniform height (to the same horizon). Each support must be covered with a layer of roofing felt or roofing felt.
A wooden lining 3 cm thick, treated with an antiseptic, should be placed on the waterproofing layer.
This entire structure is closed by beams, along which logs are placed with constant horizontal adjustments. The structure is finally fixed with fasteners. The floor is located on the joists if the production is carried out with a single flooring.
A double floor requires the installation of insulation, hydro- and vapor barriers, and, if necessary, other components between the rough and finished floors.
Finishing
It is quite simple to make just a finished floor in a private house from scratch, but sometimes additional installation of a decorative coating is required. You can also cope with this problem yourself. How can you cover the floor in a private house?
The best option for a private home can be considered a double floor made of boards. The finishing coating of this design does not need to be coated with anything additional. This option is practical and beautiful, and also has a long service life with proper care. Before use, the boards should be treated with protective compounds and varnished to protect them from sand, dirt, water and chemicals. For coating, you can choose either a transparent varnish, leaving the natural color of the wood, or a colored one, giving the floor a different shade.
A concrete floor in a private house requires a top layer of decorative coating. Parquet or parquet boards will look chic as a floor finish. This coating is quite expensive, but is highly environmentally friendly, has good antistatic and thermal insulation characteristics. It makes no sense to make a parquet floor in a country house, but in a house where you plan to live permanently, such a covering will look appropriate.
As analogues to parquet, you can consider more affordable laminate, linoleum, carpet and ceramic tiles. Laminate is suitable for the living room and bedrooms, ceramic tiles will look appropriate in the kitchen, bathroom and hallway. It is also better to place linoleum only in the kitchen or hallway. The use of carpet is more limited: the material is suitable for finishing floors in bedrooms.
We recommend: Do-it-yourself wooden floor in an apartment
The range of modern colors and textures of the listed materials allows you to choose a coating to suit every taste. In a private home, floors with natural patterns that replicate the texture of wood or natural stone would look appropriate.
The process of replacing non-grooved boards
An entire floorboard that does not have lock joints, or part of it, can be removed without completely dismantling the entire floor surface, since it is not rigidly connected to the adjacent wooden elements.
When replacing the floor in a wooden house with your own hands, before removing the board you need to find out the location of the joists and remove the baseboards. You should also find out the presence/absence of communications under the floor.
To remove the floorboard completely, you need to pick up the board from the edge with a crowbar, place a wooden block under the jack, and then carefully lift it up. Wooden scraps are placed under the raised element to fix the gap. The unnecessary part is sawed off and, acting in a similar way, moves to the opposite edge of the board.
In the event that the decision is made to dismantle the floor and install it with the reverse (non-worn) side up, the work should be done according to the sequence described above, except that sections of the boards are not sawed off. Before you begin replacing the floor, it is necessary to treat the wooden elements with antiseptic impregnations.
A new part, made from a sawn section, is placed in place and fixed to the joists. The fasteners are supplemented by driving nails into adjacent floorboards at an angle of 45º. The restored floor is sanded, coated with a layer of varnish or painted.
How to dismantle
- Removing skirting boards around the perimeter of the room.
- Raising old flooring. Use a nail puller to remove nails, and a screwdriver to remove screws, respectively. It is advisable not to reuse wooden boards; take them to a landfill or leave them for firewood.
- Dismantling the logs. This step is only available if the space in the room is completely free. The joists must be removed carefully; they are often firmly attached to the rough base. Otherwise, you will waste time repairing the remaining damage.
- Thorough cleaning. Remove all debris and notice any remaining boards or other waste.
These steps will help you prepare to begin your renovation. Now the room is free and clean, you can safely replace the boards in it.
Rules for laying lags
Connection of lags
There must be a waterproofing material between the lags and the concrete. As a rule, roofing felt is laid in 1-3 layers. There are hydrophobic mastics that have the desired properties, but their use is not widespread.
Rules for laying lags
Before laying the logs, it is worth considering the desired location of the finished floor boards. If you want the boards to lie along the length of the side of the room, then the logs need to be laid across. The logs must lie strictly horizontally and in the same plane. The evenness of the finished floor depends on compliance with the last condition. The adjustment is carried out with pads of various thicknesses, which are placed between the joist and the support. You can check the correct installation of the joists using a building level, the maximum length rule, or a laser device. Some craftsmen suggest checking the plane using a tensioned thread, but this method does not provide sufficient accuracy due to its sagging under its own weight.
Laying logs on posts
The ends of the logs rest on the foundation (or mortgage crown), and the middle part rests on the posts. They are needed so that the floor does not sag over time. The choice of distance between the posts depends on the strength of the wood used and the cross-section of the logs. The thicker the beam, the fewer posts needed. The space between the joists, as a rule, corresponds to the width of the insulation.
Installing joists and checking horizontality before laying the floor
If a 50x150 block is chosen for the base of the floor, then it must be laid at intervals of slightly less than 60 cm so that the mineral insulation, cut in half, fits well and tightly between adjacent joists. If the timber is larger, for example 100x150, this distance can be increased to 90 cm. It is undesirable to leave more than 90 cm in any case, because the boards between the joists will inevitably sag and the floor will begin to creak. The owner chooses which logs to buy and at what distance to install them based on the budget allocated for construction. But saving at this stage is impractical.
Dismantling the floor.
In a private home, from time to time you have to make efforts to maintain it in good condition.
The floor requires special attention, and if its quality leaves much to be desired, it needs to be replaced. In this article we will tell you in detail how to do this. Changing the floor is not an easy task, but necessary when it is worn out.
The main criteria for checking field strength are:
- the floor creaks under load;
- boards on the floor sag under the furniture;
- differences in floor level;
- gaps and cracks between boards;
- the quality of the material deteriorates (the wood crumbles and becomes rotten).
If you observe several items from the list presented, then it’s time to change the gender.
Work is usually carried out in several stages:
- preparation of necessary tools and materials;
- dismantling the old floor;
- installation of a new floor;
- finishing coating.
Any construction job requires a number of tools.
To lay the floor we will need:
- screwdriver;
- drill;
- saw or jigsaw;
- building level;
- axe.
It is also necessary to prepare materials for installation of the coating:
- timber for logs;
- boards;
- insulation;
- substrate;
- nails, screws.
Having prepared all the materials and tools, you can begin to work.
When choosing materials, the question arises: what to prefer: edged or floorboards. To begin with, it is necessary to characterize each species. An edged board is a woodworking product with a rectangular cross-section with specified dimensions. It is obtained by processing the log from all sides.
The following tree species are used to make boards:
- conifers (spruce, pine, larch);
- hard deciduous (oak, beech);
- soft deciduous (birch, aspen).
The cost of timber will depend on the type of tree. For example, a larch board, due to its durability and resistance to moisture, will be more expensive than its pine counterpart. True, edged boards have one drawback: a large number of knots. This material is suitable for installing subfloors or flooring in non-residential premises.
The floorboard is another matter. It is made of wood and carefully processed on all sides. This material is ideal for flooring. And most importantly, you don’t have to additionally dry and treat the surface of the boards, achieving a nasty coating.
Construction timber is widely used in construction and repair. It is made from coniferous and deciduous wood. The beam can have a square or rectangular cross-section. It is obtained by processing a log from four sides. Material measuring 50*100 mm is widely used in repairs. It can be used to make lathing for wall cladding or floor joists. Its cost can vary between 4 – 10 thousand rubles.
When dismantling the floor, you need to prepare tools. To do this you will need a nail puller, a crowbar, pliers and a saw.
Next, you need to perform a number of preparatory work:
- we clear the room of furniture;
- remove old baseboards;
- remove the floor covering;
- remove the subfloor;
- We take out the trash and clean the room as much as possible;
- We do wet cleaning of the premises.
It is quite difficult to cope alone, so ask for help in advance. Next, armed with a nail puller, we try to remove the nails with which the boards are nailed. This will make it easier to remove them. If it doesn’t work, you can lift the boards with a crowbar. If necessary, you can saw the covering and dismantle the boards in parts. This will make it easier to take them out. After this, you need to remove the lags. This way we will get a completely cleared space for installing a new floor.
First you need to level the surface for installing the logs.
To do this you will need to perform the following sequence of actions:
- level and compact the ground;
- in the place where the supports are installed, we make recesses measuring 20 by 20 cm and up to 50 cm deep;
- after that, we fill them with layers of sand, crushed stone and rubble chips, each 6 cm thick;
- fill them with concrete solution;
- We erect brick columns on concrete for laying beams;
- after that, logs are laid on the beams in increments of 50 - 80 cm;
- the space between the joists can be covered with boards or particle boards.
This way we will get a frame for laying the finishing coating.
But, we still need to insulate the floor. Mineral wool is suitable for this; it is placed in the spaces between the joists and covered with a waterproofing film. The level installation of the logs is checked with a level, or checked with a cord that is pulled between the two outer boards.
If the floor is being replaced on a concrete base, it is enough to replace the logs and lay insulation. And then comes the laying of the boards.
First you need to decide on the direction of installation. It is best to do this from the windows, this will achieve the effect of increasing the space. We start laying from the wall. In this case, you need to leave a gap of 1 cm at the ends and side surface of the wall.
This is necessary because wood can expand when moisture increases and contract when dry. We secure it with self-tapping screws. Next, we sequentially install the floor, securing them with self-tapping screws into the grooves of the boards. When installing the last board, it is necessary to measure the distance taking into account the gap. You can trim it if necessary.
To prevent the coating from deforming, you can insert pegs between the boards and the wall. Now you can varnish or paint the floor.
Many people will wonder why lay fiberboard when you can lay linoleum on boards. The fact is that sheets of this material are a good thermal insulation material. And keeping the house warm is the most important task. Also, a completely flat surface allows you to achieve an even coating. Before installing the fiberboard, it is necessary to fill all the cracks between the boards with acrylic sealant and any uneven areas with putty.
Now you can fasten the slabs using nails or self-tapping screws. The disadvantages of such methods may be the fastener caps protruding above the surface. To eliminate this problem, we make recesses at the fastening points so that the caps are completely submerged and flush with the plane of the floor. Before installing the slabs, you need to leave them in the room for a couple of days. After this, we lay fiberboard starting from the far corner of the room, gradually moving towards the door.
Now fill the gaps between the plates with putty.
Now you can lay linoleum; it is also left indoors for two days to adapt to temperature and humidity. Next, we spread the material and give it time to rest. After this, you can secure it with baseboards. Since this coating dries out over time, it must be laid close to the walls.
Another option is to glue it to the surface of the fiberboard. Apply the adhesive composition to the floor with a notched trowel and wait until it thickens. Next, it is applied to the back side of the linoleum and glued to the floor. To ensure that the coating is even, it is straightened from the center to the corners.
This way we will get a smooth and warm floor covering.
This article tells you how to replace a wooden floor in a private home. Talk about what tools and materials will be needed. Using the advice in the article, you can prepare the necessary tools and carry out the work yourself. Good luck.
The first step when replacing and/or insulating floors with your own hands will definitely be to dismantle the baseboards around the perimeter of the room and the existing floor covering, and, possibly, transfers. No special skills are required here, the main thing is accuracy in work and attentiveness when disassembling, so as not to disrupt communications (mainly electrical wiring and sewerage, possibly plumbing with heating).
We invite you to familiarize yourself with Knitting reinforcement: methods, patterns, norms and rules of knitting for beginners
After all this, the accumulated construction waste should be removed (there will be a lot of it, so prepare a place for its disposal in advance). Often, it is no longer possible to carry long boards and translations through the doors, so we either cut them right in the room (inconvenient, and when using a chainsaw, the smell of exhaust fumes remains) or we feed them through the windows (most often this is what they do).
Features of replacing a wooden floor
Replacing a wooden floor in a country house is not the easiest job and is very dirty. The speed and complexity depend on the condition of the old coating. Other factors also influence this:
- Before removing the flooring, you need to make sure that communications are not hidden under it - wires, pipes, ventilation.
- Dismantling is carried out using steel scrap or crowbar. The work is noisy and requires strength.
- It is necessary to remove not only the top flooring, but also the entire system: joists, insulation, rough flooring. All that remains is a cushion of sand or earth.
- For arranging a concrete base, it is recommended to use self-leveling mixtures, as they significantly simplify installation.
- It is easier and faster to use bitumen mastic as a waterproofing material. However, when laying a purely wooden structure, roll waterproofing will be required.
Wooden floor on joists
This type of floor is preferred by wood lovers. Installation of such a floor is not at all labor-intensive.
This should be done according to the following points:
- Preparing the base - the top balls of soil are removed (about 7 centimeters) and covered with dry sandstone.
- The sand is covered with crushed stone (15 centimeters).
- Step three - a layer of insulation. The advantage is roofing felt sheet.
- Masonry lag. The optimal width is 70 centimeters; a gap of 3 cm should be left near the foundation walls, this is done for the free expansion of the material.
- Fixation of lags with special plates. Height adjustment can be done using racks; they will require openings in wooden battens.
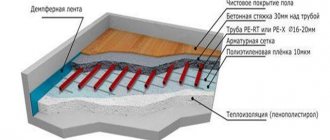
- For permanent heated floors, it is recommended to lay thermal insulation material between the joists (mineral wool, expanded clay, and expanded polystyrene are used).
- On top of the support beams we place black floor boards, or a complementary lattice; in the future, the main covering will be attached to it.
Read here: Wall decoration: modern materials and surface decoration technologies. Sequence of finishing work
On a note! It is recommended to fasten the joints of the material with tape; the edges of the material should be slightly overlapped with the edges of the foundation.
Some repair features
Major floor repairs are not an easy task, but it is quite doable if you have the time, desire and some skills. If there is no “fighting spirit”, then it is better to immediately look for a team of good craftsmen who can be entrusted with this task, and it is better to refuse to carry out the work yourself. Floor repair will involve the following work:
- thorough inspection of the base;
- identifying problem areas;
- dismantling the finishing coating;
- inspection of logs;
- removal of old insulation, if any;
- complete or partial dismantling of logs;
- complete cleaning of the surface of the floors and their inspection, assessment of their condition;
- installation of a new lag system or installation of a dry light screed;
- installation of finished floor covering.
Replacing the floor in a Stalin building
To carry out a major overhaul of floors, dismantling must be carried out completely, that is, not only remove decorative coverings such as linoleum or parquet, but also remove old floorboards and, in many cases, even logs. The dismantling procedure is quite difficult and difficult; you have to make a lot of effort to dismantle the old floors. You will need to remove a lot of debris that is generated during the dismantling process, and you also need to be prepared for this.
Parquet dismantling
https://www.youtube.com/watch?v=
Over time, any floor under the influence of temperature changes and various mechanical loads sooner or later fails. Naturally, there is a need for its repair. This process can be done quickly and easily, or it can be difficult and time-consuming. Everything will depend on the nature of the breakdown.
However, if the floor defects are more serious, then, most likely, it will be necessary to replace the floor in a wooden house - partial or complete. In this article, we will focus on the process of replacing some boards. It’s worth noting right away that this work will be quite troublesome, if only for the reason that you need to select a material that will best suit the previously installed boards.
How to replace floor joists in a wooden house
Most timber and log buildings also involve the use of wood for the manufacture of load-bearing floor structures, called joists. Their main functional purpose is to ensure the reliability and strength of the base for rough and finishing boardwalks. However, during long-term or improper use of such buildings, it may be necessary to replace the joists in a wooden house. These works can easily be done by the owner of the building with his own hands, for which it is necessary to know the technology of their production.
There are several possible reasons, the presence of which indicates that the floor joists in a wooden house need to be replaced. These include:
- when walking on the floor, the coating creaks or becomes noticeably deformed;
- under load from furniture or any household appliances of serious size, a deflection of the floor is visually observed;
- During cleaning, water flows in one direction, which indicates the presence of a surface slope that should not exist;
- during operation, cracks or gaps have formed between individual flooring boards, and they continue to increase;
- wood simply crumbles even with weak mechanical stress;
- there is an unpleasant smell of rot, mold or damp wood.
Any of the above situations indicates that it is necessary to replace the floor joists in a wooden house. This work is not difficult from a technological point of view. However, professional builders are often invited to carry it out, especially since today there are many contracting organizations on the market that are capable of carrying out quality repairs at reasonable prices.
In order to correctly and quickly change the logs in a wooden house, you should perform several fairly simple operations. First, the existing floor covering and, quite naturally, the baseboard are dismantled. After this, the finishing and rough boardwalks are disassembled. Next, you should dismantle the old logs that have become unusable.
We suggest you familiarize yourself with How to cover a brick stove in a house
At the next stage of work, new joists are installed. However, before this, it is recommended to treat wooden structures with antiseptic compounds and fire retardants. This will protect the wood from rot, mold and microorganisms, and also increase the fire resistance of the material. Ultimately, the durability of the installed structures also increases.
Before installing the logs, you also need to mark their locations. Brick or concrete pillars can be used as a base, on top of which waterproofing must be carried out. Also quite often, logs are mounted directly on wooden load-bearing beams. In any case, markings are made as preparation, only after which installation is carried out. Each mounted element is securely attached to the base, after which the remaining floor structures are installed.
Methods for repairing floors
Sometimes it is necessary to repair only the damaged load-bearing floor beams. Beams can be repaired either by completely replacing them or by cutting out the damaged part.
In this case, the beam is extended and connected by bolting. The old section of the beam and the new one are connected with a special clamp, in which a hole is drilled for the bolts.
In the case when it is necessary to replace the floor covering, the floor often needs to be leveled. The best option for leveling the floor would be to use plywood. The plywood is attached to the floor using glue and screws.
Before this, a grid of plywood logs is laid. Such logs are laid in such a way that the edges of the sheets fall on the log.
When fastening boards with self-tapping screws, they are screwed in so that they are not visible. In the case of using parquet boards or laminate as a floor covering, waterproof plywood with a thickness of 10 - 15 millimeters is attached to the floor. It is necessary to leave a small gap between the sheets of plywood to prevent squeaking.
A good way to level the floor is by scraping with a grinding machine. A mandatory step before scraping is to sink the nails with which the boards are nailed to the joists. The cracks in the floor are sealed with putty.
In the future, sanding is carried out after the putty has dried. In hard-to-reach places, a manual scraper is used. Then the floor is cleaned of dust and treated with a cloth soaked in solvent.
One way to repair a wooden floor is to use sawdust with glue. Beacons are placed along the horizontal level. A mixture of sawdust and thick glue is poured out and leveled.
Very often, creaking boards can be eliminated by replacing nails with screws. The screw is selected so that it fits 30 - 55 millimeters into the joist.
Floor board script can be eliminated by driving wedges into the gaps between the joists and boards. Filling cracks with graphite powder also helps prevent squeaking. But this is a temporary measure.
Instead of wedges, it is better to use plywood spacers soaked in hot drying oil. Wedges often fall out of their seats. And this again leads to subsidence of the floor and squeaking.
The cracks in the floor can be sealed with a special paste based on sawdust and varnish. If small cracks are sealed by puttying, then for large cracks you will need a block. The block is smeared with PVA glue and hammered into the gap.
Rotten sections of boards can be cut out and replaced with new ones. It must be remembered that both ends of the board must be placed on the joists.
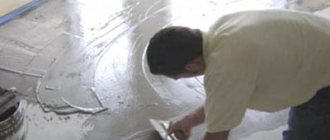
Floor repair using dry screed methods
If there are large differences in the floor area of an old house, this means that there has been heaving of the soil. In this case, for leveling you should use a screed, which can be dry, semi-dry or wet.
First, the floors are dismantled. Boards are coming off. The most difficult task is removing the first board. Then a jack is placed on a stand under each board. With its help, the boards come off. The most important thing is to ensure that the board does not injure the worker when it comes off.
The most convenient and fastest way to repair floors in an old wooden house is to use a dry screed using expanded clay.
Flooring options
The floor in a wooden house (dacha, summer house) is usually made of wood. This choice is determined by the following reasons:
- The foundation of such a structure is most often lightweight: columnar or screw;
- At the dacha they try to use inexpensive building materials and simplified construction methods, and whenever possible do the work with their own hands;
- Wood is a lightweight, natural material that retains heat well and provides ventilation to the house.
The simplest and most inexpensive option is to make a cold single floor on the ground at the dacha. In this case, the logs are recessed into pre-compacted layers of sand or clay.
If the level of groundwater rise is high enough, and the soil under the house is stable and inactive, then it is better to make the floor on support posts. This type of floor is not connected to the frame of the house, which is why it is called “floating”.
Laying the floor in the country house is carried out in accordance with instructions BCH-9-94 DS “Installation of wood floor coverings”. Following it, correctly laying a wooden floor with your own hands is not so difficult.
Cold single floor on the ground
The logs of the future floor are sunk into the sand. To do this, after removing the top layer of earth, arrange a cushion of compacted calcined sand.
However, most often, in order to avoid rapid rotting of the floor wood, a multi-layer base is made. It's not difficult to make it yourself. For this:
- a pit is dug over the entire floor area;
- a layer of compacted river sand is placed at the bottom;
- a layer of dry sand 30-50 cm thick is poured;
- a layer of clay 20 cm thick is compacted;
- The depth of the pit is reached using dry slag.
Support posts
After this, foundations are laid for the columns. For this:
- remove the soil to a depth of 40-50 cm;
- fill with gravel or crushed stone;
- The layers are shed with water and compacted with tampers.
Columns can be made of brick or concrete. The cross-section of structures depends on their height. Columns up to 250 mm high are laid out in one and a half bricks. If above 250 mm, then two. Concrete columns have the form of cubes with sides of 40x40 or 50x50 cm.
2-3 layers of waterproofing (for example, roofing felt), wooden spacers with a thickness of at least 25 mm and wedges impregnated with an antiseptic, which serve to level the lags, are laid on the posts.
The order of laying the logs is as follows:
- First, the outermost logs are laid at the opposite walls. The gap at the wall along the length of the lag is 20-30 mm. They are laid perpendicular to the direction of light propagation in the room or across the prevailing direction of movement (for example, in corridors, toilets).
- The following logs are laid in increments of 400-500 mm. Short logs are joined on posts using the half-tree method or at the ends. The joints are located on adjacent joists no closer than 50 cm.
- A wide joist is placed in the door openings so that it protrudes on both sides of the opening by more than 50 mm.
- The joists are leveled using shims and wedges. Alignment is checked in all directions using a two-meter level. In this case, the level should touch all the joists without gaps.
- The subfloor is cleared of shavings and construction debris.
tongue and groove boards
They are made from coniferous wood and soft hardwood, except poplar and linden. The permissible moisture content of the boards is no more than 12%. Before installation, they must be treated with an antiseptic solution from below and at the ends.
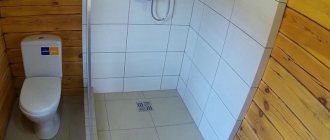
If you plan to level the floor with sheets of plywood, then instead of a tongue-and-groove board, you can use a cement-bonded particle board (CSP). If you decide to install tiles in your toilet in the future, this change will make installation much easier.
The boards are laid perpendicular to the joists. The permissible gap between them when laying should be no more than 1 mm. They are secured to the joists with nails. For tongue-and-groove boards 27 mm thick, nails 70 mm long are suitable
It is important to drive the nails correctly - at an angle, recessing the heads. The lengthening of the boards at the ends is carried out on the logs.
The permissible overhang of the boards is no more than 10 cm. Otherwise, an additional log of at least 600 mm in length is installed under them. The gap at the ends of the boards near the walls is no more than 15 mm. After installation, it is covered with a plinth.
The baseboard is attached to the wall, but not to the floor boards.
- The last board is planed to size (taking into account the gap) and nailed to the joist.
- Uneven floors after installation are eliminated using an electric planer.
- The boards are primed with drying oil. After drying, the potholes and places where knots have fallen out are filled with five percent oil putty. The surface is finally cleaned with sandpaper. Then 2 layers of floor paint are applied to the surface.
If necessary, linoleum, carpet, etc. are laid on the boards. The floor in the toilet can be tiled.
Double floors
For better insulation in a wooden house, they often resort to a double floor system. The first layer in this case is the so-called subfloor - untreated boards attached to the floor beams, if we are talking about the second floor, or to the joists. Wood itself has low thermal conductivity. The top layer - the finished floor - is laid on the bottom, sometimes through joists with additional insulation. Next comes the installation of the decorative coating.
Double flooring is done as follows:
- timber logs are mounted on the provided mortgages;
- a subfloor is laid on the joists, most often from unedged boards;
- then thinner logs are laid, the space between them is insulated with the selected material;
- This is followed by a finishing floor made from edged boards or floor tongues and a finishing decorative coating.
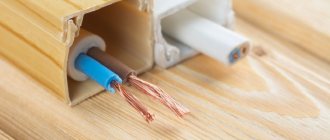
If necessary, communications can be placed between the two layers - water pipes, electrical cables in corrugated pipes, etc.
It is important to carefully monitor the tight fit of the subfloor boards to each other; if there are gaps, they can be filled with polyurethane foam. If edged boards are used, cracks in the finished coating can be filled with special wood putty compounds. https://www.youtube.com/embed/d2CPfSUJ-MM
Methods for laying wooden floors
The installation of a wooden floor can only begin after the frame structure of posts and beams is finally ready. A layer of roofing material is laid on the posts, which serves as good waterproofing. Beams are installed on the waterproofing layer, and for additional strength, logs are fixed to the beams. It’s good when the width of the room corresponds to the length of the logs, but if you have to connect the logs, then it is better that the joints are directly on the supporting pillars, and they are fastened with self-tapping screws.
The structure of the wooden floor itself can be either single or double. Single floors are not very durable and are usually installed in summer cottages. This type of floor does not withstand weather fluctuations well and is not intended for year-round use. To make you feel comfortable in winter, it is recommended to build double insulated floors. It will require a lot of time and the necessary material. But the extra effort is worth it because it increases durability and reliability. To do this, a list of works is performed in a certain sequence:
- Install logs;
- Lay moisture-resistant plywood between them, and lay insulation on top;
- Lay the rough subfloor on the joists.
Double plank floor pie
To create a subfloor, low grade boards with a thickness of 15-50 mm are suitable. Such boards, carefully processed, are adjusted to each other. Then the finished boards are attached to the joists using self-tapping screws.
The boards are laid 15-20 mm from the wall. This promotes ventilation and prevents the floor from swelling during seasonal wood deformation. Waterproofing is carried out using a polyethylene film with a thickness of 200 microns, and additional thermal insulation is made of polyethylene foam. The film is laid overlapping, the edges are glued together with tape. You need to make an overlap of 20 cm on the walls and glue it with tape. After this, the finishing floor and finishing coating are laid.
We recommend: Film heated floor under carpet
Sheets of plywood or solid wood are used for laying the finished floor. The plywood is placed on top of the thermal insulation layer and secured with self-tapping screws.
The solid board has an attractive appearance, is convenient to lay, and is also easy to use. The advantage of solid wood flooring is that you can apply varnish or paint to the floor and thereby avoid additional costs for finishing materials. Solid boards are produced in two versions: regular and tongue-and-groove. The difference between them is in the installation method. A tongue and groove board is much easier to install. However, before installation, it must lie indoors for three days.
Main repair categories
Major means dismantling the old floor and removing garbage from the apartment. Leveling and preparing the surface for laying floor coverings.
Cosmetic - if it is necessary to replace the floor covering with a new one, re-floor or re-floor.
Turnkey flooring is a set of works that includes complete replacement and leveling of floors in a room or an entire apartment (or private house), as well as laying flooring (with installation of baseboards and thresholds).
We are working:
No prepayment;
Without downtime and interruptions, with high quality and with a guarantee;
Upon completion of the work, the customer accepts it and pays.
Preparing the premises
Before carrying out renovation work in a room or the entire apartment, it is advisable to remove all unnecessary items in advance. If it is not possible to move, you can carry out repairs room by room.
If large furniture cannot be removed from the room, then the master moves it to the repaired half and then back (if possible).
To prevent construction dust from penetrating into adjacent rooms, you will need plastic film to cover doors, furniture, wallpaper, etc. It is advisable to lay cardboard on the floor in the hallway so as not to scratch or stain the surface when removing garbage from the apartment. The craftsmen take the boards and bags of garbage to the stairwell and then the loaders throw everything into the container.