CemAqua
Waterproofing additive for concrete.
More details
Important!
Destruction of a floor or concrete screed is a serious problem. The floor begins to crumble, and if a hard finishing coating (tile, laminate) is laid on top, an unpleasant crunching sound begins to be felt when moving on such a floor, the floor covering itself may become deformed, and repairing a concrete floor or screed is a labor-intensive and expensive undertaking. Therefore, it is better to immediately do everything “for centuries,” especially since concrete is one of the materials that allows this.
We recommend studying: Concrete floors
Sealing seams
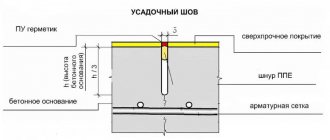
Sealing is a prerequisite for the functioning of the seam; it is performed using the following materials:
- Sealing cord: a cord made of foamed polyester is placed in the slot, which retains its elasticity under constant temperature changes;
- Sealant: the most popular method, a special case of which is pouring mastic (we’ll talk about it separately). After drying, the sealant completely closes the groove and at the same time prevents the penetration of water;
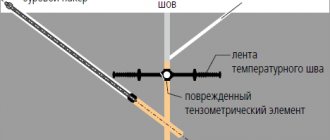
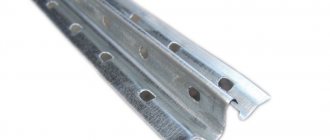
- Waterstop: a special material made of polyethylene, rubber or PVC in the form of a profiled tape, laid when pouring the screed;
- Deformation profile: a special rubber profile on metal guides is used. Rubber will not let water and dirt into the groove, distribute the load on the screed and prevent the concrete from cracking. The profile can be overhead or built-in.
Sealing with mastic
Mastic is the most popular sealing method. It can be acrylic, latex, polyurethane.
Now let's look at the sealing process using mastic in detail:
- Prepare tools and materials: mastic, brush, small triangular spatula, deep primer, sealant gun;
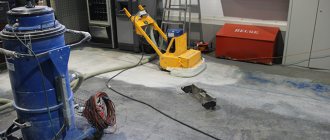
- We prepare the base: it must be dry, free from fungus and dust, free from any oil, grease, rust, old paint - everything that can affect the setting of the mastic. Before sealing with sealant, you need to blow it with compressed air, treat it with a brush and sandblaster, and then treat it with a primer;
- Mixing the sealant: mix the paste and hardener until a homogeneous composition is obtained. Do not violate the recommended ratio! You can slightly improve the fluidity by adding about 10-12 tablespoons of gasoline (about 50 grams) per 1 kg of the finished composition;
- We apply the sealant: pour the compound into the gun, then apply it evenly along the entire length, level the spatula flush with the floor. After 40 minutes, apply the thinnest layer of cement to the groove and after 1 week at most the sealant will set.
To make cleaning easier and to support the seam edges under traffic loads, cut seams must be sealed. Sealing allows you to protect them from the penetration of water and aggressive media, as well as from clogging. The type of sealant depends on the loads and operating conditions. For example, food processing plants require floors that are easy to clean and can withstand heavy truck traffic.
In industrial floors with high traffic loads, the joints must be filled with an appropriate material that will provide joint support and withstand high loads. The material is applied no less than 28 days after laying the screed. Elastomeric (flexible) sealants are used only where the seam will not be subject to loads from equipment wheels.
They are applied quickly and can withstand large movements when opening and closing the seam. Before sealing, the seam should be cleaned of dust and debris by blowing it with compressed air, cleaning it with a mechanical brush or sandblaster. When using a compressor for this, you need to make sure that it does not leave an oil film in the seam.
In our opinion, most warehouses and industrial premises, logistics complexes, parking lots, car service centers, shopping centers, etc. are objects where floors are subject to moderate loads. However, the concrete floors there are gradually deteriorating. To obtain a durable concrete floor that is resistant to traffic, pedestrian and other loads, temperature changes, corrosion and other influences, it is necessary to use materials of the appropriate quality, accurately carry out all technological operations when installing floors, correctly cut expansion joints and carry out subsequent maintenance of the floors.
READ MORE: Leveling the floor - screed for laminate, linoleum or tiles
How to seal seams
To seal expansion joints in concrete floors, plastic polymer materials are used, as well as cement-based compositions of a grade not lower than CEM I 32.5 (M400 according to the old marking), tapes, strands, and metal profiles. For seams whose opening does not exceed 0.5 mm, cementation is used with low-viscosity cement-based solutions.
The most common modern materials for filling and repairing expansion joints in concrete floors are one-component polyurethane sealants, for example, Clear Fixa CEMMIX, as well as one-component high-modulus polyurethane adhesive-sealant for joints CEMMIX.
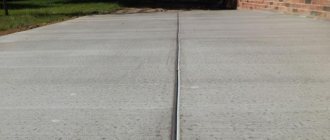
Shrink seams
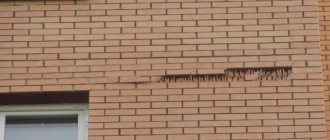
The shrinkage of concrete as it dries is usually 0.32 cm per 30 cm linear length. The concrete screed dries unevenly from top to bottom. Its upper part dries faster and shrinks more than the lower part, so the screed tends to curl up, and the edges become higher than the center. As a result, internal stresses arise in the concrete, leading to the formation of cracks.
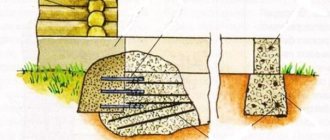
Shrinkage joints can be made by inserting special joint strips while the concrete is still plastic, or by cutting the joints after finishing the concrete. The seams should be cut along the axes of the columns and joined to the corners of the seams running along the perimeter of the columns. The distance from the column to the perimeter seam should be equal to two to three times the thickness of the screed.
Floor cards formed by shrinkage joints should be made as square as possible, and L-shaped cards elongated along the length should be avoided. The length of the card should not exceed 1.5 times the width. Shrinkage joints should be straight and, if possible, without branches. In aisles and driveways, shrinkage joints should be placed at a distance equal to the width of the screed. Paths wider than 360 cm must have a longitudinal seam in the center.
READ MORE: How to make a floor screed with your own hands, video and photo, mechanical finishing rough
In the courtyards of buildings, the distance between joints should not exceed 3 m in all directions. The general rule is that the smaller the card, the less likely it is to randomly crack. Shrinkage seams must also be made on the outer corners, otherwise cracks may develop from the corners. A section of the screed with a very sharp angle is highly likely to crack; such cases should be avoided if possible.
What materials and tools are needed to seal concrete floor joints?
The sealant is supplied conveniently packaged in tubes, and is applied using a manual or pneumatic construction gun, or a spatula.
Before applying the sealant, the surfaces must be cleaned of dirt, remnants of old sealant, and in winter - from snow and ice. If necessary, they are degreased with acetone and primed.
CemAqua
Waterproofing additive for concrete.
More details
The sealant is applied in one direction while leveling.
Once applied, polyurethane sealants react with moisture in the air, causing them to cure. During the day after application, it must be protected from mechanical influences.
What mistakes should be avoided when sealing floor joints:
- When sealing joints in a fresh concrete base, you must wait 28 days for the humidity to drop to an acceptable level;
- The seams are filled with sealant to a depth no greater than its width.
- The sealant in a seam should only have two contact surfaces; if there are three, the seam will break over time. Therefore, an insulating material is installed deep in the seam, to which the sealant has no adhesion (will not stick).
- It is recommended to make a test joint before using the sealant.
Seams in a concrete floor or screed of a large area are inevitable, since without their installation the concrete floor will become covered with cracks and quickly collapse. For subsequent sealing of seams, different types of materials can be used, but the most reliable, affordable and convenient today is the use of polyurethane sealants for sealing seams. Modern high-tech representatives of this group of building materials are Clear Fixa sealant and CEMMIX adhesive-sealant for seams, which, having all the advantages of polyurethane sealants, compare favorably with their analogues in that they can be used for indoor work. You can buy Clear Fixa and CEMMIX seam sealant in bulk from the manufacturer; They are also available for purchase in retail chains, Leroy Merlin stores and online stores.
You can buy CemPlast, CemBase CEMMIX without leaving your home, with discounts from 5 to 33%!!!!
Buy on Ozon
Buy on VseInstrumenty.ru
Buy on Wildberries
Buy at Leroy Merlin
Slicing rules
Cut seams should be straight and clean. The worker performing this operation must know when and how deep to cut them, what joint should be next, and how to prevent the blade from wearing out too quickly when using very hard aggregate in concrete. Joints should be made as soon as the concrete has gained sufficient strength so that it will not be damaged by a blade, but before random cracks can appear in the concrete.
Cutting seams with a conventional seam cutter should begin no earlier than 24 hours and no later than 72 hours after finishing the finishing of the concrete. When wet cutting (meaning cutting on soft concrete with a special Soft Cat floor cutter), such conditions usually arise 4...12 hours after finishing the concrete.
However, cutting seams after 24 hours is also possible under certain conditions. To do this, the worker must make a test seam a few hours after the concrete begins to harden. If, when cutting a test seam, aggregate particles fall out of the concrete, then it is too early to start. The operation should begin when the blade, together with the concrete, cuts the aggregate grains.
When cutting seams, you should always have spare equipment available in case the main one fails. In hot weather or if there is a risk of cracking, it is necessary to cut every third or fourth seam before cutting the intermediate seams. Usually the seams are made in the same sequence in which the concrete was laid.
READ MORE: Floor thresholds, types, sizes and installation procedure
The depth of the seam should be equal to 1/3 of the thickness of the screed. This creates a zone of weakness in the screed, and when the concrete shrinks, it cracks in this zone, i.e. it cracks directionally and not randomly. In this case, the edges of the resulting crack have a certain roughness, which eliminates vertical displacements of the edges until the crack becomes too wide.
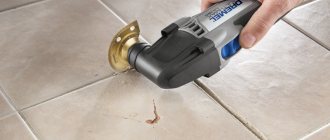
Not long ago, a method of dry, light cutting of joints was invented; it is performed immediately after finishing the concrete. A worker, using a long handle, can cut up to 10 m of seam without moving on the concrete. To cut longer seams, a worker wearing special boots with smooth soles can walk along the screed and use a 2-meter handle. This type of seam is cut only to a depth of 2…3 cm.
In order for the finished screed and the completed floor to be strong and not crack, you need to cut it correctly.