Since prices for various building materials have been rising rapidly recently, you need to think about how to create efficient and high-quality buildings so that you don’t have to correct mistakes after construction. In order to eliminate possible errors and risks, during the construction of any buildings it is necessary to organize expansion joints in concrete. These designs minimize various deformations.
Processing of expansion joint
Various concrete structures are no exception here. These can be floors, blind areas and many other structures. If the wrong choice of technology for creating the floor is made, then as a result it will become covered with cracks, and the finishing coating will be deformed.
The condition of the foundation strip depends on the blind area. If it cracks, it can cause moisture to penetrate into the base and ultimately lead to very serious consequences.
Variety of concrete joints
So, among the seams there are:
- Shrink;
- Sedimentation and temperature;
- Antiseismic.
Shrinkage joints are temporary lines. They are created mainly in monolithic structures directly when pouring concrete mixtures. As the mixture begins to dry, it will shrink. This may cause cracks. So, the solution will compress, and the pressure will act on the void line, which will expand. Then, when everything dries, the line will be destroyed.
Creating an expansion joint in concrete
As for the second group, these grooves are designed to preserve the building from precipitation and temperature changes. The sedimentary seam can be found on any elements of the building, as well as at the base. Temperature cuts can be found everywhere, on any elements, but not on the foundation. For example, in most buildings you can find expansion joints in the walls.
Anti-seismic protection is special lines that divide the building into blocks. Where these lines pass, double walls or special racks are created. This makes the building more stable.
Sealing joints in concrete floors | Construction portal
The installation of a floor screed is one of the important stages in the repair. Concrete is a strong and reliable material, but, nevertheless, vulnerable to dynamic loads, temperature changes, aggressive chemical influences and water. To ensure that the screed does not collapse and serves reliably and for a long time, it is recommended to pay special attention to cutting and sealing joints in concrete floors.
Content:
The need to cut joints in concrete
Any floor consists of a covering and a base, which, most often, is a concrete screed. Concrete by its structure is a very brittle material, incapable of plastic deformation. After applying a load to the screed that exceeds its strength characteristics, the material is not able to deform without destruction, as, for example, in the case of plastic or other plastic material, but will crack like glass.
Cracking is also observed under the influence of internal stresses in the concrete floor, which are caused by temperature changes and shrinkage deformations during hardening of the screed. To limit cracking of the floor and control the appearance of cracks in the concrete screed, it is recommended to cut expansion joints.
Classification of expansion joints
When installing concrete floors, the most important step is the correct construction of expansion joints in the floor. There are three types of expansion joints in a concrete floor: insulating, shrinkage and structural.
Insulation seams
The structures of a house are subject to various deformations during its operation. There are many reasons that cause these deformations. These are the effects of environmental factors, soil movement, temperature effects. To avoid the transfer of such deformations from the foundation and walls to the concrete floor in places where the screed comes into contact with other structures - columns, walls, foundations for equipment, it is necessary to install insulating joints to the thickness of the screed.
An insulating type seam will allow the floor to operate independently of other structural elements of the building. During the hardening process, concrete shrinks, decreasing in volume, and if the screed has a rigid adhesion to a fixed object and there are no insulating seams, then it is highly likely to crack.
Insulation joints are installed around foundations and columns, as well as along walls, in order to prevent the transfer of deformations from the house structures to the floor screed. This type of joint is created by laying insulating material along the building structure before pouring concrete. The insulating material must withstand plastic deformations without destruction, that is, be compressible. It is important that such insulating material does not protrude onto the surface of the screed.
Typically the seam thickness reaches 10 millimeters. Insulation joints can be in the shape of a circle or a square. The square seam must be rotated 45 degrees around the column to create a straight seam against the corner of the column. If equipment will move through a seam that is not intended for areas with heavy loads, it is recommended to thicken the screed by 25%.
When pouring concrete around the columns, formwork is installed along the seam line. Afterwards, the formwork is removed and insulating material of the required thickness is laid in its place. The gap remaining between the column and the seam is filled with concrete mortar and smoothed. You can also cut the seams in the concrete floor around the columns into diamond shapes in the hardened concrete, cutting out the screed to the full depth and filling it with insulating material.
Shrink seams
The concrete screed dries unevenly from top to bottom. The upper part of the floor dries and shrinks more than the lower part. The tie tries to wrap itself, after which the edges become higher than the center. As a result, internal stresses arise in the concrete, which lead to the formation of cracks. To avoid chaotic cracking, shrinkage joints are cut into the screed.
Shrinkage joints allow you to create straight planes of slack in the screed. As the concrete tends to wrap and dry, the seams will open slightly, and cracks will begin to form not randomly, but in a given place. Shrinkage joints can be made by inserting joint strips while the concrete is still plastic, or by cutting the joints after the concrete has been processed.
Expansion shrinkage seams must be made along the axes of the columns and then joined to the corners of the seams running along the perimeter of the columns. The distance to the seam from the column should not exceed the thickness of the screed by 24-36 times. In passages, shrinkage joints should be spaced at a distance equal to the width of the screed. Paths that are more than 300-360 centimeters wide must have a longitudinal seam in the center.
Floor maps formed by shrinkage joints should be square whenever possible, avoiding L-shaped and elongated maps, as well as branches, as shown in the photo of joints in a concrete floor. The length of the card should not be more than one and a half times the width. The smaller the floor map, the less likely there will be random cracking of the concrete screed, but it is also important not to overdo it.
Shrinkage joints must also be created at the outer corners, since otherwise cracks may originate from the corners. A section of the screed with too sharp corners is more likely to crack. Avoid these angles if possible. If this is not possible, make sure the base is well compacted and cut the seams where cracks are most likely to form. Sometimes, in order to properly close cracks on outer and sharp corners, the screed is additionally reinforced with steel reinforcement.
Construction seams
It rarely happens that the entire procedure of pouring a concrete floor is carried out without interruptions, the duration of which is no more than 1 day. This is only possible in rooms with a small area and provided that the concrete mixture is transferred uninterruptedly. Usually, filling is carried out with significant technological interruptions. During this time, the laid concrete has time to gain some strength. In places where screeds with different installation dates come into contact, it is useful to cut construction seams.
Place construction joints in the areas where you have completed the day's work of laying concrete. They are performed, if possible, at a distance of about 1.5 meters from other joints in the concrete floor, which are located parallel to them. The shape of the edges of the tie for construction seams is usually made according to the tenon and groove principle.
If the construction seam is located where insulating and shrinkage seams are not desired, then you can use sleepers that are laid across the seam. The slats should be placed at the correct angles to the seam in the middle of the depth of the concrete screed.
General rules for cutting seams
To obtain a durable concrete screed, wear-resistant, resistant to various mechanical loads and negative influences, it is recommended to use high-quality materials and cut expansion joints in a timely and professional manner. There are general rules for cutting joints in a concrete floor, which will be useful for you to familiarize yourself with:
- Cutting time. The seams must be cut immediately after laying the concrete, or after it has gained the required strength, so as not to be damaged by the blade, but before the possibility of random cracks occurring. With wet cutting, such conditions occur approximately 4-12 hours after finishing the concrete. Although it is also possible to cut seams every other day under certain conditions. On dry concrete, cutting joints should be done as quickly as possible, before the edges of the joints begin to crumble.
- Test stitch. The worker must make a test seam a couple of hours after the concrete mortar begins to harden. If aggregate particles fall out of the concrete when cutting a test joint, then it is too early to start cutting. And it’s time when the blade cuts the aggregate grains along with the concrete.
- Tools and equipment. The location of each seam is usually marked along a stretched rope with chalk. A ruler is used as a guide for the cutting procedure, for example, a board at least 4 centimeters wide. Seams in freshly laid concrete can be made with a special cutter, and in a dry concrete floor the seams are sawn through. When cutting seams, you should always have spare equipment on hand in case the main one breaks down.
- Slicing technology. In hot weather or when there is a risk of cracking, it is sometimes recommended to cut every third seam before cutting the intermediate ones. Usually the seams are cut in the order in which the concrete was laid. The seams should be cut to a depth of approximately 1/4 - 1/3 of the thickness of the concrete screed. Seams made on freshly laid concrete with special cutters may have a slightly shallower depth. Typically, the cutting interval is chosen within the result of multiplying the thickness of the screed by 24-36. On a 10-centimeter screed, the seams are cut at a distance of 240 - 360 centimeters from each other. For concrete with significant shrinkage, it is preferable to make the cutting interval closer to 240 centimeters. Avoid T-shaped intersections of the cut seams, which provokes the formation of cracks passing through such an intersected seam.
Methods for sealing seams
Sealing the seams allows you to protect the seams from the penetration of aggressive media and water, as well as from clogging. Sealing cracks on concrete floors allows you to strengthen the screed and protect it from mechanical chips at the joints, prevents tears, punctures, and abrasion. This is especially important if you plan to lay ceramic tiles on a concrete floor, since leaking seams will cause cracks in the coating, which leads to rapid destruction of the tile covering.
Various materials are used to seal expansion joints:
- Sealing harness. An effective method for sealing expansion joints in a concrete floor is to install polyester foam sealing tape. This material is quite practical to use and retains high elasticity even at low temperatures.
- Sealant for concrete floor joints. A very popular option is to use all kinds of sealing mastics. After curing, the material becomes elastic and completely seals the seams from water. The surface where the cracks have been treated with sealant will also not be a source of dust.
- Waterstops. Another way is to use a sealing material based on PVC, rubber or polyethylene. As such material, profiled tapes called waterstops are used, made of polymer materials, which, when pouring concrete mortar, are placed inside the expansion joint.
- Profiles for expansion joints. The last way to install expansion joints in a concrete floor is to use a profile for expansion joints, which consists of frost-resistant rubber and aluminum or steel guides. The sealing rubber does not allow dirt and moisture to pass through the seam. Installing such profiles allows you to reduce the effects of loads on the screed and prevent cracking of the concrete floor. Such profiles can be built-in or overhead.
Sealing seams with sealing mastic
In construction practice, different types of sealants are used. They differ in the number of components - they are one- and two-component, as well as in their chemical nature. The most common are polyurethane, acrylic and latex materials. Polyurethane sealants have the best indicators in terms of strength, relative elongation, resistance and durability.
Let's look at the procedure for sealing expansion joints in a concrete floor using a two-component sealant:
- Preparation of tools and materials. Before you begin sealing, you need to prepare: sealant mastic, a brush for applying the primer, a triangular narrow spatula for leveling the sealant layer, a deep penetration primer that strengthens the substrate, a frame gun for squeezing the sealant into the crack.
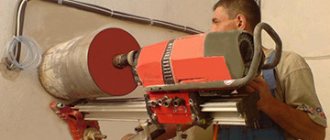
- Preparing the base. The base must be dry, strong, without signs of fungal infection, free from dust, any loose materials, oil, dirt, rust, grease, old paint or other substances, loose particles that could affect adhesion. Therefore, before sealing the expansion joint, it must be cleared of debris and dust by blowing with a stream of compressed air, through mechanical cleaning by sandblasting or brushing, and then treated with a primer. When using a compressor, you should make sure that it does not leave an oil film in the seam. It is better to widen a narrow seam slightly before applying sealant. To strengthen the bases, you must first treat them with a concentrated primer.
- Mixing the sealant. If you are using a two-component composition, mix the paste with the hardener until a homogeneous mass is obtained for 3-5 minutes. You must not violate the dosage of components, which is indicated in the instructions, because reducing the amount of hardener provokes under-curing of the sealant, and increasing it can result in a hard sealant. To increase fluidity, you can dilute the composition with a solvent (gasoline, white spirit) in the amount of 80 grams per 1 kilogram of composition.
- Applying sealant. Apply the sealant with a gun along the entire length of the joint in an even layer, then smooth the sealant strip with a trowel to level with the concrete floor, as shown in the video about joints in a concrete floor. To obtain an even and beautiful seam, you can moisten the spatula in a soap solution before smoothing. Remove excess sealant. The viability of such a sealant is approximately 40 minutes at a temperature of 20 degrees above zero. When the composition loses its viability, which is manifested in the ability to spread over the surface, it is recommended to apply a layer of cement or sand, which is 1-2 millimeters thick, onto the sealed crack. The time it takes for the sealant to gain strength is 5 - 7 days. When carrying out work indoors and after its completion, it is necessary to thoroughly ventilate the room.
In addition, the special elasticity of such a sealant allows it to be used for repair sealing of concrete floors - cracks and holes in floors and concrete slabs, as well as for repairing cracks in road surfaces. The composition can withstand temperature fluctuations from 50 degrees below zero to plus 60 degrees Celsius, which allows it to be used successfully for outdoor concrete work.
strport.ru
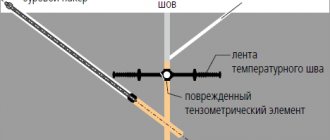
Protects against sudden temperature changes and deformation
According to its design features, a temperature expansion joint is a special groove or line. He divides the entire building into blocks. The size of such blocks and the directions in which the cut line divides the building are determined by the project, as well as by special calculations.
In order to seal these grooves, as well as to minimize heat loss, these grooves are filled with heat insulators. Various rubber-based materials are often used. Thus, the elasticity of the building increases significantly, and thermal expansion will not have a destructive effect on other materials.
Often, this cut is made from the roof to the base. The very foundation of the building is not divided, since the foundation is lower than the depth at which the soil freezes. The base will not be affected by low temperatures. The expansion joint spacing depends on the materials used, as well as on the point on the map where the object is located.
Most buildings and structures can use numbers from tables. The distance between expansion joints will be 150 m for those buildings that are built from prefabricated structures and heated, or 90 m for monolithic heated structures.
What types of expansion joints are there in brickwork and how to form them?
An expansion joint in brickwork is installed to prevent the appearance of breaks and cracks in load-bearing walls (including those that form the building frame). Mounted vertically, horizontally, shapelessly - depending on the purpose. In most cases, such seams are used as protection against temperature changes, which can cause subsidence of walls and cracking of the main concrete seams. What are they?
Expansion joints serve to protect walls from subsidence and cracking.
Types of expansion joints for brickwork
Main classification of expansion joints:
- temperature;
- seismic;
- sedimentary
They differ only in the method of formation and the impact of the foundation (that is, whether the seam will touch and relate to the foundation). They can be divided into vertical and horizontal, depending on the type of installation.
The basis of the expansion joint is a synthetic elastic material with a high degree of resistance to deformation or tearing. It is capable of withstanding loads of tens of tons without any consequences for itself. You need to understand that brickwork, when the ambient temperature fluctuates from +40°C in summer to -30°C in winter, can expand and contract by up to 5-10 mm. Without an elastic seam, this leads to the appearance of those same cracks. Moreover, they do not always pass through the cement mortar line.
Scheme of arrangement of expansion joints.
Quite often the structure of the brick itself is destroyed. And if a masonry of 2 bricks is used, and there is insulation inside, then because of all this it will be damaged and lose its main function - protecting the room from the cold. This is especially true for polystyrene foam, which begins to rot when wet.
The thickness of expansion joints is on average 1-2 cm. Moreover, its structure can be quite different. Some people simply use synthetics, others also insulate the seam (and this is considered a more correct variation of the technology). The best mounting option is tongue and groove. Due to this, specialized stiffening ribs will be created, thanks to which the structure receives additional resistance to mechanical damage and loads.
Expansion joint structure
The first thing you should focus on is that the thickness of the expansion joint is selected depending on the ambient temperature that was recorded at the time of construction. For example, if it is +10°C, then the width is set in the approximate range of 1 cm. If in the range from +30 to +40°C, then from 1.5 to 2 cm. But the best option is not to save. However, the durability of the building itself depends on the quality of the expansion joint.
Regarding the material from which the expansion joint is mounted, there are a lot of them. Some manufacturers even produce patented elastics for forming anti-shrink and anti-seismic seams. For example, it does this. The cost is extremely high, but the manufacturer provides a guarantee.
The Penekrit company produces elastics for filling expansion joints. Their price is quite high, but this is justified by the quality of the mixture.
Cheaper and time-tested variations of the expansion joint are:
- tourniquets;
- elastic fillers (similar to polyurethane foam, but when hardened, retains the property of deformation);
- plastic sealants;
- bentonite (combined strands, which partially contain concrete, are also produced from it).
The best option for expansion joints is a specialized sealant. They are more expensive than other materials, but they also last throughout the entire period of operation of the residential building.
Forming an expansion joint with your own hands
The ideal option is when the expansion joint is installed during the construction of the building, and not when it has already been in use for many years. In this situation, it is possible to connect both the concrete and the ceiling (roof), due to which the deformation of the seam will be uniform along the entire height (or length, if we are talking about a horizontal seam). This further reduces the likelihood of cracks occurring in monolithic building materials.
If the seam is formed during the construction stage, then it is enough just to make a larger indentation from one brickwork and pave the resulting hole with waterproofing and sealant.
From above, all this can be covered with either decorative plaster (for use on external walls) or siding, if its installation is planned. A similar procedure is carried out from the inside of the room (provided that the masonry is made of one brick). From above, the seam area can be further isolated from environmental influences by “clogging” it with a mineral wool mesh. By the way, it also improves waterproofing.
If the house has already been in use for a certain time, then the best solution is to install an expansion joint along a thread or crack, if they have already arisen. The installation principle is the same, as are the materials used. The only difference is that you will have to install ties (metal pins) inside the crack. There is nothing complicated about all this.
And the cost of building materials for forming a seam is quite low. But to form a recess you will need a fairly powerful hammer drill.
Protection in houses where people live
The expansion joint in a residential building has an ancient history. The use of these technologies began during the construction of the first Egyptian Pyramid. Then it began to be used for any stone structures. With the help of this trick, people have learned to protect their homes from temperature fluctuations and other natural disasters.
The operation of residential buildings often leads to various types of destruction of the base and foundation. Among the many possible causes, ground movement under the house can be identified. This is a signal of waterproofing failure. Subsequently, the house will collapse sooner or later.
Expansion joints of a brick house
Expansion joints.
A standard and familiar thing in large apartment buildings, and quite a rare occurrence in private, cottage construction. Why are they needed, and what are their benefits? Or rather, what harm comes from their absence. Naturally these are cracks.
Cracks on the walls of a house are different, as are the reasons for their appearance. Almost always, one can only guess about the exact reasons for the appearance of cracks on the walls of a house. Few people will undertake to accurately diagnose the causes of cracks, since there are many reasons for them and often this is a complex problem that does not have one clearly localizable cause. It is rather a combination of factors and reasons. But I won't complicate things. I'll try to explain as clearly as possible.
Very rarely in private construction, shrinkage and temperature cracks can pose a serious danger; such cases, of course, also happen, but they are usually visible to the naked eye. When the house is bursting at the seams and the walls are literally falling apart. Then yes, this is a problem, and it is a serious one.
But most often these are small deformation shrinkage cracks. All their trouble lies only in the fact that they spoil the appearance of the house and spoil the mood of the owners. They pose no danger. And, as I wrote above, there can be a lot of reasons for their appearance.
Let's look at this specific problem that arose in our house that we built.
The house is brick, the box is still without a roof, it stood for six months. Brick ceramics. The foundation is monolithic reinforced concrete, the total cross-section of the concrete strip is 150x45 cm. Which is the standard in our region. Specifically, the Rostov region. The soil is clay. The length of the walls of the house is up to 12.5 meters. Naturally, with such long walls, temperature expansion joints were not provided. Usually they are made on walls 15-20 meters long; in private cottages, walls this long are rare. As well as expansion joints.
- Armopoyas, monolithic reinforced concrete with a cross-section of 250x250 mm, is also present.
- The crack appeared in the middle of the window opening, only on the facing layer of brick.
- The foundation and armored belt, as well as the internal masonry of the wall, are not damaged.
The reasons here are obvious - the thermal expansion of the wall has found its weakest point, usually these are the lintels of the openings, the top or bottom of the window opening.
The fact is that at different temperatures the walls have correspondingly different linear dimensions. For example, in winter, the length of the wall may decrease by 1-2 centimeters, which, accordingly, can lead to deformations that will appear in weak spots in the form of cracks. In summer the situation is the same. Only in summer do the walls lengthen.
In the south of Russia, the wall of a house, in the summer, can warm up to 60 degrees quite calmly. A wall located on the south side can become even hotter under our sun. Moreover, only the facing layer warms up as much as possible and its expansion is much greater than the expansion of the internal masonry. Especially considering that the facing masonry is cut off from the main layer of thermal insulation. But at the same time, they are connected by masonry mesh reinforcement and stamping. Which, it would seem, is good, but in this case it creates significant internal stresses with different changes in the linear dimensions of the walls due to their different temperatures.
There is already one obvious reason for the appearance of such cracks, different temperature expansions of the front and inner parts of the wall.
In addition, there is also an armored belt (it is not visible in the photo), as we can see, while there is no roof, it is completely open, and accordingly it warms up just as much under the scorching sun. The linear elongation of concrete when heated can be greater than the elongation of brickwork. As a result, the expansion of the armored belt simply tears the weakest point of the wall. Just a window or doorway. Which is what we have in this case.
It seems that construction practice in the south of Russia needs to be slightly changed, and expansion joints need to be provided on walls longer than 8 meters. Temperature changes, even in summer, can reach 40 degrees, which, in my opinion, is a lot.
But there is a problem here, rather an aesthetic one: the appearance of expansion joints is not liked by home customers. It is difficult to make an expansion joint invisible, and even more difficult to make it beautiful. But you have to choose between possible cracks or expansion joints on the walls.
In this case, while there is no roof, the problem can be solved in two ways.
The first method is to carefully dismantle the brickwork of the facing layer and re-lay it. It is removed approximately as in the picture, 32 bricks. The cracked brick changes. Outwardly everything will be fine, but will this solve the problem? There is still no expansion joint. And the weak point of the wall will remain right here, in this place, and will not go anywhere.
Perhaps, after installing the roof, the crack will no longer appear, it won’t, the reinforced belt will warm up, and the roof eaves will also somehow reduce the heating of the walls. But will this help in the end, and will this solve the problem, the lottery.
Second option. At this point, at the site of the crack, we make a thermal seam, that is, we cut the facing masonry along the crack, cutting it as neatly and evenly as possible. And the resulting incision is filled either with a special deformation tape or with a plastic suture sealant. Almost like in the picture. It won’t be so beautiful, but there won’t be a crack anymore; its place will serve as an expansion joint. This will not affect the strength of the wall, lintel and the house itself. The house is one-story and has a wooden attic. But, do not forget that this is still a jumper, a place clearly not intended for an expansion joint. Therefore, the option is not the best.
These are options for solving an existing problem. It is better, of course, to avoid these problems in the first place. And for this purpose it is precisely necessary to provide expansion joints, even on walls 8 meters long. Apparently, temperatures in the summer in the south of Russia have already exceeded the limits laid down in the old standards. Perhaps, of course, the quality of the bricks, which is falling every year, is having an effect. There are many reasons, as I wrote. And in order not to deal with cracks later, it is better to provide constructive options for solving such problems. This will be useful for your home both in summer and winter. And not only in terms of preventing temperature cracks, but also in terms of preventing sedimentary cracks on the walls, which are also not uncommon due to natural shrinkage, of a newly built house.
Temperature expansion joint is not difficult to do. There is a lot of information on its designs and methods of formation on the Internet. I won’t describe it in detail, I’ll just attach a few pictures for clarity.
There are options for a smooth vertical expansion joint, and there is a zigzag seam. In my opinion, a simple vertical seam is simpler and looks better. In addition, it is clearly easier to form and easier to seal with sealant or special tape.
By the way, there are also special tape sealants for these purposes, in the form of long sausages placed in these seams. But since expansion joints are a rare phenomenon in private construction, you most likely won’t be able to find them in building materials stores. You need to look for them either at large construction sites, or from suppliers of materials for these largest construction projects. It is easier to choose a good, elastic joint sealant, which will be used to fill the formed expansion joint in a brick or concrete wall.
By the way, as you understand, these seams are far from eternal. Sometimes they may require repairs, replacement of sealant or sealant. So once every 10 years, it’s worth remembering about them and checking their condition. If water gets into the seam, it won’t be good for your walls, especially in winter. In the worst case scenario, even more serious damage to the walls is possible due to their periodic freezing.
And of course, we will sort out the problem that is in the photo so that it does not spoil the mood of the owners. But for the future, we will insist on expansion joints on external walls, already 8 meters long. And accordingly, we will warn about the possibility of such cracks appearing on the walls of the house. Unfortunately, there is no escape from this.
Actually, this is why this article was written, with pictures. It’s easier to give a person a link so that he can read this article than to repeat the same thing many times to different people.
That’s all, I have nothing more to add to this particular case, but cases, as you know, can be very different, and it’s not a fact that this is your case, and it’s also not a fact that the described methods for eliminating and preventing such problems are right for you .
IMPORTANT!
Thank you for your attention to my site. If you want to sell or buy real estate. And also if you are planning to build a house. Contact me at a convenient time, and perhaps I can offer you interesting options for the fastest and most profitable implementation of your plans.
In any case, all consultations are free. And my experience will definitely not be superfluous. For any questions related to construction and real estate, please contact us individually.
Komarov Igor. Taganrog.
INFORMATION.CONTACTS.REAL ESTATE.CONSTRUCTION.
Get the best conditions.
Buying and selling real estate in Taganrog and its suburbs. Houses, cottages, apartments, commercial real estate. New buildings and secondary market. Construction of cottages in Taganrog, Rostov-on-Don, Krasnodar Territory and Crimea. Projects, estimates, consultations. Extensive experience and a guarantee of up to 10 years!
- About me.
- Buy property.
- Sell real estate.
- Order the construction of a house.
- Contacts.
Call at any convenient time.
- Go to the contacts section.
- Tel
- Write - Whatsapp.
Buying, selling real estate.
- Buy property.
- Services for the buyer.
- Mortgage.
- Sell real estate.
- Services for the seller.
- Cost of services.
Order the construction of a house.
- Construction.
- Construction consultations.
- Construction technologies.
- Cost of building a house.
- Home warranty.
- Agreement.
- Select a house project.
- Cities in which we are ready to work.
What if the house is made of brick?
Seam in a brick house
Here, such protection measures should be provided at the design stage. In order to arrange the cut, a tongue and groove is used in the brickwork, which will be lined with two layers of roofing felt. Then everything is covered with a layer of tow and again everything needs to be covered with a lock based on water and clay.
- The tongue and groove is created during the construction of the building. However, if it does not exist and is not provided, and it is very necessary to make such a protective agent, then everything can be done using a hammer drill, but you need to work very carefully. What is a tongue and groove? This is a technological notch. The dimensions of such a recess are 2 bricks high and 0.5 deep.
- At this stage, it is necessary to cover the future expansion joint in the brickwork with the same roofing felt and hammer it with the same tow. Due to their unique properties, these materials do not react in any way to temperature changes, and the masonry, in turn, will not react to them either.
- Now it's time to close this groove. Most people use concrete or cement mortar for this. However, clay-based putty is much better suited for these purposes. The effectiveness is due to the fact that clay is an excellent heat insulator and waterproofing agent. Clay also has a decorative function.
Thermal joint in brickwork
An expansion joint in brickwork is necessary to ensure high-quality and effective protection of the building from premature destruction due to uneven shrinkage of the building or soil instability.
If created competently and correctly, it will help prevent the appearance of cracks in the walls of the building and breaks in the load-bearing walls. An expansion joint in the brickwork will help to avoid cracking of walls due to significant temperature changes. Great attention is paid to the design of an expansion joint, since the strength and durability of the building depends on its implementation. There are several types of seams that increase the resistance of a structure to various factors affecting its durability:
Temperature connections provide reliable protection of walls from the negative effects caused by changes in ambient temperatures. Their design complies with SNiP II-22-81 regulations, paragraphs 6.78-6.82.
Their peculiarity is that such seams are arranged in accordance with the height of the walls, without affecting the foundation.
A brick wall at a temperature of +20°C in the hot season and -18°C or lower during the winter cold expands and contracts. Its height changes accordingly. The range of such changes reaches 0.5 cm for every 10 m of height. The size of the seam depends on the air temperature, but in any case, when creating them, a tongue and groove is used, filled with an airtight, dense gasket in order to avoid blowing.
The width of the seam is from 0.1 to 0.2 cm, depending on the air temperature in each individual area.
Settlement joints are designed to protect the load-bearing walls of a building from deformation and premature destruction under the influence of increased loads. It is these loads that lead to uneven shrinkage of the building and the appearance of cracks on the walls.
These defects most often occur during the construction of multi-story buildings. Sedimentary expansion joints begin to form from the foundation of the house.
Anti-seismic seams are those whose installation is mandatory in areas with increased seismic hazard. Soil mobility and tremors lead to significant deformations, which result in cracking of walls and their subsequent destruction. The peculiarity of such seams is that with their help the building seems to be divided into separate stable blocks.
To fill the seam, insulation, sealant and mastic are used, the density of which will ensure the quality of the device and withstand the upcoming loads.
The quality of the joint filling determines the building’s ability to withstand deformation, its reliability and durability.
Device
The most common is a temperature expansion joint, since significant temperature changes become one of the most common reasons why building walls crack and collapse. The width of the seam being made depends on the temperature level.
In accordance with the regulations, it cannot be less than 2 cm, and in some cases reaches 3 cm. This is due to the fact that expansion joints have sufficient horizontal mobility. The distance between the joints is no less than 15 and no more than 20 m. In the hottest areas, this distance can be reduced to 10 m. For more information about the need for brickwork joints, see this video:
The design is easy to install. The work is done using:
- tourniquets;
- elastic fillers, characterized by their ability to retain elasticity after hardening;
- bentonite or other substances containing a small percentage of concrete;
- sealants with increased elasticity.
The construction of the expansion joint begins during the construction of the house. To do this, it is enough to retreat the required distance from the main masonry and fill it with insulation or sealant. The installation process will be easier if the depth of installation of the sealant is small.
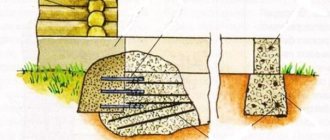
Protecting the blind area
So, to make expansion joints in the blind area, you need to:
- Dig a trench along the petimeter of the building. Its depth should be 15 cm. The width of the trench should be greater than the roof canopy;
- Fill the bottom of the trench with a cushion of crushed stone, and lay roofing material on top along the entire perimeter;
- Install the frame based on the reinforcement.
Before moving on to concrete work on the blind area, we will make a protective seam. It should be done on the line where the walls and the blind area connect. To organize a groove, it is enough to install boards of small thickness between the blind area and the wall. These grooves are also necessary across. This is done using the same method. You need to maintain a distance of 1.5 m.
After pouring, the concrete mixture will go where it is needed, but there will be grooves where the boards are installed. After the solution has sufficiently hardened, the wood can be pulled out. The cracks can be sealed with sealant or other means. The most important thing is that the cuts are not empty, otherwise there will be zero protection.