LED lamp
Represents a small luminous diode element operating from direct current, mainly 12V. To create lamps, they are assembled in several, depending on the required light intensity. The advantages of such lighting:
- low power consumption;
- service life from 100,000 hours;
- can work for days without shutting down;
- There is a large selection of different models on sale.
The main disadvantage is the high cost of ready-made LED lamps. The sellers do not understand the issue well and cannot answer your questions competently. The characteristics of the lamp itself do not take into account losses when light passes through the diffuser, ground glass and the properties of the reflector.
The packaging of the lamp contains calculated data based on the characteristics and number of LED elements. Therefore, in fact, the luminous flux of the purchased lamp is significantly lower than required and the lighting is weak. The lamps themselves and the parts for creating the circuits cost pennies. Therefore, the easiest way for craftsmen is to do everything with their own hands.
Use of LED lamps
In houses and apartments, constant lighting of some place is often necessary. These could be stairs and children's rooms, toilets where there are no windows, and there is a child living in the house who cannot reach the switch.
Dim light and low energy consumption make it possible to install lighting in entrances and porches, in front of gates and garage doors. Lamps with a soft glow due to glare suppression are used to illuminate work tables in offices and kitchens.
DIY making
There are many different forms of lamps and lighting systems that can be made with your own hands in a housing, or you can use ready-made tape , which is also very convenient. For example, when creating backlighting for a keyboard or shelves in a closet.
What is required to make a LED lamp? You don’t have to think long, because LED light sources are universal. They can be connected to AC or DC voltage of any rating. It is enough to make a high-quality driver or control unit and correctly arrange the LEDs on the plate.
Mounting and installation
Before you start making an LED lamp, you should think about its purpose. If it is installed in a standard cartridge, then this will require a base E27, E14, G9. You can take it from any old light bulb, for example, a fluorescent one. The same principle is followed when lighting a greenhouse with LED lamps.
Depending on the purpose, LED lamps can also be different. Some are intended for general lighting, for use as night lights or as a phytolamp for growing plants. In the first case, bright LEDs with a cold or warm glow are used to make lamps From the point of view of the effect on human vision, it is better to buy lamps with a yellow glow, the same applies to the choice of LEDs themselves.
And when it comes to a night light or dim lighting, then for its production you should choose colors other than white or use low-brightness lighting modes. If you need to make a phytolamp for growing plants, then it is better to choose red and blue colors of the light flux. It is the spectrum of these shades that has a beneficial effect on growth and ensures intensive development of plants.
DIY LED lamp
For the design we will need: - part of a housekeeper type lamp, the one with a base; - 5630 LEDs; - 4 1n4007 diodes; - electrolytic capacitor from 3.3 uF; - resistor R1 - 470k, 0.25 watt - resistor R2 - 150 ohms , 0.25 watt—resistor R3—more on that later.—capacitor type K73-17 with a capacity of 0.22 μF and an operating voltage of 340 V;
The circuit is simple with a quenching capacitor. There are 8 LEDs.
Scheme for selecting capacitor capacitance.
Adjustable resistor R3. I set it to maximum resistance before turning it on, so that the instrument needle did not go off scale. Then I reduced it to a minimum. Capacitor C2 with a voltage of 340V. When testing, I set it to 10 uF, but due to its size it did not fit into the case, so I set it to a lower value. Why so much tension? This is in case of an open circuit with the LEDs. Since the voltage will jump to a voltage higher than the AC mains voltage by 1.41 times (230 * 1.41 = 324.3 V).
I was guided by measurements taken on a test circuit with a milliammeter. The payment was made using LUT technology. SMD LEDs. Board in lay 6 version format included
We etch the board, drill holes and tin.
The board is mounted in the base part of the case. The diameter of the housekeeper case is 38 mm, the board is 36 mm.
Capacitor C1 is soldered to resistor R1. Again due to the limitation of the case. Resistor R2 is located outside the board and acts as a “pull-up”. Due to this, the board is pressed tightly against the body.
Solder the resistor and wire to the base.
The first switching was done through a light bulb. The lamp consumption was 7.45 watts. There is no way to measure the luminous flux, but by eye it is more than 3 watts (when compared with a nearby purchased one).
The circuit does not have galvanic isolation from the network. Be careful when experimenting and using
Also be careful when installing the lamp. Installation should be carried out with the switch turned off
The lamp has been working for about a year and a half with constant on/off.
In the video you can see everything in detail:
Mains powered LED lighting
But to build an LED lighting circuit, it is necessary to build special power supplies with or without regulators, transformers. As a solution, the diagram below shows the design of a mains-powered LED circuit without the use of transformers.
220 V LED lamp circuit
To power this circuit, 220 V alternating current is used, which is supplied as an input signal. Capacitive reactance lowers the AC voltage. Alternating current is supplied to the capacitor, the plates of which are continuously charged and discharged, and the associated currents are always flowing into and out of the plates, causing reactance against the flow.
The response produced by a capacitor depends on the frequency of the input signal. R2 dumps the accumulated current from the capacitor when the entire circuit is turned off. It is capable of storing up to 400V, and resistor R1 limits this flow. The next stage of the DIY LED lamp circuit is a bridge rectifier, which is designed to convert the AC signal to DC. Capacitor C2 serves to eliminate ripple in the rectified DC signal.
Resistor R3 serves as a current limiter for all LEDs. The circuit uses white LEDs, which have a voltage drop of about 3.5 V and consume 30 mA of current. Since the LEDs are connected in series, the current consumption is very low. Therefore, this circuit becomes energy efficient and has a low-cost manufacturing option.
LED lamp from waste
LED 220 V can easily be made from non-working lamps, the repair or restoration of which is impractical. A strip of five LEDs is driven using a transformer. In a 0.7 uF / 400V circuit, polyester capacitor C1 reduces the network voltage. R1 is a discharge resistor that absorbs the stored charge from C1 when the AC input is turned off.
Resistors R2 and R3 limit the flow of current when the circuit is turned on. Diodes D1 - D4 form a bridge rectifier that rectifies the reduced AC voltage, and C2 acts as a filter capacitor. Finally, Zener diode D1 provides LED control.
The procedure for making a table lamp with your own hands:
Disassemble and carefully remove broken glass. Carefully open the assembly. Remove the electronics and remove them. Assemble the circuit on a 1 mm laminate sheet. Cut a round sheet of laminate (with scissors). Mark the positions of the six round holes on the sheet. Drill holes to match the LEDs flush in the six holes. Use a glue tip to hold the LED assembly in position. Close the assembly. Make sure the internal wiring does not touch each other. Now test carefully at 220V.
LED for car
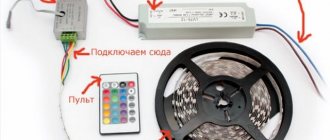
Using LED strip, you can easily make homemade beautiful exterior lighting for your car. You need to use 4 LED strips of one meter each for a clear and bright glow. To ensure waterproofness and strength, the joints are carefully treated with hot-melt adhesive. Correct electrical connections are checked with a multimeter. The IGN relay is energized when the engine is running and turns off when the engine is turned off. To lower the car voltage, which can reach 14.8 V, a diode is included in the circuit to ensure the longevity of the LEDs.
DIY LED lamp 220V
The cylindrical LED lamp ensures a correct and uniform distribution of the generated illumination over all 360 degrees, so that the entire room is evenly illuminated.
The lamp is equipped with an interactive surge protection function, ensuring the device is perfectly protected from all AC surges.
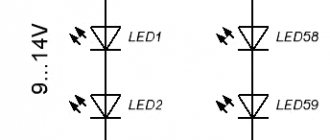
40 LEDs are combined into one long chain of LEDs connected in series one after the other. For an input voltage of 220 V, you can connect about 90 LEDs in a row, for a voltage of 120 V - 45 LEDs.
The calculation is obtained by dividing the rectified voltage of 310 VDC (from 220 VAC) by the forward voltage of the LED. 310/3.3 = 93 units, and for 120V inputs - 150/3.3 = 45 units. If you reduce the number of LEDs below these numbers, there is a risk of overvoltage and failure of the assembled circuit.
How to connect an LED to a 220 volt network
An LED is a type of semiconductor diode with a supply voltage and current much lower than in a household electrical network. If connected directly to a 220 volt network, it will instantly fail.
Therefore, the light-emitting diode must be connected only through a current-limiting element. The cheapest and easiest to assemble are circuits with a step-down element in the form of a resistor or capacitor.
The first thing you need to know when connecting to a 220V network is that for a nominal glow, a current of 20 mA must pass through the LED, and the voltage drop across it should not exceed 2.2-3V. Based on this, it is necessary to calculate the value of the current-limiting resistor using the following formula:
- Where:
- 0.75 – LED reliability factor;
- U power is the voltage of the power source;
- U pad is the voltage that drops across the light-emitting diode and creates a luminous flux;
- I – rated current passing through it;
- R – resistance rating for regulating the passing current.
After appropriate calculations, the resistance value should correspond to 30 kOhm.
However, do not forget that a large amount of heat will be generated at the resistance due to the voltage drop. For this reason, it is additionally necessary to calculate the power of this resistor using the formula:
For our case, U will be the difference between the supply voltage and the drop voltage across the LED. After appropriate calculations, to connect one LED, the resistance power should be 2W.
An important point that you need to pay attention to when connecting an LED to an AC network is the reverse voltage limitation. Any silicon diode designed for a current no less than that flowing in the circuit can easily cope with this task
The diode is connected in series after the resistor or with reverse polarity in parallel with the LED.
There is an opinion that it is possible to do without limiting the reverse voltage, since electrical breakdown does not cause damage to the light-emitting diode. However, reverse current can cause the pn junction to overheat, resulting in thermal breakdown and destruction of the LED crystal.
Instead of a silicon diode, you can use a second light-emitting diode with a similar forward current, which is connected in reverse polarity in parallel with the first LED. The downside to current-limiting resistor circuits is that they require a lot of power dissipation.
This problem becomes especially relevant when connecting a load with a large current consumption. This problem is solved by replacing the resistor with a non-polar capacitor, which in such circuits is called ballast or quenching.
A non-polar capacitor connected to an AC network behaves like a resistance, but does not dissipate the power consumed in the form of heat.
In these circuits, when the power is turned off, the capacitor remains undischarged, which creates a risk of electric shock. This problem is easily solved by connecting a 0.5-watt shunt resistor with a resistance of at least 240 kOhm to the capacitor.
Calculation of a resistor for an LED
In all of the above circuits with a current-limiting resistor, the resistance is calculated according to Ohm's law:
R = U/I
- Where:
- U is the supply voltage;
- I – LED operating current.
The power dissipated by the resistor is P = U * I.
If you plan to use the circuit in a low-convection package, it is recommended to increase the maximum power dissipation value of the resistor by 30%.
Calculation of a quenching capacitor for an LED
Calculation of the capacity of the quenching capacitor (in μF) is carried out using the following formula:
C = 3200*I/U
- Where:
- I is the load current;
- U – supply voltage.
This formula is simplified, but its accuracy is sufficient for connecting 1-5 low-current LEDs in series.
To protect the circuit from voltage surges and impulse noise, a quenching capacitor must be selected with an operating voltage of at least 400 V.
It is better to use a ceramic capacitor of the K73–17 type with an operating voltage of more than 400 V or its imported equivalent. Electrolytic (polar) capacitors must not be used.
How to make a phytolamp
LED lamps are widely used, especially often used for growing plants in greenhouses. For this, the so-called phytolamp is used. Its peculiarity lies in the spectrum of light. Plants grow well in red, blue and yellow shades of light. For example, red promotes better photosynthesis , blue stimulates growth at the cellular level, and yellow enriches the plant with other important components. Therefore, DIY LED lamps will be an ideal option, especially when it comes to growing plants.
Bending pipes from different materials without a pipe bender
But in order for the plant to really grow intensively in the greenhouse, strengthen and form faster, it is necessary to maintain the proportion of the amount of red light to blue in a ratio of 1:3. And add a little yellow. The plant in such conditions is much stronger , more resilient and healthier. Therefore, if you decide to grow seedlings, you can make a phytolamp yourself. To do this, you will need to buy a strip or combine red and blue LED colors in greenhouse lights. Such lighting in a greenhouse will not require significant material waste, because the price of materials is lower than that of a finished phytolamp.
Thanks to the ability to place lighting sources in any convenient place, you can save on electricity. For example, the tape can be stretched over the plants themselves, eliminating unnecessary waste on lighting the space of the entire greenhouse.
To make a lamp, you do not need to buy special LEDs; for greenhouses, market ones or those ordered from an online store are quite suitable. There are various models on sale , it is important that the brightness is sufficient and the color matches the effective spectrum.
Basic design
When it comes to making your own LED lighting for greenhouses or for other specific needs, the type of design is selected based on the features of its fastening. If you are going to install it in a standard pendant lamp with an E27 socket, then, accordingly, it is better to use a standard base.
The light bulb body can be made from any transparent material. But you will get the best effect from direct glow without using various filters. But flasks and diffusers are just that. When it comes to making a lamp for household needs, beauty can be put on the back burner.
Selecting a Power Source
LED light sources are universal. They can be connected to any supply voltage. But just to do this you will need to make the necessary driver or a simple power supply ; the design of the device should be selected based on the location of the lighting. There is almost always high humidity in the greenhouse, so the power supply must be sealed.
In practice, there are a lot of diagrams for connecting LEDs when making greenhouse lighting with your own hands, powered both from a 12V DC network and a 220V AC network. But the formats of the supply circuits do not end there, because any voltage can be used using standard calculations.
How to calculate the power supply
To select the right components and select the correct modes of operation of the lighting source for a greenhouse or other place, you need to know the parameters of the LEDs. And these include:
- Supply voltage when connected directly. Almost all LEDs, unless it is an assembly, have a standard supply voltage of 3 V.
- Current consumption when connected directly. A standard pn junction consumes 20-30 mA for normal lighting. But there are also LEDs with increased current up to 100 mA or more, called super-bright. Therefore, it is important to check the parameters in the reference literature, since it is available without restrictions on many portals.
- Peak current and voltage. These values are indirect, but are important when calculating a high-quality and reliable source.
How many square meters in 1 are of land
Knowing the parameters of the LEDs, you can begin to select a switching circuit. First of all, we draw up the geometry of the LEDs on the board or plate, depending on what the lamp is made for. There are 3 LED switching schemes, which are used in equal proportions by various manufacturers:
- Sequential connection. The simplest and most reliable when creating effective lighting. Simplicity lies in the absence of the need to create various converters. For example, when using 70 LEDs for a lamp, the power supply will consist of only one component - a resistor with a resistance of 330 Ohms and a dissipation power of 0.5 W. In this case, the LEDs are connected to a 220 V network. A disadvantage of the circuit may be that if one of the LEDs fails, all of them stop lighting at once. And when it burns out at the short circuit, the current increases, which will lead to the output of another one, and so on along the chain. The current in the entire circuit is equal to the current of one LED.
- Parallel connection. Each LED is supplied with a voltage of 3 V, limited by a resistor or from a stabilized power source. If one of the LEDs fails , the others continue to light, which is an advantage. The total circuit current is calculated as the sum of the currents in each of the LEDs. When connecting the same 70 LEDs with a current consumption of 30 mA, the total value will be 2.1 A. To limit the current, you will have to take a resistor with a resistance of 100 Ohms and a power of more than 400 W. Although the power consumption of 1 LED is less than 10 mW, and 70 is only 6.3 W. Therefore, it is better to make a driver or use a capacitor source without a transformer. The capacitor cannot dissipate the power, so it will simply be limited, but a current of 2.1A will require a larger capacitor, which will make it difficult to fit into the lamp body.
- Combined circuit combining parallel and serial connections. Quite often, such a switch is observed in Chinese-made household lamps with 6 powerful LEDs. 3 LEDs are connected in series and the strings are connected in parallel. The total current should be calculated in parts separately in parallel and series circuits, and so on, depending on the connection. The source is selected based on the obtained value.
Sourdough cabbage according to lunar phases: tips and recipes
For example, in the case of a lamp with 6 LEDs, the total current consumption at a supply voltage of 9 V will be only 60 mA. If you use a current-limiting resistor, you will need to use a resistance of 3.5 kOhm and power dissipation with a margin of 2 times - 24 W, which is also completely irrelevant. After all, the total power consumption of the LEDs themselves will be 0.54 W. Therefore, it is better to use a source with a decoupling capacitor or a transformer driver on a PWM controller. Using the same principle, you can make LED chandeliers with your own hands with any number of homemade light bulbs.
Let's consider an example of calculating a power source for a lamp with 20 LEDs connected in series-parallel. The first step is to make a reservation. If you want to make a truly reliable light source, you will need to add to the circuit:
- Varistor with a pulse voltage of 278 V, provided that a 220 V circuit is connected.
- An electronic fuse will protect the device from excess current in the event of one of the LEDs burning out during a short circuit.
- Stabilizer. To increase the reliability of the lamp, a stabilizer of 3V or more should be included in its circuit, depending on the total voltage of the series connection of the LEDs. There are 10 of them in the lamp in question, so the stabilization voltage should be 30 V.
Practical implementation
In practice, the driver circuit is significantly simplified, eliminating all kinds of protections and fuses. Therefore, it is difficult to call ready-made lamps high-quality. But this is not always the case. Expensive LED lamps are equipped with a truly reliable source with all protections.
Lamp assembly
First of all, it is necessary to remove the electronic ballast plate from the lamp. Then pieces of LED strip are glued onto it. In this case, the number of glued rows can be different, for example, six rows of three diodes each with a transverse installation. Installation variations can be different, the main thing is to accurately maintain the power of the required glow.
power unit
It is necessary to dwell on this element of the new lamp in more detail, because the LED strip on the power supply of a fluorescent lamp will not work. The thing is that the LED strip requires stabilization of voltage and current. If this is not done, the diodes will overheat and eventually simply burn out.
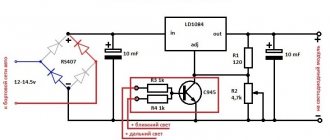
In our case, the best option is a power supply without a transformer, but with a ballast capacitor. Here is a diagram of the power supply from below.
Power supply with ballast capacitor
In this circuit, C1 is the same ballast capacitor that extinguishes the mains voltage of 220 volts. After it, the current is supplied to the diode rectifier VD1-VD4. After this, a constant voltage is applied to filter C2. To ensure that the capacitors discharge quickly, two resistors R2 for C1, R3 for C2 are installed in the circuit. Resistor R1 is a kind of mains voltage limiter, and diode VD5 is protection against output current overvoltage, which is a maximum of 12 volts (this is in case the LED strip breaks).
The most important element in this electrical network is capacitor C1
Here it is important to accurately select it according to the required capacity parameters. There is no need to use complex formulas for this.
Just find a calculator on the Internet that will help you accurately calculate. True, for this you will need one introductory information: the current strength on a piece of LED strip. This is usually indicated in the product passport.
But keep in mind that the accompanying documents indicate the maximum current parameter, so you should not take it as the main one. For example, a current of 150 mA will be normal for a new lamp 30 cm long. In this case, the LEDs will not heat up, and the brightness of the glow will be sufficient.
Power supply for LED strip
Try entering our data into the calculator, you will get the capacitor capacitance indicator - 2.08 µF. We round it up to the standard - 2.2 microfarads, which will withstand voltages up to 400 volts.
electronic ballasts
There is no need to throw away electronic ballasts that constantly fail. It needs to be checked for serviceability
It is important here that the diode bridge is intact; all other parts can be removed
But now you need to check the power supply and plateau for correct operation. You just need to connect an LED strip to the block, plug it into an outlet and check how the LEDs work. If you are satisfied with everything, then you can install the power supply into the lamp body and make a permanent connection of all its parts to each other.
More powerful design
In principle, increasing the power of a homemade LED lamp is not a problem. What needs to be added to the diagram already described for this?
- Four pieces of LED strip with three LEDs each.
- Another capacitor for one microfarad.
The result is a DIY LED lamp with 24 crystal diodes with a total brightness of 360 lumens. Here is her diagram below:
It should be noted that the power of this lamp is approximately 6 watts. But it shines much brighter than a regular 40-watt energy-saving fluorescent light bulb. At the same time, it consumes much less electricity. Let’s add that you can vary the color of the LEDs, because some people like cool white color in their home, while others like warm white.
And one last thing. Assembling LED lamps with your own hands is just fun. Anyone who does not understand anything about the diagrams and the parts used, do not even try to carry out the installation yourself. First of all, nothing will work. Secondly, this may end due to poorly carried out processes.
What do you need to know about safety when fixing to the ceiling?
Here experts give several important recommendations:
LEDs get very hot
Therefore, special radiators are used for cooling. Contact and heat dissipation are improved thanks to special thermal paste at the junction between two important elements. When installing, it is important to ensure that there is free space around the radiators, not enclosed. Otherwise, the LEDs will fail prematurely.
It is also prohibited to install lamps near heating appliances.
Special regulators and light bulbs with a dimming function will be needed for those who are interested in adjusting the level of brightness and lighting. Availability of replacement lamps is an important factor when choosing suitable models.
Where can you hang an LED light?
Stretch and suspended ceiling structures – these are the products with which LED spotlights are most often used. Devices can be located in the center or on the sides. Here, each buyer chooses the option that best meets current operating conditions.
Assembling a lamp from LED strip
Let's look at the step-by-step creation of a 220 V light source from an LED strip. To decide to use an innovation in the kitchen, it is enough to remember that LED lamps assembled by yourself are significantly more profitable than their fluorescent counterparts. They live 10 times longer and consume 2–3 times less energy at the same lighting level.
For construction you will need two burnt out fluorescent lamps half a meter long and 13 watts in power. There is no point in buying new ones; it is better to find old ones that are not working, but not broken and without cracks. Next, we go to the store and buy an LED strip. There is a large selection, so please purchase responsibly. It is advisable to buy tapes with pure white or natural light; it does not change the shades of surrounding objects. In such strips, LEDs are collected in groups of 3 pieces. The voltage of one group is 12 volts, and the power is 14 watts per meter strip. Then you need to disassemble the fluorescent lamps into their component parts
Carefully! Do not damage the wires or break the tube, otherwise toxic fumes will escape and you will have to clean up, like after a broken mercury thermometer. Do not throw away the removed entrails; they will be useful in the future.
Below is a diagram of the LED strip we purchased. In it, the LEDs are connected in parallel, 3 pieces in a group. Please note that this scheme does not suit us. Therefore, you need to cut the tape into sections of 3 diodes each and get expensive and useless converters. It is more convenient to cut the tape with wire cutters or large and strong scissors. After soldering the wires, you should get the diagram shown below. The result should be 66 LEDs or 22 groups of 3 LEDs each, connected in parallel along the entire length. The calculations are simple. Since we need to convert alternating current into direct current, the standard voltage of 220 Volts in the electrical network needs to be increased to 250. The need to “throw up” the voltage is associated with the rectification process. To find out the number of LED sections, you need to divide 250 Volts by 12 Volts (voltage for one group of 3 pieces). As a result, we get 20.8(3), rounding up, we get 21 groups. Here it is advisable to add another group, since the total number of LEDs will have to be divided into 2 lamps, and for this you need an even number. In addition, by adding another section, we will make the overall scheme safer. We will need a DC rectifier, which is why we cannot throw away the removed insides of the fluorescent lamp. To do this, we take out the converter and, using wire cutters, remove the capacitor from the common circuit. This is quite simple to do, since it is located separately from the diodes, you just need to break off the board. The diagram shows what the end result should be, in more detail. Next, using soldering and superglue, you need to assemble the entire structure. Don't even try to fit all 22 sections into one lamp. It was said above that you need to specifically find 2 half-meter lamps, since it is simply impossible to place all the LEDs in one. You also don't need to rely on the self-adhesive layer on the back of the tape. It will not last long, so the LEDs need to be secured with superglue or liquid nails.
Let's summarize and find out the advantages of the assembled product:
- The amount of light from the resulting LED lamps is 1.5 times greater than that of their fluorescent counterparts.
- The power consumption is much less than that of fluorescent lamps.
- The assembled light source will last 5–10 times longer.
- Finally, the last advantage is the direction of light. It does not dissipate and is directed straight down, so it is used near the desktop or in the kitchen.
Of course, the emitted light is not very bright, but the main advantage is the low power consumption of the lamp. Even if you turn it on and never turn it off, it will consume only 4 kW of energy in a year. At the same time, the cost of electricity consumed per year is comparable to the cost of a ticket on a city bus. Therefore, such light sources are especially effective to use where constant illumination is required (corridor, street, utility room).
LED lamp 2 watts
A 2-watt lamp made of fifty-four single-chip SMD3528 LEDs into a table lamp. Current consumption 11 mA. Capacitor 0.47 µF.
Principle of operation
Here, owners must take into account several features:
- An alternating voltage of 220 V is supplied to the drivers of LED lamps. The frequency of such energy is 50 Hz.
- Next, the flow itself passes through a capacitor that limits the current.
- The next component where energy ends up is a rectifier bridge assembled on the basis of four diodes.
At the output of the bridge, in the next stage, a rectified voltage appears. It is this energy option that is needed for the diodes to work correctly. But the driver needs to be supplemented with an electrolytic capacitor for the device to start functioning as it should. Then the ripples that occur when the alternating voltage is rectified are smoothed out.
The device also contains resistances of various types. A special resistor is used to discharge the capacitor for additional protection. The other, designated 1 in the diagrams, limits the current that flows to the light bulb when turned on.
220V LED light bulb device
The following components are distinguished in any LED lamp:
- The light flux becomes uniform thanks to the diffuser.
- Resistors or chips that protect against sudden changes in performance.
- Printed circuit board for soldering LEDs.
- A radiator that removes heat.
- Driver. It is the basis for assembling a circuit that converts alternating current voltage into direct current. The main thing is to get the required value at the output.
- Dielectric gasket between the housing and the base.
- The base into which a chandelier and sconce are screwed, a lamp.
The difference between LED and fluorescent: a brief description
The main differences are related to the design. The basis of fluorescent lamps is a glass bulb. Mercury vapor and inert gases fill part of this device inside. Sealing ensures tightness. The scope of application is wider thanks to kits with sockets of various sizes.
LED lamps are built on electronic matrices. This is the electronic connection of several diodes to each other. The products also contain other auxiliary elements to ensure stable operation of the mechanism. Low energy consumption is the main advantage of LED lamps compared to others.
Main conclusions
You can make a lamp yourself using improvised means and inexpensive radio products. Also, this will require direct LED elements - lamps or strips. They can be both low-power and strong. When choosing a material for the body, you need to proceed from the parameters of their heat transfer. To connect such a device to a network without a power supply, you will need to make a driver with a quenching capacitor, having previously calculated it using the formula.
Using the proposed technology, it is possible to produce lamps of any shape and parameters for installation as the main or decorative source of lighting. You can mount them with your own hands on the ceiling and walls in lampshades, chandeliers and table lamps, as well as in any other specially made artistic design.
Previous LEDs Formula and example of calculating the limiting resistor for an LED Next LEDsDetails about the characteristics of LED lamps
Scope of application
The advantage of LED light sources is their versatility. Manufacturers produce LED matrices or LEDs themselves that vary in emission power, shape and number of elements. Therefore, you can design lamps at your discretion, either on a standard base from a broken lamp, or on a specialized one in accordance with the requirements for connecting to a driver or control board.
The advantage of LED light sources is that the brightness of the light can be controlled by changing the voltage at its input. Thus, you can get a shade from barely noticeable to overly bright. This property makes it possible to create many useful things:
- spotlights;
- Street lights;
- night lamps;
- indicators;
- do-it-yourself phytolamps or LED lamps for plants;
- lighting of retail shelves;
- chandeliers.
Country houses on the site subject to registration in 2019
LEDs are used in many areas due to their practical qualities. They are actively used in industry, everyday life, medicine, and preschool institutions.