General information
The meter box in apartments contains a two-wire circuit for connecting electrical appliances. It is simple and contains a supply wire - “phase”, and a discharge wire - “neutral” or “zero”. Modern standards require the use of “grounding” to protect against short circuits. Devices such as a washing machine, refrigerator, electric oven must be connected using a three-wire circuit.
The general designation of the ground wire is yellow-green stripes. To connect the machine, it does not matter which terminal the phase wire is connected to. But it is recommended to connect it from above so that the next inexperienced specialist does not get caught in the current by grabbing the wire from the bottom of the machine out of habit. Before any work, it is required to turn off the input switch, but many electricians perform work under voltage.
Wiring and connection must be carried out by a specialist with appropriate education and approvals. Understanding the nuances of installing some machines is not easy, especially if the consumer decides to install a separate switch for each socket and light bulb. Some organizations can provide a ready-made electrical panel assembly. But in this case, it is necessary to provide for the possibility of installing additional machines in the future if you want to change the overall electrical circuit.
Photo instructions on how to connect machines
- About switchgears and switchboards
- How to check the battery
Bead mat: what are the features
Read here! Modular contactor - main types, installation and connection features. Parameters of modern devices
Which circuit breakers to choose for the electrical panel
The main question that affects many users is: how to decide on slot machines? The rated current of the circuit breaker is calculated based on such parameters as the consumer’s load or its power.
For example. The rated power of simultaneously switched on electrical appliances and the lighting network will be 15 kW. There is a formula: P=U×I, where P is power, U is voltage, I is current. If P = 15000 W, then the current strength will be (rounded) 68 A. This means the sum of the rated values of the machines should not exceed 68 A. But it should be remembered that a three-phase network is connected to the switchboard, so the rated amperes must be divided by 3, which will give approximately 23 A. This means that the input circuit breaker should be set to 25 A.
For lighting networks, it uses 6.3 or 10 A automatic machines. These are generally accepted standards, which are convenient to resort to to save time. If you still have free time, then you can calculate the amperage of the machine for light using the above formula, only P will be equal to the sum of the powers of all lamps used in a separate or common lighting line.
The amperage of automatic circuit breakers for power circuits should not be less than 16 A. It is this nominal value that will allow you to use electrical appliances uninterruptedly for a long time. If you install a circuit breaker with a lower rated threshold, then turning on the household appliance will be perceived by the device as a short circuit on the line and the circuit breaker will turn off the voltage.
There may also be more powerful electrical appliances in the house: hobs, ovens, refrigerators. And if several sockets can be combined into one group, then such devices will require the installation of a separate circuit breaker with a value of at least 25 A. The power of a modern electrical panel can reach 7 kW and higher.
Installation of an electrical panel on the wall according to GOST
When installing the panel, electricians are guided by GOST requirements, according to which:
- the shield must be made of non-conducting and non-flammable material (metal coated with paint or special plastic);
- the door and body of the shield must be grounded and have “ears” intended for sealing;
- the filling of the shield must comply with the requirements of the technical documentation, which indicates the number of protective devices and their rated current;
- the body of the shield must be marked with an electrical hazard sign indicating the rated voltage.
Don't miss: Which gloves are better to choose: nitrile, vinyl or latex
General information on the structure and material of cable cores
Here, the information that many people have is limited only to the difference between aluminum and copper cable. Moreover, it is quite meager and, at times, erroneous. The fact is that aluminum, in addition to its short service life, is also very unreliable. It is enough to bend it several times and the core will break. Its only advantage is its low cost, but this criterion in electrical engineering should be in last place, which means we should stop at copper.
Aluminum wires are quite unreliable
Copper cables and their modifications
Such conductors are ideal not only for assembling distribution boards, but also for any electrical installation in general. However, we should not forget that such cables can be rigid and flexible. The latter are much easier to install, but are more expensive. Another disadvantage they have over rigid conductors is the impossibility of fixing them in screw terminals without prior preparation. We are talking about tinning or crimping with a tip using a crimper.
Such conductors must be crimped or tinned before switching
What to choose: the use of rigid and flexible copper conductors in the installation of a distribution panel
If you look from the point of view of convenience, then during installation it is better to use flexible cables, however, even here everything is not clear. When using rigid conductors, their installation is a little more complicated, but at the same time it simplifies the creation of high-quality contacts on connections with automation and buses, both zero and grounding. In addition, having carefully laid everything once, the master will not return to this work again. But when using a flexible cable, the problem arises of poor-quality connections, which will subsequently begin to heat up, which is unacceptable when assembling power cabinets or lighting panels.
Thus, the best choice for installing electrical panels is rigid copper wire of a suitable cross-section. The use of flexible conductors is permissible only in hard-to-reach places with obligatory tinning or crimping of a section cleared of insulation with a tip.
Preparation of jumpers and connection diagram
Making a jumper in a non-breaking way
The conductors need to be prepared for connection in the panel. To do this, you need to strip the ends from the insulation using a knife or a special tool. The cores should be inserted into contact and tightened well with a screwdriver.
During operation, you need to pay attention to the following:
- The insulation should not get caught in the clamp.
- The exposed part of the wire should not stick out from the contact over a large area. This requirement is made by network organizations that seal meters. This helps prevent illegal connections from outsiders.
- The upper screw is tightened first, followed by the lower one.
The last step is to check the reliability of the fixation. The veins need to be carefully touched and pulled apart. The conductor should not swing or stagger.
Connection of machines
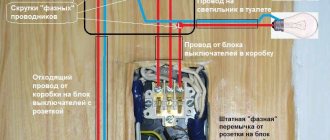
Next you need to connect the neutral wire. It is connected using a jumper from the lower right contact of the automatic two-pole switch to the third contact of the electric meter. The ends also need to be stripped of insulation, connected and tightened with screws. The wires must not touch each other. Be sure to leave a gap between them.
Now you need to connect the outgoing wires from the meter. First, the phase is connected through a jumper to the upper contact of the machine. The ends are stripped and joined. The phase also needs to be distributed among other sources in the directions of the machines.
There should be one contact left from the electricity meter in the apartment. This is the outgoing zero contact, which must connect to the zero bus. Usually it comes complete with a plastic box. Length, dimensions and configuration vary by manufacturer.
The composition of the electrical panel and its design
Composition of an electrical distribution panel in an apartment
The electrical panel is a metal box containing various switching and protective devices. They are connected using wires that have special requirements.
An input cable is inserted into the electrical panel through a special hole. After this, the electrical equipment is connected and the wires are laid inside the panel. The conductors must be connected according to the developed diagram.
A modern home panel includes the following switching and protective devices, as well as other types of products:
- Electricity meter.
- Automatic machines. They are installed at the entrance and to individual groups of energy consumers. Typically, an automatic switch is selected for the entrance, for the lighting group and for powerful electrical equipment in the apartment.
- RCD.
- Diffautomatic machines.
- Timer.
- Voltage and phase control relay.
- Other automation for control and monitoring.
The housing must be grounded, as well as metal doors and live parts. Otherwise, if there is a current leak, the shield will pose a potential danger to human life and health. The shield should be locked with a key to prevent access by unauthorized persons and to prevent electric shock.
What should the wire be like?
The requirements for cable products of any type are determined from the conditions in which they are used and laid. In an electrical panel, due to the limited space during its assembly, there is a need for compact routing of wires. Therefore, during assembly, the wire for the electrical panel is bent in accordance with the diagram to connect the functional elements. This implies that the wire must withstand bending normally, so aluminum conductors are poorly suited for this purpose - they break after several bends. Therefore, preference should be given to copper conductors.
Wires are distinguished by flexibility class, which depends on the design of the cores - monolithic (single-wire) and multi-wire. Solid cores, although difficult to bend, can be directly connected to terminals and screw terminals. In addition, flexibility after installation in the electrical panel is not required.
It is more convenient to work with a flexible stranded conductor during assembly, but there is a significant problem - it cannot be used to connect to terminals and screw terminals, which are used in all automatic machines and other equipment. To connect a flexible wire to such a terminal, you need to either tin the end or crimp it with a tip like NShVI or NShVI2 and the like. If you neglect this, the contact will be unreliable and short-lived.
Taking into account all of the above, we can conclude that domestic wires are suitable for installation in an electrical panel:
- PV-1 (PuV) – single-wire copper core, single PVC insulation, flexibility class 1.
- PV-3 (PuGV) – stranded copper core, PVC insulation, class 2 flexibility - 0.5 to 1.5 mm2; flexibility class 4 – from 2.5 to 4 mm2; Flexibility class 3 – sections exceeding 4 mm2.
- PV-4 - stranded copper core, PVC insulation, more flexible than the previous one, depending on the cross-section, PV-4 has 4 or 5 flexibility class.
There are also foreign analogues - H05VK, Н07VK for 0.5 and 0.75 kV, respectively.
The cross section is selected in accordance with the currents that will flow through the conductor.
It is also worth remembering that there are standard colors for wires according to their intended purpose:
- phase – gray or black;
- zero – blue;
- earth – yellow-green.
In this case, it is necessary to carry out the installation in such a way that there is no sagging of the wire (this especially applies to multi-wire conductors) and unnecessary kinks (this applies to monolithic conductors). To do this, you should determine the required length of the wire in advance, and then cut it 2-3 cm longer to ensure normal insertion of the end into the terminal of the machine.
Connections in the distribution board with the input circuit breaker of a group of consumers are made using jumpers between adjacent circuit breakers; for this you can use both flexible and rigid wire with a single-wire core, but the latter is more convenient, since you do not need to use NShVI lugs. It is better to avoid jumpers altogether if possible and use a connecting bus. It is rigid, the contact will be good, and the installation will be visual and aesthetic.
Finally, we recommend watching a useful video on the topic:
Now you know which wire to choose for assembling an electrical panel in a private house or apartment. We hope the information provided was useful and understandable for you!
Work related to electricity requires a high level of training of the master. An emergency situation can be created by either low-quality components or insufficient education of the electrician, or incorrectly selected wires.
Wire selection
When installing protective devices into the shield, it seems that there is a lot of space left inside, but this is not the case. It will be completely occupied by the wire for assembling the shield and outgoing cables. Therefore, it is necessary to choose wires with a minimum diameter.
This requirement is met by copper conductors, which have a smaller cross-section at the same permissible current compared to aluminum conductors.
In addition, aluminum wires are more likely to break off when connected, so when using aluminum wire to assemble an electrical panel, it is necessary to leave a larger length reserve, which additionally “eats up” free space.
Electrical 380V electricity metering panel for a private house with a 220V socket
In this electrical panel diagram, there is additionally a modular 220V socket (number 7) with an individual protection device - difavtomat (number 8), which combines a circuit breaker and a residual current device. The rating of the RCD must be higher than that of the circuit breaker, for example 40A, leakage current 100 or 300 mA.
Electrical metering panel 380V, with modular socket and automatic circuit breaker, TT grounding
Following this example, where the outlet is protected by a residual current circuit breaker, you can install any other modular equipment, contactors, transformers, etc. to the electricity metering panel, if necessary.
Let me note again that under each diagram there are links, by clicking on which you can read the details, find out the equipment used, and ask questions.
Otherwise, here are the main options that are used when connecting private houses and garden houses to the power grid. And most importantly, such electrical panels are successfully accepted by regulatory authorities and put into operation.
What elements does an electrical panel consist of?
It is necessary to purchase the components of the electrical panel immediately, so as not to subsequently waste time and not travel to the electrical store several times a day. The power of the shield is determined, it is 15 kW, which means that the maximum power consumption will not exceed 15 kW/h.
Electrical panel of a private house, list of elements:
- Electric energy meter. The meter is the first element that must be installed in the panel. The best solution would be to purchase an electronic device designed to connect three phases. Such measuring instruments have high accuracy and a long service life. All information is displayed on a digital screen. Electronic meters can be programmed to operate in several tariffs.
- Electrical shield. Now in stores there are a large number of electrical panels of various sizes and designed for a certain number of elements. The price of the product varies depending on the presence of a DIN rail, a built-in lock, as well as an inspection window (especially for taking readings from the meter). You should pay attention to protection from dust and moisture, its level should be at least IP 54. Dimensions - 445 × 400 × 150, and a wall thickness of 1 mm.
- Input circuit breaker. You should purchase a three-pole machine, because the voltage supplied to the house will be 380 V, which means the presence of three phases.
- Residual current device (RCD). It is required to be installed, since it is a protective element when a dangerous potential appears on the body of an electrical device.
- Circuit breakers. The amperage should be selected based on the consumer load, which will be discussed below.
- Voltage relay. Protects household electrical appliances from power surges. Many users install a relay, but it is not a required element. Also now widely used is the surge protection device (SPD). For example, when lightning strikes an overhead power line, the voltage in the house will reach high limits, which will be destructive for all equipment. The SPD will turn off the network in time, but, like the voltage relay, it is not installed often.
- Measuring instruments. They are also an optional element of the electrical panel. Measuring instruments include ammeters and voltmeters, often combined into one product.
Electrical Panel Components
The assembly of an electrical panel requires the presence of mandatory components, which include circuit breakers, residual current devices (RCDs), electricity meters, buses, as well as additional and auxiliary components that add convenience to the operation of the panel: voltage control relays, light indicators, digital voltmeters, contactors and etc.
Among the most respected by specialists are the manufacturers of components used in the installation of electrical panels - ABB, Legrand, Shcneider Electric. The prices for devices of these brands are approximately the same. Chinese devices are much cheaper, but practicing electricians claim that once you use Chinese equipment to complete an order, you can lose your reputation for a long time, so they use such components only at the request of a customer who cannot afford branded components.
Application of aluminum cables for installation of automation
This option is budget-friendly, which means it will require minimal costs.
But there are features that need to be paid attention to
- The main problem with such cables is the excess of duralumin component in the alloy. This often happens when a manufacturer wants to reduce the cost of production. In this case, the wire cannot withstand even one bend and breaks. These cables are not worth purchasing. It is not difficult to determine the excess of cheap metal in an alloy. You just need to ask the seller to strip about 1 cm of the cable from the outer insulation, then bend one of the cores 180º, and then straighten it back. An excess of duralumin in the alloy will be immediately noticeable - the vein will break. Sometimes it breaks even at the first bend.
- Aluminum is short-lived, so its use is permissible only if the residential premises are planned to be used for a period of no more than 30 years. Most often, after this period, aluminum begins to crumble at the slightest touch.
- When assembling the electrical panel, you should be extremely careful. Don't bend the wire too often. This will lead to weakening at the point of repeated breakage, which can lead to burnout at the slightest overheating of the cable.
- When using aluminum, periodic traction of the contacts is necessary - they often weaken.
This is what inattention when using aluminum can lead to - the consequences of ignoring periodic broaches
Brands of installation wires
The above criteria impose fairly mild restrictions on the wires permissible for use. In actual practice, the following cable products are quite popular due to their parameters and mass supply:
- single-wire first-class flexibility wire PV-1 with vinyl (PVC) insulation (Figure 2);
- stranded wire of the third or fourth (depending on the cross-section) flexibility class wire PV-3, also with vinyl insulation.
- PV-4 stranded wire increased to the fourth and even fifth class of flexibility with a minimum bending radius of five outer diameters, the design of which is shown in Figure 2).
Figure 2. Installation wire grade PV-4
The operating voltage of all listed products is 450 V at a frequency of 50 – 400 Hz, the operating temperature range is from -50 to +70 ° C. The insulation comes in a variety of colors, incl. yellow-green, which is standardized for grounding circuits. An example of such a product in relation to the PV-1 brand is shown in Figure 3.
Figure 3. Mounting wire brand PV-1 for implementing grounding circuits
All of the above wires, due to the appropriate additives in the plastic sheath, correspond to a fire safety class of at least LSZH.
Color coding and jumpers of machines
The color of the shell also plays an important role.
You need to pay attention to this, because black, red, brown, purple, gray, pink, orange, white and turquoise are phase colors. The yellow-green shell indicates that this is a protective or zero protective shell, which can be used for grounding
If blue is added to this color, it is a combined working and zero color. If the wire is just blue, it means the conductor is zero working or average.
Jumpers are installed between adjacent machines. For connection, you can use both single-core and multi-core materials, but the former will still be more convenient - they do not need to be pressed.
To make the right choice of components, you need to take into account the material and calculate the amount of voltage that will pass through the conductor. The cross section and even the color of the shell play an important role. The wrong choice of material can lead to many disastrous consequences, so it is best to delegate the task of creating the wiring to a master who can confirm his professionalism.
Assembling an electrical panel for a private home with a voltage of 380 V and a power of up to 15 kW requires an appropriate approach and the presence of the following tools:
- pliers;
- flat and figured screwdrivers;
- crimping pliers;
- assembly knife with a set of replaceable blades.
All work begins with planning, and if the home owner prefers to contact an electrical company, then a project and preliminary diagram are drawn up before installation begins. You should also prepare the components of the shield and consumables (crimping lugs, heat shrink, DIN rail, dowels).
General principles for wiring in the panel
The switchboard contains all the equipment and mechanisms for connecting consumers to electricity
For its proper operation and safety, it is important to use suitable wires and high-quality parts, because due to a malfunction, users may be left without light, or a fire may even start. The function of conductors in an electrical panel is to connect controllers, indicators and other devices
The entire panel, including the metal casing, must be reliably grounded. Ideally, you should also put a lock on it so that unauthorized people do not have access to the equipment.
The connection must be made in such a way that the connecting wires do not sag. To do this, you need to carefully measure the distance between the connection elements and cut off a few centimeters more so that they can be inserted into the terminals. You cannot save on this, and if the calculations turn out to be incorrect, it is better to repeat the operation.
This is interesting: Nut for connecting wires - markings and instructions for use
Internal content - layout of modular devices
The equipment mounted in the panel is manufactured according to standard unified dimensions. A DIN rail – a metal profile – is used for mounting. The single space occupied by a single-pole circuit breaker is called a module. To calculate how much space is needed in the panel, you should know that a two-pole AV is 2 modules, a three-pole AV is three. A single-phase RCD takes 2 modules, a three-phase one - 4. One terminal block - one module, a counter, depending on the modification, - 6-8 modules.
The shield is assembled on a table, which is much more convenient than on the wall. But you must first install the mount for the shield when it is not yet filled with modules. The implementation of the circuit diagram can be carried out in several ways: linear or group. Regardless of the method, the opening machine always comes first. According to the linear principle, all RCDs are located further, followed by automatic machines. The placement is simple, but the fault is difficult to find. According to the second method, devices are placed in groups: first the RCD, then the machines in its group.
Installation rules must be followed:
- connections inside the panel are made with a wire of the same cross-section as the input one;
- the entrance is located at the top, the exit at the bottom;
- It is prohibited to clamp a stranded wire without NShVI lugs;
- To clamp different conductors in one terminal, use lugs for two wires.
Let's start assembling. We arrange the modules according to the chosen scheme on the DIN rail and secure them with clamps. To make it easier to work, in addition to the diagram, we draw up a plan for the location of the devices. Then we connect them together with wires. We clean the ends; if the wires are multi-core, we insert them into NVSHI lugs of a suitable cross-section. We crimp the tips using KVT press pliers, which are not very expensive. It is this tool that will securely secure the conductors in the lugs.
The use of special tires (combs) will greatly facilitate the disconnection of the electrical panel. They are equipped with flat contacts (pins), which are inserted into the automation contacts, ensuring a reliable connection. Manufacturers of automatic devices produce combs that are suitable in size specifically for these modules; they may not fit others due to differences in pitch.
Basic rules for laying wires
All of the above actions must be performed in accordance with the rules adopted by the PUE. Failure to comply may result in negative consequences, including electric shock and possible short circuit.
Don't miss: How can you paint ceiling tiles? Painting ceiling tiles: choosing paint and tools, surface preparation and painting technology
Primary requirements:
- The input panel, distribution boxes, and meter must be mounted in easily accessible places.
- The wires should not intersect; there must be a distance between them.
- The cross-section of the wire in the panel for connecting automatic devices, RCDs and other products is selected depending on their current load.
- A conductor layout plan should be created.
- Wires should not touch metal parts and building elements.
- All connections in the junction box must be securely insulated.
- Protective and neutral wires are attached to the devices using a bolted connection.
While working, be sure to follow safety precautions. The technician must wear protective dielectric gloves and goggles.
Cable cross-section
The selection of wiring for a wooden house or apartment is made from those available with copper conductors, with a minimum cross-section of 1.5 mm². It characterizes throughput. For such elements, 1 mm² transmits 8-10 A, and for aluminum ones - only 5 A. The calculation of electrical wiring lines in a private house or other building is carried out separately according to the load, after which the cable cross-section is selected.
Watch this video on YouTube
The table shows the cross-sections used for home electrical wiring (VVGng-LS cable).
| Purpose | Section, mm² | Maximum power, kW | Recommended rating of the protective circuit breaker, A |
| Lighting | 3x1.5 | 4,1 | 10 |
| Sockets | 3x2.5 | 5,9 | 16 |
| For electric stove or hob | 3x6 | 10,1 | 32 |
Input wiring to the apartment is carried out with a cross-section of 3x6 mm². Selected by power and current.
The buyer must understand that cross-section and diameter are different concepts. The first is the area of the circle, calculated as 0.785 square of the diameter. This figure is always rounded up when purchasing.
Making electrical wiring | Electrician tips
The main connection methods are twisting and terminal clamps (screw, PPE, Wago, etc.).
There is also a bolted connection, but it is used very rarely.
All of the above connections fully comply with the Rules for the Construction of Electrical Installations (PUE) - all regulatory authorities - energy supervision, energy sales, and electricity supply organizations - are guided by the same rules.
As for twisting, it should be clarified - this means twisting followed by welding or soldering.
note
Let me look at these connections in more detail. Read more “How to connect wires in a junction box - disconnection. Video tutorial.”
Despite the variety of types of electric stoves and their wide range, the connection diagram for an electric stove is almost always standard - for built-in stoves, for stationary industrial stoves, and for household ones.
Almost all electric stoves can be connected to both 380 Volts and 220 Volts.
If you purchased an electric stove and don’t know how to connect it, I will show you how to connect an electric stove using a practical example .
A client just turned up who needed to connect an electric stove.
Continue reading “How to connect an electric stove”
I find the topic of lighting control from two places .
Imagine: you go into a house, turn on the light in the hallway, then go up to the second floor and turn off the light from there. That is, you don’t have to go down to turn off the light! Very convenient, but how to do it?
For this, there are special switches or, more correctly, pass-through switches .
To do this, you need to know the wiring diagram for the pass-through switch .
Important
Now I will tell you and show you how to connect a pass-through switch and assemble its circuit in a distribution box. Continue reading “Wiring diagram for pass-through switch”
I continue the series of lessons on connecting switches and this time I will tell you and show you on video how to connect a two-key switch .
In apartments, such switches are installed mainly on chandeliers; when one button is turned on, the first group of lamps lights up, and another button lights up the second group of lamps.
The number of lamps in groups can be different - from one to 10 or more lamps. But there can only be two groups. Read more “Connection diagram for a two-key switch”
So, the final stage of work after installing the input cable and installing the apartment panel is assembling the electrical wiring diagram, connecting the machines and RCDs in the panel .
As I already said in the previous article , I divided the electrical wiring in the apartment into three groups and installed its own circuit breaker for each group.
Group 1 - automatic machine for 16 A - rooms, corridor. Wire AVVG 2x2.5 (old wiring)
Group 2 - automatic machine for 20 A - kitchen. Wire VVGng 3x2.5
Group 3 - automatic machine for 16 A - bathroom. Wire VVGng 3x2.5
Continue reading “Replacing electrical wiring in apartment-3”
So, the input cable was secured in a metal hose along the entrance wall; fortunately for us, when drilling, not a single wire was found under the plaster)))
I talked about it HERE .
We breathed a sigh of relief and moved on.
Now the task is to think about how the apartment panel with automatic devices will be attached and how to connect the wires from the new and old electrical wiring to it.
Advice
We bought a plastic shield with 6 modules, wall mounting , external design. It would not be possible to build it into the wall since the partition is very thin - only half a brick. But in order to deepen it at least a little, they removed a layer of plaster. Continue reading “Replacing electrical wiring in apartment 2″
When replacing electrical wiring in an apartment, first of all you need to think about the condition of your input cable.
This is especially true if the entire electrical wiring - it is better to put the input cable in order immediately than to do it after the repair.
What does it mean to put things in order?
If the input is made with aluminum wire, it is better to immediately change it and lay a copper cable from the floor panel to the apartment panel or distribution box.
In general, the aluminum wire should be removed as soon as possible and replaced with copper.
It is important that the cross-section of the input cable cores corresponds to the expected load and rated current of the input circuit breaker.
For example, with a load of 7-8 kW, the input must be made with a copper cable with a cross-section of at least 4 sq. mm and the machine must be set to no more than Inom = 40A
Here's how I replaced the input cable in the apartment: Continue reading “Replacing electrical wiring in apartment-1”
note
I want to tell you a case from practice, especially a very instructive case, since I observe this very often.
It all started with a call from a client I knew for a long time; we went to school together.
The woman is very impressionable, naturally she doesn’t understand anything at all about electrics, she calls and, almost wailing, tearfully asks to come and make light for her in the apartment.
From the verbal waterfall that fell on me from the phone, I realized that something terrible and catastrophic had happened... Read more “Woeful electrician or how NOT to install automatic machines”
In houses with PC-type concrete floor slabs (with air channels inside the pipe), it is possible to install hidden electrical wiring inside the slab.
Wires are laid there for chandeliers, lamps, and even lines for sockets if necessary.
Now I will show how we changed the wire going to the chandelier from the junction box. Continue reading “Installation of hidden electrical wiring to a chandelier”
Source: https://ceshka.ru/category/elektroprovodka
Choosing the right wire for high-quality electrical panel assembly
Reading time: 3 minutes No time?
There is quite a lot of information on the Internet on assembling electrical distribution panels with your own hands. However, it is not enough to learn how to do this work. It is much more important to understand how to choose the right wire for high-quality assembly of an electrical panel and connection of protective automation. Today's article will talk about exactly that.
After all, it is vitally important for a home craftsman who is planning to do electrical installation in his apartment or private house to understand what features a particular material for making or modifying a cable has
Choosing a wire modification and its cross-section is a very important task.
Read in the article
Installation and connection
Accepted colors of phase, neutral and ground wire
Before starting work, be sure to turn off the power to the room. Using a tester, it is checked whether voltage remains on the conductors. Using the probes of a screwdriver, you need to touch each core one by one. If the light does not light up, you can start working. It is prohibited to work with electricity turned on
It is also important to prepare tools in advance and provide the master with an autonomous light source
When connecting wires in a panel, it is important to remember that the colors of the wires indicate their purpose. The core can be completely painted in one color or another or have a color mark at the entrance to the device, that is, at the ends of the conductor
The following scale is used:
- Phase – gray, black.
- Zero is blue.
- Grounding – yellow-green.
The wire for installing the electrical panel must be laid in such a way that there are no sagging or unnecessary bends. To do this, the length of each segment is determined in advance with a small allowance of 2-3 cm.
All connections to the machine are made using jumpers. Single-wire rigid wire can be used for this purpose. If possible, it is better not to use jumpers, but to do everything through the connecting core. Thanks to it, the contact will be reliable and the appearance will be aesthetic.
Do-it-yourself wiring in the apartment: from the panel to electrical appliances
In a modern apartment, the number of household appliances that consume electricity is growing every year.
Unfortunately, most of the houses were planned and delivered according to old Soviet GOST standards, which did not require such a large power load.
And in new buildings, sometimes electrical wiring planning is carried out according to the same standards. It is not difficult to guess that residents are forced to lay a huge number of extension cords along the floor.
These strings and tangles of wires not only pose a potential threat, but also expose homeowners to the risk of fires. All plugs are connected in cascade to sockets through tees and can lead to the most common short circuit .
In old houses built during the Soviet era, aluminum cables were most often used. This metal has a number of disadvantages. It exhibits plasticity only in the first two decades of operation.
When current passes through it, chemical processes occur that lead to brittleness. Not only does it become very difficult to twist the wires, but the wire itself can simply break at any moment.
There is one more disadvantage: aluminum is susceptible to corrosion when exposed to moisture and electricity. The wire quickly becomes thinner and can overheat at any time.
Important
Another reason why the owner may want to do the wiring in the apartment with his own hands from the panel to each consumer is modern new buildings , in which everything needs to be done by yourself.
They are rented with bare walls, and before you have the opportunity to live in them, you will have to do a large amount of work, one of which will be new electrical wiring, done, for example, in a hidden way.
Preparatory work
Before you begin installing electrical wiring in an apartment with your own hands, you need to draw up a detailed plan of the apartment, which will accurately indicate the location of the entrance panel, all sockets, switches and junction boxes. planning work in accordance with some rules, which will be given below.
Plan diagram
The diagram should be drawn on the plan of the room in which it is planned to install the electrical wiring. This is done so that some of the sockets and switches do not end up in cold reserve: some will be blocked by cabinets, and some will be out of reach of the wires. So, the sequence of drawing up the diagram is given below.
- It is necessary to depict the location of all objects in great detail and in accordance with the physical location.
- After this step, you need to use some color, for example, red, on the diagram to mark those items that will be powered from the mains. In the place where such equipment will be located, sockets on the walls are schematically depicted.
- The diagram shows the exact location of lighting fixtures and switches that will control the supply of electricity to them.
- Straight lines are drawn within the room along the walls from the sockets, and perpendicular to the walls from the lighting fixtures. In one room, the least distant point is selected, preferably near the corner of the room in which the box will be placed. The box must be marked separately on the diagram.
- All boxes that appeared at the previous stage must be connected to the entrance panel with the same lines. The boxes will carry out local cable distribution within the rooms.
Thus, the distribution of sockets , switches and lighting fixtures with their physical location will be determined.
Based on this, it will be possible to determine the length of the electrical wiring cables.
If problems arise when drawing such a diagram, you can always use software (“Electrician”, “Visio”, “DIA”, etc.) and perform all the work on a computer.
Characteristics of the main elements of electrical wiring
Before you start purchasing wires, you need to decide on their type and cross-sectional area. The latter is determined by the power consumption ratings of devices with a small margin, for the calculation of which you should be guided by special tables.
The most common copper wire core with an area of 2.5 mm allows you to connect a load with a power of 4 kW . For the same load, the aluminum wire will have to be taken with an area of 4 mm. Such wires are most often connected from boxes to sockets.
For the lighting part of the electrical wiring from the box to the consumer, 1.5 mm copper wires are used, which allow connecting a load of up to 3 kW.
Cables designed for high power will be correctly connected to the boxes from the panel in those rooms where consumption will exceed 4 kW, for example, a kitchen in which a kettle, microwave, electric stove, refrigerator and coffee maker are working simultaneously. The copper core should be supplied to such points with an area of 4 mm or even more.
In addition to the power of the electrical wiring, the protective coating is also important. Most often, two types of cables are used : VVG and PUNP (and their varieties). The cables are protected with polyvinyl chloride film and consist of copper cores surrounded by insulation.
The former may have a round or triangular cross-section, while the latter may have a flat cross-section. For internal wiring, it is more correct to use VVG cables, since they are more reliable. In modern apartments, three-core cables are used, one wire per phase, working zero and grounding.
As a rule, all wires are color coded:
- grounding – yellow-green wire;
- working zero – most often blue;
- phase – all other colors, for example, brown or red.
This color variety of phase wires makes it easy to determine the path from a specific machine on the panel to the outlet. The neutral wire and grounding are mounted on the panel in a common bus and, in fact, represent one distributed connection point .
In addition to cables, sockets and switches, you will also need boxes and terminal blocks. They carry out cable routing inside the room from the wires that lead to the panel. In addition, an automatic device and an RCD are installed on the distribution panel. For automatic machines, most often no more than 16 A is used on the lighting line, and for electrical appliances 25 A or 32 A.
Shield installation
It is best to install the shield at the front door. As a rule, in this place a special recess is made for it, and the power cable brought into the apartment is already laid. If there is no such niche, then there are models of power shields that are mounted on the surface.
When connecting internal and external electrical wiring, it is very important to observe the color coding of the wires to avoid confusion. The neutral wire is always blue, the ground wire is yellow-green. Both of these cables are mounted on special busbars.
Advice
All other wires are phase wires and have different colors to make it easier to determine which wire is connected where. The switchboard must have circuit breakers installed for each phase, and the common line must be connected to the RCD.
Before electrical wiring has been installed in the apartment, you must not connect external wires to internal ones in order to avoid electric shock.
Electrical wiring
There are a large number of varieties of electrical wiring methods, but all of them can be divided into two main groups: hidden, on the surface. common methods are described below
- hidden installation methods are carried out: in specially created recesses in the wall - grooves,
- on the wall surface before applying the finishing touch,
- in the niche between the ceiling covering and the horizontal partition,
- on the floor before pouring the screed;
- wall boxes,
Regardless of which method is chosen, a number of rules are always followed. All cables must run strictly vertically or horizontally . There should be no diagonal connections. Thanks to this, even in hidden wiring it will always be possible to determine from the sockets, for example, where the cables run.
Wiring lines that run parallel to the floor and ceiling must be at least 30 cm from the ceiling. This is due to the fact that fastening the ceiling covering or baseboards also requires drilling mounting holes in the wall. You should retreat at least 15 cm from window frames and doors. Electrical wires should not be placed closer than half a meter to the gas pipe.
Device selection
The load on the machine should be less than the calculated one. 10, 16, 20 amperes are in demand. Higher ratings are usually used for boilers, house heaters, and ovens. For standard appliances, 10 amperes are suitable: PC, TV, iron or hair dryer. However, if several loads can be connected to one device, then the resulting value is obtained by adding all the ratings.
It is not recommended to use many devices, sockets, and lighting lamps on one machine. If one link fails, the socket can melt without turning off the fuse. So a 2-amp household appliance can start drawing 5 amps if there is a fault in the circuit board. A circuit breaker rated for 16 amps will not work. Even the insulation on the wires can melt.
Therefore, before choosing a machine, it is recommended to consult with an electrician on choosing the type of protective device. They differ in response speed, purpose of protection, connection, internal structure, number of phases. For installation in a panel, the phase wire is supplied from the side of the fixed contact; the marking is often already indicated on the body of the machine.