Peculiarities
Schneider sockets differ significantly from their competitors in that they are completely dismountable. We will describe each detail separately.
- Metal caliper
Metal socket support Schnider- Has special mounting holes so that you can accurately install several sockets side by side in one block;
attached to the socket separately from the rest of the socket;
- has a metal thickness of more than 1 mm, very hard.
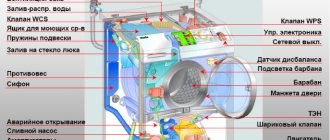
- Socket mechanism.
- Holds the fork firmly, preventing it from accidentally falling out under any circumstances.
Inside are bronze contacts that are resistant to oxidation, guaranteeing excellent connection throughout its service life.
- Overlay (frame). It is made of high-strength heat-resistant plastic and is attached to the socket mechanism with latches. Comes in various colors and shapes
Versatility and practicality
If you have chosen Schneider sockets and switches of the same series for the entire apartment, then you can safely install the supports right away. They are equally suitable for all electrical installation devices. This approach saves a lot of time, because... It is more convenient and faster to install separate calipers than ready-made sockets, and even with connected wires. You simply tighten two screws and the metal frame is securely fixed in the socket box.
Helpful Hint: When choosing outlets, give preference to outlets with grounding. You can plug in any device into this outlet.
Further work is connecting the outlet. Everything happens very quickly. Depending on the model, you either screw the wires into screw terminals or simply push them into screwless terminals. We recommend that you use screwless terminals because... they guarantee proper operation for the entire service life of the socket without periodic tightening of the thread. The mechanism is inserted into the caliper without additional screws, just on the latches
In the same way, the socket cover is placed on the latches, and on top there is a decorative frame with the colors and shape of your choice. No additional screws, nuts or fasteners. Everything is done by hand without tools. Purely. Reliable. Beautiful.
Comments:
Frustrator
Schneiders are my favorite sockets. With any model there is no work, but only pleasure. All contacts, all terminals, bolts, nuts. Everything rotates, secures and latches perfectly. No Legrand was lying around
Danil
Frustrator, that's understandable. If you compare prices, you can't expect anything else. Schneider is more expensive than ABB and much more expensive than Legrand.
Leave a comment Cancel reply
Related Posts
How to connect a three-key switch, diagram, instructions, tips.
Correct and convenient installation of sockets in the apartment
How to assemble a convenient switchboard with your own hands
Installing a socket or switch in a plasterboard wall, brief instructions
Variety in details
Schneider sockets come in various variations that can suit the taste of any interior designer. This picture is complemented by the fact that only Schneider supplies its sockets with a body made of wood, metal, glass, and stone. That is, not plastic stylized as metal or wood, but real aluminum and real steel, beech, glass and slate. And if you didn’t notice it with your eye, then by touch you will immediately understand the difference. You want to use such sockets and switches again and again. However, this only applies to the outer frames. The inside of the sockets is the same heat-resistant plastic, which can be painted in the appropriate color.
In terms of the variety of models, Schneider sockets leave their competitors far behind. Due to the versatility of its parts for all devices, sockets alone can be selected in thousands of different colors, shapes and textures.
Very often, clients ask us which installation products to choose, that is, the sockets themselves, switches, etc. Everyone has different tastes and therefore it can be very difficult to offer something specific. We have to direct clients to specialized stores where sockets and switches of various series and manufacturers are presented on stands. After clicking the keys and reviewing several options on the spot, people calmly choose the models they like.
Today, installation products are available in a variety of designs, colors and, accordingly, have different prices. In this article I want to show the Unica series from Schneider Electric. This is a beautiful and quite reliable product. They are also quite easy to install into place, which I really like as an electrician.
Below you will see photos of the Unica series from Schneider Electric during installation. Also here will be presented the already installed products in their places. Such photographs help to better examine this series and decide whether it is worth buying. I hope you find these photos helpful in choosing your installation products and that I didn't waste my time taking them.
The most common installation products are sockets. They are sold only in single versions and look like this.
The white lids fit snugly but are easy to remove. You just need to pull them towards you.
The contacts at the sockets are very good. They do not diverge when tightening, which makes it possible to press the cable conscientiously. The metal frame that attaches the socket to the socket box is quite thick. It does not play or bend during installation.
A computer socket or Ethernet socket also has a solid base. The mechanism for connecting the FTP or UTP cable is very convenient for installation. Here you need to insert the cable through the hole, unravel the strands, arrange them by color and place them in their grooves.
Excess parts of the veins are bitten off.
Then the connection mechanism cover is closed.
In the end it will look like the following photo. The twisted pair will already be securely clamped and will not go anywhere during the installation of the computer socket in the socket box.
TV sockets have the ability to connect cables in series. Their base is also metal. It is not shown in the photo because it was removed while connecting the cable.
The mechanism for connecting the television cable is made of metal. In order to bring the cut cable into place, you need to unscrew one bolt.
The next photo shows that the metal base is already in place, and the mechanism itself with the cover is hanging on the connected cable.
After installing all the products in place, a frame is placed on top in several positions. The frame is simply placed on top and clicks into place when pressed.
In order to remove the Unica frame and gain access to the sockets, you need to pry it from the side with a thin flat-head screwdriver. There is a special groove there.
In the next photo, one person's name can be seen on the wallpaper under the screwdriver. The surname was hidden under the frame. Guess this last name, write it in the comments and get a 10% discount on complete electrical installation of your apartment in Samara)))
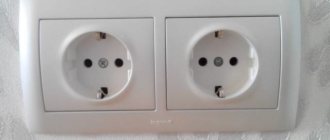
This is what the finished blocks from different Unica series sockets from Schneider Electric look like.
Next is a two-key switch on the reverse side. Here the cables are connected very simply. You just need to strip the core to the desired length and stick it into the hole. In order to disconnect the cable from the switch, you need to press the lever on top and simply pull it. Where the incoming phase is connected is indicated on the mechanism itself.
In two-key switches there is one mechanism for each key. They are not electrically connected to each other. Therefore, here it is necessary to make a jumper as shown in the following photo.
This is what the Unica series switches from Schneider Electric look like. There are switches with and without backlight. Their lighting is very pleasant, blue. In the dark it looks very beautiful and does not catch the eye, unlike bright red LEDs. In the next photo the glow is not visible and the full effect is not conveyed.
What series and manufacturers of installation products do you use?
The need to install sockets is unlikely to raise doubts among anyone. There is such an element in absolutely every home. Hardly a day goes by without this connector being used. In addition, there are electrical appliances that simply need to be connected constantly (for example, the most famous and popular household appliance is the refrigerator). This article will discuss how to install an outdoor outlet.
It is probably difficult to find a person who does not know what an outlet is, but not everyone can carry out independent installation. After all, this work involves a risk to life, so you should approach this matter very carefully. First of all, you need to carefully study the installation technology and typology of sockets.
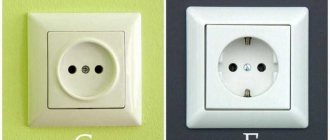
Outdoor socket outlet
- The “rosette” got its name from a similarly named decorative element, which, in turn, began to be called that because of its similarity to a rose. The element was fixed to the wall or ceiling, and over time, any product fixed in this way began to be called that way.
- Today, electrical outlets are used to connect various devices that require electricity to operate. The main feature of the connector is that it provides almost instantaneous access to current. Devices in such a device are easy to insert and remove due to the fact that they have a cord with a plug (or plug) at the end, and the socket has holes for these pins.
- The connector is designed quite simply. It is equipped with a housing (front panel), a base and conductive elements (spring contacts, terminals). It can be fixed both inside the wall and outside (the so-called overhead or external socket, the fastening of which will be discussed).
Installation of external sockets
So, to understand how to secure a connector to any surface, you need to understand its structure. Most often, the installation location for the element is a wall, but installation on absolutely any plane is allowed, including the floor, ceiling, or on an interior item, for example, in a decorative fireplace or built-in closet, as well as outdoors. The main elements of the socket are three components:
- base;
- current-carrying mechanism;
- front panel.
Base
- This is an element that is fixed to the plane, and conductive parts and the top decorative cover are connected to it. It can be made of ceramic or plastic. Each material has its own advantages and disadvantages. Thus, the ceramic part will not support combustion, which is very important when it comes to electricity, and it also dissipates heat perfectly. But its significant drawback is that it is very fragile and should be handled with care, as there is a high probability of damage. It is recommended to install such sockets only indoors.
- Of course, modern plastic may also have non-flammable properties, but be sure to pay attention to this when purchasing, since ordinary plastic very quickly ignites, melts and emits an unpleasant odor, and also releases harmful chemicals into the air (when burned). The non-flammable element is made of polycarbonate with special additives. This material is very durable and does not support combustion processes. Perhaps this is all you need to know about the base, since for the socket it is not the main element and serves only to secure the entire structure to the wall and to connect other elements to it.
Conductive mechanism
- The most important part of the device is the conductive mechanism. It can be made in three modifications: uncoated brass;
- tinned brass;
- bronze.
- There are also varieties in which the brass parts on top have an additional coating. It should be noted that contacts made of uncoated brass are considered the least reliable. This manifests itself in cases where there is an environment of high humidity, and the contact itself comes into contact with aluminum wires. As a result, an oxidation process occurs and the current-carrying capacity decreases.
- Another disadvantage of this material is that after a short time the parts do not spring back well, which looks like a loose socket when used. Sometimes, to prevent this process, manufacturers additionally install spring washers on the contacts, which do not allow the petals to move apart, but keep them together.
- Tinned brass contacts are more reliable. Externally, they look like white matte metal and are less susceptible to oxidation and corrosion. The pins of the plug are secured quite securely in such a socket and do not dangle.
- Bronze contacts are considered the most reliable, but very few manufacturers make this element from this metal. Externally, they have a darker color and their main advantage is that the plug is securely fastened in the connector, since even after a long time they do not become loose, but have excellent spring qualities.
One of the necessary elements of the conductive part of an outdoor outlet is grounding.
Its presence will allow you to avoid many problems, since there are a sufficient number of household appliances for which grounding is a paramount point. Such techniques include:
- heating devices, due to the fact that they generate a lot of power (for example, electric furnaces);
- equipment in contact with water, since moisture is an excellent conductor (washing machines);
- equipment with a complex device containing microcircuits, since such devices are sensitive to static electricity (computers).
The grounding contact almost instantly drains the resulting free electricity into the ground, as a result of which the discharge does not strike equipment or even a person. When purchasing an outlet, be sure to find out whether it has grounding elements. Externally, products without grounding have less depth, and their cost is slightly lower than products with grounding contacts.
The wires are secured in the connector using a screw connection or a special clamping mechanism. The difference between them is that the screws may become loose during use and will need to be tightened to avoid the outlet heating up under increased electrical load. The clamping structure does not require additional effort on the part of users, since it is a self-regulating device, that is, it has the ability to tightly press the wire and ensure reliable contact throughout its entire service life.
Front panel of external socket
- And the last element included in the socket is the front panel. This detail determines the appearance of the product. It is made of polycarbonate, which is a low-flammable material. But this is far from the only choice; modern manufacturers offer products where the front part is made of wood, metal or glass. Thanks to this variety, it has become possible to choose the perfect socket for any interior.
Outdoor socket photo
- The front panel of the external outlet has a special lid that securely closes the device itself and protects it from dust and moisture.
Installation of an external outlet
All sockets available today are divided into two main types of installation: internal (that is, hidden or built-in installation of the product inside the wall) and external, in which the socket remains on top of the surface and usually the wires are also not hidden in the wall, but run along it. In this case, the cable can be installed in a corrugated pipe or in a cable channel. But hidden placement of wires, in special grooves or cavities inside the wall, is also practiced.
- So how do you install an outdoor outlet? The first step is to disconnect the power cable. To do this, you just need to turn off the corresponding lever in the electrical panel. But even after this step is completed, you should definitely make sure that there is really no current. To do this, use an indicator screwdriver to check the presence of voltage in the wiring at the installation site.
- Next, you should disassemble the socket into its component elements. First, the top cover is opened; this is required in order to release the latches securing the front panel to the base. This is done quite easily, usually they are located on the sides, we simply press on them, for example, with a screwdriver (since it must be present during the installation process) and separate the product into three component parts - the base body, the mechanism and the front panel with a cover.
- Then mark the places where the mounting holes will go. To do this, place the base at the installation site, level it, preferably level, and mark the holes for fastening, usually there are two of them, located diagonally, but there may be more, depending on the design. Marks are left on the wall with a pencil or a sharp object and holes are drilled along these marks, or if the base is wooden or into which screws are easily screwed, you can immediately use a screwdriver. Otherwise, fastening is done using dowel-nails.
- Typically, the socket body has an inlet hole closed with a plug. Therefore, before extending the wiring, this hole should be cleared. Different products have different options for such plugs; some manufacturers even offer specially selected sizes for different cable diameters. Having cut out the required size, the cable is pulled into it; if it is in a corrugated pipe, then it should also be pulled out slightly. If you plan to install a hidden cable, then a hole is drilled on the back of the case.
- The insulation of the cable located inside the socket is removed, and the exposed wires (cores) are stripped to about 1 cm. The cores have different colors, in Russia the following marking is accepted: L - phase, usually white or gray wire, but you also need to keep in mind that the phase wire can be of other colors, for example, black, red or brown;
- N - zero, neutral - blue or blue wire;
- PE - protection, grounding, yellow-green in color.
- After the cores were secured in place, it was time to install the current-carrying mechanism into the housing. This is as easy to do as pulling it out, just press it into place and it is securely held on the base.
- The last thing that needs to be done is to install the front part of the product, which is pressed by a special mechanism. Next, connect the electricity and check the operation of the connector.
Manufacturers of outdoor sockets
You should purchase only those products that have all the appropriate certificates and are capable of working efficiently on the territory of the Russian Federation. The price of an outdoor socket varies depending on the manufacturer. The products of the following companies have proven themselves to be the best:
- Jung;
- Legrand;
- Schneider Electric;
Outdoor sockets Jung
- This German company has been known throughout Europe since 1912 as a reliable supplier and manufacturer of electrical installation products, switches and sockets. All products are of excellent quality and the necessary reliability. The elements of each manufactured product have been tested and have the appropriate confirmation and guarantee, which means we can say with complete confidence that such a purchase will last a long time.
- At the manufacturer's factories, such careful control is carried out that not only functionality is checked, but also the paint layer. In addition, 220V outdoor sockets are tested for the number of on/off cycles, and if the indicator does not correspond to the declared value, then the entire batch is discontinued.
- Every year, technologists try to expand the range of products, doing this together with designers who add attractiveness and increase the ergonomics of products. The company's best-selling outdoor sockets include products from the Jung WG 800, Jung WG 600, and Jung AP 600
.
- Some models come immediately in combination with switches. In addition, double sockets for external installation and even triple sockets are produced. The choice of model range is huge.
- The cost varies from 1000 rubles. and up to 7000 rub. That is, you can find a product for every taste and opportunity. At the same time, the price depends only on the functionality and does not affect the quality, since all products deserve attention.
Legrand outdoor sockets
- A French corporation that was founded back in 1866. Today it is a world leader in the production and sales of electrical products. The company has representatives in 70 countries around the world. In 2007, close cooperation with Russia began after the acquisition.
- In our country, products under the “Legrand” brand appeared back in 1980. The official representative office was opened in 1993, along with the start of production of products under the Leten brand.
- The most reliable overhead sockets are considered to be the products “Legrand Urbano” and “Legrand Plexo”
, their cost is approximately 1.5 thousand rubles. — 3 thousand rubles.
ABB outdoor sockets
- The history of the company began in 1988, when the two companies merged into a single corporation. These were the Swiss "BBC" and the Swedish "ASEA", which have been known since the end of the 19th century. The head office of the new merged company operates in Zurich (Switzerland). Sockets and switches are manufactured by ABB and Niessen.
- More than a century of experience of the company allows it to create the highest quality and reliable products; in addition, the product is distinguished by increased safety, which is very important, given that it operates under constant voltage.
- There is also a variety of colors, due to which you can choose sockets for almost any modern interior. The most popular and best-selling products are the Ocean and Busch-Duro
.
Outdoor sockets Schneider Electric
- The company was registered in France in 1836 and has since become a leader in the production of electrical equipment. Several different companies, Merlin Gerin, Telemecanique, including the Russian enterprise JSC Schneider Electric, are united into a single corporation.
- Cooperation with our country began back in 1974, and for 40 years now on the Russian market you can see high-quality and reliable switches and sockets under this brand. The company's innovation was the use of sockets with a special lever to make it easier to remove the plug from the socket. The most popular model is the product of the “Etude”
; the price of such sockets is up to 500 rubles.
Of course, these are not all manufacturers of outdoor sockets; you can also find products under the following brands:
- "Bticino";
- "DKC"
- "Fede"
- "Gira";
- "Merten"
- "Simon"
Externally mounted sockets are usually installed in places where reliable protection from moisture and dust is needed, for example, in the bathroom, kitchen, cellar or garage, as well as on the street, in gazebos and even in the garden. Their main difference is the presence of a protective cover that opens and closes conveniently. They usually have a high degree of protection (IP 55 marking). The lid reliably protects against the penetration of moisture, dirt and other foreign objects.
Such products are not afraid of any weather conditions; they are quite resistant to any temperature conditions, due to the fact that only high-quality materials are used in their production. In addition, installing an external outlet is much easier than a conventional one with hidden wiring.
Almost every room has in its interior an element of electrical equipment such as sockets. You can’t live without them, because whatever you take – an iron or a computer, you need to turn it on somewhere. Due to the ever-growing number of supposedly necessary household appliances, there has become a catastrophic shortage of these same sockets.
In this regard, a certain type of device will be considered below, which is successfully used not only in closed residential premises, but also outdoors in a humid environment.
We will talk about outdoor sockets. They are also called external, for open wiring.
Connection diagrams
There are many schemes for connecting a TV connector. A splitter is used to process the signal. This device looks like a small box and performs the function of signal separation. Just like in telephone lines, when transmitting digital electrical signals, you cannot do without their separation.
The principle of operation of a splitter is to divide the signal into equal packets. Next, the divided segments are transmitted to the input part of the television connectors. The splitter is designed in such a way that all TVs receiving the signal, regardless of their number, will receive a signal of equal quality. As a result, within the same apartment there is no point in having a separate antenna for each TV.
The connection can be made in one of two ways:
- The “star” scheme, when the old cable is removed and the new one is laid through the splitter.
- Daisy chain circuit.
Below we will look at the question of how to connect an outlet, while paying attention to the advantages of the circuits under consideration.
Star pattern
This circuit uses a splitter that performs the function of branching the signal, breaking it into packets and amplifying it. The device is placed at the cable entrance to the living space from the entrance. Next, antenna conductors are distributed to consumers. Installing a TV outlet using this simple technology is most often used, since the splitter provides a number of advantages:
- The cable is located in a technically protected place, which is important both during installation work and during further preventive inspections.
- The signal is stable.
- Separated signal packages are uninterruptedly supplied to all television receivers in the apartment.
Daisy chain connection
This method of installing a TV outlet involves the use of a cable. The main cable is routed to any of the TVs in the house, and then it is routed to other receivers directly at the connector. The wiring is a branch into two or more parts (depending on the number of TVs available).
Connecting in this way is called daisy chain. In this case, the connectors connected by a cable must be feed-through, except for the last one, which is the terminal one.
The daisy chain circuit allows you to save on cable consumption, but it also has disadvantages. The disadvantage of a daisy chain system is that the quality on the first receiver will be higher than on subsequent ones. However, if the television signal is strong enough, the difference will be almost unnoticeable. In addition, one should take into account the fact that modern television equipment is equipped with the ability to amplify the signal, and this happens automatically.
Daisy chain connection via pass-through television sockets
So, the uneven distribution of the signal in this case can be considered an insignificant drawback. Other disadvantages of the loop system include the following:
- The circuit, where there are pass-throughs and a terminal TV socket, will cost more than the standard “star” circuit.
- If the circuit breaks, all subsequent consumers are deprived of a television signal.
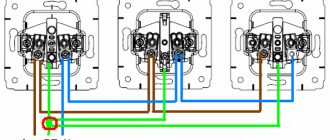
Installation using the example of a Schneider socket
As an example, let’s look at the installation of a pass-through socket from a French one (model socket tv rj45). The task is to connect two TVs to one cable using a loop-through circuit.
When installing a socket for a TV cable, we provide a small excess of the cable itself - it should come out of the installation box. Next, we strip a small section of the insulating material on the cable. At the same time, we keep the central core and shielding braid intact.
We start by removing the front panel and slightly unscrew the clamping bolt. This is necessary to ensure that the cable exits freely through the hole.
There are arrows on the connector body. Insert the cable all the way in the direction indicated by the arrows. Then we press the cable with a clamping screw (tighten it). The cable must be securely fastened, but the screw must be tightened with care so as not to crush the line. We perform exactly the same manipulations with the second end. We install the connector in such a way as to avoid kinks on the cable.
Note! Before installing a television outlet, you should inspect the area where the wire is fixed for the possibility of a short circuit in the main core with the braid.
When the cable is inserted and secured, put on the front panel. The panel is fixed using special proprietary latches. Using a building level, we check the accuracy of the horizontal installation of the connector. If everything is in order, we finally fix the panel with fastening bolts and cover it with a frame.
Degree of protection
There are external sockets for open wiring with varying degrees of protection of the housing from moisture and other substances.
Important! When choosing electrical fittings, pay attention to the IP protection level. Especially if it is installed in a damp room.
Devices with IP 21 protection do not have a housing that is sealed on all sides. The back side is open and during installation it leans against the plane of the wall.
Basically, outdoor sockets with open wiring with a completely closed housing with protection class from IP 44 to IP 68 are intended for wet and other hazardous areas.
Such devices have, as already mentioned, a molded plastic housing, a cover for insulating live parts and rubber inserts for better sealing. All this should protect people from electric shock and fire - inside and outside the building.
Installation procedure for a simple TV socket
Before installing the socket, it is necessary to install a cable (for a simple single socket, the only cable leading from the switchgear). It is masked either in a closed way - under plaster (plasterboard, decorative panel), or openly - on the surface of the wall, in a cable channel. The second option requires external (overhead) sockets.
For a sample, let's take a high-quality product from a French manufacturer.
Socket for connecting a coaxial antenna cable from the famous French brand Schneider Electric. This is a simple (single) module MGU5.462.18ZD, designed to connect one TV
Before installation, use a drill with a round attachment to cut a hole and insert a plastic box (socket box). A cable about 15 cm long should come out of the hole.
The end of the cable should be prepared: remove part of the outer insulation so that the copper core protrudes by about half a centimeter, and part of the shielding braid is also exposed
Next, we disassemble the body of the product into parts.
After separating the front panel, we find the clamping screw that ensures stability and unscrew it a little to make it easier to insert the antenna cable
We insert the cable in the direction of the arrow and fix it with a special clamp, tightening the screw.
Under the arrow there is a small through hole to control the connection of the copper conductor. But for greater reliability, a visual inspection is not enough; to more effectively check the quality of the installation, you need to use a tester
Checking with a tester will eliminate the occurrence of a short circuit due to accidental contact of the braid with the conductor.
Carefully, trying not to disturb the position of the cable, insert the housing into the socket box, fasten it with fasteners and snap the front decorative panel into place. Using a level, level the position of the block
The result of assembly and installation is no protruding wires or unprotected connectors.
The socket block usually represents one long panel, divided into several functional sectors: for connecting a coaxial cable, RJ-45 Internet wire (twisted pair) or electrical cables
Installation of the pass-through module will be slightly different.
Installation features
Sockets for external installation are mainly used in pairs with external wiring: that is, when the wires are laid not in the wall, but outside: on ceramic insulators, in a metal hose, plastic corrugation or plastic box.
Important! Installation in a metal corrugation requires its grounding, which is not always possible. It is preferable to use plastic corrugation.
Such installation, of course, can spoil the interior, but doing wiring this way is much easier and faster. Also, such installation does not require special equipment, for example, an angle grinder and a hammer drill with a crown for socket boxes.
How to properly dismantle a socket
So, having examined the main technical characteristics of sockets and their types, you can proceed to the main thing, how to remove the socket from the wall. To do this you should need:
- small screwdriver with plastic handle,
- insulating tape,
- latex gloves,
- tester.
Here are the step-by-step instructions:
- The first step is to turn off the power to the apartment. In this case, you should check several times that the electrics are actually de-energized. You can use a tester for this.
- Depending on the type of outlet, the decorative cover is removed. It can be secured with screws or latches. Domestic sockets use a screw.
- Then the socket fastenings are unscrewed. If the legs are movable, then when the screw is unscrewed, it will become accessible for removal.
- Carefully pull out the entire structure of the socket and see how the wires are secured.
Note!
If the wiring is old or aluminum, then it is important to be careful not to break the wire. Otherwise, it will be difficult to replace and you will have to build up the wires, which will not have a very positive effect on the overall design.
That's all the instructions for removing the socket. After this, you can hang wallpaper or install a new socket. If you have experience working with sockets, be sure to leave your comments at the end of this article.
Use of high security sockets.
In the case of a completely sealed socket, when the top cover is unscrewed, you will see the internal ceramic part, on which there are contacts and clamps for wires.
This interior can be easily removed, making it easier to connect wires. The main thing to do is to place the case flat against the wall and use a pencil or marker to mark the mounting holes. Now we remove the body and drill two holes for the dowels according to the markings. Most often these are 6*40 mm dowels. Moreover, we immediately insert the plastic part of the dowel into the hole, and screw the metal part into the lid. When the lid is firmly attached to the wall, half the work is done. Next, we connect the wires to the terminals of the internal part and insert it into the already nailed housing. Screw on the lid.