In many ways, the comfort of living in an apartment or house depends on the type and quantity of household appliances and electrical appliances installed in it. The lack of sockets is becoming a common phenomenon, causing the use of many extension cords and tees. These actions help solve the problem, but have side effects - wires get tangled under your feet, additional pads spoil the interior of the room. In some cases, a double socket will help solve the problem of a lack of connection points. Modern products are compact, sufficiently powerful and presentable in appearance. There is no need to invite specialists to carry out the re-equipment of electrical equipment. You can do the work yourself after familiarizing yourself with the safety precautions and the rules for selecting and installing electrical appliances.
When it becomes necessary to install a double socket
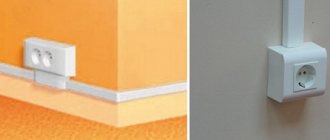
Double socket
In some cases, a socket with 2 sockets is a necessary measure, especially for apartments built in the mid-late last century. Their peculiarity was an extremely inconvenient layout of electrical appliances. In most cases, one of them ended up behind cabinet or upholstered furniture, and the owners had one point at their disposal in the corner of the room. Installing long external pads in such places is neither practical nor aesthetically pleasing. This will lead to the fact that over time a trail of wires will stretch to them that do not fit into the interior. The best solution in such situations is to install double recessed sockets.
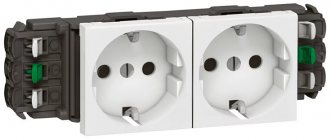
The advantages of this solution are the following:
- The products have one body. There is no need to make inserts and jumpers using twists. The cable retains its integrity after installation and connection of the device.
- Common cover for both sockets. This is not only aesthetically pleasing, but also practical. To install covers when installing dual outlets, you will need to widen the holes in the wall to increase the distance between the mounting blocks. In any case, there will be a gap between the outer linings, which will not decorate the wall in any way.
- There is no need to drill a hole for a double socket box. Double designs fit perfectly into standard glasses in the walls. Their mounting blocks correspond to the dimensions of single products.
- Easy to install. Connecting a two-socket outlet is as easy as connecting a device with one input. The caliper and spring-loaded feet ensure precise positioning and strong fixation of the mechanism.
If the cable has a grounding wire, it is recommended to purchase internal double electrical sockets that have the appropriate contact. It is recommended to ground electrical appliances not only for safety reasons. Connecting this wire will allow you to get rid of the background noise and crackling noise produced by the speakers of household appliances.
How to install a double socket in the house: existing connection options
For maximum comfort and beauty of external walls, it is worth using double sockets. For connecting multiple electronic devices in a room.
Double socket: comfort and beauty in the home
In a room where several electronic devices will be connected at once, there is a catastrophic lack of sockets. To solve the problem, install a double socket.
Firstly, it is practical, and secondly, it is a more attractive option than connecting a filter and other devices. Every year the product is improved and new options are developed using innovations. Therefore, the modern market offers a wide variety of models, which determines the option for connecting devices.
When is it appropriate to use?
When connecting several devices, it is more advisable to use a double socket. This one looks better than two single ones. But it is worth considering that when connecting two electrical appliances, it is worth dividing the power of the electric current by two. Choosing a double socket is a practical solution that will create maximum comfort without harming the design of the room.
Varieties
Sockets are classified depending on their design features:
- Closed and open models. The first ones are recommended for use in children's rooms. The second are classic sockets without closing curtains.
- Options with or without grounding. In the first case, the home owner will provide protection against voltage surges. The devices will be safe and sound.
- Overhead and hidden products. The first ones are installed to replace existing sockets, and the second ones are installed during renovation; their location is planned even when creating the project.
- There are also programmed models, polar or standard. Programmed devices turn on and off according to the set timer. But the simpler the design, the less functionality, the easier their installation. The choice of model directly depends on whether the installation will be done by yourself or with the help of a specialist.
Each type has its own marking, which allows you to choose the appropriate option. For example, “A” indicates that the device is made in the USA, but “B” confirms the presence of a grounding contact. The body of each socket is made of durable thermal plastic. From a decorative point of view, inserts are used; products are made in different colors.
Overhead 2-seater with grounding
The body of this model contains contacts that are necessary to protect electrical appliances. Such an outlet also protects a person from possible penetration of current, which may accidentally end up on the plastic case.
To install such an outlet, no additional renovations are required in the apartment; it can be installed instead of any conventional model.
Double pass-through with lid
The operating conditions of the device also determine its choice. The device case has a lockable lid, which protects the contacts from moisture. This product is marked IP-44. If the socket will be used outdoors, you should pay attention to the product marked P-55. The durable housing protects against moisture and dust.
Indoor installation
Indoor installation requires planning the placement of the device even during renovation work. In such options, the holes are hidden behind curtains, which are moved to the side when connected. Such sockets are grounded, because there may be children in the room. Only when pressed simultaneously, the curtains are activated. Even if you insert a foreign object into the socket, it will not work, so it does not pose any danger at all. This is why closed plan models are so popular among the varieties of double sockets.
How to install and connect?
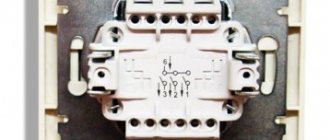
The double socket has one design option - one socket box, a mounting part and two separated terminal blocks.
To install the device you will need:
- Phillips and flat head screwdriver;
- braid cleaning tool;
- electrical tape and pliers.
To protect the cable in case of fire, the wires are installed in corrugation. During subsequent operation, this approach simplifies cable replacement and does not require breaking through walls. The installation process requires preparatory work.
The wires need to be identified. The instructions describe the corresponding color, phase is usually red or brown. Grounding is usually green or yellow. But the blue one is the neutral wire.
But it is better to first check with a special screwdriver, which will light up during the phase. Installation without grounding is much easier.
Connecting an electric double surface
Unlike a single one, this model has one body, but two separated terminals. The first step is to open the cable for which the knife is used.
How to choose a good double socket
Table of degrees of protection
When choosing a product, you should pay attention to the following criteria:
- The size of the mounting box corresponds to standard holes in the walls. It is advisable to install a double socket in one socket box without carrying out additional drilling work to expand or deepen it.
- Degree of protection. For a family with no children, conventional models with an IP22 rating are sufficient. Products with degrees of protection IP33 and IP43 are equipped with curtains that protect the contacts from splashes and penetration of solid objects. For the bathroom and kitchen, it is better to take IP44 sockets, which are not afraid of splashes and streams of water flowing along the wall.
- Contact standard. You should stop at F or C. Products of this type are adapted for all types of plugs and are equipped with a contact for grounding.
Table for calculating the power of sockets based on the energy consumption of electrical appliances - Power. Sockets for 10A (2.5 kW) and 16A (4 kW) are available for sale. It is advisable to purchase a more powerful model to be able to connect consumers such as a welding machine or a washing vacuum cleaner.
- Internal organization. Preference should be given to models that are equipped with a protective cover for the contact group. The terminal tightening screws must be on the outside. This will help to maintain the device without dismantling it. You should choose products with terminals equipped with spring clips.
- Mounting feet. They must be made of thick steel that will not bend when installing the mechanism in the socket box.
- Restriction of access to terminals. It is necessary that each wire has its own hole, which will eliminate installation errors.
The color of the product matters. It is not necessary to take standard white sockets. To decorate the interior in an original way, you can buy products in blue, red, yellow or any other color.
Marking the wall
In the place on the wall where the electrical point is supposed to be installed, you need to make a mark with a pencil. To install a double socket, the design of which has two glasses, you need to measure the distance between the drilled holes. For this purpose, determine the location of the central point of one of the socket boxes, which is located at the intersection of the diagonals. In a similar way, the central point of installation box No. 2 is identified.
Next, at the location where the socket is installed, a recess is made in the wall, the dimensions of which must correspond to the dimensions of the internal part of the product.
Socket layout in the kitchen
In order for the recess to have the correct round shape, you can first make an annular cut using a crown mounted on a drill, after which the material inside the cutout is knocked out with a chisel. The diameter of the crown should be 2 - 3 mm greater than the diameter of the socket. In the absence of a crown, a recess is formed using a drill, drilling several holes and then removing the remaining material with a chisel.
You need to go deep enough so that the mounting box fits completely in the recess without protruding from it.
Brief overview of characteristics and prices
Legrand Valena
The domestic electrical goods market offers a wide selection of socket models with two inputs. Products vary in design, technical specifications and prices.
Most popular products:
- Legrand Valena - grounding, screw terminals, 16 A, IP20, 375 RUR;
- Legrand Valena Allure - grounding, spring terminals, protective curtains, 16 A, IP21, 650 rubles;
- Legrand Etika - grounding, screw terminals, 16 A, IP20, 185 RUR;
- Legrand Quteo - grounding, spring terminals, protective curtains, 16 A, IP21, 220 rubles;
- Legrand Quteo - grounding, screw terminals, water protection, 16 A, IP44, 525 rubles;
Schneider Electric DUET WDE000124 - Schneider Electric Duet WDE000120 - without grounding, screw terminals, 16 A, IP20, 110 rubles;
- Schneider Electric Duet WDE000226 - grounding, spring terminals, protective curtains, 16 A, IP20, 130 rubles;
- Schneider Electric W59 - without grounding, screw terminals, 16 A, IP21, 100 rubles;
- Schneider Electric Rondo RA16 - grounding, screw terminals, water protection, 16 A, IP44, 250 rubles;
- Viko Yasemin - grounding, screw terminals, 16 A, IP20, 85 rub.
The product range consists of mechanisms with white and colored covers.
Preparatory work
The amount of preparatory work will depend on whether the outlet is being installed in a new location, or whether they simply want to replace an old regular outlet with it. Let's consider both options.
Preparations before replacing the outlet
If there is already an outlet at the installation site, it must be removed. This can only be done after disconnecting the outlet from the power supply. After turning off the machine, you need to use the phase indicator to check whether the electric point is really turned off.
Removing the socket
Dismantling the socket is carried out in the following sequence:
- First, remove the front panel by unscrewing the screw holding it in place. Sometimes, to access the fastener, you need to pry off the plastic decorative panel, which is held on by a latch, with a flat screwdriver or knife.
- Having gained access to the inside, unscrew the screws holding the wire strands in the terminals.
Next, all that remains is to unscrew the fastening that holds the base of the socket in the socket box.
Preparations before installing a new outlet
As part of the preparatory work, a wire needs to be laid from the distribution box to the installation site of the new electrical point. To do this, a channel is punched in the wall with a punch - a groove.
When the groove is ready, a wire is laid in it. It is best to place it in a corrugated tube. In this case, if the wire burns out, it can be easily removed and replaced with a new one without breaking the plaster.
Socket outlet
After laying the corrugated pipe with the wire, the groove must be covered with cement-sand mortar.
The wire is connected to the terminals of the junction box after installing the socket.
Now you need to make a recess in the wall in which the new double socket will be placed.
Installation of a double socket
Socket design
To figure out how to install a double socket in a wall with your own hands, you need to study the design of this design.
Conventionally, it can be divided into 3 parts:
- Cable. Depending on the building design, it may consist of 2 or 3 cores. In older buildings, wiring with white insulation is installed. Zero and phase have to be found experimentally using measuring instruments. In new houses, a three-color cable is laid, where the insulation near the ground is green-yellow, the phases are brown, and the neutral is blue.
- Mounting box, in conversation - socket box. It is a plastic cup with holes for wires. The depth of the cylinders is 40 and 60 mm. The second option is more convenient, as it makes it possible to conceal the installation of additional equipment (dimmers, sensors, relays). The mounting box is held in the wall due to the astringent properties of the plaster.
- Housing with lid. The housing is made of heat-resistant plastic. A caliper is attached to it, a tire made of two brass plates forming contacts, nuts, screws and terminals. On the sides there are spring-loaded tabs with position adjustment screws.
To properly assemble the socket, you must have an indicator, a straight screwdriver and a Phillips screwdriver.
In one socket
Double socket in one socket box
This process is not particularly difficult even for a novice master. If the product is manufactured according to international standards for the width and depth of the case, there should be no problems during installation. You need to determine where the phase is and clean the glass of debris. To prevent the penetration of domestic insects from neighboring apartments, it is recommended to seal the channel in which the cable is laid with silicone. If space allows, the bottom of the glass can be covered with felt for better sound insulation.
After the preparatory work, the mechanism is connected to the network, inserted into the installation box, positioned and secured.
In two sockets
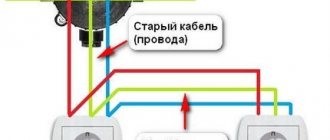
If there are two holes in the wall, in each of which wires are laid, the following solutions are available for this case:
- Insert two devices into them with one socket each. You need to choose them so that the lids do not overlap one another or there is an opportunity to grind them off along the edges.
- Purchase an internal socket with a long cover. Connect two holes into one. After this, you can plug the extra line and insert the mechanism in the middle of the created opening.
The choice depends on the residents' needs for electrical outlets. One option would be to install an outer horizontal block with 4-5 slots on top of the holes.
With grounding
Viko Yasemin with grounding
To obtain a grounding point, you need to purchase an appropriate product that provides a contact for the third wire. In three-core cables it is located in the middle. Connect the ground by tightening the bolt firmly. This line is designed for extreme conditions; poor contact is unacceptable here.
If there is a two-core cable running through the wall, it is not necessary to change it. As an alternative to this expensive process, you can run a single copper wire directly from the panel. For laying, you can use the spaces under the baseboards or colored plastic boxes.
Installing a double socket instead of a single one
When deciding whether to replace an outlet, you need to take into account that a double product has a total power that is distributed to both inputs. If the 16A marking is applied, the total power of consumers connected to the sockets or to an extension cord from one of them should not exceed 4 watts.
It should also be taken into account that due to the spacing of the inlet holes on the sides, the thickness of the double structure will be greater. Because of this, the risk of damage to it by any hard and heavy object increases.
What is a double socket?
A double socket is a device in the form of a plastic case of different designs with a working part. Inside the case there are all the terminals, springs for the plug, contacts, and grounding elements that allow you to remove voltage from the devices and ensure their safe use. Modern sockets are available in the following types:
- French with a third additional pin,
- American, with side slits,
- double socket with cover for installation outdoors or indoors with high humidity levels,
- German with grounding contacts (common in Russia).
The case on the front side in the center has two recesses with holes for the plug pins. A single socket has one recess, a triple socket has 3. On the sides of the recess there are protrusions in the form of metal plates, and on the reverse side there are working elements. The double socket can be installed independently. It is better to plan the installation of electrical accessories during repairs, so that the socket can be slightly recessed into the wall using a socket box, i.e., make it “hidden”. If replacement is required after repair, then you can choose special compact models that are easy to use.
Connecting a double socket is not very complicated; a plastic cup is used for installation, and the structure itself is secured with bolts. First, the socket must be disassembled; first, the frame with the working mechanism is attached, using the previously installed socket box. The top of the structure will be covered with a decorative overlay cover. Before starting work, you must turn off the power to the apartment and take care of your own safety.
Double socket installation sequence
To work with electricity, it is necessary to use tools with insulation that protects against voltage of 1000 V. It is advisable to place a rubber mat with the same level of protection under your feet. Before turning off the electricity, you should check for its presence on the wires running in the walls. This is to avoid doing unnecessary work on a faulty line.
The following is a step-by-step algorithm for installing a double socket.
Dismantling the old device
Removing a used socket is carried out in the following sequence:
- The cover is removed.
- Carefully remove plaster deposits and wallpaper edges.
- The legs are loosened and the body is removed from the glass.
- All that remains is to loosen the contact bolts and remove the cores from them.
1
2
3
4
The old product is thrown away or used for spare parts.
New socket box
Installing a new socket box
If the socket box is rusted or deformed, it should be replaced.
- The wall of the glass needs to be bent inward, grabbed with pliers and pulled out of the hole.
- Insulate the ends of the wire and clear the opening of debris.
- Take measurements and, if necessary, adjust the hole size to the required parameters.
- Insert the wire into the holes in the mounting box, and then insert it into the opening into which putty has been previously applied.
- Place the glass to the desired depth and level it horizontally.
You can continue working when the solution has completely hardened.
Preparing to connect
Before connecting the housing to the line, it is necessary to level the wall and grind off the protruding fragments of the mounting box. Then you need to cut off the worn sections of the wires and remove the insulation from the ends of the wires. If they are copper, you need to solder them. Aluminum conductors are treated with contact paste, which removes the oxide film from aluminum and further protects against re-oxidation
How to connect wires
Connecting the socket
Before connecting the wires, their ends must be shaped so that they fit freely into the contact holes.
The connection diagram is as follows:
- phase - left;
- earth is in the middle;
- zero is on the right.
Fastening should begin from the center, tightly tightening the bolts on each terminal. After this, the cable needs to be shaped into a spiral so that it folds compactly when installing the case.
Final stage
The photo of the double outlets does not show any protruding wires. They are all neatly placed inside. There should be nothing unnecessary under the fastening tabs. Otherwise, the entire insulation system may be damaged. Bend the wires with a regular accordion. The installation is simply perfect in this case.
Then you slowly bury it inside. Everything is fixed using self-tapping screws or fastener tabs. Using a level you can always choose the optimal place. Its auxiliary part is then attached to the installation box.
Never forget that although this is a double outlet, the load on it does not exceed the standard 16 Amps. The load cannot be increased 2 twice after connecting. When turning on a variety of electrical appliances, it is worth remembering these data.
Two single sockets are placed side by side if there is no extra space when working according to the European standard. Study the question carefully so that you can do everything yourself later.
Work on dismantling old devices
Installation of the socket begins either by removing the old socket box and replacing the wires, or by directly installing it in a new niche in the mounting box.
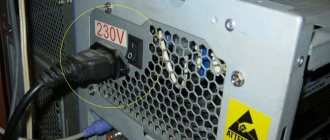
Before you begin directly removing the old outlet, you need to turn off the power to it. Climbing into a current-producing device connected to the network is dangerous to life.
We make sure that there is no voltage. We don’t check it, as some smart experts recommend, with the back of our hand. To do this, there is an indicator, a voltmeter and other devices for checking the presence of current. You can use one of the following, placing their probes correctly on the contacts.
When the device confirms that there is no voltage, we pick up a screwdriver and begin to disassemble the socket. When installation starts from scratch, at a new point, we skip this step and proceed to the actual installation.
First, remove the cover by unscrewing the small bolt located between the two contacts and remove the cover. We unscrew the fastening screws on the sides of the socket box until the “legs” are loosened and the core can be removed. Disconnect the live wires.