Loop creation technology
The loop method is the safest of all options. It involves not simply moving the old outlet up or down, but creating a new “point” in close proximity to the old one.
The main advantage of the daisy chain method is the ability to connect a new outlet, placing it on the section of the wall required for work, and at the same time keep the old one
The only drawback of this connection is that the cable from socket to socket is laid horizontally. Knowing that traditionally the branching to the same switches and sockets is laid in a vertical route, due to your forgetfulness you can inadvertently damage the wire.
In addition, if one of the cores is damaged at the switching point, then all the elements following it will stop working. Therefore, the fewer connection points the system includes, the more reliable it will be.
Selection of required materials
When using this method, material costs are minimized.
In addition to purchasing the newest outlet for work, you need to prepare:
- wire of the appropriate cross-section;
- plastic socket box;
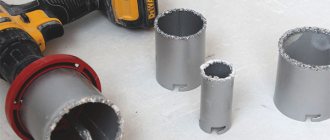
- hammer drill with crown D70 mm;
- indicator screwdriver;
- pliers;
- hammer;
- flat screwdriver;
- braid removal tool.
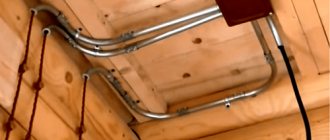
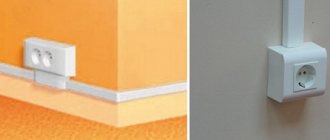
The wire itself does not have to be laid in a groove, but can be laid openly using a cable channel.
To transfer the connection point to a new location and avoid the procedure of wall slitting, it is recommended to use an overhead cable channel model
The choice of socket box model depends on the base material into which it is supposed to be buried. For concrete and brick walls, ordinary plastic “glasses” are chosen, and for plasterboard bases, models equipped with spacer legs are chosen.
Making a niche and installing a socket box
Before moving the hidden socket to another place, you need to prepare a place for installing a socket box and make a groove for laying a section of the electrical network. Having outlined the location of the future connection point, use a crown to drill a hole.
In the absence of one, you can use a hammer drill equipped with an impact drill or a grinder. In this case, holes are first drilled along the marking contour, and then individual fragments of the wall material are chopped off using a chisel.
The depth of the niche is made such that the floor is completely recessed into it, and at the same time there remains a margin of 3-4 mm
A “glass” is immersed in the prepared niche. The electrical cable coming from the junction box is inserted through its back wall.
The socket box is fixed in a concrete wall using gypsum mortar. After the mixture has hardened, the product is cleaned of gypsum residues, and its inner walls are wiped with scraps of fabric. To secure the socket box into a plasterboard or wooden base, the “glass” is immersed in the made niche and fixed using the side spacer tabs
Connecting a new point
Having measured the cable of the required length to power the new point, one end of it is connected to the terminal blocks of the old socket, and the other to the contact part of the new “point”. The neutral, phase and ground wires are connected in parallel directly to the socket contacts.
To prevent short circuits between conductors, each core is insulated with a plastic braid. When connecting the cable, it must be removed. To make the task easier, use a cross-connecting knife, which can easily remove the insulation without damaging the core.
The work of stripping the braid should be done as carefully as possible, because if the core turns out to be damaged or defective, it will certainly “prove” itself very soon.
Neutral and phase conductors are allowed to be connected directly to the contacts of the socket, and the protective PE conductor only through a branch using a terminal block
When dealing with a PE conductor, keep in mind that according to the PUE, it is important to maintain its continuity. Indeed, if the grounding conductor on one of the sockets breaks, all other devices will be ungrounded
Having connected the neutral, phase and grounding conductors, all that remains is to fix the working part of the product in the installation box and install the decorative cover.
Instructions for replacing the socket
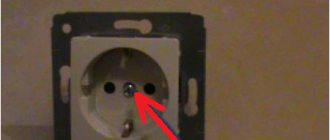
1. Turn off the circuit breaker in the apartment distribution board. Use an indicator screwdriver to check that the machine has turned off. To do this, check the vase; the indicator on the upper contact lights up and the indicator on the bottom contact does not light up.
It is really important to make sure that the power is disconnected from the mains before you start replacing the socket!
2. Using an indicator screwdriver, check the phase in the socket on both sockets. If the indicator lights up, there may be voltage in the outlet. Connect any household appliance and check if it turns on. If it works, then perhaps you turned off the wrong machine and, to be on the safe side, turn off the input machine for the apartment. Check again for the presence of phase in the socket.
Similar articles
Three phases in a private house: connection, diagram and purpose
23.08.2017
Wiring in the bathhouse and steam room: rules and recommendations
28.07.2017
3. We dismantle the old socket, for which we unscrew the screw between the sockets and remove the decorative trim. The socket mechanism can be supported by spacer legs or screwed to the junction box with screws. We remove the mechanism mount and pull it out of the socket.
4. Use a screwdriver to disconnect the wires from the terminals one by one. If there are 3 wires to the mechanism, then one of them is grounding and it needs to be attached to the body of the mechanism, to an additional third contact. Two wires, phase and neutral, can be connected to any terminals and their order does not need to be remembered.
5. If there are 4 or 6 wires coming to the socket, then another one is connected to this socket, which can be located on this wall to the right, to the left, or in another room. The new outlet must be connected in the same way as the wires came into the old one.
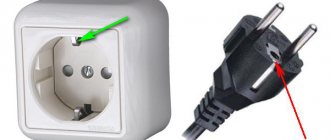
6. We separate the wires to the side and determine the connection points on the new mechanism. The contacts to which the phase and neutral wires need to be connected are designated by the letters L and N. We connect to them accordingly. Grounding is indicated by an icon in the form of an inverted letter T and if you have a ground wire, we connect it to this terminal.
You need to know the individual symbols. Grounding is indicated by an icon in the form of an inverted letter T
7. Install the socket mechanism into the box, carefully tucking the wires into the wall. We make sure that they do not fall under the mechanism and spacer legs. We tighten two bolts along the edges of the mechanism, while the legs move apart and secure the mechanism to the wall. If the paws do not hold the mechanism well, you can place pieces of plastic cut from a bottle or vial under them.
8. We put on the decorative cover and secure it with a screw. We turn on the machines and check the socket.
How to replace a wall outlet
Most owners of not only city apartments, but also private houses have to regularly think about how to replace an electrical outlet. Sometimes this is due to the desire to install something more beautiful and modern, but most often the reason for replacement is the failure of the outlet or its failure to meet modern requirements.
It is not at all necessary that this work be carried out by a professional electrician
Anyone can cope with it if they work thoughtfully, slowly and follow basic safety precautions. And we will try to prove this to you with our story.
How to replace a socket correctly, basic parameters
To avoid unforeseen situations when replacing an old outlet with a new one, you must follow the safety rules:
- The handles of all tools that will be used must be insulated with electrical tape;
- Before replacing an electrical outlet, you need to make sure that the electricity in the apartment is turned off;
- Do not allow the exposed wire to come into contact with the body;
- Before connection, each core in the cable must be checked with an indicator screwdriver.
We hope that our article answered the question of how to replace an outlet at home quickly and without negative consequences. If you follow safety rules, installing a socket yourself will not cause any difficulties. You just need to follow the instructions and be careful when working with electricity.
Completion of installation
The last steps will be installing the cover, turning on the input circuit breakers and checking the socket with a voltage indicator. The checking procedure can be changed - first turn on the machines, check the socket contacts, the functionality of the grounding (if there is one), and then install the cover and decorative strip. This is done so that you do not have to turn off the circuit breakers again, turn off the power to the apartment and disassemble the outlet if it turns out that there is no contact with the wiring.
The last thing you can check is whether the socket is popping out of the socket. To do this, you just need to insert and remove the plug several times. If there is even the slightest displacement, the fastenings must be reviewed.
If everything is normal, then your debut as an electrician can be considered completed - the “creative mess” is eliminated and the replacement of the socket is completed.
Replacing a burnt-out electrical outlet
If there is an electrical outlet in your house that has not broken down, but has not been replaced for a long time, it does not sit tightly in its place, and when the plug of any electrical appliance is pulled out of it, it “tries” to fall out of its socket. This means that you need to completely replace the socket and reconstruct the socket box.
Replacing a burnt out socket yourself.
When the cover of such an electrical outlet is removed, you can see loose spacer legs that are no longer able to hold the outlet in its designated place. It will take very little time to fix the mechanism itself in the wall, however, this will be a temporary solution to the problem, especially if an outlet box was not used when installing this old outlet. In this case, a complete modernization by replacing the socket and installing a new socket box cannot be avoided.
In order to replace the socket with your own hands, first pay attention to how it is fixed in the wall. It often happens that it does not stay in its seat, as a result of which a short circuit in the electrical wiring is possible, which can result in a fire.
Choosing a new electrical outlet
A regular household outlet in Russian conditions should be designed for the following parameters:
- voltage - 220-240 V;
- current – 10-16 A for conventional devices.
If the cable has a grounding conductor, then the socket must also be purchased with a grounding contact. The presence of a grounding conductor is a prerequisite for sockets in rooms with high humidity, when connecting powerful household appliances, as well as units that use water during operation (washing machines and dishwashers).
Depending on the design of the new socket, fastening the wires to its contacts can be done using screws or using screwless clamps.
The screw fastening can be designed for two wire end configurations:
- U-shaped – bend in the form of a loop;
- straight end.
Connecting a socket with loop fastening of the wires will require some time - form loops at the ends of the wires with round pliers, completely unscrew the screws of the clamps and tighten them after inserting the loops. But this design, due to the large contact area of the contacts, ensures a strong and reliable connection to the socket.
It is much easier to power a socket with a screw fastening of the straight end of the wire - the end of the wire is stripped of insulation, inserted into the guide and tightened with a screwdriver.
Electrical sockets with conductors secured in contacts using a screwless method are connected as quickly as possible - the stripped conductor is inserted all the way into the guide of the flat-spring clamp, the configuration of which ensures good contact and a strong connection. Terminals of this design are also called automatic.
Network connection
The working mechanism of the socket is connected to the current-carrying conductors by inserting the ends into the terminals. Since the conductors “ground”, “phase” and “zero” must be located separately in the box, and in the cable they are combined by common insulation, you first need to remove the latter connecting them.
To do this, remove the insulation from the wire cores and cut off the excess ends. Experienced experts advise not to remove the excess, but to leave a reserve of 20 cm and hide it in the socket.
All manipulations must be carried out very carefully to reduce the risk of damage to the cores. If you do not have a special stripper (a tool for stripping conductors from the insulating sheath), you can use a stationery knife or a sharp kitchen knife. Some home craftsmen remove the braid by heating the conductor with a lighter.
The relevant regulatory documents indicate that the marking of cores is carried out in accordance with GOST. Thus, the phase is often indicated by white, zero by blue or blue, and ground by yellow-green.
When working with Soviet wiring, where predominantly white or black conductors are located, the supply conductor must be checked before connecting it to the product. To avoid mistakes, it is often highlighted with a marker.
The final step is to install the outer panel. The cover is connected to the inside of the socket with a bolt in the middle. You should not tighten the fastener too much, so as not to damage the fragile plastic.
To check the strength of fixation of the device, you need to insert the plug of any electrical appliance into it. If the socket is loose, remove the outer cover and tighten the spacer bolts tighter. At the end of the procedure, install the decorative panel, and then turn on the power.
Replacing an outlet yourself is not as difficult as it might seem at first glance
The most important thing is to take precautions and follow the instructions when carrying out the procedure.
Choosing a new outlet
And we continue to tell you how to change the outlet yourself at home. The new device can be selected according to the type of the old one or differ from it in the decor of the front cover.
In the previous paragraph, we disassembled an outlet without a grounding contact. This is a standard case - most of our apartments will not have this third wire. But if in your case it is, then we recommend that you mark it somehow during dismantling - for example, by gluing a piece of electrical tape. But in some cases, electricians take care of you and immediately make it a color other than zero and phase.
If you do not live in a new house, then most likely there is no grounding in your apartment. Previously, only the power cabinet in the building could be grounded. This was due to the fact that equipment requiring such an addition was not produced, and the plugs of all devices were stamped without a “ground”. However, if you changed the electrical wiring to a new one or purchased a wire specifically for these purposes, then the corresponding socket device is purchased.
Even if your home is wired without a ground, we still recommend purchasing an outlet with a ground pin. Although it costs a little more. Why? Grounded sockets have special springs installed that guarantee additional pressure on the plug of the electrical device. As a result, we get a tighter connection of contacts. And this is a guarantee that such an outlet will last longer than a regular one.
Step-by-step dismantling instructions
Working with electricity requires care and caution. When dismantling and replacing an outlet, it is important to follow safety precautions. In this article we will talk about replacing an outlet on a two-wire network. But if you need to replace a grounded outlet, we recommend that you familiarize yourself with this material.
In multi-storey buildings, panels with package switches that cut off the supply of electricity to apartments are located on staircase landings. It is necessary to determine on the dashboard the bag that corresponds to the apartment, and then move it to the upper “off” position.
If desired, you can de-energize only one room in which the replacement will take place. But for this you need to clearly know which of the machines is responsible for the corresponding line.
Connecting and installing a new outlet
Before replacing the socket, we determine where the phase, zero and ground are in the cable. Accordingly, connect the wires and tighten the screws. The cable color coding is as follows:
- The phase is white, sometimes red, gray or black;
- Zero - blue or light blue wire;
- Ground is a yellow-green wire.
Failure to comply with the connection rules can lead to a short circuit in the electrical network. Depending on the type of socket, it can be secured with spacers, dowels or bolts. To ensure that the spacer legs do not interfere, they are fixed with rubber bands.
The installation process for an electrical outlet is as follows:
The electrical tape is removed from the old wires.
- Using a clamping screw, the first wire, the phase, is fixed. The clamp must be strong, otherwise the wire will come loose and the socket will stop working.
- The same is done with the rest of the wires. If the house is old and the wiring is not grounded, the top mount in the outlet is not used.
- At the last stage, the entire structure, which is already connected to the network, is inserted into the socket box. Having installed the structure in the socket box, the bolts are not tightened completely, but only tightened. This is done in order to align the core exactly in the center. To do this, the bolts are tightened one at a time, and at the end the rosette core is fixed with a center bolt.
Connection diagram
Finally, a plastic panel or cover is installed on the socket, securing it with a screw. Check whether the socket is securely in place by connecting one of the electrical appliances. If the panel and the core of the socket do not wobble when you pull out the plug, everything went as it should. But if the socket is loosely secured, you will have to remove the top panel and tighten all the bolts more tightly.
Fix the box in the wall using putty
In order for the putty to better adhere to the wall, to the concrete, you need to wet the concrete. You can do this using a sprayer. It is better, of course, to use special primers, but if they are not available, you can use ordinary water. Then we take a regular spatula, putty and coat the hole evenly on all sides.
Here's what happened:
Now we also coat the socket itself evenly on all sides with putty:
We install a socket box in the wall. We insert the wires into it and, using rotational movements, first push it into the hole, and then turn it a little.
Removing excess putty:
It is imperative to ensure that the socket itself does not protrude from the wall, is flush with it and is well fixed. Once the putty dries, we won’t be able to fix anything. We place the box exactly horizontally and wait for the putty to dry.
Video text
How to replace an old-style socket in an apartment with your own hands if it falls out. How to lengthen a short wire. Channel Your own Master: https://www.youtube.com/channel/UCv8x. #Self-Master#how to replace a socket#sockets#repair
In order to replace an old-style socket from the #USSR era, you need to purchase: 1. #Socket box for concrete walls, 2. 3 self-tapping screws with a press washer, 3. A socket (for convenience, two sockets with one mechanism to get rid of tees).
If your apartment has aluminum wire, then in addition you will need: 1. #Terminal blocks from VAGO with paste, two-wire 2273-242 or three-wire 2273-243 designed for aluminum and copper conductors.2. 30 cm of copper wire with a cross section of 2.5 sq. mm.
Tools:1. Screwdriver2. Side cutters3. Scissors4. Knife5. Screwdriver6. Voltage indicator.
We check the functionality of the indicator, and then go to the panel located on the entrance platform to turn off the circuit breaker.
We check the absence of voltage with the indicator and proceed to dismantling the old socket. First, you need to unscrew the screw holding the socket cover with a screwdriver, then loosen the screws of the spacers of its mechanism. After this, loosen the bolted contacts and remove the socket from the wire.
If the depth of the metal cup is sufficient to install a plastic socket inside it, then we can secure it with several screws in the area of the rear wall, removing the side connecting elements from it.
If the depth of the metal cup is not enough, as in my case, then in addition to the connecting elements, we also remove the back part of the plastic socket box, taking into account the required size. The fasteners can be made with self-tapping screws to the sides of the metal cup at three points.
Instead of metal scissors, you can use side cutters, a sharp knife or stationery scissors to remove the connecting elements of the socket box.
Depending on the location of the wire, it is necessary to make a cutout in the wall of the socket box, taking into account the horizontal location of the mounting holes for the socket. To do this, just cut the jumpers around the hole with a knife. After this, we proceed to remove the back wall of the socket box. All that remains is to remove all the protruding elements around the perimeter of the socket box, which will prevent it from being inserted into the old mounting hole.
If the plastic of the socket bursts, do not be upset, it will not affect anything. The three-point fastening will hold it very well.
When inserting the socket box, pay attention to the horizontal or vertical arrangement of the mounting holes for the socket. The socket box you prepared should fit into the metal cup without much effort. Parts of the socket box that protrude beyond the plane of the wall can be easily removed with a knife
All that remains is to secure the plastic socket box with self-tapping screws and a press washer. The wire rises upward, which means it is necessary to tighten the screws in places away from the wire and into those places in the socket where there are no gaps or cracks, into its solid wall.
Despite the fact that the bolts and nuts of the terminal connections of the socket are iron, and press the wire on one side, we will connect small pieces of copper wire, with a cross-section of 2.5 sq. mm, using VAGO terminal blocks, designed for connecting both copper and aluminum conductors , this will undoubtedly be more reliable. By the way, you can extend a short wire in the same way if its length is not enough to connect an outlet or switch. You will only need 2 of these flints.
To conveniently connect the socket, you need pieces of copper wire 10-12 cm long, from both sides of which you need to remove approximately 12 mm of insulation.
Thanks to the transparent part of the terminal block, you can make sure that the wire has passed its contact. We prepare both pieces of copper wire for installation, and then we prepare the aluminum wire for connection. We cut off the excess part of the wire without insulation and put a terminal block on it, while holding the wire with pliers.
Carefully bending it, we lay the aluminum wire to the back wall of the socket box.
Having connected the copper wires to the bolt terminals of the socket, and carefully bending them like an accordion, we insert the socket into its place, making sure that the wire is not in the way of the socket spacers.
We fix the socket with self-tapping screws from the socket box kit. Sometimes this fastening is enough. But it won’t hurt if you secure the socket with spacers for the socket mechanism.
Replacing an electrical outlet
Replacing an outlet with your own hands is a task that is feasible for almost every owner. To work, you will need a flashlight, ordinary screwdrivers, an indicator screwdriver (with a light bulb built into the handle), which is used to determine the presence of voltage in the network, pliers, a knife, and insulating tape.
To ensure safety when replacing switches and sockets, you need to remember a few rules:
- You can only work with de-energized sockets;
- it is necessary to warn household members about the need to turn off the power at home, so that someone does not turn on the electricity by mistake while work is being carried out;
- You should always work with cotton gloves;
- All tools used must have insulated handles without cracks or damage.
Before you replace an electrical outlet yourself, you must first turn off the power. To do this, turn off the voltage at the distribution panel. Just in case, then check the absence of voltage in the socket using an indicator screwdriver. For ease of work, use a flashlight, which is useful even in daylight.
The first stage of work on replacing an outlet in an apartment involves dismantling the old electrical outlet. Using a screwdriver, unscrew its outer part - the plastic panel.
The main contact part of the socket is located under the frame. It is screwed with small bolts to the socket box located in the wall. Sometimes it is attached to the legs located on the sides. The contact part is also carefully unscrewed and removed from the wall.
Next, disconnect the wires from the socket contacts. In this case, you must remember what color wire was screwed to which contact, i.e. which wire is a phase, which is a zero, and which is a ground. The most important thing with a three-wire cable is not to make a mistake with the ground wire. Most often it is yellowish in color. If the cable is two-wire, then there is no grounding in it.
When the wires are disconnected, their condition is assessed - whether the insulation is damaged, whether the wire itself is burnt out. If everything is in order, then the wires look like new. If the contact is heated, then the ends of the wires are blackened, and the insulation is melted or cracked. When replacing a socket with your own hands, the damaged section of the wire must be removed, remembering that the ends of the cable should protrude from the wall by about 10 cm - you cannot cut it too short. When it is not possible to cut, the tip of the wire is cleaned with a sharp knife. Electrical tape is used as new insulation. Then they begin installing the new outlet. The previous steps are repeated in reverse order: the wires are attached to the corresponding contacts, and the fastening bolts are carefully tightened. (You don’t need to tighten it too tightly, otherwise they may “cut through” the wires.) Insert the contact part of the socket into the socket box and attach the outer panel.
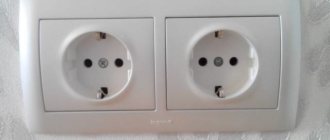
When purchasing an outlet, you need to check its quality. The plug should go in and out tightly, even with a little force. If it dangles and falls out of the socket, then the socket is defective. Its operation can lead to failure of electrical appliances.
Learn more about how to replace the socket yourself in this video:
DIY electrical outlet replacement
When might an electrical outlet need to be replaced? The most common cases are carrying out repair work or replacing an ordinary single socket with a double socket, with a socket block. However, a situation may arise when the socket needs to be replaced urgently:
- the socket heats up when you turn on the electrical appliance;
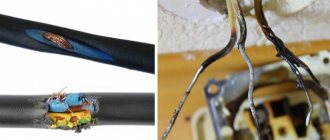
- when operating electrical appliances, the smell of burnt plastic or plastic, melting wires is heard; sparking is noticeable when turning on or working;
- The burning of the inside of the socket is visually noticeable, on the area near the holes where the plug from the electrical appliance is inserted.
All of the above situations can be classified as emergency situations, which require immediate resolution of the issue and replacement of the electrical outlet. Typically, such situations arise when there is a weakened contact in the electrical circuit, a break in the contact wire, or melting of the insulating braid due to excessive electrical load. And it is important to remember that you urgently need to figure out how to change the outlet in the apartment, since this situation will not go away on its own, and ignoring it can lead to a fire or electric shock to the user.
Installing a socket box for a new outlet
Having inserted a new socket into the hole, you should fix it using a solution prepared from a dry gypsum or cement-sand mixture. But it is still better to work with gypsum solutions.
To prepare it, add a dry gypsum mixture to a container with a small amount of water (preferably building gypsum is alabaster, its solution dries out faster) and mix thoroughly. The solution is prepared to such a thick consistency that it can hold the socket in the hole even when not frozen.
Next, a fairly large amount of the prepared solution must be transferred using a spatula into the hole in the wall and evenly leveled along all its edges. Then apply the same solution to the end part of the socket box with a window previously broken in it for entering electrical wires, thread the wires into this window and insert the socket box into the hole. All that remains is to fill the cracks in the hole with mortar and repair any existing damage in the wall.
Having thus completed the installation of the new “glass”, you need to wait until the solution dries and then continue installing the new socket.
To prepare the wires for connecting power to the outlet, it is necessary to remove the insulation from their edges using wire cutters and “bite off” the excess part of the core. In this case, aluminum wire was used for electrical wiring, laid in a wall tunnel. If the length of the wire is excessive, then it is better to remove this excess wire into the tunnel rather than “bite it off”.
If the wire is not long enough, it can be extended by attaching small pieces of new wire to it. But you should adhere to the following rules: extending an aluminum wire must be done using a terminal block, and a copper wire can be extended by simply twisting the wires, and then soldering and insulating this connection.
Connecting and installing a new outlet
Now the replacement of the socket is nearing completion. All that remains is to connect it and fix it in the wall.
Remove the panel from the new socket by unscrewing the central bolt. We insert the bare ends of the wires into its contacts one by one and secure them there, tightening the corresponding contact bolts with a screwdriver.
| In this case, the phase wire is usually connected to the right contact, and the neutral wire to the left. It is better to check the phase of the supply wire before connecting it to the outlet using a probe. The phase wire can be marked with a marker. |
Then the socket is inserted into the socket box, aligned horizontally and secured with lower and upper screws. To avoid distortion of the socket, these screws should be screwed in one at a time until it is securely fixed.
The installation of the socket is completed by installing the panel (cover) and fixing it with the central bolt without applying excessive force so as not to damage it.
It remains to check the reliability of the socket fixation. Insert the plug of one of the electrical appliances into it and pull it out. If the socket is loosely secured in the box, tighten the bolts of its spacers more firmly. With the outlet panel reinstalled, you can connect power to the electrical panel.
We hope that our tips on how to replace an outlet yourself will be useful to you. Well, read, leave comments, ask, maybe something is not clear. For regular readers I posted a video on the YouTube channel. Subscribe for new videos.
Similar materials on the site:
- Grounded socket
- Connecting a three-key switch
- Electronic timer socket
Installing a new outlet in a prepared place
The final stage of this work begins, when you need to install a new socket in a previously prepared place, taking into account that the connection must be carried out according to a certain generally accepted principle - it is recommended to connect the phase wire to the right contact of the socket, and the neutral wire to the left. In this case, the phase wire is preliminarily determined when the power supply in the room is turned on, using a special indicator - a screwdriver. After checking and identifying the phase wire, it is marked with a special marker or wrapped with red electrical tape, and the neutral wire with black or blue electrical tape. Naturally, before connecting the outlet, there must be no power in the circuit.
To install a new socket, remove its decorative panel, unscrew the central fastening screw, connect the electrical wires to the appropriate places; Next, the screws holding the contact groups are securely fastened using a screwdriver. It is imperative to check the surface quality of the contact groups and, if necessary, protect them from corrosion or dirt. The quality of contact depends on this, which ensures reliable operation of the new outlet. If the contact is poor, even a new socket can heat up or melt.
Having connected the contact wires, you need to carefully install the new socket in the socket box, placing the wires in free space and creating as few bends as possible, which allows you to maintain their integrity and reuse them repeatedly when replacing the socket. The socket itself, without a decorative panel, is securely fixed using side screws that compress special fastening tabs in the socket box.
Having fixed the inside of the socket, you need to make sure that there is no wobbling or movement even from a strong applied force. Then decorative panels are applied, secured with a central screw. The socket is ready for use. You can supply power and check its operation by connecting electrical appliances.
How to replace an electrical outlet
Careless handling of electrical energy is extremely dangerous, so replacing the socket must be done in stages.
First, the electrical network from which this outlet is powered must be de-energized. Multi-storey buildings are distinguished by the fact that in the entrances on each landing there is an electrical panel, in which packet switches (so-called package switches) are installed, which, if necessary, can interrupt the supply of electrical energy to a certain apartment. All that remains is to find among them the package that corresponds to the apartment in which the socket is being replaced, and turn it to the “off” position.
If you don’t want to turn off power to the entire apartment, but be content with only turning off power to the room in which you will be replacing the outlet, this is possible. However, you must know exactly where the machine is located, which will turn off only the necessary line. Still, the most reliable option is to cut off the power to the entire apartment.
You, of course, understand that if you completely turn off the electricity in the apartment, it will no longer be possible to turn on the light in it. And sometimes the socket is changed in twilight or darkness (if this needs to be done urgently), so before performing work, prepare an alternative light source, which can be a regular flashlight.
Before attempting to replace an electrical outlet, you must first think about how you will do it. Because to work you will need to prepare the following tools:
- New electrical outlet;
- If necessary, a new socket;
- Straight and Phillips screwdrivers;
- Nippers or pliers;
- Phase indicator.
A phase indicator is an inexpensive electrical measuring device (probe screwdriver) that every man needs to have, since it is often used.
Replacing a burnt out or old socket.
First you need to remove the old socket from the panel. This is done very simply: using a Phillips or straight screwdriver (this depends on what kind of head the bolt has), unscrew the central bolt.
In order to be completely sure that the electrical line is de-energized, it is necessary to check the contacts of the socket using an indicator. Every electrician or person at least a little familiar with electricity knows that one contact of the socket is connected to the phase wire, and the other to the neutral wire. When there is voltage in the socket, touching the phase wire with the indicator, you will see that the light on the indicator lights up.
When you check both contacts of the socket and the light does not light up, then you have truly completely de-energized the line, and you can safely replace the socket without using any protective measures.
Loosen the bolts in the socket contact clamps and disconnect the wires from them. You then need to unscrew the bolts holding the internal spacers of the socket that hold it in the box and pull the socket out of the box. If the socket is firmly seated, you need to carefully turn it in different directions until you can get it out.
After the socket is removed from its installation location, check the presence of a socket box (socket box). If it is not there, then the socket was installed by making a hole in the wall. It is not recommended to install sockets this way, since in this case they are not secured securely. But in the past, this method of installing electrical sockets was most often used - directly into a recess in the wall, without a socket box.
You can also find a metal socket box, which is installed without the use of mounting bolts. Fastening of sockets in such socket boxes is carried out using spacer mechanisms of the socket. This is also considered an unreliable fastening.
Then you need to try on a new standard socket box. It's good if the hole fits it. When the socket box does not fit into the hole, it is shortened - its back part is cut off. If this is undesirable, widen the hole so that the socket box can fit into it without being deformed during installation.
Perhaps the old socket was installed with a metal socket
Then it is carefully removed from the hole, trying not to significantly damage the wall, in order to avoid further repairs to the wall. If you couldn’t remove the socket without minor damage, don’t worry - they will be hidden under the panel of the new socket
How to replace a socket with a new one
One of my friends called me and asked me to make an outlet. They say the problem is that the socket is old, wobbly and constantly falls out of the wall when the plug of an electrical appliance is pulled out. According to her, I realized that a complete replacement of the socket with reconstruction of the socket box was needed. When I came on call, I actually saw an outlet that needed repair, so I decided to write about how to replace the outlet with my own hands.
When I removed the socket cover, I saw that the spacer legs were loose and no longer held it in the socket. You could, of course, try to fix the mechanism itself in the wall, but this would only be a temporary solution to the problem, especially since there was no socket box in the wall. Here a complete modernization was needed with the replacement of the socket and installation of a new socket box.
So, how to replace the socket yourself? First of all, you should pay special attention to the mounting of the socket in the wall. After all, it often happens that it simply falls out of its seat. And this is fraught with a short circuit in the electrical circuit, which can even lead to a fire.
Let's look at the steps of replacing an electrical outlet . Before starting work on replacing the socket, it is imperative to disconnect the electrical network that powers it. In multi-storey buildings (usually on landings) panels with packet switches (packet switches) are installed, interrupting the supply of electricity to apartments. Find the bag that matches your apartment in its upper compartment and move it to the upper “Off” position.
You can, of course, de-energize only the room in which the outlet is to be replaced, and not the entire apartment, by turning off the machine responsible for the corresponding line. But to do this you need to know where it is exactly. Otherwise, the most reliable option would be to cut off power to the entire apartment.
It is clear that if you turn off the power supply to the apartment, you will also lose lighting. Therefore, if you have to change the socket in conditions when it is twilight or already dark outside, you should stock up on an alternative light source, for example, a flashlight, in advance.
You should think in advance about how to replace the socket if necessary. Since for this you, of course, will need a new socket (and, possibly, a socket box), as well as a simple plumbing tool (straight and Phillips screwdrivers, wire cutters or pliers) and a phase indicator. By the way, this simple and inexpensive electrical measuring device in the form of a test screwdriver is needed in everyday life quite often and therefore it’s a good idea to have it in the house.
Dismantling an old outlet begins with removing its panel. To do this, unscrew the central bolt in it, using a Phillips or straight screwdriver, depending on the type of its head.
To make sure that the line is truly de-energized, use the indicator to check the contacts of the socket. A phase wire is connected to one of them, and a neutral wire to the other. If the socket is energized, then when the probe touches the phase wire, its light should light up.
If there is no such indicator light when you touch both contacts of the socket, it means that the line is de-energized, and you can operate the socket, essentially, with your bare hands.
And only after making sure that there is no power supply can you continue working. Loosen the bolts of the socket contact clamps and free them from the wires. Unscrew the bolts of the socket's internal spacers that hold it in the box and pull the socket out of it. You may first have to turn it several times in both directions.
Having pulled out the socket from the place where it was installed, we discover in this case that the socket box (box) is missing. That is, the socket was simply installed in a hole made in the wall. This installation of the socket is incorrect and its fastening is unreliable. However, this can be found quite often in old houses.
Often there are metal socket boxes that do not have mounting bolts. Therefore, sockets are attached to them only with the help of their own spacer mechanisms. This way of fastening the socket is also very unreliable.
Next, you need to take a new standard socket and try it on the hole. In this case we see that he has completely entered it.
If the socket box does not completely fit into the hole, it should be shortened to the depth of the hole by cutting off its back part. In some cases, it is necessary to widen the hole to the size of the socket box so that it does not deform during installation.
If there is a metal socket in the hole, it should be carefully removed, while avoiding significant damage to the wall, in order to avoid repairing it in the future. Minor damage will be hidden by the panel of the new outlet.